PROJECT
Making beautiful boomerangs – part 2

John Cryderman

Find more Toys / Puzzles projects
This is the final part of our two-part article on making laminated boomerangs.
In the previous issue we covered selecting lumber, cutting it into strips, steaming them and bending the strips to shape in your mold.
My favourite glue for boomerangs is a two part epoxy mix of 50% hardener and 50% base. Unlike the water-soluble glues, the epoxy can be used with wood that may have a higher moisture content (8% or even up to 15%) and still glue-up very well. Epoxy is also the best choice to stand up to moisture and severe temperature changes while the boomerangs are being used outside.
Making beautiful boomerangs – part 2
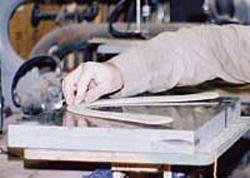
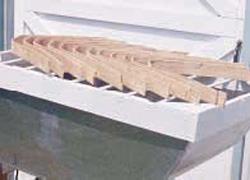
Before placing your glued hardwood strips into the mold, wax the surface of the mold that comes into contact with the strips, using your fingers or a cloth. Give your mold a coating of wax each time you use it for gluing your strips (photo 1 – left).
Any quality paste-type wax will work well. Without this coating of wax your glued strips would adhere to your mold. With the wax coating, all that is necessary is a light tap with a hammer to remove your striplaminated hardwood blank (photo 2 – right) from the mold after the glue has cured.
I found it best to slowly clamp the strips together to about 75% of the total clamp pressure. Don’t fully clamp the strips, because if the adhesive is still a bit watery you may squeeze all the epoxy out from between the strips and weaken the lamination.
Once you feel the epoxy has become good and tacky, continue to squeeze the strips together. Generally I allow the epoxy-glued strips to cure over night. When the temperature is cooler, allow extra time for the epoxy to cure. A good way to test the degree of curing is to poke the epoxy with the tip of a sharp nail; if you can puncture it, the epoxy hasn’t cured.
Cutting Your Mold Blank to Obtain Multiple Boomerang Blanks
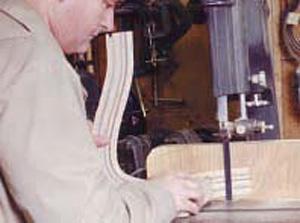
Take the bonded hardwood strips from your mold by giving it a tap to loosen your blank away from the mold. The 1 ½” or 2” thick blank has to have both surfaces leveled. A table saw can be used for this but I have found it very hard on the blades. Using a table saw also makes it a little more difficult to prevent twisting during the cut. Instead, level the surfaces on the bandsaw (photo 3) with a custom fence about six to eight inches high. Another option is to level both blank surfaces on your jointer – being careful to remove only about 1/16” on each pass over the blades.
Once you have trued your thick boomerang blank, slice it into thinner blanks suitable for a boomerang. The thickness can very from ¼” (6mm) to ⅜” (9mm). For this project try ¼”. You should be able to get four to six boomerang blanks from your laminated stock (allowing for the blade thickness and any inaccuracies in your cuts). If the thinner blank is not exactly the same thickness throughout, don’t worry; this will not affect its flight. However, if you do want consistency in thickness then a thickness sander works very well. Do not run your blank through a thickness planer because you would be planning against the grain and it would blow your blank apart.
Profiling Your Boomerang
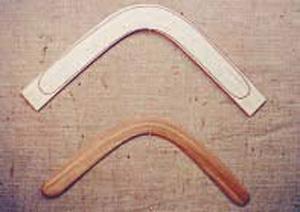
Using the pattern (fig. 1) provided, cut out the boomerang pattern, then trace the desired shape onto your strip laminated blank (photo 4).
Trace the pattern and cut it to shape on your bandsaw. Once the shape is cut, contour each wing to resemble an airplane’s wing. Because there are right and left hand boomerangs, (fig. 2) be careful that each wing is contoured in the right direction for either a right or left hand thrower. Profile the boomerang wings on a pneumatic drum sander.
Profile the boomerang on a pneumatic drum sander (photo 5).
If you cannot contour the wings accurately enough on the drum sander, or if you don’t have a drum sander, you can profile them with a wood rasp. Although rasping is a little slower, using one often improves the symmetry of each wing. This is a good time to do some inlay work with exotic inlays if you want to dress up your boomerang (see “Inlay in Minutes” Dec/Jan 2002).
Sanding
Once the boomerang is cut out and profiled, sand it smooth, using an open grit sandpaper to prepare the new wood for a finish. Use quality sandpaper up to 320 grit. Early in my woodworking years I would sand my new wood to the point where it was like glass (almost burnishing it), and then wonder why my stains or finishes wouldn’t apply properly. Later I learned that stains couldn’t penetrate this hardened surface. I have not had a great deal of success with the oxide papers (generally a brown or orange colour) without the grit coating. They clog and I have experienced the grit falling off onto my work. I have had great success with the silver coloured, aluminum oxide paper that has a grit coating. You can sand your project without having the paper gum up. This paper is available in various grades. Although they are initially a little more expensive, in the long run they are cheaper because they have a longer sand life, and they provide better finishes.
Sealing and Finishing
I generally use a readily available sanding sealer compatible with my spray-on lacquer. To create a very nice finish try the following: one or two coats of sanding sealer simply rubbed on with a soft cloth; leave it to dry; sand with 0000 steel wool; and complete with two or three coats of lacquer spray. To prevent bubbles/fisheyes in your lacquer coatings, do not use steel wool products that are processed with oil. Lacquer dries rapidly and applies nicely in a spray. To gain better control of your spraying, purchase a spray handle made for spray cans for $3 or $4. This spray handle fits conveniently on any spray bomb.
To obtain an even better finish, use fine steel wool or fine sanding paper between 4-6 coats of lacquer and then apply the final finish. You will be amazed by this hand-rubbed finish. A simple and quick method I use is exterior varnish or urethane mixed with boiled linseed oil and paint thinner. Until you become familiar with this type of mix it’s probably best to mix small amounts at a time (say, ⅓ of the recommended amount). This is a mix that can be rubbed on and fine finished between coats. Although it takes longer it will produce a finish equal in appearance to the best fine European hand rubbed finishes. It will be something you can be proud of.
Tuning Your Boomerang
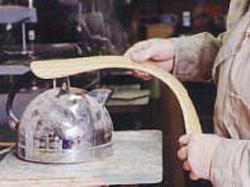
Although tuning a boomerang is not like tuning a violin or guitar, some boomerangs do require tuning in order to return to the thrower. These include boomerangs that have a shape other than the traditional “V” shape. The only tuning necessary for the boomerang shape featured in this article occurs during the making of it, before applying the final protective coatings. I always use a kettle for steaming (photo 6), which produces just the right amount and intensity of moisture and heat.
All facts of science, which explain how aircraft fly, apply to most boomerang shapes. The more the boomerang shape differs from the traditional shallow “V” shape, the more likely it will require tuning. With the more circular shaped boomerangs the wings have to be steamed upwards and twisted; that is to say, the wings have to be given either a positive or negative dihedral (inclination/angle from true horizontal). The wings must also be adjusted with a negative or positive angle of attack – just like an airplane. In addition, both wings have to have the right proportion of wing width to their length (wing aspect ratio) in order to fly and return.
Once the wing has received enough heat and moisture through the steam I’ll twist the wing. Holding it over a high intensity cooling fan will quickly dry that portion of the wing so that it remains in the position it was bent. When making more circular shaped boomerangs check for proper wing twist.
Some competition boomerangs have to be a certain weight and thickness. For these I use a special scale for weighing each boomerang and a vernier scale (measures fine adjustments) for measuring boomerang wing thickness. However for this project, your “V” shape boomerang, tuned during the making, will stay tuned for a long time.
Throwing Your Boomerang
Throwing a boomerang requires a slight breeze. Do not practice throwing in a strong wind. Stand so the breeze is blowing in your face. If you are a right-handed thrower, hold the boomerang with the flat part of the boomerang away from you. Turn to the right, away from the oncoming breeze. Tilt the boomerang to one o’clock and throw straight out, parallel to the ground. The boomerang will fly straight, and then make a large swooping circle to the left, and come back to you. If the boomerang lands too far in front of you then throw a little more to your left. If the boomerang lands too far behind you then throw a little more to your right.
The inside surface of the boomerang mold must be waxed to prevent the glued layers of strips from sticking to it.
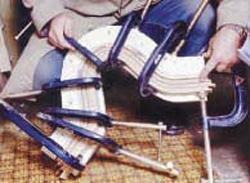
A typical mold with strips fully clamped.
The easiest way to level the sides of the glued-up blank and to cut the blank into boomerangs is with the bandsaw.
Trace the outline of your boomerang onto the boomerang blank.
Tune the boomerang wing for proper lift by using a kettle to steam it and twist the wings slightly.
Checking the boomernag for proper wing twist after tuning it.