PROJECT
Making beautiful boomerangs – part 1

John Cryderman

Find more Toys / Puzzles projects
This is the first part of a two-part article on making laminated boomerangs.
Making boomerangs is a fascinating hobby. It combines the construction of geometric configurations and the strip lamination process to make an object that flies away from the thrower, for up to 150 yards, in a wide sweeping circle returning to thrower’s feet, like a well-trained falcon.
Making boomerangs through steaming and strip laminating is a rewarding and satisfying endeavour. By your own hands, you create a finely tuned instrument that will perform for you beyond your wildest expectations. In addition, the process of construction can be peaceful, serene and satisfying.
Boomerangs are truly unique and with modest, easy-to-do inlay using exotic woods, they become exquisite pieces of woodworking art for your home, office or for sale.
Your hobby can become a second income in addition to being an enjoyable learning experience. Because you can use virtually any and all woodworking techniques, this type of project never becomes boring – it actually invites one to learn more about wood and woodworking in a pleasant and enjoyable way.
Boomerangs are like fingerprints – there are probably no two alike. And, like mathematical equations, there is no end to the number of shapes and sizes of boomerangs. The largest boomerang I have made was 152 cm (about five feet), which produces a massive sweeping flight pattern. Unfortunately it would take an entire day’s energy just to throw it one or two times – nonetheless it is impressive.
The smallest I ever made was 7.5 cm (about three inches), which flew and returned. The smaller one was not very impressive because it was really difficult to see from any distance when I was throwing it myself and I’m sure people watching may have thought I was swatting mosquitoes or had some other problem.
Although boomerang construction is really not difficult, it does involve all facets of woodworking, from the forest to the finished product.
Making beautiful boomerangs – part 1
Selecting the Proper Trees and/or Lumber
Making beautiful strip laminated boomerangs begins by selecting the proper woods with the best steam bending qualities. Strength and appearance are also important. I have found the best domestic woods to use are walnut, white oak, ash, most of the hickories (shagbark, red and shellbark hickories), black locust and honey locust, plum, some species of Hawthorne, apple and both white and red elm and cherry – although to a lesser degree.
For optimum results, freshly cut wood is the very best. Generally, anything between 22%-38% is great for steaming and bending. If fresh cut wood is not available with high moisture content, then it is important that the wood is air dried instead of kiln dried, since kiln-dried wood will not bend well.
When selecting freshly cut lumber from the sawmill or when selecting a log, it is important to try and select a trunk that has as few knots or twists as possible. I purchase a log and have it custom cut to acquire the desired grain pattern for steaming. I also have the log custom cut because most mills cut their logs flat-sawn and these boomerangs need quarter-sawn lumber (Fig 1).
If you are buying wood from a lumber store, getting wood that has been quarter sawn may be difficult, since it is too expensive for lumberyards to deal with quarter-sawn material. But don’t discount the possibility – rummage around at the lumber yard and you can sometimes find the odd quarter-sawn piece. The custom cut or lumber-yard search is worth it though, because the quarter-sawn material, air-dried and freshly cut, is necessary for optimum steam bending results.
Cutting Your Wood Strips
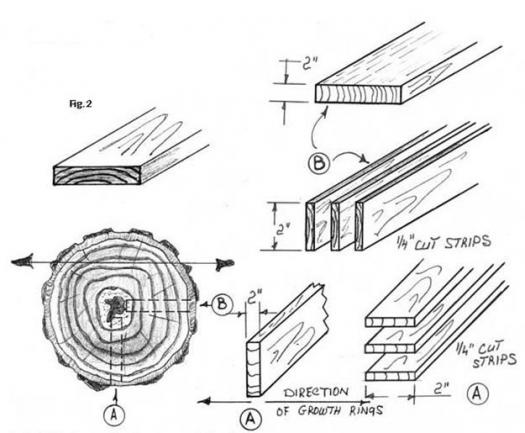
Once you have a suitable board (approximately 2” thick) the ¼” strips of lumber to be steamed are cut from the quarter (or radia) sawn board. The ¼” thick strips of lumber have the growth rings running from top to bottom and the face grain is shown on the side (Fig 2). I use one of two methods to cut the ¼” thick strips, either on the table saw or on the bandsaw using a proper fence guide and a four-tooth-per-inch blade.
Making the Boomerang Plywood Mold
One of the fun parts of making boomerangs is making a mold to bend and clamp your hardwood strips into after steaming. I use ¾” fir plywood to construct my mold. I currently have about 180 molds representing a variety of boomerang shapes and sizes.
Since the hardwood strips used are generally 1 ¾” to 2” high by ¼” thick, the height of the plywood mold clamping wall needs to be 1 ¾” or 2”. Depending on the height of your strips you can build your mold from three layers of ¾” plywood. To know the size and shape of your mold you’ll have to determine the size and shape of the boomerang(s) you’re going to make.
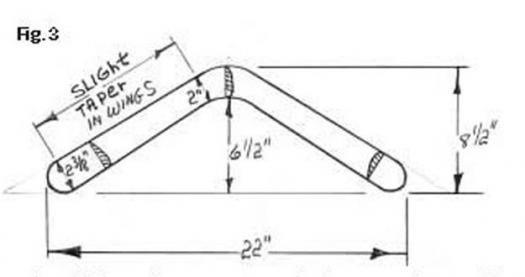
Note the boomerang sketch (Fig. 3) showing a traditional shape that does not require any tuning (steam twisting of the wings). It is an impressive 22” (or 56cm) from tip to tip and produces a beautiful 50-yard (45 metre) circular flight.
Trace the shape and size of your boomerang onto your plywood, allowing about 2 ½” in width for each plywood layer. These will represent the back or wall portion of your mold.
You have the option to glue and screw each layer of plywood or just screw each layer together to build your mold wall. Once your three layers of plywood are fastened together, use a vertical drum sander to create a smooth, squared surface on the inside of your mold.
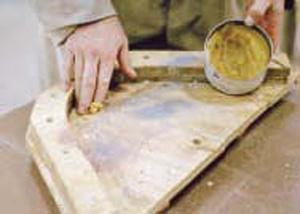
When your three plywood pieces are fastened, sanded smooth and squared, you can attach your mold wall to a plywood base. Since most adhesives have a degree of “creep” (sliding between pieces of wood when clamped together) the ¾” plywood mold base will stop the wood strips being clamped into the mold from being glued unevenly. It will also stop them from protruding beyond the bottom of the plywood mold.
Molding the Boomerang Strips
Once your hardwood strips have been taken from the steamer, bent and clamped to shape in your mold, you wait. You need to wait overnight for most of the drying to take place. For best lamination results your wood should be dried to approximately 6-8%. One of the essentials of good laminating is having a moisture meter.
Nothing too elaborate is needed. I use a less expensive model with two sharp prongs that penetrate the wood just enough to get a sufficiently accurate reading.
Moisture meters are simple to use and quickly pay for themselves by saving time and preventing laminating problems that would arise out of trying to bond wood that is too wet.
Sometimes in an area with high humidity it isn’t always possible to achieve the ideal moisture content. In that case, I use a couple of methods to finish drying the strips (after they have dried sufficiently to hold their shape). One method is my custom made portable drier (photo 3) consisting of a furnace fan, duct work with take off on top (to hook to my hot air duct) and a wood grate fitted on top to support the hardwood strips. Although somewhat crude, this system works very well during the months with low humidity and dries my strips within 45 minutes. That allows me to finish my work the same day I started it. Unfortunately it will not work that well during the high humidity days, because all you end up doing is blowing moist air over the strips. However, operating this device in a small humidity controlled room will work well.
A second method I use for drying materials during the humid months is the utilization of my small storage room (6’ x 8’). In this room I have installed a small air conditioning unit that not only removes the moisture from the air but also drops the temperature. This, coupled with a small fan for air circulation, works well for getting my wood strips dried to the desired moisture content. It usually takes only one night to remove enough moisture from the air, and subsequently from the wood, for best gluing.
In the event you try this method and it is still a bit slow drying, you can add a dehumidifier to your drying room.
In the next issue we will continue the article on making boomerangs and you will learn how to glue-up your steam-bent strips in the mould, cut out the boomerang blank, shape it’s profile, apply a finish and learn how to throw it like an expert.
Steambending
When we steam wood with a high percentage of natural moisture we are actually boiling the moisture in the wood to increase the pliability of the wood for easy bending.
Generally, when wood dries below 22% it becomes increasingly difficult to effectively steam bend. Once wood has dried to an even lower moisture content, all the steaming in the world won’t put back the original quality and quantity of natural moisture. Only to a degree can moisture be permeated back into the wood fabric. This is why green lumber is best with the second option being to use air-dried stock.
I use a custom-made steamer that has safety features installed. It consists of a 10-gallon steel drum with a 220-volt, 3000-watt heater element (screw in base type) fitted at the bottom of the steel drum. It takes just a short time to bring the water to a boil, producing all kinds of steam necessary for good steam bending.
The top of the drum is fitted with two copper spouts that allow me to connect two lengths of radiator hose. Also on the top I have fitted a filler hole with a screw on cap. The grey box on the top is a timer and automatic shut off. In the event the water boils below the heating element the timer shuts off and turns off the power source. If the heating element continued heating without being submerged it would burn out quickly.
Also, in the event I leave my shop and forget to turn the steamer off, it will automatically turn off once the water boils down to a certain level. Once again safety is so important with woodworking.
Lastly, at the very bottom of the drum I have a small drain to let the water out when finished my steaming. If water is allowed to remain in the drum, the drum will soon rust.
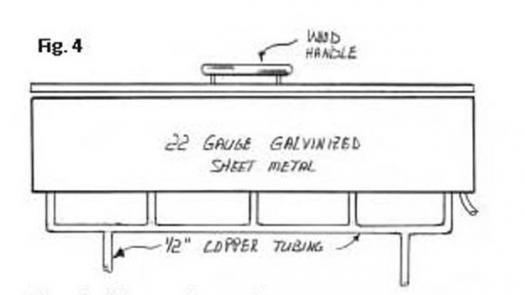
In steaming various lengths of wood strips from 20 inches to five feet I have made various size tin tanks as featured with the steamer. It is important that the steam is given every opportunity to permeate evenly inside the tin steam box. The sketch illustrates how the copper tubing from the radiator hoses is designed to allow the steam to be distributed to the total length of the steam box.
It is also important to allow the steam to draw similar to a chimney. I always allow the steam box lid to remain partially opened. This creates a good change of steam and allows the hot air (which always rises) to better circulate around the wood strips than out the top it goes. At the bottom of the tank and at one end I have incorporated a small drain to allow the water collected inside the tank to drain. It is important to angle the tank slightly so the water will direct itself to the small drain.
Although timetables exist for how long wood should remain in steam for best results, you will find the more you steam the more your intuition will be your guide. Intuition is a better guide. Wood density is always inconsistent to varying degrees, even from the same tree and, because of this, the steam penetration time will change.
In general, when your strips are placed in the steam box with the steam in full motion, usually15 to 20 minutes is sufficient for our ¼” thick material. It is important not to over steam. You can actually achieve a point where you “boil your wood dry”. Bending then becomes difficult.
Be sure when placing and removing the strips from the steam box you wear quality-insulated gloves for hand protection. It also makes it easier to hand bend the strips – usually 7 or 8 to be bent together – and place in the mold for clamping to shape. The width of your boomerang wing will determine the number of ¼” strips required.
This diagram shows the direction of the grain and growth rings in quarter-sawn boards, as well as the location it is cut from the log. Notice how the growth rings run from side to side of the piece of lumber, as shown on the end of the board, and that the face grain is well displayed on both sides.
This diagram shows the direction of the grain and growth rings in quarter-sawn boards, as well as the location it is cut from the log. Notice how the growth rings run from side to side of the piece of lumber, as sown on the end of the board, and that the face grain is well displayed on both sides.

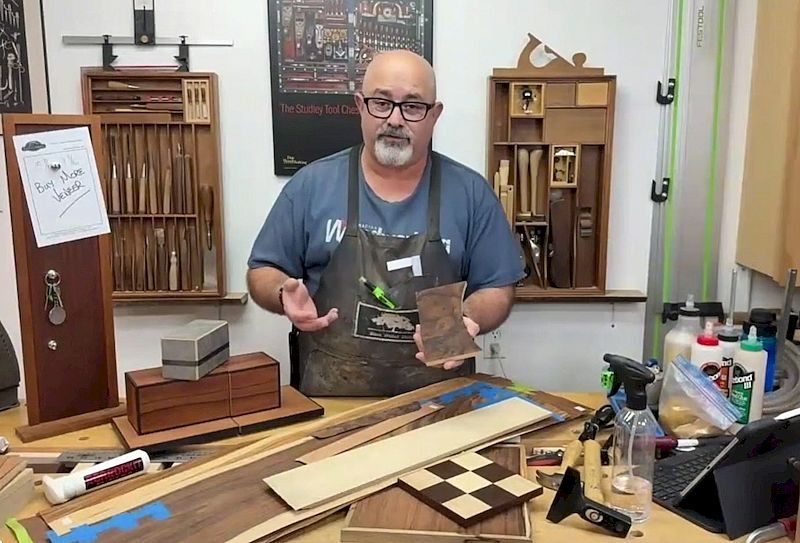
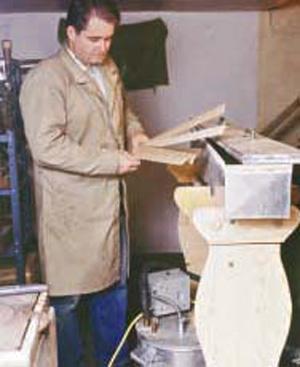
The author examines the timber for radial cutting. Normally, many sawmills will not radial or quarter cut logs because of the waste material created.

The 1/4" thick strips are cut from the quarter-sawn board as shown.
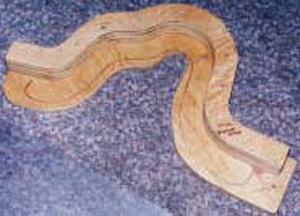
The boomerang mold is used first to shapre the steamed wood strips and then to glue the strips together.
A straight forward boomerang pattern that is easy to make as your first boomerang.
A custom-made dryer shortens the time it takes to properly dry the molded strips before gluing them together.
The author prepares wood strips for the steamer.
The author's homemade steam box.