FROM ROB'S BENCH
I have the power!

Rob Brown

Blog for April 23, 2026
We all have our favourite parts of woodworking. My favourite thing to do might be adding texture to wood. Right behind that is power carving.
When you think about it, power carving is essentially adding texture to wood, but just not on as tight or focused of an area. Power carving usually leaves you with an undulating surface that, when you brush your hand over it, is just texture on a larger scale.
Back in the day
Before I dove into power carving head first, I had absolutely no idea what it was. I figured it was some sort of carving chisel that you plugged in, but common sense told me that likely wasn’t the case.
Power carving revolves around a number of different general approaches. Likely the most common approach is to use a power-carving disc on an angle grinder to remove material from the workpiece. There are a number of companies that produce these discs, but the main two are Kutzall and Arbortech. Kutzall generally makes cutters that have thousands of tiny (or medium-size, in the more aggressive discs) sharp nibs on their faces. Some discs even have nibs on their edges so you can cut with the edge of the disc. Arbortech products generally have a few large, sharp carbide cutters on the disc’s face or edge. I find Arbortech products do a good job removing large amounts of material, while Kutzall products do a good job fine-tuning the surfaces. This is a very generalized statement, though.
Another approach to power carving involves some sort of rotary tool, like a Dremel, equipped with a small burr. Kutzall is the company I usually purchase these sorts of burrs from, but there are others as well. The Kutzall burrs generally have the same small nibs on their faces as their larger carving discs have. Other companies’ products often have small cutting edges. As you can imagine, these smaller cutters remove material much more slowly than the larger discs and are usually used for more intricate details.
There are other miscellaneous tools and attachments that can also be used for power carving, but the discs and burrs are by far the most common.
Where can this be used?
You can power carve any surface of wood you’d like. Creativity can be applied in a large way. If there’s a flat surface on a project you’re working on, you could add power carving to it. You could use a carving disc to heavily shape the face of a solid wood door or a cabinet gable. You could use a burr to add a small power-carved area to the surface of a drawer front or a table rail on a hall table. In fact, there’s nothing wrong with first using a power-carving disc to shape a workpiece, then using power carving burrs to more finely shape those surfaces.
A drawer front or door rail can be power carved to reveal an integrated hand pull, for instance. Or maybe you are a nature lover and want to power carve a large maple leaf to use as a shelf or tabletop. Carving through different laminated wood species can also provide a strong visual effect.
There’s a certain amount of common sense that needs to go into designing with power carving. Adding some deep grooves and angled surfaces to the top of a coffee table might look great, but it might make balancing a coffee mug on it very difficult
Is this safe?
I’ve heard some folks say how incredibly safe power carving is. I’m not sure I’d go that far, but I would say it “can” be safe. Protecting yourself is always good to do while working in a shop, but this is especially true when power carving. Everything from steel toe footwear and protective eyeglasses to a dust respirator and hearing protection should be used. I also use snug-fitting gloves and almost always wear a face shield when I’m doing any sort of power-carving operation.
But protecting yourself isn’t enough. Knowledge and good technique are critical to staying safe while power carving. Learning from a knowledgeable instructor and practicing on simpler projects are both important factors that speed the learning curve and help keep you safe.
One important tip I give everyone is to allow the tool to work at its own speed, rather than pressing it into the material too forcefully. Some cutters remove material faster than others, and that fact needs to be respected.
The second tip I give to anyone who will listen is to take breaks, especially if you’re working with a disc and angle grinder. It can be surprisingly tiring, and if you get tired there’s a much higher chance something will go wrong. Even resting for 30 seconds now and then to not only rest your hands, but to also stand back and check on your progress, is time well spent.
Join me next week
I’ve power-carved ginkgo-shaped serving dishes and serving bowls, waves into cabinet gables, a 6′ long feather that was turned into a top for a chest, a 4′ wide ginkgo leaf for a table, a small maple leaf that I used for a shelf, and many, many more items.
It seems there’s a lot of interest in power carving, as I’ve conducted a few webinars on the subject over the past year and still get lots of requests for more. I did a power carving webinar a few months ago, which can be viewed for free on our website. I’m putting on another free webinar next Wednesday that will be a continuation of the previous webinar. Folks really want to see me actually power carve, as opposed to just talk about the tools, safety and the overall potential of the topic, so that’s what I’ll be doing. I’ll spend most of my time in PPE, making lots of dust and noise, though I’ll be stopping regularly to take questions and rest. I might even get into sanding and finishing, if I have enough time. I’m looking forward to it and would love to see you there.
Free Webinar
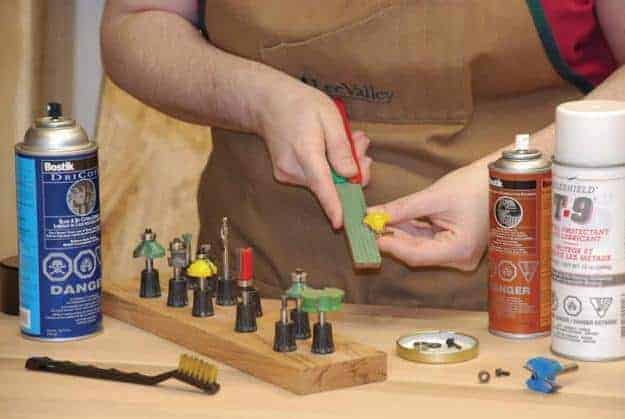
Power-carving discs and angle grinders remove the bulk of the material in a power-carving project. Join me next Wednesday while I put these discs, as well as many other power-carving tools, to work during my webinar.