PROJECT
Craft a frame-and-panel urn

Mark Salusbury

Find more Featured projects , Gifts / Crafts projects
A cremation urn is a special object that speaks to the person whose remains it will contain one day. Making one allows you to customize it to further suit your loved one.
Thought should go into the design and materials of a cremation urn so it becomes an extension of the person’s presence in life, and a reminder of their personality and tastes. Exotic, plain or rich-looking, the only requirement is that the urn must have an internal volume nearing 200 cubic inches.
My design produces an attractive urn; a tasteful statement for proud presentation or display in any setting. By adjusting the dimensions of this design, you could easily create canisters, boxes, lamp bases and a host of other projects.
The build is simply frame-and-panel assemblies and two brass dowels. Precision, patience, thoughtful choice and careful preparation of materials produce stunning results you’ll be proud of.
Craft a frame-and-panel urn
One bit set does the trick
Possibly the most versatile router bit in any collection is the adjustable tongue and groove bit set. Uses include creating frame-and-panel joinery, cutting dadoes, tenons and rabbets, tongue and groove joints for assembling panels like tabletops or flooring, and routing recesses for inlays, among others. Its strength is how easy it is to finesse the placement and spacing of the cutters in 0.002″ increments for perfect-fitting joints for any application, adhesive or wood species. And by accessorizing from a host of budget-friendly cutters or spacers, it can be customized to further enhance its creative possibilities.
Breakout and templates
First, cut all the frame parts to final dimensions, making extra dimensioned stock to test set-ups and to check fit. Mark all the less attractive faces “in”, placing them down when routing for consistency and appearance.
Next, make the templates to shape the arches in the top rails and the panels. Templates are easily created from 1/4″ sheet stock and are used to first trace each shape onto the part, then used to guide a piloted flush-trim router bit once the template has been temporarily attached to the part with double-sided tape. Even though the shape is relatively close, there needs to be a separate template to shape both the lower edge of the upper rails and the tops of each curved panel. Because this urn is wider than it is deep, four templates need to be created.
Rout the curves
Trace the arch shapes onto the top rails, rough each out on the bandsaw, then bond the template to the rail with double-sided tape to rout a crisp profile with a flush-trim bit.
When cutting downhill the finished surface should be smooth, but when routing uphill there may be some tear-out. Removing as much waste as possible with the bandsaw, and moving slowly when routing the curve, may improve the outcome. But rout too slowly and you’ll risk burning the routed surface.
Groove the parts
Cut all the grooves along the inside edges of all of the frame parts using the adjustable tongue and groove bit mounted in a router table. These grooves will accept the panels. The single two-wing × 1/4″ cutter should be set exactly 1/4″ above the table.
Adjust the fence so the front edge of the pilot bearing and the router table fence are flush with each other.
It’s possible to rip many of the grooves on a table saw, but you’ll run into problems when it comes to ripping the grooves in the curved rails. One set-up on the router table will take care of all the grooves.
Because the rails are so small, the safest way to rout the grooves, especially within the arches, is to gang each pair of rails end-to-end, joined on top by a strip of wood bridging the two. The parts can be bonded to the strip of wood with a piece of double-sided tape. This approach allows you to keep your fingers clear of the cutter, while also providing stability while machining. Neither the table’s fence nor hold-downs can be used in the arch-shaping cut; the only reference point will be the pilot bearing, so care and control are important.
Time for tenons
Next, shape and size all the tenons on the ends of all parts as required, again using the adjustable tongue and groove bit set. This time, start with two 1/4″ cutters spaced apart exactly 1/4″ using the pilot bearing and the supplied shim washers to perfect the fit of the tenon in the grooves. I keep the fence halves quite close to the cutter so the part is well supported as it moves past the cutter, guided by my mitre gauge with a wood backer block, eliminating blowout.
Assemble the top and bottom frames
With the grooves and tenons formed, dry-fit the top and bottom frames together and once satisfied, glue these assemblies up, ensuring squareness as clamps are applied.
Panels are next
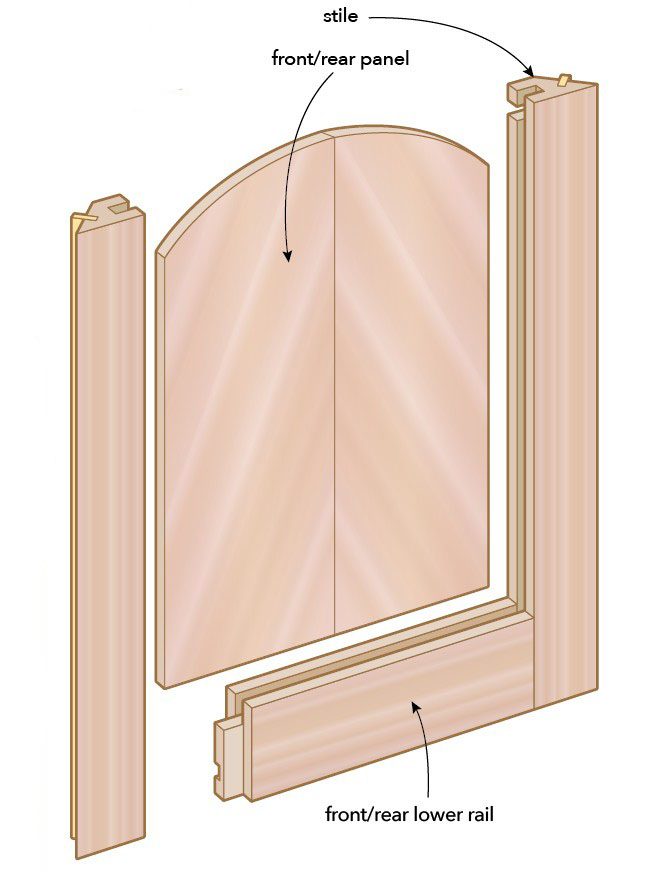
Shifting gears, I create the four central panels. Here’s where a statement can be made by using attractive pattern, figure or book-matched assemblies. I used solid wood, though laying up veneered panels, with figured or exotic wood or a veneer match, is also an option. I made the panels slightly oversized, then used the template to guide a flush-trim router bit. Next, I rout the tenon framing each inner panel using a panel raising router bit, then ease all the edges and detail the panels.
Slip the panels into the frames to test their fit. Once pleased with the fit, sand and prep for the glue-up. Glue these assemblies together, checking for squareness as clamps bring the assembly together firmly. If you decided to make the panels out of solid wood, only apply glue to the centre area of each rail to allow for seasonal movement. Veneered panels can be glued in around their perimeter.
Bevelled corner joints
I bevel the stiles with a fine cut ATB table saw blade set to 45°. When machining bevel joints I prefer leaving a small amount of material to be trimmed at the router table with a 45° bevel bit and fence, creating a clean, perfect angle while leaving a hairs-width shoulder along the outer edge to be chamfered away after final assembly. You may want to skip the router table operation and just machine the finished bevel joints on the table saw.
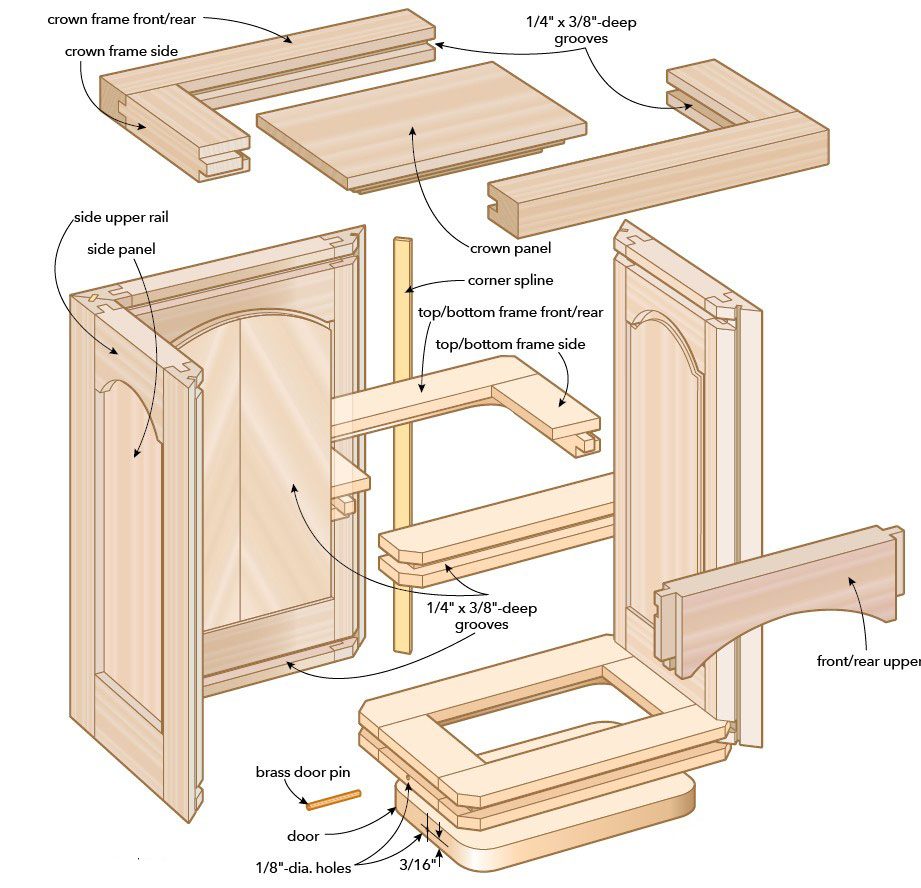
Next, rip a slot the length of each bevel to receive a spline, using a 1/8″ ripping saw blade. From the same stock the stiles are crafted from, make 1/8″ × 3/8″ splines to fit the 3/16″ deep slots. Just be sure the splines aren’t too wide for the joint to fully close.
The top and bottom frames
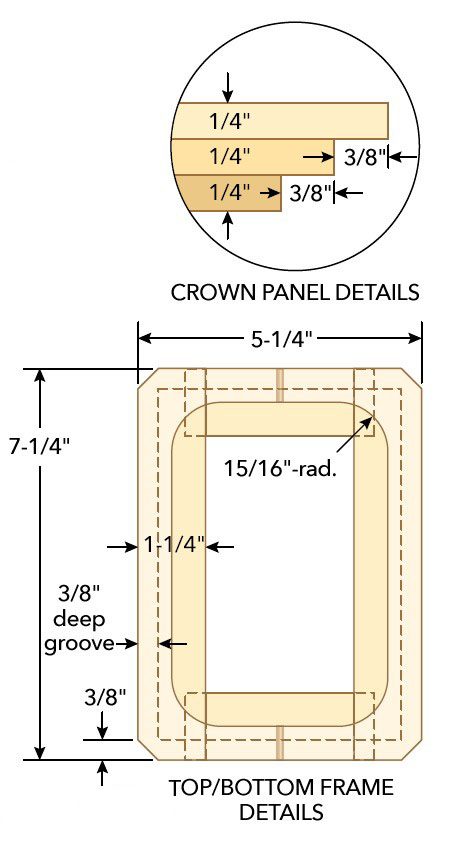
Machine the grooves across the top and bottom of each panel that are sized to accept the top and bottom frames. Rout a 1/4″ wide groove 1/4″ up from the end of each panel frame assembly, again using the adjustable tongue and groove bit set with a piloted single 1/4″ cutter.
Now, without changing the router set-up, turn to the top and bottom frames, routing external dadoes all around each, just as the inner dadoes were formed, making sure the inner face of each frame is down toward the table for consistency.
Dry-fit the four side panels around the top and bottom frames, add the splines, then label mating corners of all parts, eliminating guesswork during final glue-up. Because the four corner splines will interfere with the assembly of the top and bottom frame to the two sides, front and back, machine a 45° notch on each corner of the top and bottom frames. The exact dimension will depend on where exactly you machined the spline grooves, but for me the notches were 3/8″ from each corner.
Door panel
There’s a door panel that allows the user to access the inner cavity of the urn. When the ashes are placed inside the urn, this door can be held shut with a pair of brass pins. The 1/2″ thick door panel sits in a 1/2″ deep rabbet in the underside of the bottom frame.
Although the top frame doesn’t need the same rabbet machined into it to accept the crown frame assembly, you could always add it anyways and select the best one for the lower frame, as it will be more visible during handling.
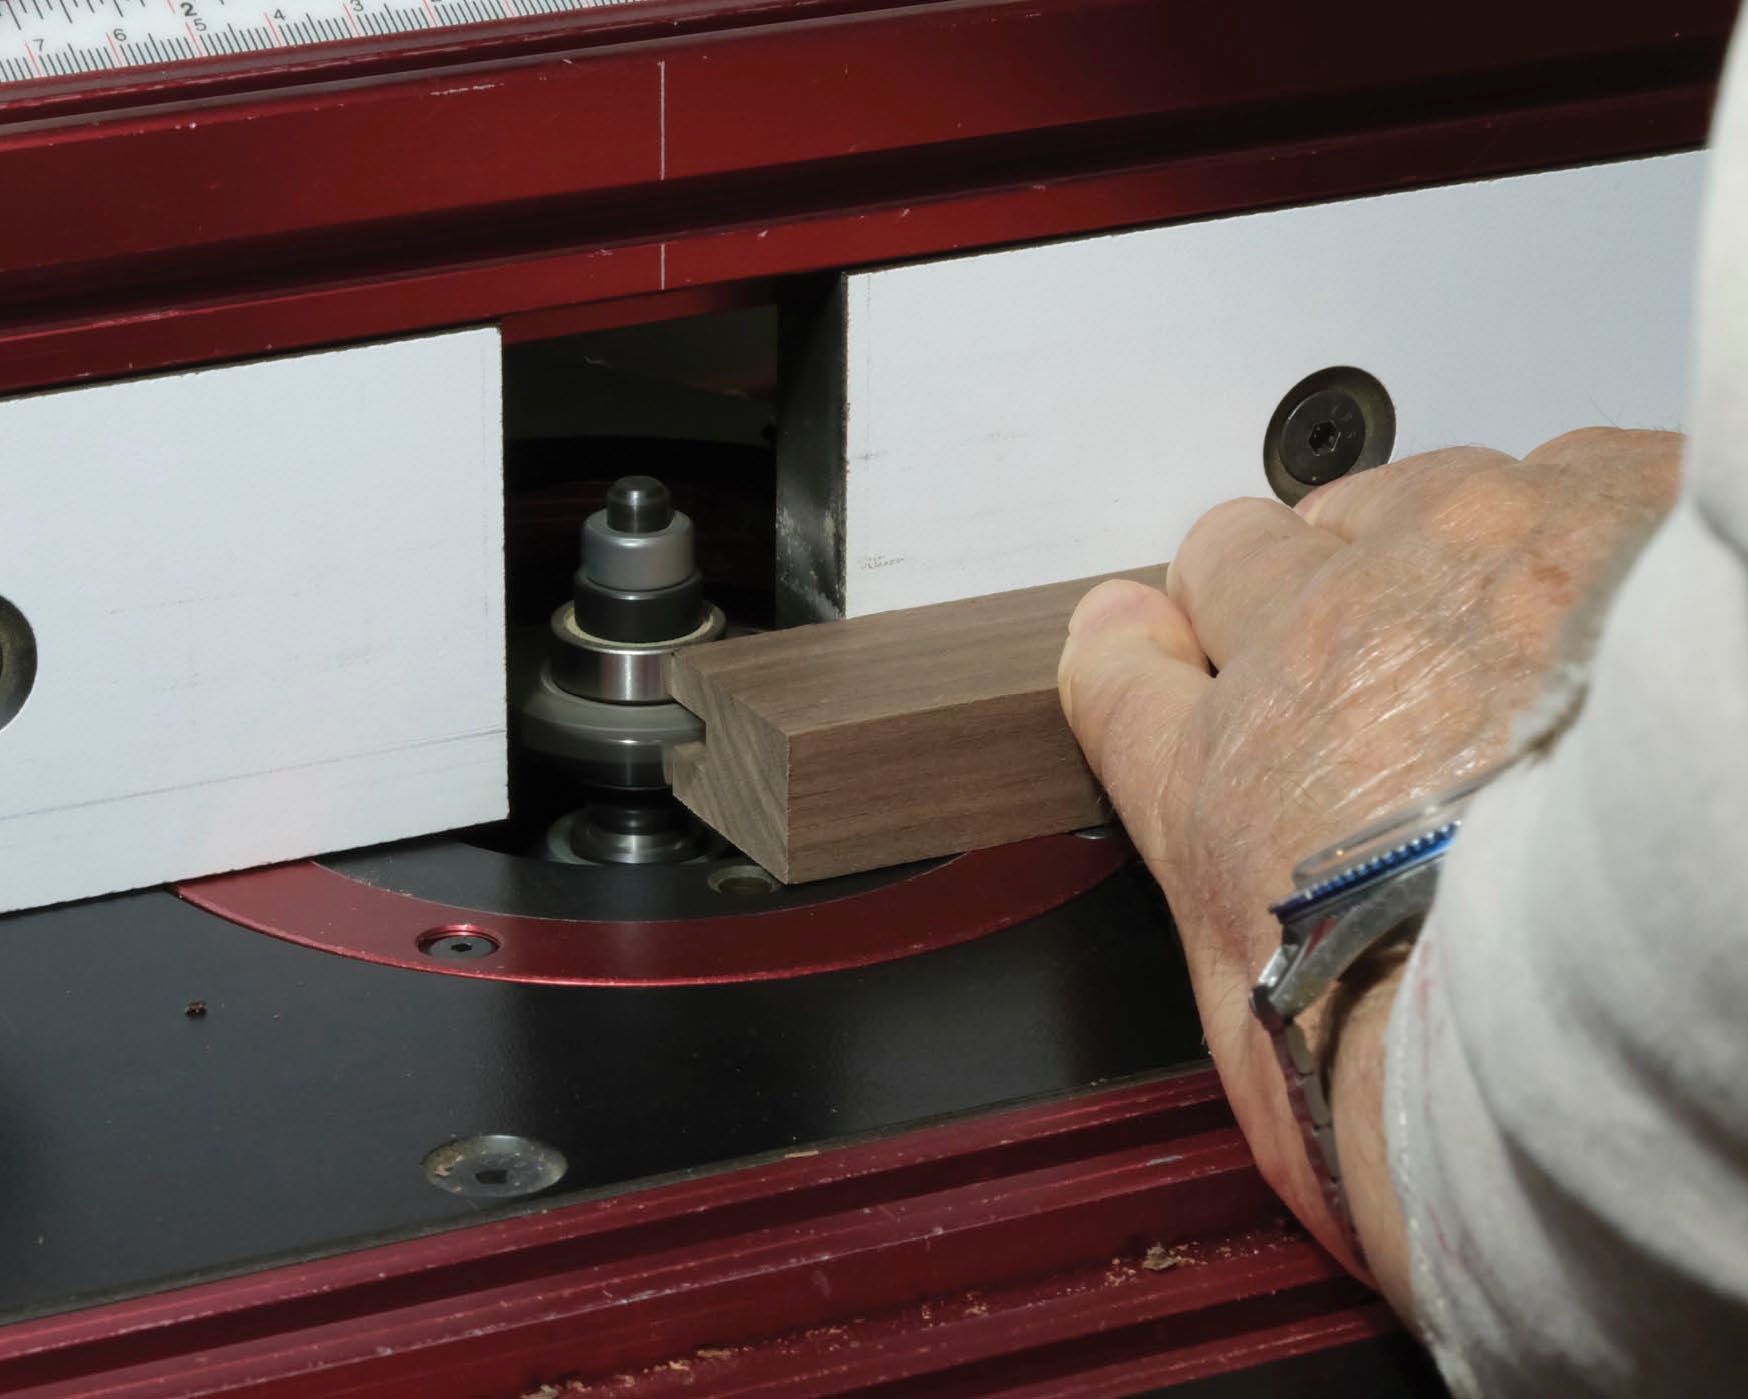
To rout the 1/2″ deep rebate, I used the adjustable tongue and groove bit set, now fitted with a pair of 1-7/8″ diameter three-winged cutters stacked with 5/8″ diameter spacers above as rub collars. The rub collars are guided by the inner edges of the frames. Incrementally raise the cutters and make passes until they’re flush with the top of the dado, leaving a 1/4″ inner shoulder for the door to seat against. Machining the frames this way creates a clean appearance, a wide opening and extra internal volume.
Shape the door to fit flush within the bottom frame. The door should be a loose piston fit to allow for seasonal expansion. (The contents will be plastic-bagged.) Keep in mind, the last thing needed is for the door to swell enough to be inoperable.
Centre-punch the location of the brass pins and pre-drill the holes with a 5/64″ bit to prevent bit drift. Then bore 1/8″ diameter holes through the rim of the bottom frame, into the door’s end, to receive 1-1/4″ long brass pins cut from 1/8″ rod. Chamfer and polish the ends of the brass pins. They’ll sit flush with the frame once the urn is finally sealed at some future date. Until then, they’ll rest not fully seated, loosely holding the door in place. Alternately, make pins 1-5/8″ long bent at 3/8″ from one end to form an “L” so they can be installed but readily removed.
Crown frame
I dry-assemble the crown frame, clamped firmly for final dimension, so I can accurately make the fitted crown panel using a straight 1/2″ diameter end-cutting router bit. By guiding the stock along the router table fence, taking multiple shallow passes, remove 3/8″ all around the blank, leaving a 1/4″ shoulder that will fit into the groove in the frame. Shift the fence back, adjust the height of the bit, and take a second 3/8″ wide pass to a depth of 1/4″, thus creating three 1/4″ tall × 3/8″ wide steps; the upper two sized to fit within the crown’s inner dado and shoulder, and the lowest one protruding, to be glued within the urn’s top frame. Now assemble the crown and panel squarely with glue and clamps.
Dry assemble and finish the interior
Dry-assemble everything and ensure a good fit. Then disassemble the urn and seal all the inner surfaces (except glue surfaces) with Zinsser Sealcoat dewaxed shellac, my preference for all sealing applications.
Final assembly
With the interior surfaces sealed, sand everything to satisfaction, preparing for final assembly. The assembly process is smooth and orderly, using only one lean bead of glue at each joint. This process needs to be done in order, while moving smoothly along, so the glue doesn’t dry before all the parts are brought together snugly.
Apply glue along one leading edge of each of the four splines and install them in the front and rear frame/panels. Apply glue to the lower tenon of the rear frame/panel, installing it centred within the dado of the bottom frame, ensuring the door opening is down.
Next, apply glue along one rear frame/panel spline, plus the lower tenon of a side frame, installing the spline in the frame’s side dado while slipping its lower tenon into the bottom frame’s dado. Add more glue to the top tenon of both rear and side frames, fully seating the top frame dado over both tenons, inner face down.
Apply glue to the remaining spline of the rear frame and both the top and bottom tenons of the second side frame, seating this frame fully on the spline, as well as within the top and bottom frames.
The last application of glue goes on both splines plus both top and bottom tenons of the remaining front frame/panel. Then, while gently spreading the side frames, seat both splines at once while guiding the tenons home in the top and bottom frames. Apply clamps, checking for square, while fully seating all the glue lines.
When dry, remove the clamps, apply glue around the rim of the opening in the top frame and install the crown assembly, adding clamps or weight after confirming best rim/case alignment. The assembly is now complete.
Sand and finish the exterior
With the glue cured, I detail the exterior, ease all edges and corners, and then apply shellac sanding-sealer, leaving it to cure overnight. The next day I scuff sand with P320 abrasive, vacuum and apply my finish of choice.
I install the door, pressing the pins in enough to stop the door from falling out of its opening, but not too far I can’t get them out later to place the ashes in the urn.
A thing of beauty is a joy forever.
Photos by Mark Salusbury
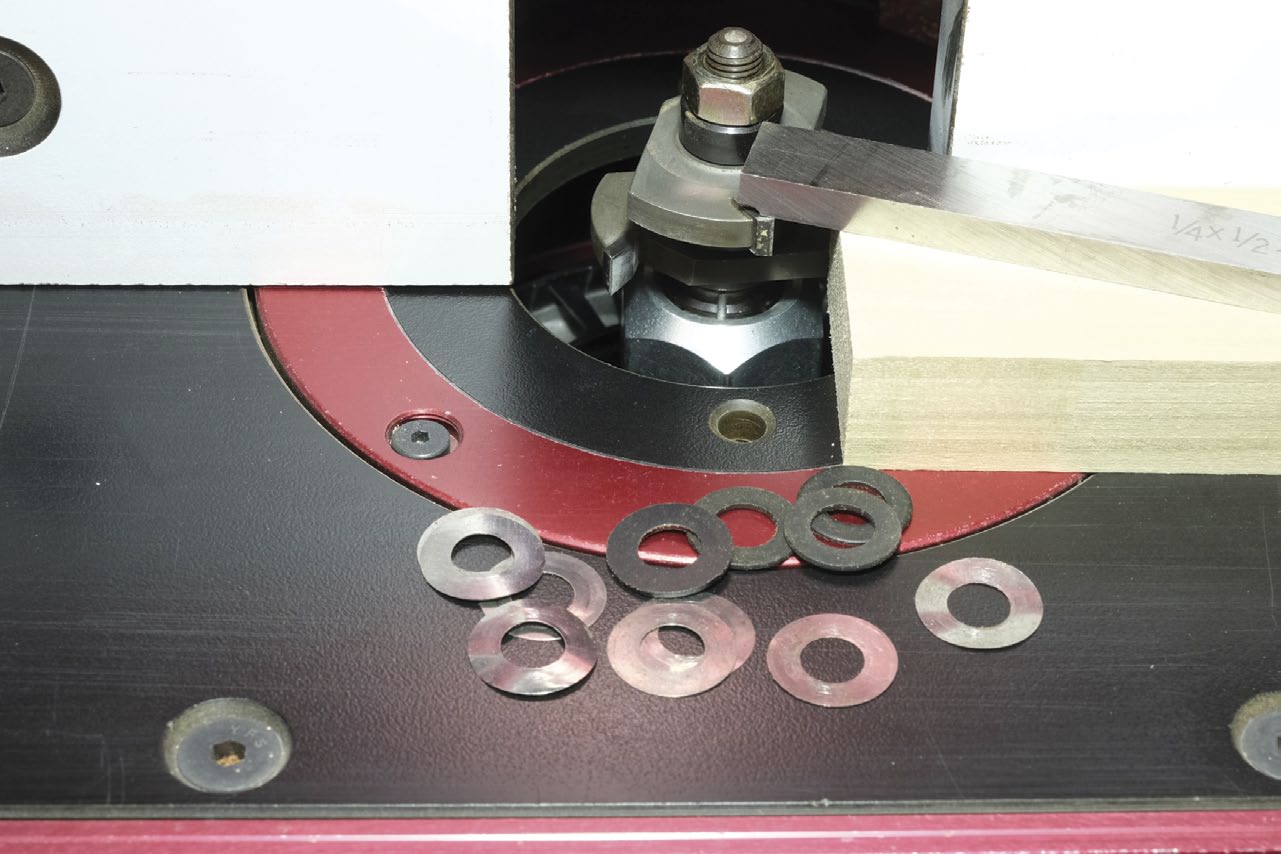
Valuable and Flexible
One of the most versatile router bits in Salusbury’s collection is the adjustable tongue and groove bit set. Shims fine-tune the spacing between cutters. Salusbury also uses accurately sized shims from his shim set to further maintain accuracy while machining these joints.
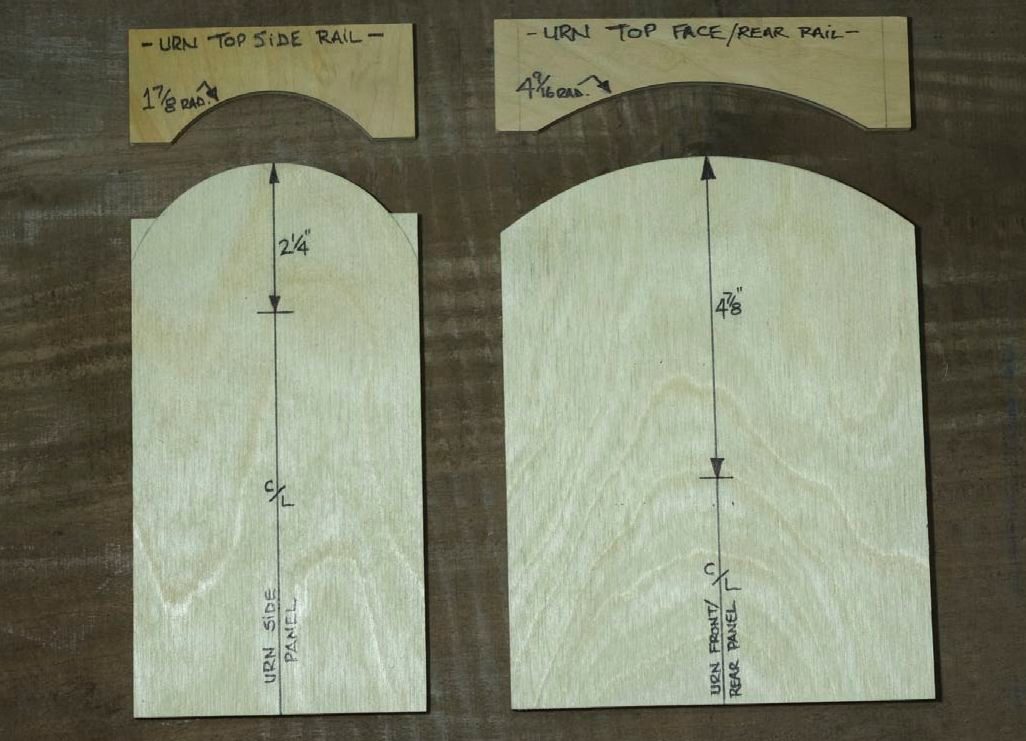
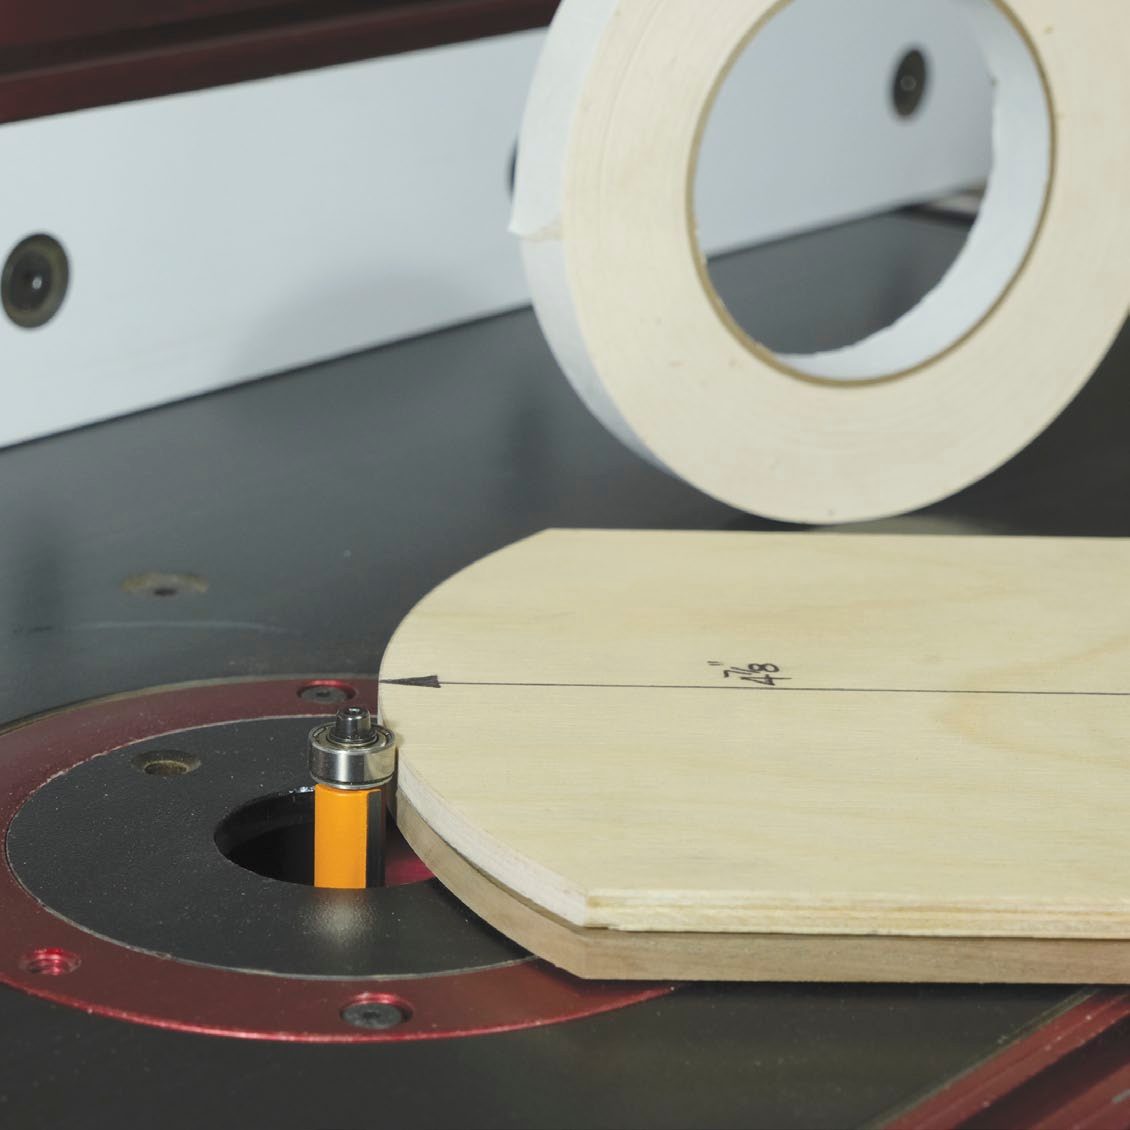
Nice Curves
Templates and flush routing guides can be used to mark and machine the curves in the panels and upper rails.
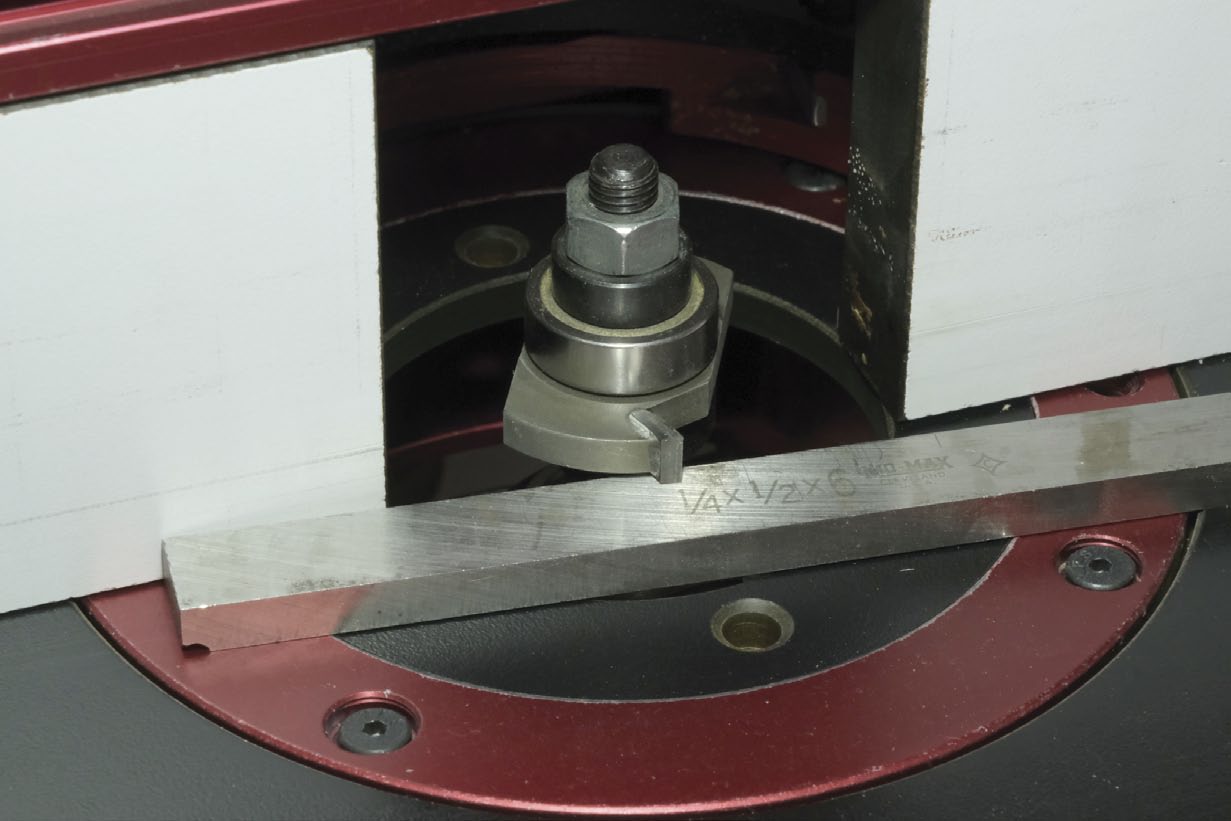
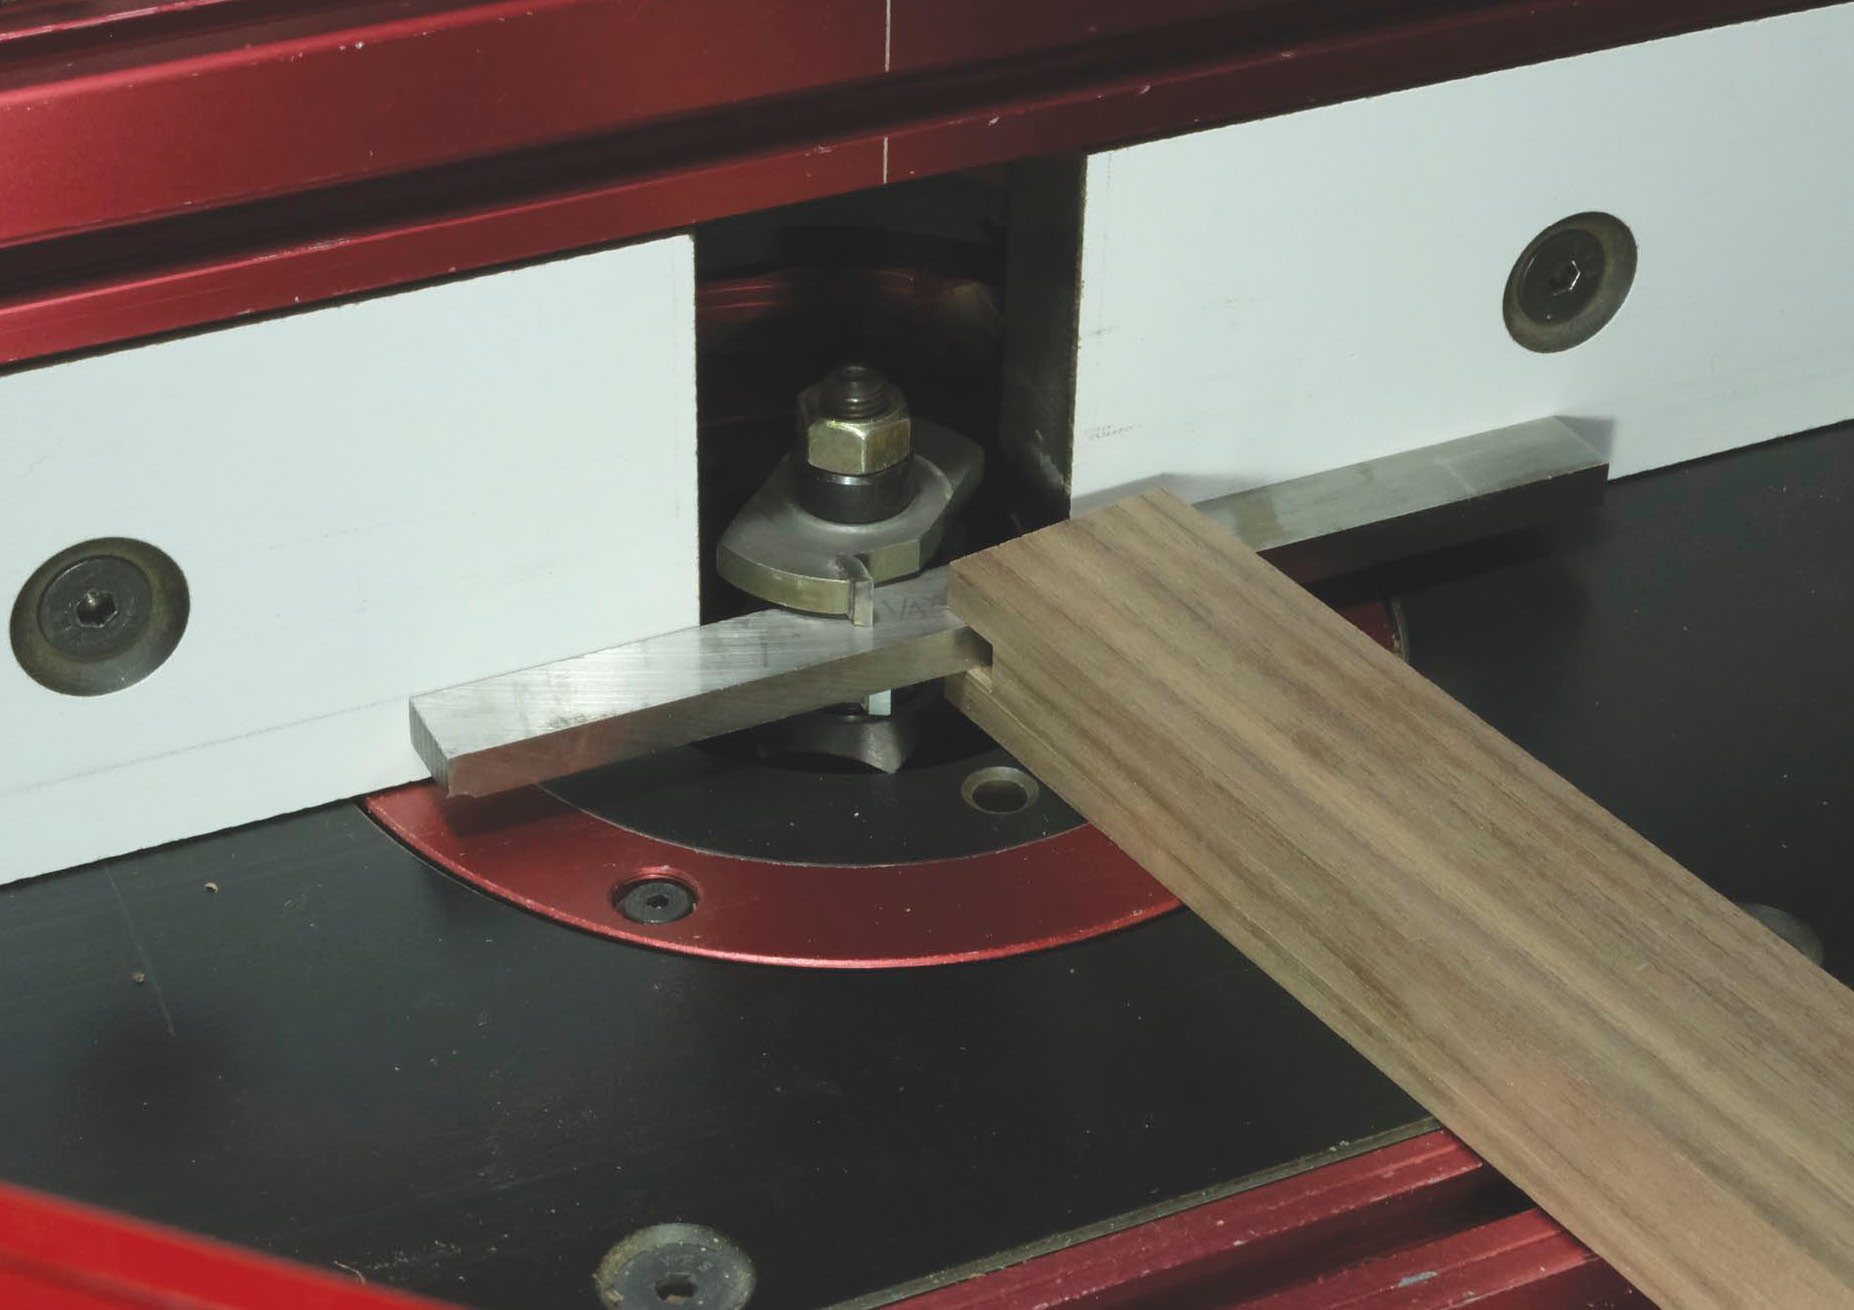
Maintain Accuracy
Salusbury uses 1/4" × 1/2" ground tool steel to accurately set up his router bit to leave 1/4" of material below the 1/4" wide groove.
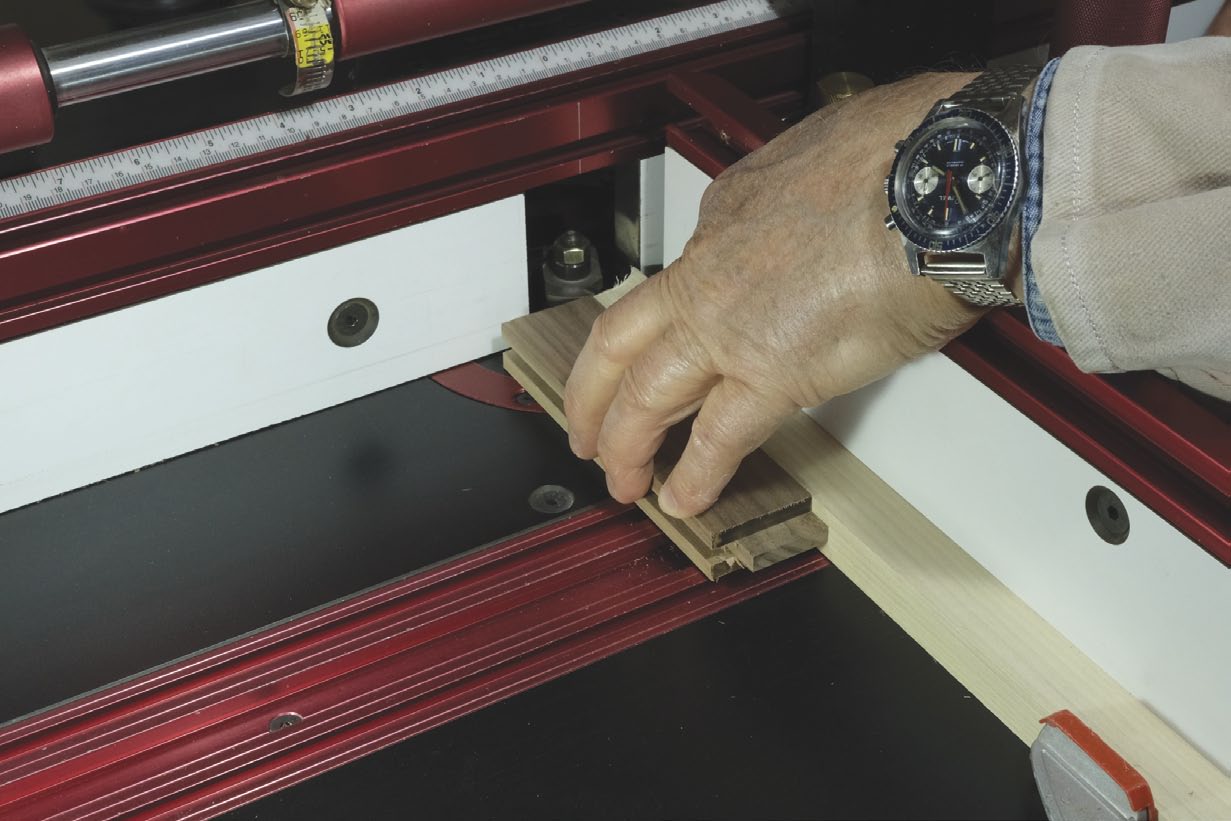
Groove the Rails
The groove that will accept both the tenon on the ends of the rails and the panels is machined on all the frame members.
Gang Together
Gang-routing the smaller, curved rails will increase accuracy and safety. Quality double-sided tape will do a good job at keeping the parts fixed to the longer wood strip, as the amount of material being removed during this operation is minimal.
Shim for the Win
Again, the tool steel bar Salusbury uses as a shim helps him set up the bit accurately. Since it’s 1/4" wide, the bar will fit directly into the groove on the wooden workpiece, then the router bit height can be adjusted to mate with the bar. This wooden workpiece was created as a set-up aid in a previous step.
Rout Tenons
With the fence set up parallel to the mitre gauge slot, and a wooden backer piece on the mitre gauge to eliminate tear-out, Salusbury machines the tenons on the ends of the rails.
Trim to Shape
Salusbury uses his plywood template and a flush trim router bit to shape the curved end of each panel. The panels are fixed to the template with double-sided tape.
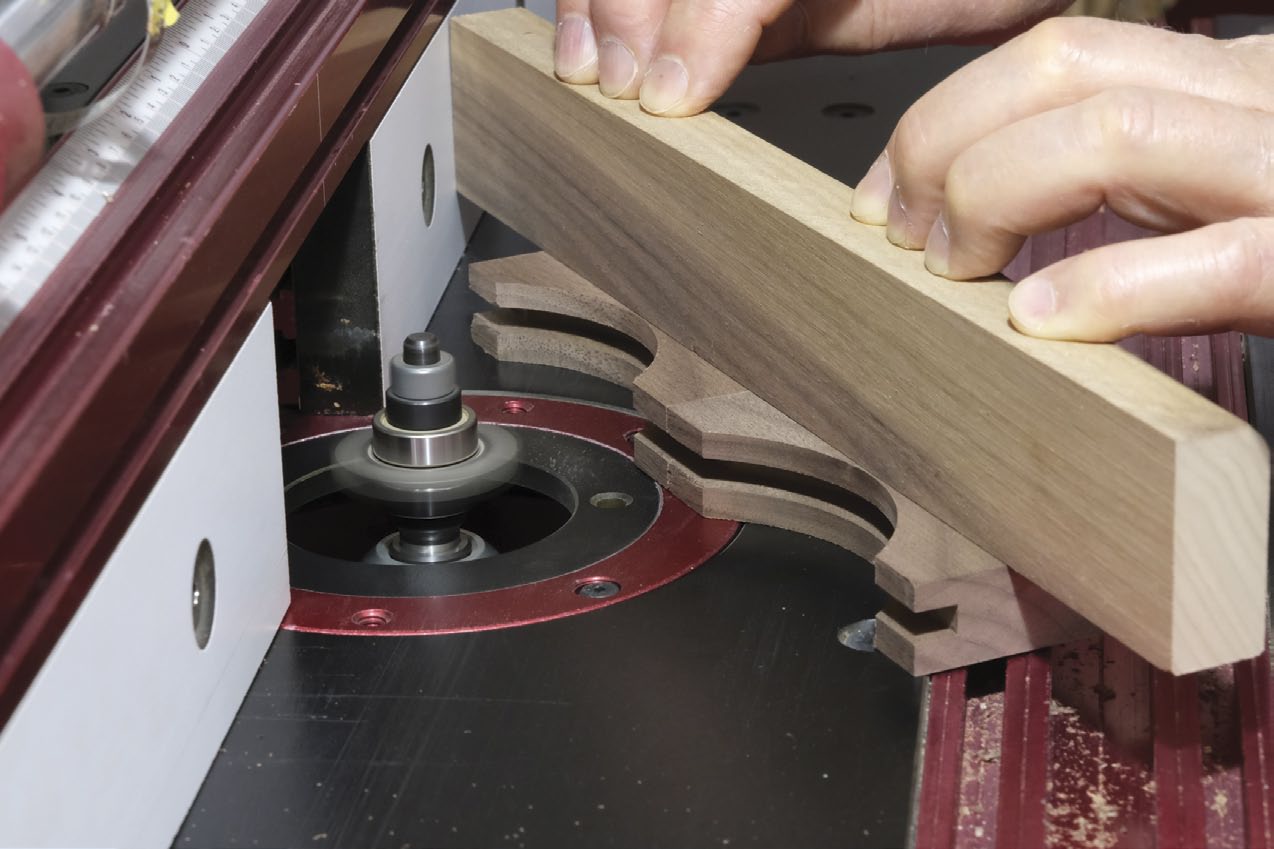
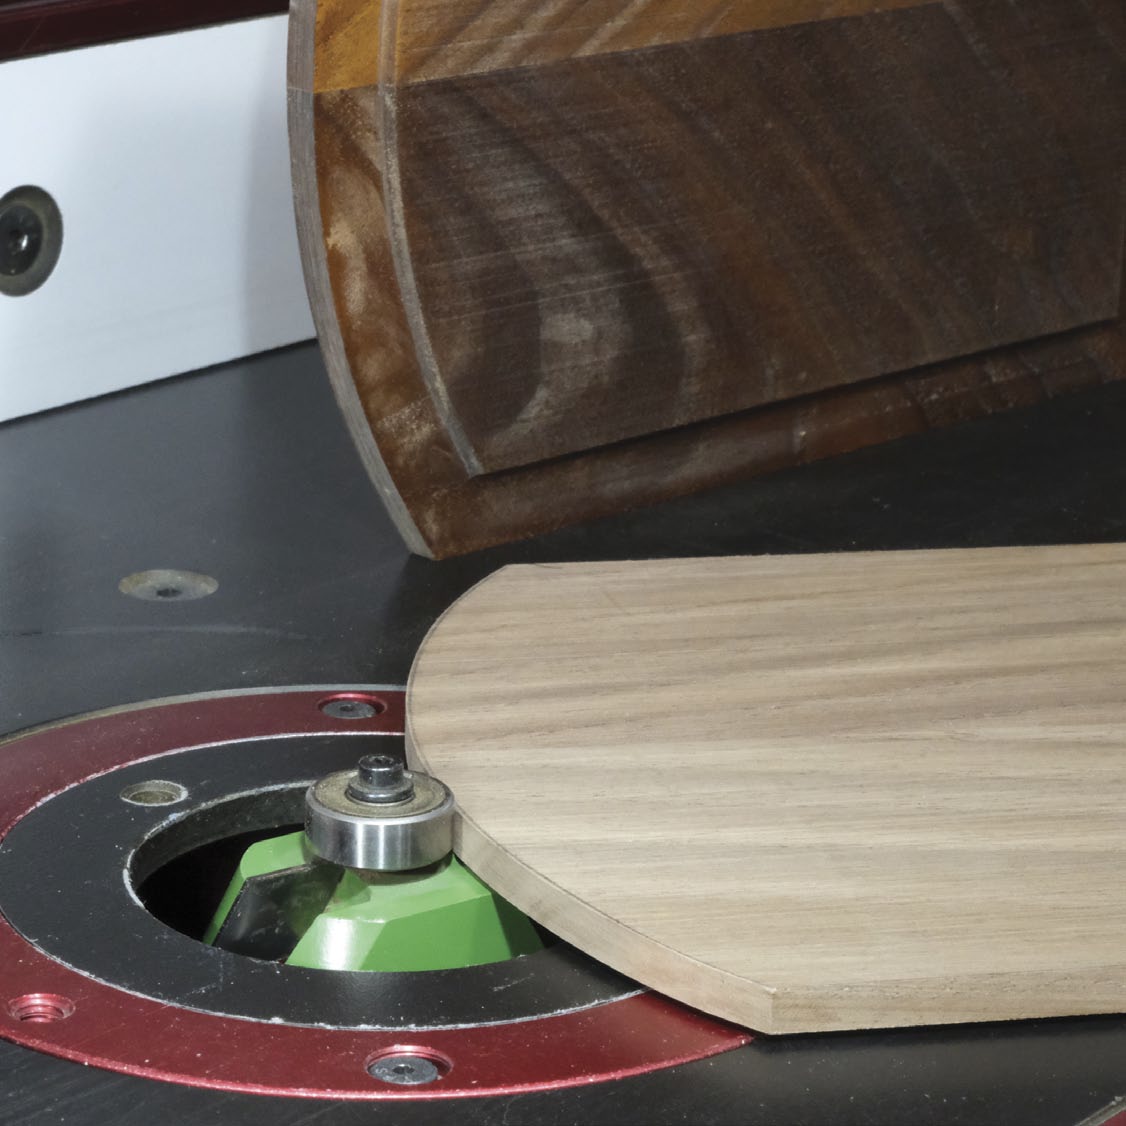
Raise the Panel
With the curve added to the panel, Salusbury installs a Shaker-style panel-raising bit in his router table and routs the rear face of the panels.
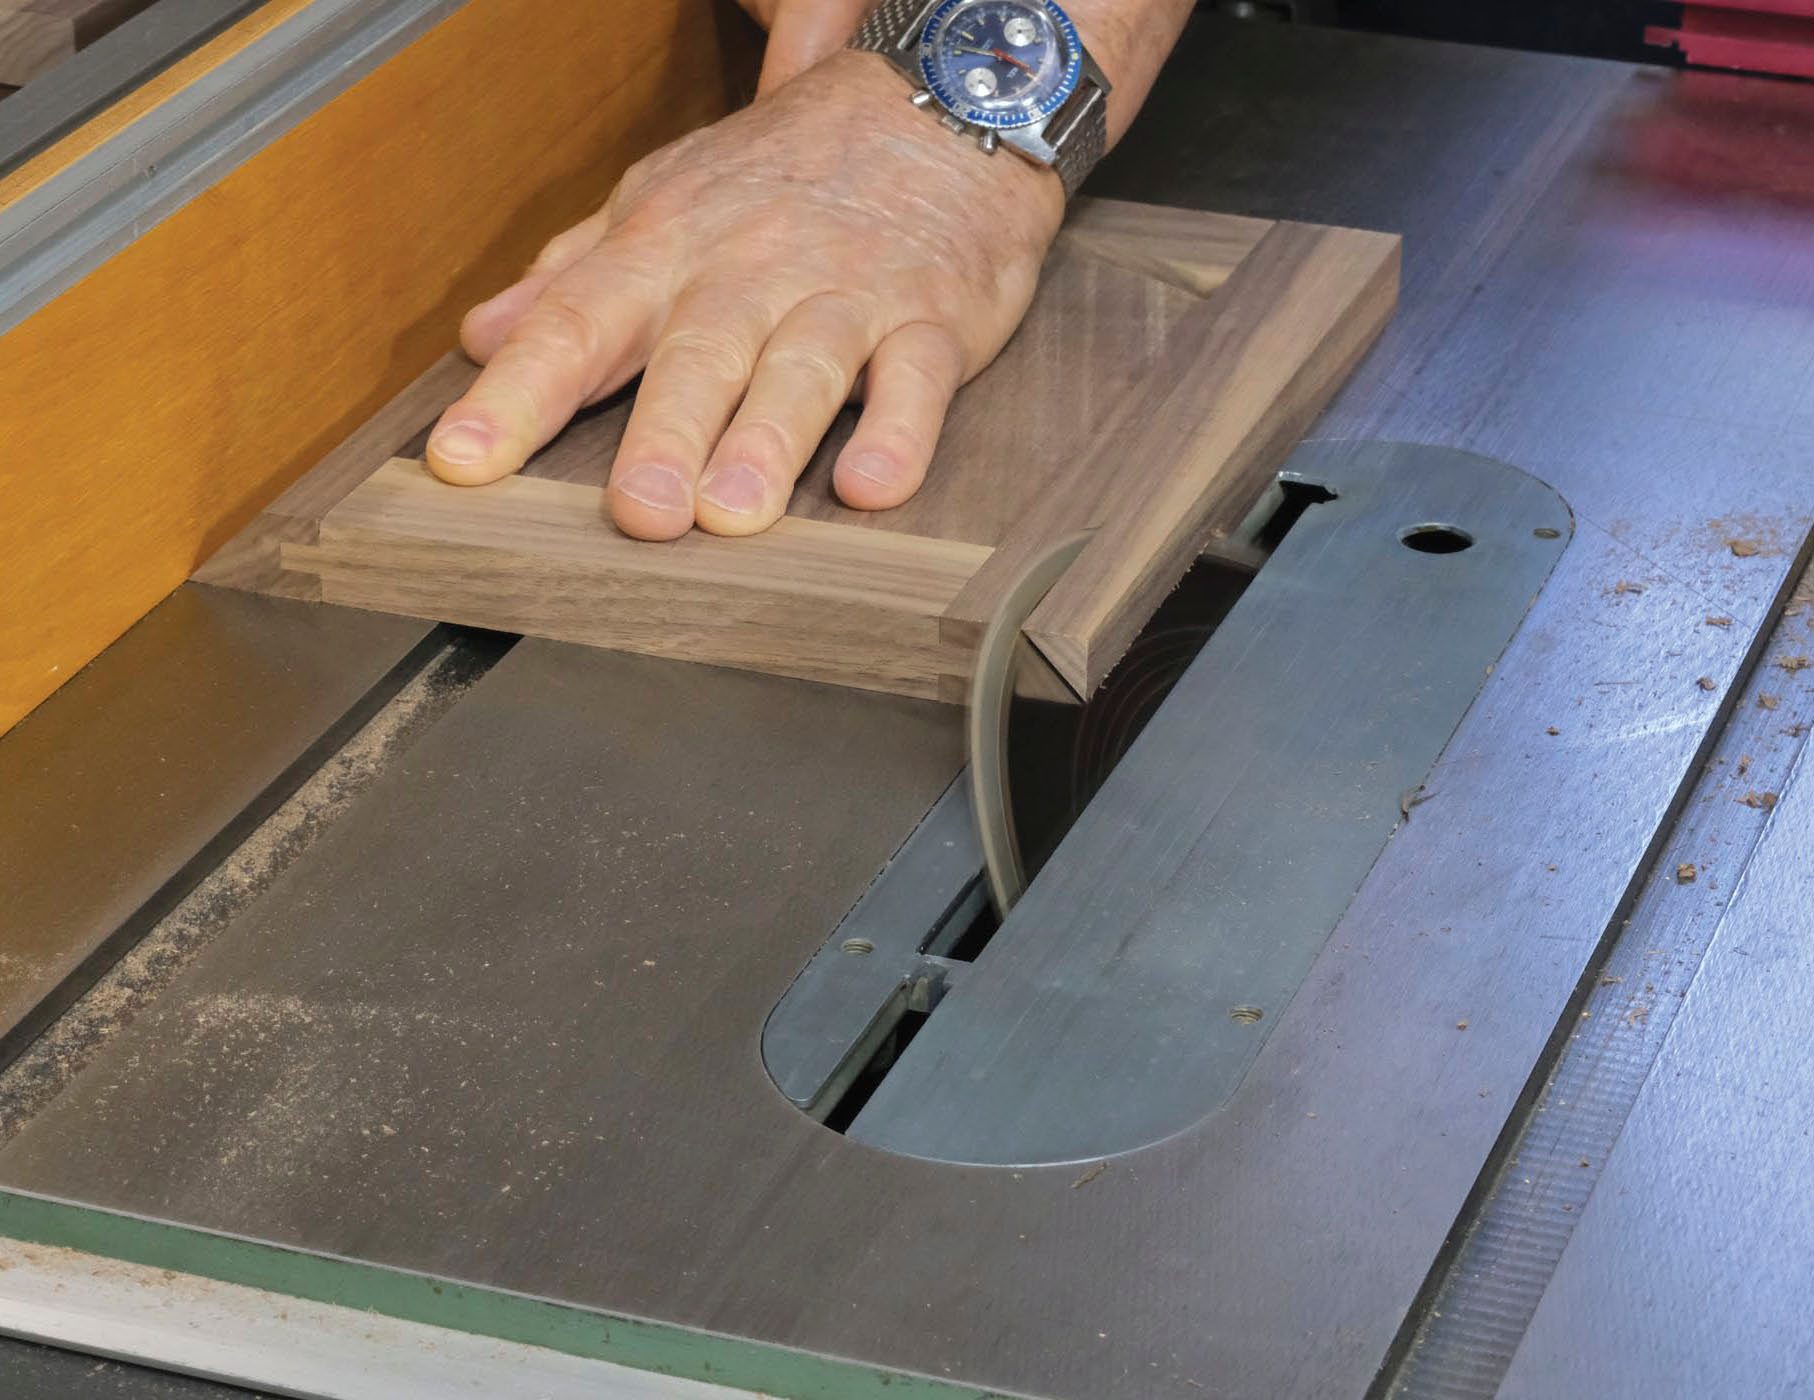
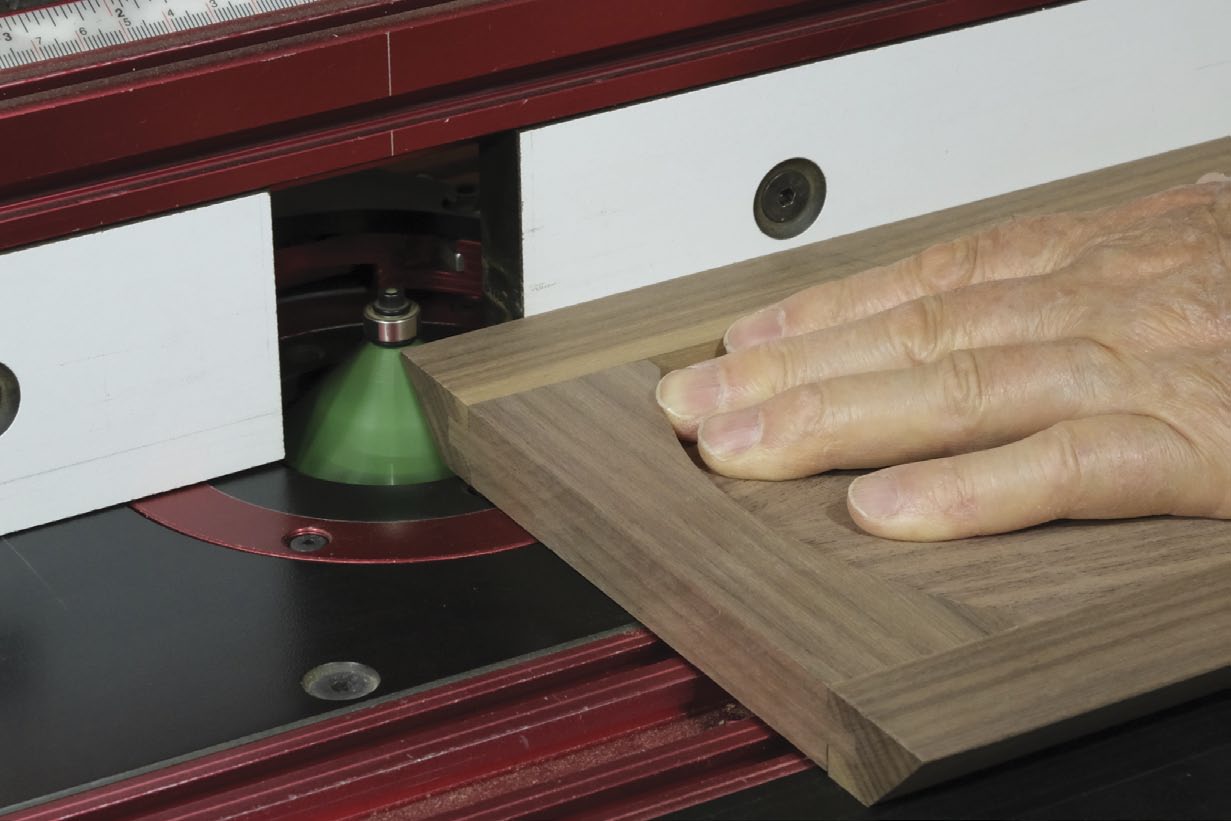
Bevel Cuts
Salusbury prefers to remove most of the material for the bevelled corners on the table saw (top), then move to the router table (bottom) to remove the final small amount of material to form the finished bevel joint. It’s also possible to do this cut with one pass on the table saw.
Grooves for Splines
With the blade on a 45° angle, slots to accept splines can be machined near the centre of the bevelled edge.
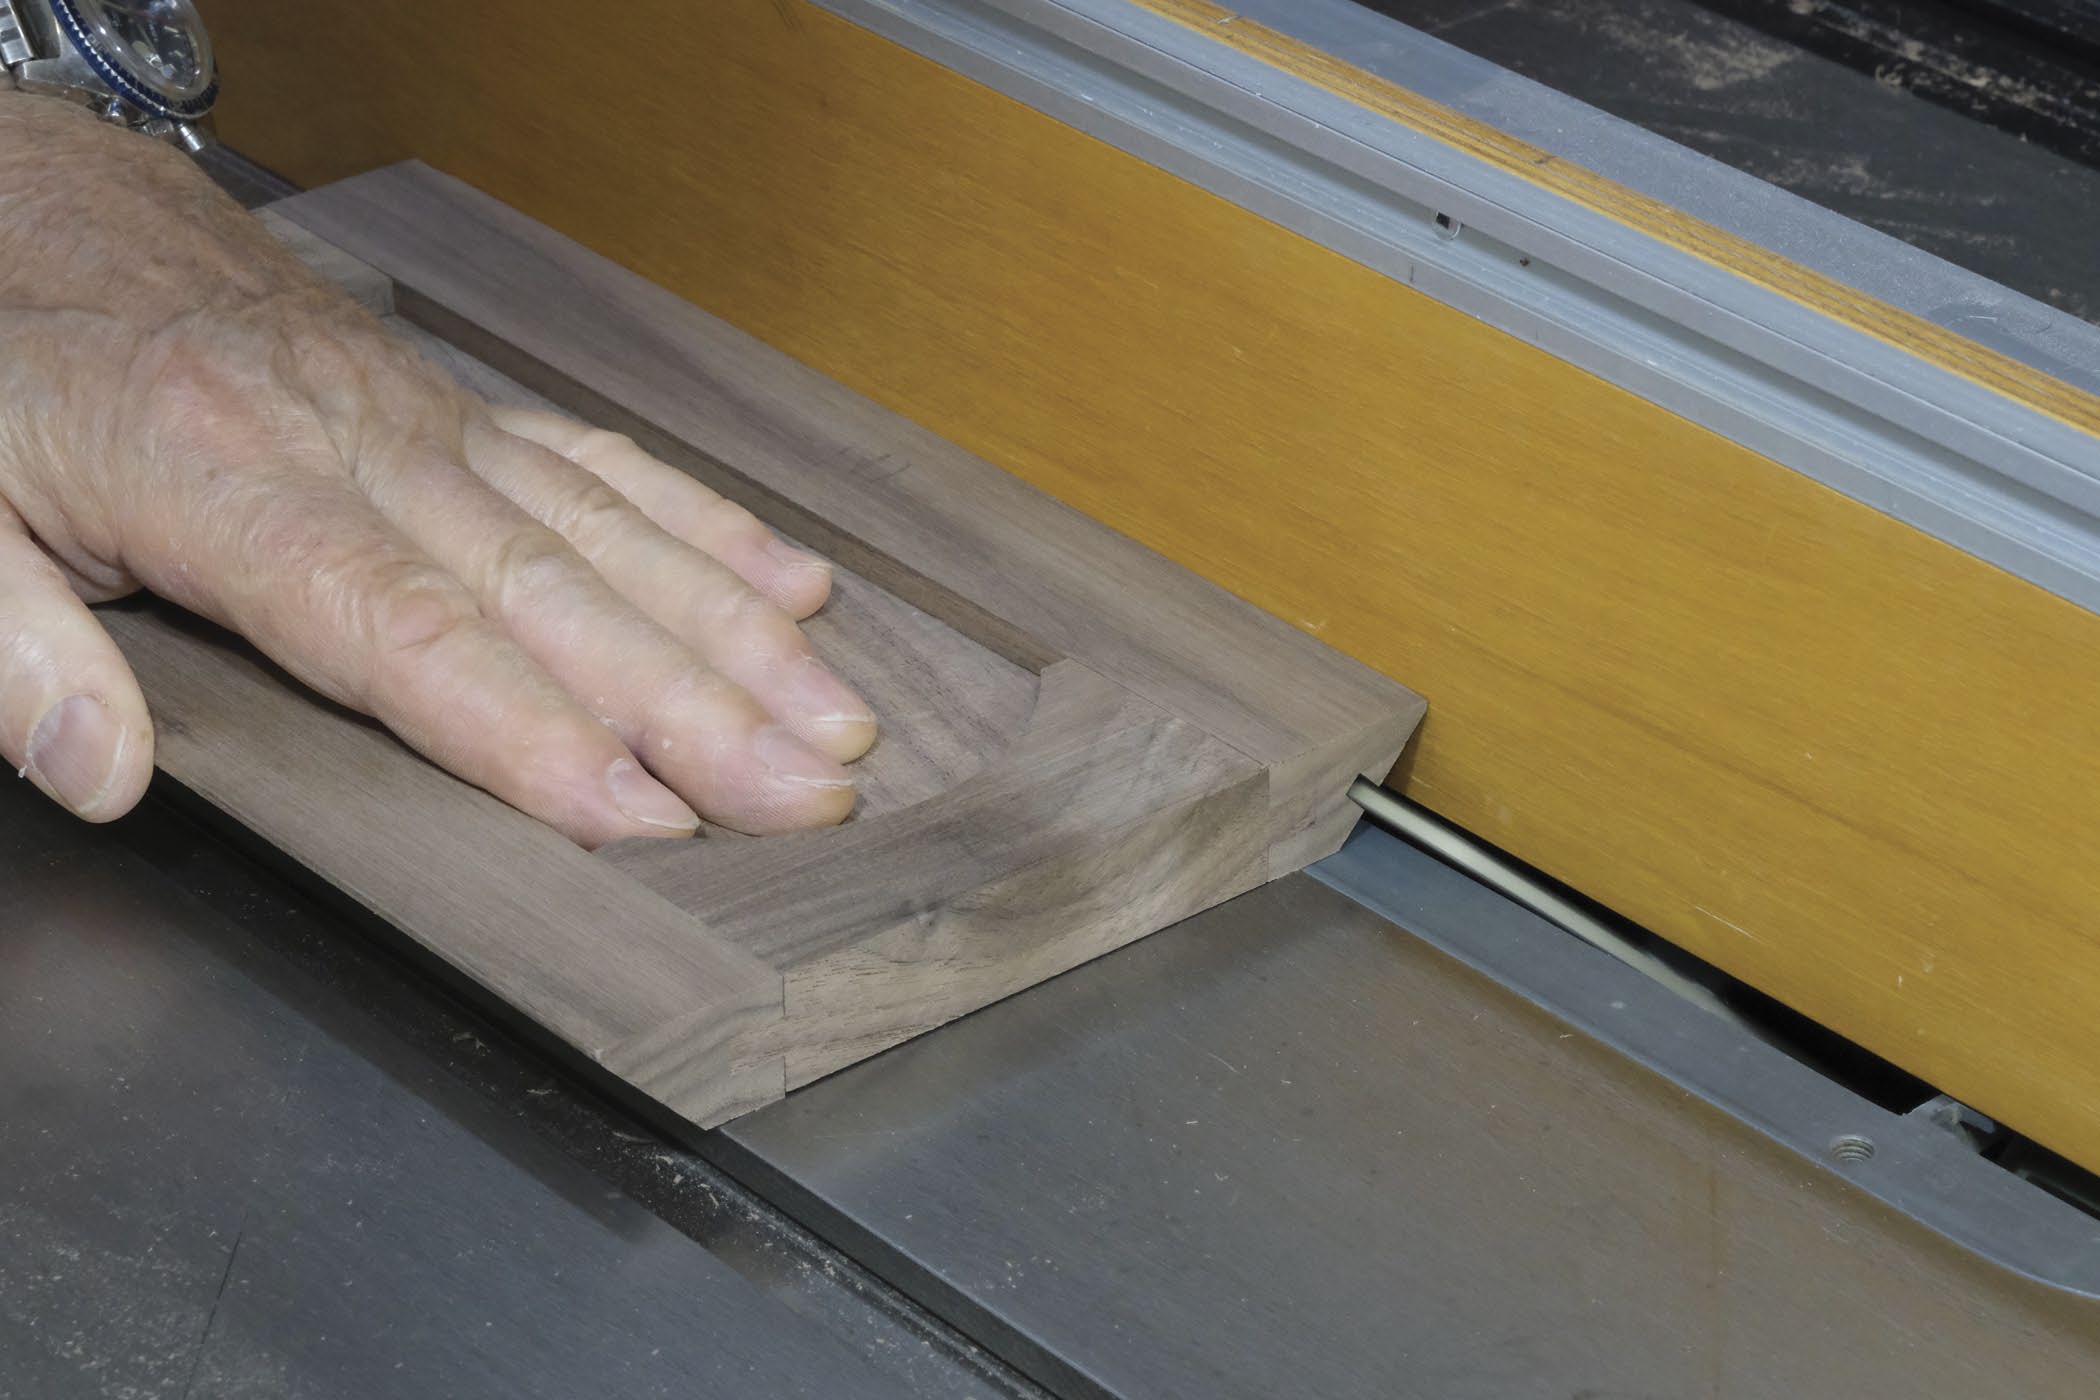
Move Grooves
Salusbury uses the set-up to rout 1/4" wide grooves that are located 1/4" above the lower and upper edges of the sides, front and back panels. A featherboard ensures an even cut.
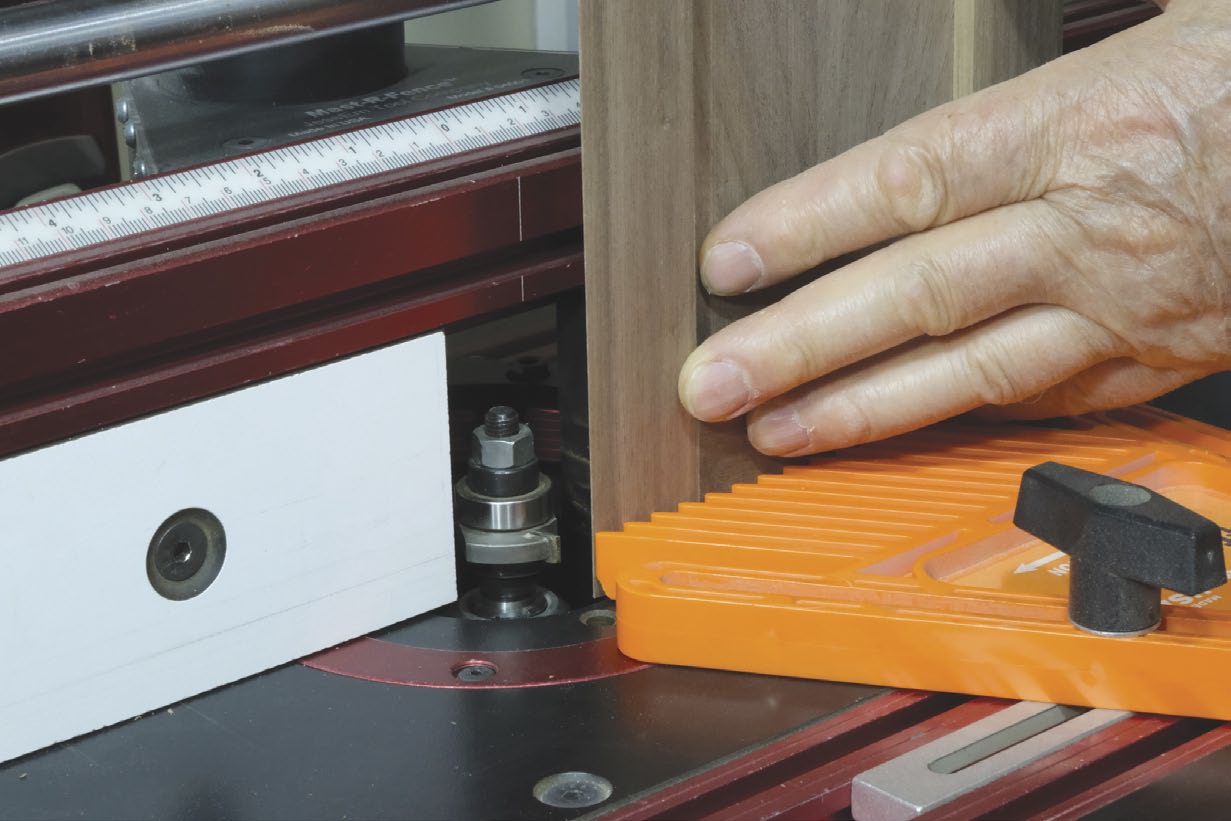
Rout Rabbets
With two 1/4" thick wings secured in his shaft side-by-side, Salusbury is able to create a 1/2" high rabbet in the inner edge of both the top and bottom frames. It’s only safe to make these passes incrementally, raising the bit slightly before each pass. Also ensure to move the frame in the correct direction to ensure no climb cutting takes place.

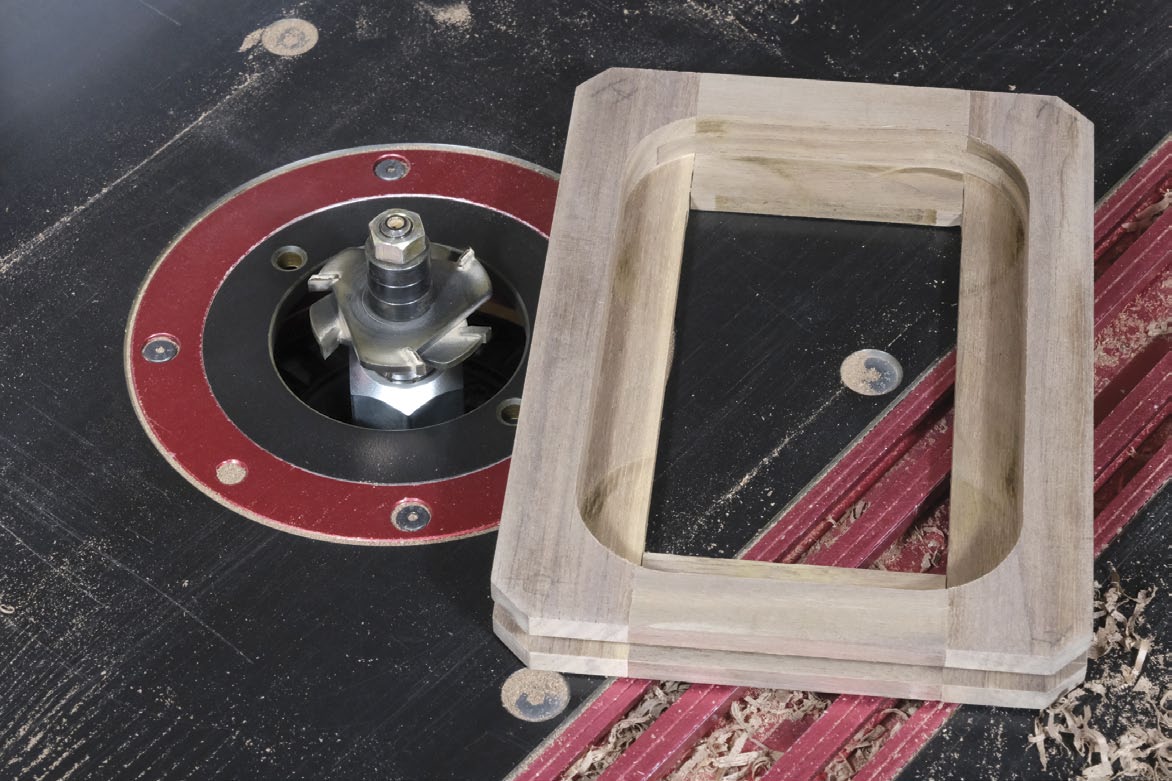
Completed Rabbets
This rabbet in the lower frame assembly will house the door panel.
Two Straight Holes
A drill press and 90° fence will help create a straight hole in the lower frame and door panel. A brass pin will eventually be inserted into this hole to secure the door after ashes are placed in the urn.