

Looking for an alternative to sanding dust and noise? Look no further...the smoothing plane will peacefully get the job done.
The smoothing plane excels at jobs that power tools can do but with less noise and dust. In most cases, the smoother does the task faster and with far superior results. The key to mastering this plane is in the set-up and some basic techniques that are often not known by novice plane users. There are many types of smoothers on the market, but in this article I’m going to focus on metal type smoothing planes because they are the most accessible to the average woodworker. So let’s move towards improving your knowledge and technique.
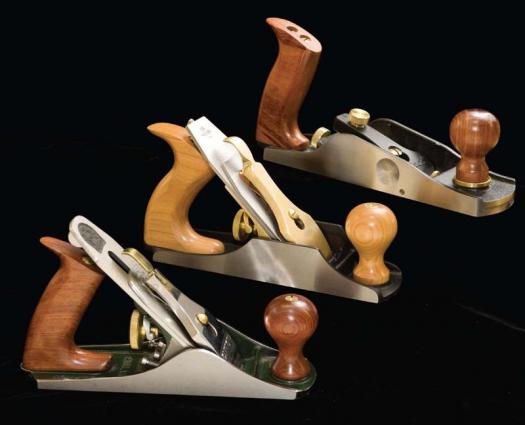
The first issue to discuss is the equipment. The reality is that not all hand planes are created equal. Generally, the cost of a plane is a good indicator of the quality. Unfortunately, in the world of fine woodworking, you are not going to be able to use a hardware store smoother and get the desired results. These hand planes are typically not machined to high tolerances and lack the adjustability to take the fine cuts that we are looking for. In my opinion, the big three metal hand plane makers are Veritas (leevalley.com), Lie Nielsen (lie-nielsen.com), and Clifton. All of these makers make high quality tools and they are all in similar price points. Lie Nielson and Clifton model their planes after the Stanley Bedrock line of planes, while Veritas has shown some innovation by using a Norris type adjuster to control the depth of cut and lateral adjustment. There are differences between the plane makers but I feel that the most important thing to consider is how the plane feels in the hand. Imagine you are surfacing the top of a dining table to prepare it for finish. The smoothing plane could literally be in your hands for hours. If the plane does not come to the hand easily and with comfort, then that is going to be a miserable couple of hours that may compel you to use a sander instead. As far as vintage planes go, that topic is another kettle of fish entirely. There are many factors involved in choosing a well-made vintage smoother, so I recommend staying away from these planes unless you have taken the time to educate yourself.
Another consideration when choosing a plane is the angle that the blade beds at. This is referred to as the frog angle. A standard frog beds the iron at approximately 45º, a high angle frog beds the iron at approximately 50º and the low angle frog beds the iron at approximately 32º. The high and low angle smoothers come in handy when working highly figured woods or some exotics that have difficult grain. However, most of the time a standard angle smoother will do the trick. The bevel-up smoother from Veritas is a versatile plane because there are three blades available: a low angle, standard angle, and high angle. This allows you to purchase one plane and three irons to cover all the different planing angles instead of buying three separate planes.
The smoother is probably the most versatile plane a woodworker can have in their hand tool arsenal. Obviously, as the name suggests, the smoother really excels at smoothing surfaces. However, its use is not limited to smoothing alone. For example, after running the edge of a board over the jointer, you have achieved a square and straight edge from the machine. What you also have is the scalloped surface left behind by the cutter head. If you were to try to use this edge as a glue line with another board you would end up with a less than perfect glue line. If you run a smoother along the edge of the boards first, removing the scalloped machine marks, you will have two perfectly flat surfaces to glue together. These two hand planed edges will give you a glue line that is virtually undetectable.
The smoother can also handle end grain fairly well. It’s important to remember however, that the iron must be very sharp in order to not make a mess of the end grain. Where this technique comes in handy is in shaping a bevel on the underside of a tabletop. Instead of switching to a block plane to handle the end grain of this cut, you can simply carry on with the plane you have in your hand. As well, the longer sole on the smoother will provide you with a straighter and more accurate cut than the smaller block plane.
This plane can also handle more strenuous tasks, such as dimensioning lumber by hand. At the moment I don’t have a jointer machine in my 170 sq. ft. shop. In a shop this small, space is a premium and I would sooner do without a jointer than purchasing a smaller machine. Having a 12″ jointer would be nice, but in the real world, most of us can’t afford a tool of this size in our shop, whether financially or spatially. You can easily use your smoother to flatten one face of your lumber which gives you a reference face to use on the bed of your thickness planer.

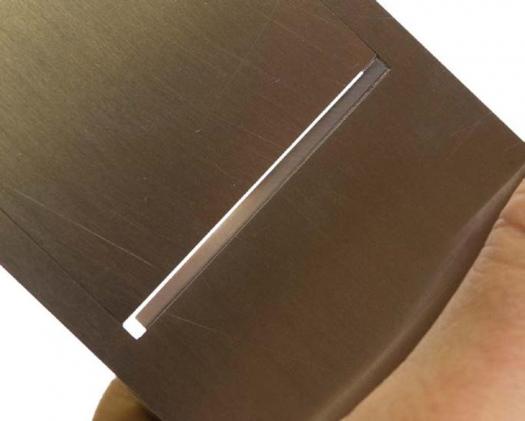
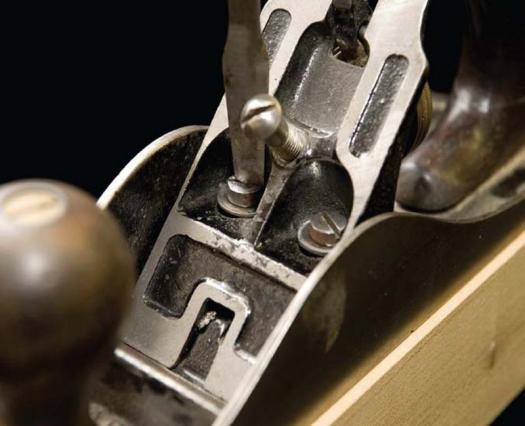
After reading my last article on prepping plane irons, you know that it is important to have an iron that has been properly tuned and sharpened to a keen edge. Your success with any type of edged hand tool hinges on this, so take the time to prepare your iron properly. The other adjustment that is important to set properly is the plane’s mouth opening. The mouth refers to the opening between the cutting edge of the iron and the plane body. If you are setting up the plane to take gossamer-thin shavings then the mouth will be only slightly open. Conversely, if the plane will be doing heavier dimensioning work the mouth can be left with a wider opening. Essentially, the mouth opening is just large enough to get the shaving through without clogging the opening, or ‘choking’ the plane. The type of plane you have will determine how you adjust the mouth. In the case of a Bedrock style plane, all of the adjustments can be done with the iron in place. You simply loosen off the two locking screws at the rear of the frog and use the center screw to either increase or decrease the mouth’s opening size. If you have a Bailey style plane, then you will need to remove the blade to access the two locking screws and then adjust the frog appropriately. Once the frog is adjusted you’ll then have to replace the blade and see if the mouth opening is the correct size. As you can probably deduce, adjusting a Bedrock style plane is much easier than a Bailey style. Veritas again has innovated their planes with an adjustable toe that makes it quite easy to adjust the mouth opening. You simply loosen the front knob, adjust the mouth, and then tighten the knob again.
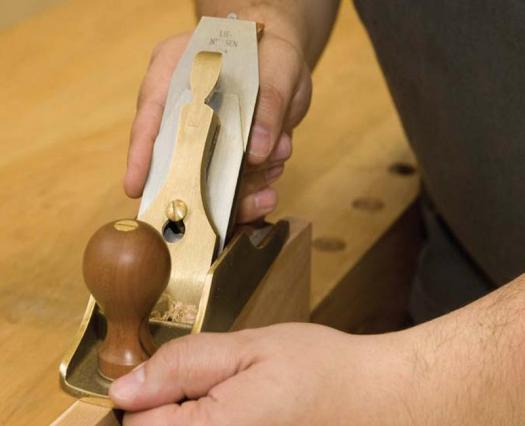
Now we want the plane to make shavings. To do this, you’ll want to ensure that the blade is backed out all the way and place the plane onto the wood to be surfaced. Now, start moving the plane back and forth on the board with your one hand on the tote. Simultaneously, you will start to advance the blade using the depth adjustment wheel until the plane just starts to cut. At this point, you want to pay attention to where the plane is cutting in reference to the center of the iron. Ideally you want the plane cutting in the center of the iron. If the plane is cutting to the left or right of center, you’ll want to adjust the iron using the lateral adjustment lever. You will move the lever into the direction that the plane is cutting. For example, if the plane is cutting right of center, you will move the lever to the right and vice versa for the left. Keep in mind that the adjustments that you make to the plane are very slight. It is easy to overcorrect a problem with gross adjustments. Once you have used your plane for a while you will understand how much adjustment is needed to make the correction. Now that the plane is cutting where you want it, let’s talk about the skills you will need to plane effectively.

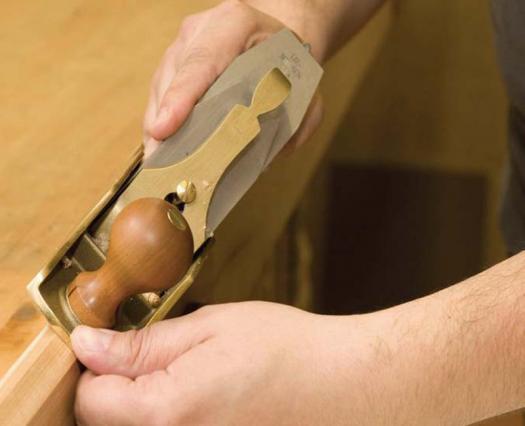
Using a hand plane in the beginning feels a bit awkward but with practice it becomes a natural body movement. It’s not easy to describe what the body needs to do while hand planing because everyone is built differently; what I may find comfortable may not work for everyone. Generally, you will want to take a wider stance with your feet so that you’re comfortable and feeling stable. When you begin moving the plane back and forth across the board you will want to ensure that you are planing with the grain or else you may encounter tear-out. At the beginning of the cut, you should place more pressure at the front of the plane. Conversely, you will place more pressure at the rear of the plane at the end of the cut. This will prevent you from removing too much material off the ends of the board. Move the plane across the board in a controlled manner and move deliberately focusing on each stroke. Speed will come with practice, so let’s worry about honing your skills first.
In the case of planing on the edges or end grain of a board, the trick is to balance the plane on the thickness of the board. You’ll want to keep the plane cutting on the center of the iron to keep the edges square to the faces. Again, the technique involved for this skill is very personal. I don’t think I’ve ever seen two woodworkers do this technique the same way so you will just have to do what seems comfortable and effective for you. I tend to place my thumb on the toe of the plane while curling my index finger to the underside of the plane to help guide the cut.
As with any other woodworking skill, it’s important to practice to become proficient. Eventually you will get to the point where you will pick up your plane and instinctively guide it across a board taking off beautiful delicate shavings. Your smoother will become your ‘go-to’ plane for a whole host of tasks. However, your smoother won’t pollute the air with dust or create noise that will eventually deafen you…sounds like a better place to work already.
Special thanks to Ron Barter at rosewoodstudio.com for the use of his bench room for our photo shoot.


Thanks for this Vic! Kind regards, Tony Whieldon