TIPS & HOW TO
Preparing plane irons

Vic Tesolin

Learn to prepare and maintain your plane irons, as a sharp iron can make the difference between frustration and enjoyment.
Working with hand planes can be an enjoyable and efficient way to woodwork.
However, many woodworkers have had difficulties with hand planes and shy away from using them. A lot of these problems can be attributed to dull and poorly prepared plane irons (blades). It’s no secret that hand tools require keen edges in order to be used effectively. Unfortunately, there is a lot of information out there about sharpening and honing. The topic of sharpening to woodworkers is like religion in that it causes many heated discussions and disagreements. However, how you go about sharpening is not as important as actually achieving a sharp edge. There are many different techniques and jigs to choose from. What I’m going to do in this article is share with you the techniques I use to sharpen my tools. These techniques are not the only ones to use for sharpening; but they do work well for me. I make my livelihood making furniture and unfortunately I don’t get paid to sharpen. Keeping that in mind, my techniques are efficient and effective and allow me to get back to building furniture with a minimum of delay.
Flatten the Back
The first step that I take to prepare an iron is to flatten the back. Depending on the maker of the iron this process can take anywhere from a few minutes to hours. However, most higher end plane makers flatten and polish the backs of their irons. Regardless of the maker, I still go through the process of flattening and polishing just to be sure. Before I get started, I secure a small block of wood to the top of the iron with double-sided tape. Doing this affords me the ability to keep a good grip on the iron while flattening, and keeps my fingers away from the stone. The stones feel smooth to the touch but dragging your fingers across the stone repeatedly will wear away your skin and cause bleeding. Next, I draw lines on the back of the iron with a black marker. These marks will act as wear lines that allow me to gauge my progress and will indicate when the iron is flat. The process starts with a 1000 grit stone that I take the time to flatten beforehand. This process won’t work with a stone that is dished or not flat.
Place the leading inch or two of the iron’s back flat on the stone, grip the wooden block and begin drawing the iron back and forth along the entire length of the stone. Your other hand will help guide the iron and keep it flat on the stone. After around twenty strokes or so, check your progress. If all of the wear lines are gone, you’ve lucked out with a flat iron. If not, you must carry on with the exercise. Every couple of minutes I rotate the stone end-for-end to help prevent uneven wear of the stone. As well, if it is a difficult iron that is taking a lot of flattening, I will periodically re-flatten the stone to ensure that I’m always working with a flat stone. Failing to do this will result in a bellied iron that is very difficult to flatten. Once all of the wear marks have been removed, I move up to a 5000 grit stone. Again, the stone must be flat before starting this step. I repeat the same action on the 5000 grit stone as I did on the 1000. You can mark the iron with the marker again if you like but I find that it is quite apparent where the stone has been cutting on the iron. The spots where the iron is dull are the areas that still need work. At this point, the back of your iron should be nicely polished and you should be able to see your reflection in it like a mirror. At this point I move on to the final, 8000 grit stone, and I repeat the same action as with the other stones. Once you have polished the back with your finest stone, do not use coarser stones on the back of the iron again.
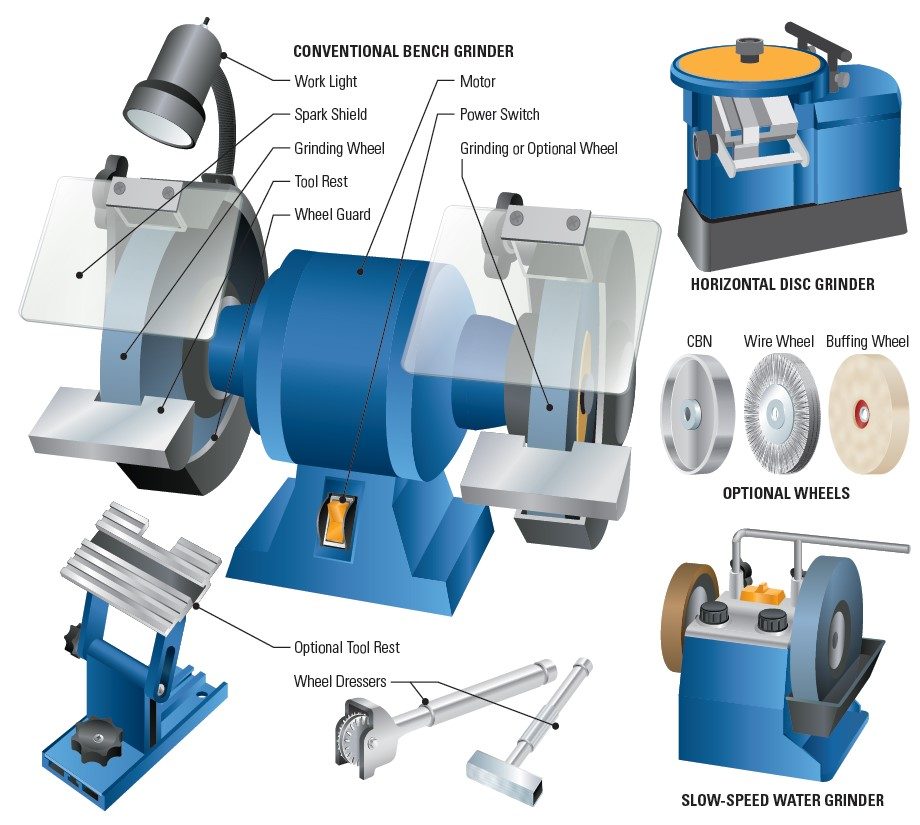
Hollow Grind a Bevel
Now that the back of the iron is flat, I remove the block from the iron and head to the grinder to hollow grind the bevel. It’s referred to as hollow grinding because the grinding wheel will hollow out the bevel instead of keeping it flat. I use a 6″ full speed (3750 rpm) grinder. Some people insist that a half speed grinder (1725 rpm) is necessary to avoid burning the steel. I feel that the grinding wheel and your technique are of more importance than the speed of your grinder. I replaced the grinder’s original grinding wheel with a Norton 3X, 46 grit wheel which can be found at europeanhandtools.com. This wheel removes metal quickly and with very little heat build-up. I also removed the original tool rest from the grinder and replaced it with a Veritas Grinder Tool Rest from leevalley.com. This rest allows me to accurately adjust my grinding angle and provides a larger surface on which to rest my irons. It’s important to regularly dress grinding wheels with a wheel dresser. I use a Diamond Bar Wheel Dresser that is also available from Lee Valley. This tool allows you to remove any metal build-up (glazing) on the wheel, and is also used to shape the wheel. I usually round the wheel slightly at the edges so that it is high in the center. This makes it easier to judge where the cutting will occur. There are, of course, other set-ups you can use for grinding edge tools. You may end up trying several different systems until you find one that you feel comfortable in using.
Before I begin grinding I coat the entire bevel with a black marker so I can see where the grinder is cutting. With the grinder off, I place the iron on the tool rest and advance the iron until it makes contact with the wheel. I then sight along the side of the iron to see where on the bevel the wheel is touching. I then make adjustments to the tool rest so that the wheel is touching as close as possible to the center of the existing bevel. I generally keep the angle the same as what was shipped by the plane maker. It’s very easy to get caught up with angles and numbers when grinding irons. If you’re off by a degree or two it won’t be the end of the world. Once the wheel is touching the center of the bevel, turn the grinder on and slowly advance the iron into the spinning wheel. As soon as I make light contact, I turn the grinder off and inspect the bevel to see how close to the center I actually am. If I’m out of center, then I gently tap the tool rest up or down appropriately to correct its position and try again. When the iron is centered, I’m ready to start grinding the remainder of the bevel. I proceed by moving the tool back and forth along the moving wheel checking my progress every few passes. If I’m grinding a smoothing iron I will introduce a light camber to the blade by subtly moving the tool in an arc to remove more material at the edges. Otherwise I strive to keep the edge square to the side of the iron. I keep light pressure on the back of the iron; just enough to keep the blade on the tool rest so that I don’t inadvertently change the grinding angle with excessive pressure. I keep grinding until I remove the black marker from the existing bevel. Take care when you get close to the edge of the iron. This is where burning will occur if you’re not careful. You will know when you’re close to the edge when the sparks from grinding start coming out on top of the iron.
Hone the Bevel
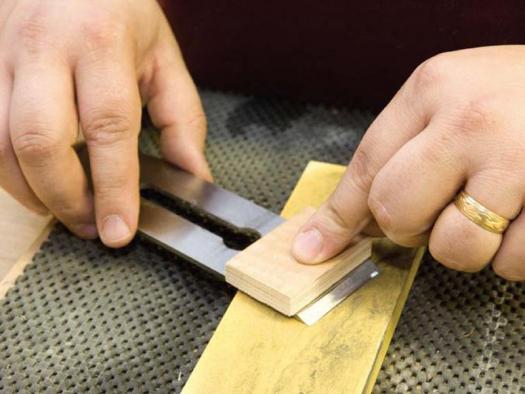
After a bevel has been ground it’s time to hone the iron. I use a 8000 grit stone to hone the bevel because every time the edge is honed, a small amount of the hollow bevel is worn away. I try to remove the minimum amount of material when I hone as this will mean less trips to the grinder to reshape the bevel. There may be a slight burr on the back of the iron as a result of grinding. We will remove this in a later step.
I place the iron on the far end of the stone, and then slowly elevate the iron until the toe of the bevel touches the stone. It is quite easy to judge when the toe touches the stone because you will feel a distinct tap. Also, the water or oil you use to lubricate the stone will push out from under the toe when it makes contact. Once the heal and toe are touching, I simply drag the iron towards me on the stone while maintaining contact on the stone. I try not to push the iron away from me on the stone because if the iron digs in it will create a gouge that will have to by removed by flattening the stone. If I’m honing a cambered blade, I will alternate pressure from one side to the other with my fingers. In the case of a straight blade, I keep the pressure equal on both sides. I repeat this action for about a dozen strokes, and then check my progress. I’m looking for the heel and toe to have a consistent polished line along them. Once I have these two polished lines, I flip the iron over and polish the back on the same stone. This action will remove any burr that the grinder has raised.
Checking For Sharpness
To check the iron for sharpness, I attempt to make a paring cut on the end grain of pine or poplar. A sharp iron is required to cut end grain in these woods because they are very soft and the fibres tend to want to bend over instead of being shorn off. Some woodworkers check the sharpness of their irons by licking their arms and shaving a bit of hair off. I am not one of those woodworkers. Just because I am able to shave my face with a dull razor doesn’t mean that it will give me the best shave. The same is true with plane irons. Hair is easily cut compared to end grain wood fibres. As well, the hair technique leaves you with all those unsightly bald patches running up your arm. The real test is to place the iron into your plane and take some shavings.
If this seems like a lot of work, you’re right. Every one of my many edge tools has had this treatment. It is a necessary task, but your hand skills will greatly improve with sharp edges. The good news is that once the back is flat and the edge is hollow ground, it only takes a few strokes to rehone the edge. The only time you’ll have to head back to the grinder is when the hollow bevel is gone or if you get a large nick in the edge. If you invest this time now your tools will be ready to go and you can focus on the fun stuff… your woodworking.
Flattening Waterstones
Waterstones wear fairly quickly, so it’s good practice to regularly check them for flatness. One of the quickest ways to do this is with a Norton flattening stone. The stone is made from a coarse silicon carbide, and has diagonal grooves milled across its large 3″ x 8″ surface to catch any slurry. Begin by drawing a grid of pencil lines across the surface of your waterstone. While doing this place the flattening stone in a container of water.
Because it’s so porous it will absorb water very quickly. Now simply rub the flattening stone across the surface of the waterstone with firm, even strokes. Check your progress every couple of minutes. As soon as you’ve removed all the pencil marks you’re finished.
Honing the back
Grinding the bevel

Honing the bevel

Ready to plane

Check progress often

Draw pencil marks on the stone

Stop when all marks are removed