When it comes to putting a new bevel on a chisel or repairing a chipped plane blade, most woodworkers will gravitate to the bench grinder.
You will find four basic types of grinders on the market today. In this article we will be looking at the conventional dry grinders (you don’t apply water to the wheel). These grinders use an abrasive wheel to shape metal. The other types of grinders include: wet grinders, which use an abrasive wheel that is constantly lubricated by water; belt grinders that use a one to two inch flexible abrasive sanding belt to remove metal quickly, and are commonly used by knife makers and carvers; and the recently introduced turntable style grinders that use adhesive backed micro abrasives discs.
Conventional bench grinders are simple machines that have an abrasive wheel attached to each end of a motor shaft. A set of wheel covers and protective shields which contain the sparks generated during grinding, and a tool rest, complete the basic package. The motor is mounted on a heavy base that also contains the on/off switch, and helps to dampen any vibrations in use. There are holes provided in the base for fastening the grinder to a bench; if you have the space to permanently mount the grinder, it is a good idea to fasten it down to reduce vibration.
Bench grinders are really ‘all purpose’ grinders that the home handyperson, DIY’er, and home hobbyist will find useful for a wide range of uses. However, most woodworkers will likely find that a few modest enhancements will make the grinder a much more functional tool.
Rubbing an abrasive material against a piece of metal causes the two materials to wear away through heat and friction. Obviously, the faster you rub the two together the more material you wear away, and the more heat you produce. Most bench grinders run at 3,450 RPM, which is pretty darn fast. If you’re grinding gardening tools or shop tools with a lot of mass, like axes, cold chisels, or heavy wood turning chisels, you shouldn’t have too much trouble getting a sharp edge without ruining your tool.
But if your sharpening requirements are for plane blades, bench chisels and carving tools, grinding at high speeds can quickly build up enough heat to take the temper out of a tool, and it’s very easy to over-grind and disintegrate the tool tip. There are two things you can do to overcome these grinding dilemmas – upgrade to a set of wheels specifically designed for woodworkers or reduce your speed. The Steel City 15420 and Delta GR450 have variable speed motors running from between 1,725 and 3,450 RPM, while the General 15-825 runs at 1,725 RPM. A lower grinding speed will considerably reduce the amount of heat generated. And you’ll be less prone to grinding away more steel than you really mean too.

Almost every grinder on the market ships with fairly coarse, hard, grey aluminum oxide wheels – typically you get one 36 grit wheel and one 60 grit wheel. Only one grinder (Steel City 15420) has wheels in a finer grit – one 60 grit and one 120 grit. While coarse hard wheels are great for rough metal shaping such as sharpening the edge of a shovel, touching up an axe or shaping metal parts before welding, they are not the best choice for putting a fine edge on your woodworking tools. On coarse hard wheels the particles on the surface will tend to round over when they wear and the surface will begin to clog (referred to as glazing). This generates additional heat that can take the temper out of a tool very quickly. As the wheels glaze over there is a tendency to apply more pressure on the tool being ground, which only produces more heat. Upgrading to a higher quality wheel is recommended.
Regardless of the grinder you purchase, it is imperative that you inspect the wheels before using them. Look for loose sections or cracks, as damaged wheels can come apart at speed and cause injury. You’ll also need to ‘prepare’ the wheel using a dressing tool. Wheels can be out of round, vary in their side-to-side thickness, and vary in their densities. Unbalanced wheels put greater stress on motor bearings, increase wheel vibration, and more importantly, make it very difficult to achieve a fine edge on your tools. Dressing the wheel after it is mounted to the grinder will remove much of the eccentricity in the wheel, leaving it true to the center of the arbour. Additionally it will, when used properly, leave the surface of the wheel flat across its width. To obtain the maximum in wheel balance install the Oneway Precision Balancing System, which uses gravity to rectify inconsistent weight distribution in wheels.
And of course you’ll have to use the wheel dresser on a regular basis to remove the glaze that will invariably build up over time. Surprisingly, not all grinders come with a wheel dresser. The dressers for the Steel City 15420 and Delta GR450 are cleverly stored on the back of the grinder, where they are likely to be easily found, unlike so many of those little tool accessories that inhabit our shops.

There are a lot of factors that go into the production of grinding wheels. Manufacturers have to consider, among other things, the hardness or softness of the material being ground, the area of grinding contact (size of the surface being ground and diameter of the grinding wheel), the amount of material that is to be removed, the smoothness of the finish, and the speed of rotation.
Basically, grinding wheels consist of a mixture of abrasive grains in various sizes, which do the actual cutting, and a bonding agent that holds the grains together while they cut. The grade of a wheel is determined in part by this grain-to-bond ratio, the size of the grains, and their density (grain spacing). Like cookie makers, each manufacturer has its own recipe, and they vary the recipe depending on the kind of grinding the wheel will be doing. A ‘soft’ bond is designed so that the grains fracture (break off) easily and works best on harder metals, while in a ‘hard’ bond the grains require more force to break off, and work best on softer metals. Grit size refers to the actual size of the abrasive grains. A coarse 36 grit wheel is best used for quick removal of material where the surface finish isn’t important. A finer 120 grit is more appropriate when you want a smoother finished surface.
For grinding bench chisels, plane blades and small carving tools, what you want is a finer grit wheel (80 – 120 grit) with a soft bond. Unfortunately, most grinders come with coarse grit wheels in the 36 – 60 grit range, that have a hard bond. Which is why so many woodworkers upgrade their wheels. Upgrading wheels is comparable to replacing the stock blade included on your table or band saw with a professional model. Premium wheels, such as the Norton 3X or those made by Oneway have an open structure with a soft bond. As the tool is applied to these friable wheels the abrasive surface starts to fracture and small particles break away from the surface. This constantly exposes new cutting edges that are always sharp, and the surface never loads up with the material being ground. Since the tool is constantly exposed to fresh cutting edges, not as much pressure is required during the grind and as a result heat doesn’t build up as quickly. We use the Norton 3X wheels on a low RPM grinder and find the tips of chisels barely warm to the touch after grinding.
When a new wheel has been mounted on a grinder, before its first use, it should be dressed. In most cases the wheel will be off center slightly; dressing the wheel will true it to the arbour. Wheel dressers come in several different types, with the most common being dressing sticks, star wheel dressers, single point diamond dressers, and our favourite, multi point diamond dressers. Check with the wheel manufacturer for specific recommendations for the particular wheel you are using. To dress a wheel, set the tool rest so the dresser meets the wheel at 90º, stand aside, and turn the grinder on. Let it spin for a minute or so to ensure that it is sound. Move the dresser back and forth across the front of the wheel until it has worn away all high spots. You don’t need to apply a lot of pressure. Periodically, as the wheel is used, dress the surface to expose fresh abrasive and true the surface to correct any uneven wear.

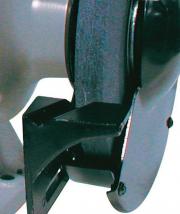
Tool rests are the part of the grinder you will interact with every time you use it. Some are robust and solid while others can often look and function like an afterthought. Unless you plan on replacing the tool rests immediately, select a model that has solid tool rests that are easy to adjust and are made of metal that is thick enough not to deflect in use. Cast iron is a good choice. A large tool rest, such as found on the DeWalt DW758, is desirable. We also like tool rests that can be adjusted by knobs, such as on the Steel City 15420, rather than having to use an allen key or wrench.
When setting the rest, keep it as close to the wheel as possible, a distance of 1/8″ is best for most situations. Setting the rest too far from the wheel increases the risk of the tool getting caught between the rest and the wheel. Some grinders have a set of serrations at the point of attachment, the purpose of which is to prevent the rest from shifting in use. However these serrations can also make it impossible to set the rest to an accurate angle setting.
Some grinders (Craftex B2248, King KC-890, Ryobi BGH827) incorporate an angled guide-way in the rest to allow the sharpening of drill bits, and while it may seem like a good idea, it is not a feature we have ever used on any grinder so equipped. While this type of arrangement will grind the surface of the bit, it cannot establish the proper relief angles needed to make the bit function properly; at best it could help to rescue a badly damaged tip in a pinch. If you intend on using the grinder to grind chisels, this guide-way will actually reduce the surface area supporting the chisel making it more difficult to get a good grind.
None of the tool rests provide an edge to register a tool against. Woodworkers often improvise by clamping a piece of wood or metal to one edge of the tool rest (if it’s large enough). The second most dramatic improvement you can make to a bench grinder (along with replacing the wheels) is to replace the tool rest. There are several high quality after market tool rests that have features to make grinding edge tools easier and more precise.

You only have to use the tool rest that came with your grinder a few times to realize its deficiencies. These tool rests are typically small, lack a support to align your tool square to the wheel face, and are limited in their adjustability. Fortunately there are several aftermarket tool rests available. If most of your sharpening is on bench chisels, plane blades or other small tools, then you’ll love the Veritas Basic Grinding Set. It consists of an anodized base with a 2 5/8″ x 4″ platform that bolts to a workbench (or a plywood base). There is a channel in the platform along which you can slide the grinding jig (which securely holds chisels and plane blades). A brass pin on the grinding jig enables you to align your tools at precisely 90º. You can quickly lock the rest in position at any angle to the wheel edge. A cleverly designed and very effective enhancement for any grinder.
Wood turners have a special affinity for the Oneway Wolverine Grinding Jig, and with good reason. It comes with two bases that mount on a plywood base under each grinder wheel. The bases have a cam lock clamp that enables you to quickly move the large (3″ x 5″) tool rest from one wheel to the other. An adjustable speed handle lets you set the tool rest at any angle to the wheel edge. There is no feature to accurately position tools square to the wheel face, but you can easily clamp a small wood fence to the tool rest. The system includes a V-arm that greatly facilitates sharpening long turning tools. You can also purchase several other accessories specifically designed for sharpening turning tools. A rock solid grinding jig.
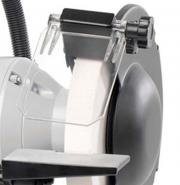
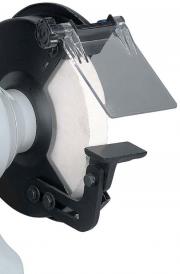
It’s very important to protect your eyes when using a grinder. We recommend that you always wear protective eyewear and use the spark guards (a.k.a. eye shields) on the grinder. We prefer a large, clear guard like on the Craftex B2248, made from a flat piece of plastic that can easily be replaced from common materials when it becomes dirty or damaged. As with the tool rests, a plastic knob to adjust the guards is preferable over set screws.

Some grinders have lights, some don’t; this is a feature that should not be considered a deal breaker. An on-board light can be a nice feature for those of us whose eyesight is faltering, or if you plan to place the grinder in a dark corner of your shop. We do find they often vibrate quite a bit and rarely have enough range of motion to be useful. The Ryobi BGH827 has lights under each spark guard, and a magnifying lens on the left side spark guard, so you can get a closer look at the item being sharpened. It’s always handy to have a bit of water at hand when grinding, and some unit, notably the Steel City 15420 and Ryobi BGH827, have cooling trays. We can’t think that they would be of much use, as they don’t hold much water and it would warm up pretty quickly. A one litre container of water placed beside the grinder is what’s called for.
And don’t forget that you can add other accessories to your grinder, including wire wheels, which allow for quick removal of rust or paint from metal without damaging the surface, buffing wheels for polishing metals, and felt wheels for honing tool edges.


Running upgraded wheels on a low RPM grinder with an aftermarket tool rest is about as far as you can take this tool, and it will likely handle most of your sharpening needs. For those who want the ultimate in powered sharpening machines it is worth looking at a complete sharpening system such as those made by Veritas, Tormek and Delta. These are designed from the ground up with the woodworkers sharpening needs in mind. These über sharpening systems do come with a premium price tag but the fast, accurate and repeatable results they provide can be well worth the additional cost, particularly for the serious home hobbyist or professional woodworker.
These three units feature larger abrasive surfaces than a standard bench grinder, allowing you to sharpen wider items like plane irons easily. With optional accessories some will handle jointer and planer knives as well. The Delta 23-710 and Tormek T7 systems are water cooled to reduce the risk of overheating edges during grinding. In addition to the larger 8″ horizontal wet wheel, which has a 2 1/2″ grinding surface and spins at 400 RPM, the Delta has a smaller aluminum oxide wheel with 2″ of grinding surface spinning at 3,450 RPM. Like the Delta, the Tormek has an 10″ wet wheel, with a 2″ grinding edge, but it is mounted vertically, as on a conventional grinder.
It also has a second wheel, but in this case it is made of leather and is used for final honing to a mirror finish. The Tormek spins at a mere 75RPM, which makes it virtually impossible to ruin the temper on your tools. It also offers the widest number of accessories of any grinder on the market. If you prefer not to bother with the fuss of having a water-cooled system, the dry Veritas Mk.II Power Sharpening System uses modern abrasive papers in grit sizes from 80 to 1200, on a horizontal turntable system that spins at 650 RPM.
Using two double-sided 8″ discs provides four different grit levels that will see you through from basic edge shaping to a final honing. The tool is secured in a holder designed to set the correct projection and angle, and differing platter thicknesses automatically establish a 1º micro bevel when using the two higher grits.