PROJECT
Display Case

Michael Kampen

Find more Cabinetry projects , Featured projects projects
Everybody has something that means a great deal to them, something they would like to display, yet keep safe from harm.
Everybody has something that means a great deal to them, something they would like to display, yet keep safe from harm. In this instance it is the military medals and cherished items of Cecil Fulcher, the father of founding Canadian Woodworking publisher Paul Fulcher.
The design of this case is a bit different from the display cases that I found when researching display cases over the internet. Most of the ones I found were little more than a shallow plywood box, capped with a picture frame. Once the items were mounted, they were forever beyond reach. This display case takes a slightly different approach. It is still a shallow plywood box with a frame on it, but the frame takes the form of a door that can be opened. This allows a more intimate contact with the items that are inside.
Display Case
When you are making your display case, remember that this particular box was custom made to hold military mementos that were inherited. In all likelihood you will have different artefacts, so your box will need to be a different size. Make adjustments to the dimensions in the accompanying materials list as required.
Also, rather than worry about how to display all of the various pieces, we decided to have the pieces mounted by a professional framing shop. That way, it was all set in an attractive and balanced mounting that I simply built around.
Military Precision
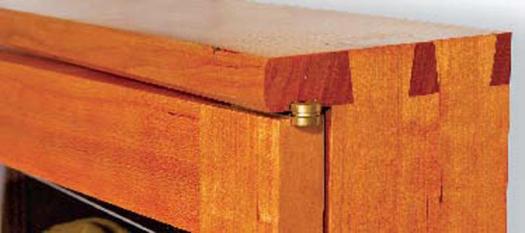
I used solid brass Brusso knife hinges for the door, as they are elegant and yet unobtrusive. The latch side of the door is held in place with a pair of Brusso ball catches. Both of these are very fine pieces of hardware that demand precision fitting. Once you have cut the mortises for them, there is no room for adjustment – they either fit or they don’t. If you choose to use this same hardware, take your time during the installation phase. Using the simple tricks that I show you, it is possible to achieve perfect results, even the first time.
Strategy
When selecting your wood at the lumberyard for this project, bear in mind that the object is to build an elegant display case to show off the contents.
Select wood with this in mind – the case should not draw attention away from the contents. Straight grained stock works the best, giving the final project an understated appearance that compliments the contents.
You will need about seven board feet of 4/4 stock for this project. When you get the wood back to the shop let it acclimatize for a few days. Select the stock you will be using for the case and door components with an eye for grain and colour. It’s best to order the glass for the door after you have assembled the door.
This display case is essentially a box with a door. As such, the top must match the bottom, and the rails and stiles (opposite each other) must be precisely the same. The most basic step toward accurate construction, and hassle free hardware fitting, is to machine both components of a pair with one machine set-up. Set an end stop and cut both pieces to length one after the other. Use the same fence setting to rip both sides to width before cutting them to length.
Box and Door
- Joint and thickness plane the lumber for the top and bottom (A), sides (B), and the door stiles (C) and rails (D) to a final thickness of ¾”.
- Rip the top and bottom to 4″ and the sides to 3″ and trim to finished length. The materials list gives measurements for the sides when using through dovetails. If you use a butt joint reinforced with dowels or biscuits, or other type of joinery, adjust the length accordingly.
- Cut the door stiles and rails to size.
- Cut the mortises (⅜” wide x ¾” deep) on the stiles and corresponding tenons on the rails.
- Glue up the door. Check the diagonals to be sure the door is perfectly square.
- When the glue has set, remove the clamps and mount a bearing-guided rabbet cutter in the router table and, taking a couple of passes, rout a ⅜” x ⅜” rabbet around the inside back perimeter of the opening to receive the glass panel (L).
- Cut the mortises for the hinges on the router table: (see Sidebar: Installing Knife Hinges)
- Use a dish carving bit in a router table, set just slightly proud of the fence. Cut two shallow finger indentations on the latch side of the door.
- Sand the door in preparation for finishing.
The Main Box
I used a dovetail jig to cut the through dovetails on the main box. Biscuits or dowels would be equally as effective. If you go this route, remember to deduct the thickness of the top and bottom from the length given in the materials list for the sides. The sides are not as wide as the top and bottom, so if you are using a dovetail jig, bear in mind that most jigs require a common reference edge to ensure all parts line up. I used the back edge of the milled boards as my common reference edge for all set-ups.
As mentioned, the matting and mounting was done at a local framing shop, which allowed me to focus on constructing the box. The mounting measured 1¼” x 23″ x 17½”, and sits inside the display case, being held in place with a bezel made of cherry (E, F). These pieces of cherry sit in stopped grooves in each side of the box. If you opt for butt joints instead of through dovetails, the grooves in the side pieces must run the full length of the side boards. I cut mine on a router table using a spiral Onsrud bit.
- Cut through dovetails on the top, bottom and sides pieces. You can do this by hand or machine.
- Set up a 5⁄16″ spiral bit in the router table and rout the grooves for the bezel pieces in the top, bottom and sides.
Lay Out the Hardware
In order to accurately lay out the hardware on the top and bottom pieces, dry assemble the box and clamp it to draw the joints tight.
- Lay the case on its back.
- Use a laminate sample (like you get from a building or home improvement store) to set the proper gap between the door and the cabinet. Place it on the edge of the side to act as a spacer when laying out the mortise location.
- Lay a 3⁄16″ wood spacer on the laminate. The top of the spacer represents the back edge of the mortise. Draw a line on the top and bottom showing the edge of the mortise.
- Use the same hinge leaf and drill bit to set the hinge in place, and mark the other sides.
- Reset the router fence and use the same stop block set-up used on the door to rout the mortises in the top and bottom.
Install the Catches
The latch side of the door is securely held by ¼” Brusso bullet catches. The holes for these have to be drilled in exactly the right place before the case is assembled.
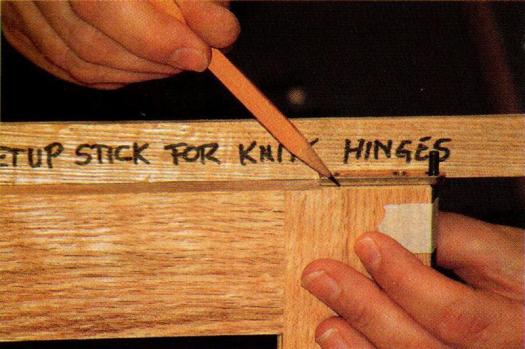
- Extend a fine pencil line out to the front edge from the inside corner of the box.
- Take the piece of laminate you used to set the door gap and place it on the hinge side of the catch. This represents the gap between the door and the cabinet.
- Since the mortise is set 3⁄16″ in from the back edge of the door, and the Brusso hinge is ⅜” wide, simply lay the hinge flat on the piece. The edge represents the centerline of the hinge on the other side of the cabinet. Carefully scribe a short line so that it intersects the pencil line extended along the corner to the front edge. This intersection is the center of the of the cabinet bullet catch.
- Use a ¼” Forstner bit in a drill press to drill the hole. Set the depth stop carefully – the hole must be the exact depth required by the catch.
- Sand the interior surfaces.
- Glue up the box. Once the clamps are on, check the diagonals to be sure the box is perfectly square.
- When the box comes out of the clamps, measure the distance to the center of the hole from the side of the box. The easiest way to do this is with the bottom of a dial or digital caliper.
- Transfer this to the door and strike a line. This is the centerline of the catch in from the side.
- Lay the door face up on a flat surface. Using the hinge leaf, set it flat against the bottom, mark the front to back centerline of the bullet catch.
- Drill the hole for the catch. Again, be sure to mind the depth to ensure the proper projection for the catch.
The Finish
Cherry can be a tricky wood to stain, as the wood tends to absorb the pigments unevenly, resulting in a blotchy appearance. With cherry’s natural beauty I’ve always preferred to highlight the grain and colour with a natural oil, followed with a beeswax finish.
- Sand the box, door, and bezel pieces through to 180 grit.
- Finish with Watco Natural Oil. Do not get oil on the inner section or in the groove for the bezel.
- Glue the bezel pieces into the grooves.
- Follow up with a couple of coats of a natural beeswax polish, buffing between coats, to give it a classic hand rubbed finish.
- Install the glass in the door. I took the door to a framing gallery and had them install the glass, fastening it in place with glaziers point. You can add a bead of silicone in the corners as well or use some wooden strips and brad nails as I did for a more finished appearance.
- Install the hardware and the door.
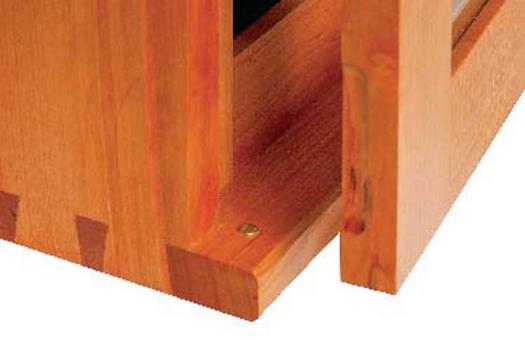
Install the Spacers
- Mill material for the spacers (G, H, I), back (J) and cleat (K).
- Using the table saw, rip the cleat in half lengthwise at 45º. You will attach half of the cleat to the back of the box, and the other to the wall, which will enable you to easily remove the box from the wall as needed.
- Using glue and a brad nailer, install the spacers. The spacers form a ledge to receive the back and center the package in the door opening.
- Place the back on the spacers and mark out three mounting holes along either side. Make sure these are symmetrical from top to bottom. It will allow you to change the door swing by reversing the contents and putting the back on upside down.
- Drill and countersink the four mounting holes.
- Glue and screw the one half of the cleat to one end of the back. Orient it so the sharp edge of the bevel is against the wall and down.
Install the Mounting
- Lay the box face down on a table.
- Place the contents in the center cavity and fasten the back in place with eight screws.
- Attach the other half of the cleat (K) to the wall. Be sure to drive the screws directly into a frame member to support the weight of the cabinet. If the location or wall construction make this impossible, check with a local building centre for a fastener appropriate to your situation.
Stand back, be quiet, and give thanks to the contributions our veterans have made to the peace and security we all enjoy today.
Medals like these are earned at great personal sacrifice and it is important that we recognize the efforts our family members have made on our behalf; display them with appreciation and keep the link to your past alive.
Installing Knife Hinges
The method I use works with the Brusso hinges from Lee Valley, which are ⅜” wide. If you use other hinges, check the measurements first. All routing is done on a router table. To set the projection of the hinge past the edge of the door, I use a ⅛” drill bit. To set the gap between the door and the cabinet I use laminate samples, and to set the hinge setback, some scrap wood.
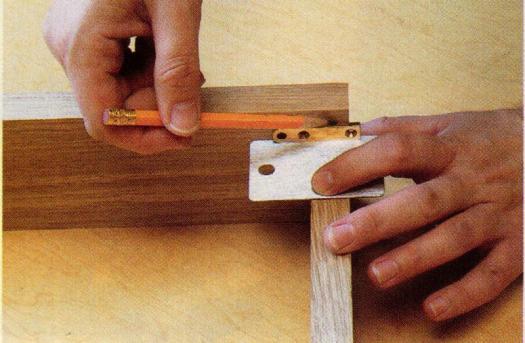
- Prepare a 3⁄16″ x ¾” x 12″ wide strip of wood. This will become the spacer you use to locate the hinges and set up the router. The spacer represents the setback from the edge of the door to the beginning of the mortise.
- Using painter’s tape, secure the ⅛” drill bit to the center edge of the door that is to receive the hinges. Take the hinge arm with the hole in it and slip it over the drill bit.
- Hold the strip of wood along side the hinge arm so that it is flush with the edge of the door. Hold the hinge in position and mark the three sides.
- Install a ⅜” spiral cutter in your router.
- Use the spacer to set the fence 3⁄16″ away from the cutter. This will locate the mortise the correct distance in from the back of the door.
- Set a stop block to limit the length of the mortise, and set the bit to project from the table so that the depth of the mortise is slightly less than the thickness of the hinge. I use a router table and constructed an L-shaped stop block that I can quickly clamp to the table. It automatically sets the right length for the hinge mortise, and can be switched to the other side of the table to rout the mortise on the other end of the door. Because the back of the door must ride on the fence during both cuts, the door must be turned upside down and the stop moved to the other side of the bit. Because it is not adjustable, it ensures that the mortise is the same length every time, no matter which side it is on.
- Rout both hinge mortises on the door.
Photos by Michael Kampen
Illustration by Mike Del Rizzo


Very nice Michael, I made a similar cabinet with a door last year out of red oak…….Regards, Rod Sheridan