TIPS & HOW TO
Sand by hand

Steve Der-Garabedian

Random orbit sanders have improved greatly over the years. They’re now more comfortable to use and do a much better job of collecting the dust they create. However, there are plenty of times we still need to sand by hand.
Hand sanding may seem like a chore, but it doesn’t have to be. There are times when it’s a necessity. It’s hard to sand small pieces or hold a vibrating sander on a thin curved edge. Doing it by hand is ideal and, in some situations, more than likely the only way. I love working with veneers, and after using a random orbit sander I switch to hand sanding to tackle final smoothing and small trouble areas. Sanding by hand gives me more control and reduces the likelihood of sanding through veneer.
Protect yourself
Wood dust from sanding is one of the most harmful objects we come across in the workshop. That might surprise some, considering all the sharp edges and high-powered machinery we work with, but wood dust is a carcinogen once it gets into your lungs. Protect your lungs and wear a good dust mask. Many woodworkers wear a proper mask or respirator not only when they’re sanding, but during their entire time in the shop.
Vacuum your dust instead of blowing it with a compressor. And if it’s warm outside, ensure the windows or doors of your shop are open so cross ventilation can provide some assistance in removing airborne dust.
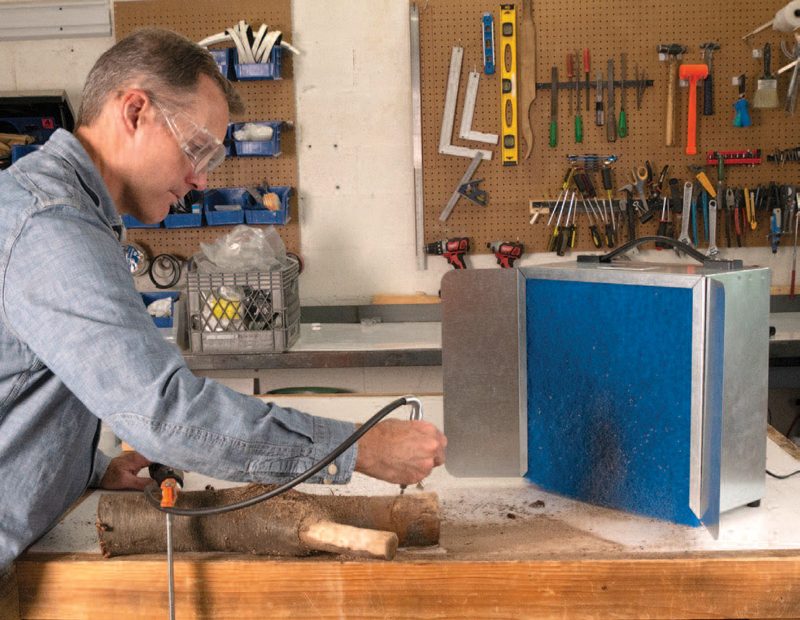
There are also dust control options beyond the standard dust collector. Oneida’s Benchtop Variable-Speed Personal Dust Collector is great for when you’re doing smaller sanding tasks. It sucks in and cleans dust-laden air at the source with no dust ports to deal with. Downdraft tables can also assist with keeping the air you breathe clean. They’re essentially work surfaces covered in holes that suck air down into a cavity below the table’s surface and onward to your dust collector.
Shop-made solutions
While there are a lot of good commercial sanding solutions out there, such as sanding blocks, sponges, cords, tapes, twigs and more, it’s also easy to make up some of your own tackle. Making your own will be a better solution since it will be dedicated to your specific project rather than something manufactured for general use.
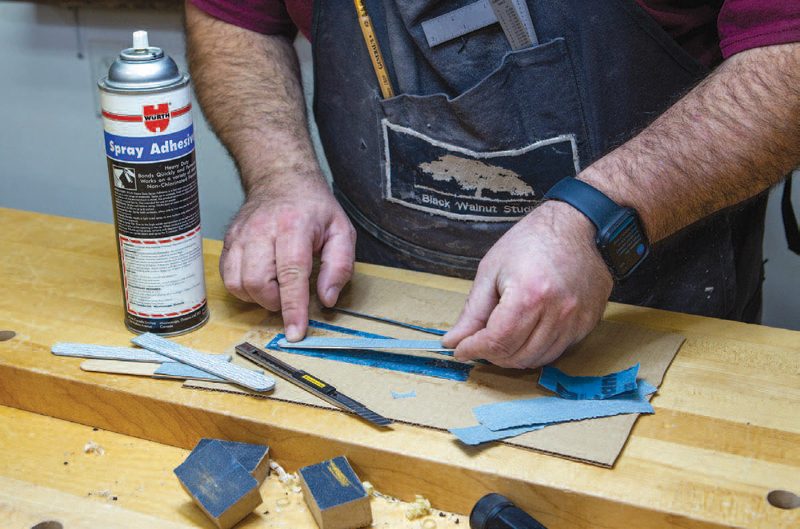
One of the easiest is shop-made sanding sticks. Dollar and craft stores are a good, cheap source for tongue depressors and popsicle sticks which make for effective sanding in hard-to-reach areas. You can also look through your scrap pile for thin pieces of wood. Use self-adhesive sandpaper or make your own with spray adhesive. Much like applying finish, or veneers for that matter, what you do to one side you must do to the other. When first making my own, I had applied sandpaper to only one side and marked the other with the size of grit. This ended up warping the stick into a concave shape, which in certain cases can be desirable. You can generally feel the difference between grits, but if not write the grit on masking tape and attach or detach as you use it.
Another similar shop-made solution is to wrap a dowel with sandpaper for curved work. There are times I will wrap some cork around the dowel first, then add sandpaper with masking tape. The cork helps cushion the strokes on delicate work or if we are a bit too heavy handed.
Today’s sanders come with speed control as well as various hardnesses of sanding pads. Soft pads allow for work on slight curves while hard pads are meant to help stop rounding over the edges on our work. I find that when I’m sanding by hand I tend to round over edges. While sometimes I use that to my advantage, I don’t always want a soft edge. In those cases, I use sanding blocks, either shop-made or bought. I always apply self-adhesive cork to the business end of the ones I make. This is to cushion the sanding action and, along with finer grits, prevent unwanted reshaping of parts.
One of the blocks I use the most is the wedge-shaped version I wrote about in the June/July 2021 issue titled “The Power of Wedges.” I’ve made several of these in different widths and have different grits loaded on each. They’re comfortable in the hand and can be held against your bench with minimal effort, thanks to the sandpaper wrap. I find it convenient and easy to sand small parts this way.
Another task better suited to hand sanding is that of curved work, especially when the parts are thin. While you could run a power sander over the curve it would be harder to control. For these instances I like to attach self-adhesive sandpaper to 1/8″ thick hardboard. Or, if the curve is more radical, I attach the sandpaper to a piece of wiggle wood. Non-flat surfaces can also be smoothed with a range of sponges, flexible pads and tapes all available in different sizes and grits.
Sucking it up
Since I work with veneers, I also wanted to find a way of being able to sand by hand under vacuum. Specifically, I was looking for a way of sanding panels where a dark-toned wood was mated near a lighter-coloured wood. It’s a nightmare to keep the joint crisp between solid ebony edging and holly or white ash veneer. I was surprised to find two well-made solutions that weren’t terribly expensive.
The first is the Mirka Abrasives’ Roundy Hand Block Kit. The kit includes a Velcro-lined block, hose adapter and several different grits of Abranet sanding disks, although you can use your own 6″ disks. The second solution is the Festool Hand Sanding Block. It comes with a hose adapter and uses their line of Granat StickFix abrasive sheets. Both did a good job of keeping dust off of my work and out of the shop. I find I reach for these two vacuum blocks more and more, especially for rounding over hardboard cauls so they won’t puncture vacuum bags, as well as when working with the aforementioned different toned woods. Anywhere you can use a sanding block these will do the trick and eliminate most of the dust.
Custom work
If you do curved work then custom sanding blocks will be your best friend. It’s easy to match the curve by taping rough grit sandpaper, somewhere in the range of 80x or 120x, to the curve. Next, take a small block of thick pink rigid insulation and form the curve by running it across the taped sheet. With little effort you’ll soon have an exact match for the radius. Use spray adhesive to attach different grits to your custom blocks. Be careful with spray adhesives and rigid insulation as some formulas will eat the foam.
There are plenty of other solutions as well. There are all sorts of shapes and sizes of blocks you can purchase, contoured rubber forms that allow you to conveniently sand moulding no matter the profile, stick sanders that use narrow sanding belts and tension themselves via a spring and bow sanders for another option for sanding curved work.
It’s getting better
Random orbit sanders aren’t the only thing that’s improved with time. Sandpaper has also benefited from research. We now have more flexible sandpaper, synthetic steel wool and abrasive pads made for the car industry that have found their way into our woodworking circles. Man-made abrasives are also proving to be better compared to natural abrasives such as garnet and emery. Aluminum oxide and silicone carbide are just two of these compounds.
Longer-lasting aluminum oxide particles are constantly breaking to reveal new, sharp edges. Silicone carbide sandpaper removes material quickly but doesn’t have the longevity of aluminum oxide. One of the better improvements has been in mesh types of abrasives that allow for better dust collection when paired with a vacuum. Different formulations of sandpaper are also better suited to different aspects of woodworking. Raw wood does better under aluminum oxide, where once garnet was king. Finished or painted woods are better cleaned up with silicone carbide-based sandpaper.
Tricks and a few tips
Hand sanding is almost always done in the direction of the grain. Depending on certain woods, I find that skewing the block as you move up and down your work, similar to skewing a jack plane as you push it across a board, leaves a better surface. If you’re going to do a lot of levelling with sandpaper then try these suggestions. Use a block that you can attach to a vacuum like the ones previously mentioned. For the rougher grits move diagonally over the board as if you were using a jack or jointer plane to level a bench top. Then switch to the same direction as the wood’s grain for the finer grits. Don’t skip grits, especially the rougher ones, since you’ll see some bad results and only after you apply the finish. You can also use a low raking light to see any defects.
Depending on the wood or finish, sandpaper will clog with what you’re removing. You can unclog sandpaper by either banging a block against your palm or even vacuuming it with a brush attachment. While sandpaper has improved, you still need to replace it when it’s worn. Much like a dull chisel or plane blade, you need sharp edges to get good results. You’re wasting energy and possibly scratching your work by using worn sandpaper that just slips instead of cuts. The same applies even more so for power sanding.
While machines have improved over the years, they still don’t fit every situation. Besides, we have more control and a finer touch using our hands and fingers. It’s hard to ruin a solid oak tabletop with power sanding, but if you’re working on a piece that has been veneered, or has some nice smaller details to it, hand sanding will safely smooth surface and ease edges while readying the surfaces for a finish. They say applying a finish is one of the most important steps of building quality furniture, but the first step in readying wood for a finish is to prepare it carefully and thoughtfully.
Photos credit: Steve Der-Garabedian
Remove Airborne Dust
Oneida’s Benchtop Personal Dust Collector can be placed directly in front of what you’re sanding to pull in dust and remove it from the air. (Photo by Oneida)
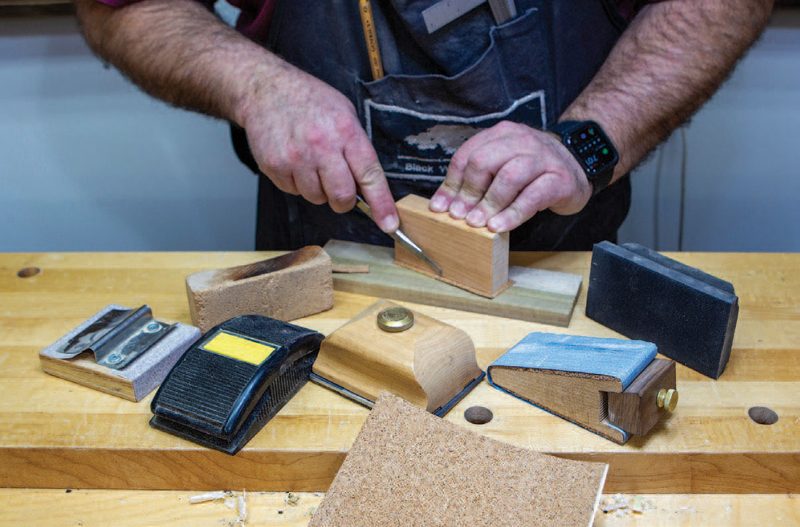
Sanding Sticks
Der-Garabedian makes his own sanding sticks with tongue depressors, though thin offcuts also work well. Either self-adhesive sandpaper or a spray adhesive will allow you to adhere the abrasive paper to the sticks.
Roll It Up
Der-Garabedian wraps sandpaper around a dowel to sand curved areas. He often uses cork between the sandpaper and the dowel, though it’s not necessary.

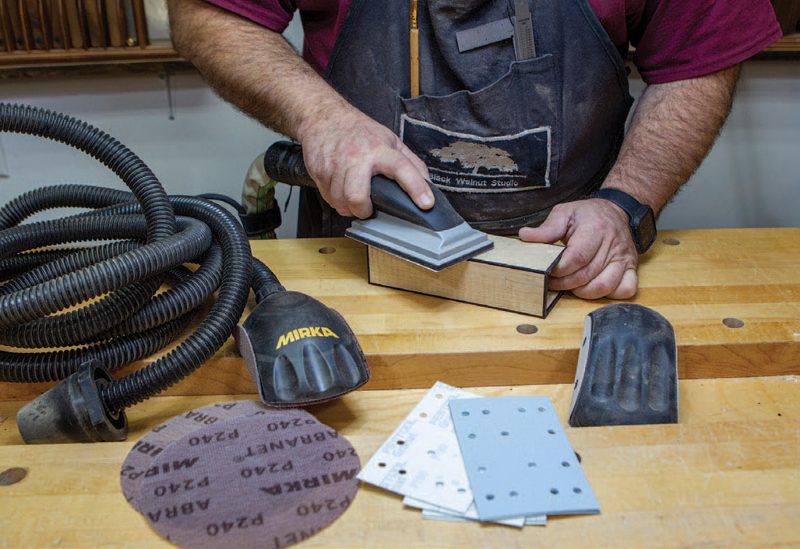
Sanding Blocks
Sanding blocks have been around for ages, though I bet you never thought of making them in so many different types and shapes. Der-Garabedian has a large collection of different sanding blocks, both purchased and shop-made. Cork is regularly added to the blocks to offer a softer, smoother feel and function. Here, he adds cork to the edge of a sanding block.
Small Surfaces
For sanding small surfaces, especially when those surfaces are veneered, it’s impossible to beat hand sanding.
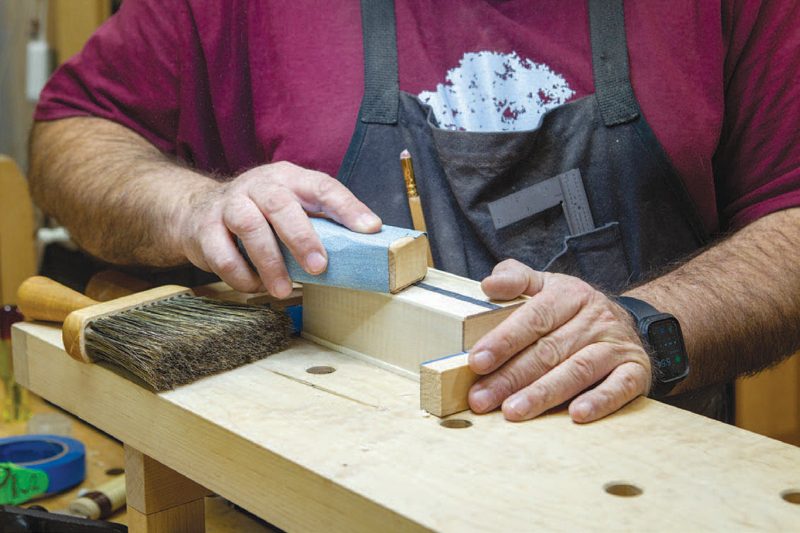
Flip It Around
Instead of moving the block, consider holding the block stationary and moving the workpiece over it for better control when sanding small pieces.

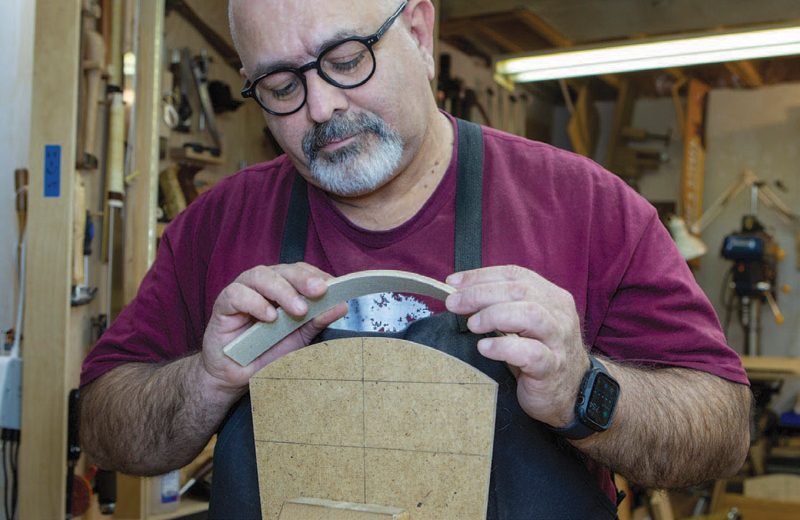
Lots of Curves
Here, Der-Garabedian has applied sandpaper to a wiggle-wood offcut. This will allow him to sand curves of virtually any shape or radius.
Many Options
From sponges and pads to cords and sticks, there are a lot of options when it comes to store-bought sanding accessories.

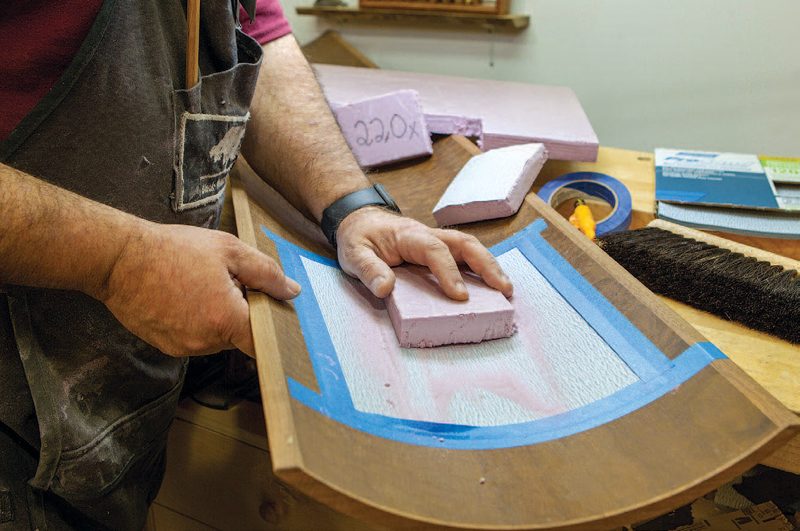
Custom Sanding Pads
By using the curved workpiece as a shaping device, Der-Garabedian is able to quickly and easily make curved sanding blocks out of rigid insulation with the perfect radius on them.
Keep It Clean
Vacuum-attached sanding blocks provide a nearly dust-free solution.