TIPS & HOW TO
Patterns, Templates & Jigs

Michael Kampen

If you are looking to make your woodworking easier, faster and safer, then you’ll want to use patterns, templates and jigs.
For a very simple project, such as the saw blade storage box (June/July 2007, Issue #48), all you may need is a basic sketch of how the parts fit together, along with a material or cut list. Then it’s off to the shop.
For a more complex project, like Rob Brown’s Secretary Desk (Apr/May 2007, Issue #47) you’ll want to give careful consideration to the kinds of shop aides that can help you mill project pieces easily, accurately and safely.
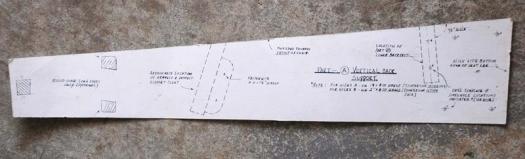
For difficult projects it is a good idea to draw, on paper, a full sized pattern of the whole project. You’ll more easily be able to work out (and understand) construction details; you’ll get a much better visual impression of how the completed project will look (enabling you to make design changes before you commit to the construction process); and you’ll be able to cut out parts of the pattern to aide you in milling individual project pieces.
Some parts of a project might be fairly complex and time consuming to build. In such a case you could transfer the patterns for these parts onto sheet stock – these sturdier templates would stand up to more repetitive use and could also be easily stored for future use.
In other situations there may be parts of a project considerably more intricate and time consuming to build, and you may have to construct many of these parts. You might even envision using these parts on other projects in the future. Using more robust sheet stock and some additional hardware, you can build sturdier jigs that will significantly increase productivity, accuracy and safety in milling.
The Pattern – A Basic Overall Guide
A pattern is a physical representation of a project. Typically this is a full-size drawing of the project. Newsprint (available at art supply stores) is excellent for large drawings. You can easily lay out grid lines on the paper. For smaller scale drawings graph paper (also available from art supply stores) that has 1/8″ squares allows you to quickly transfer measurements from a project plan. Draw the pattern using a soft 2B pencil – use a light touch and the soft lead will leave a nice dark line that can easily be erased.
You can then cut out individual parts of the pattern using a sharp utility knife and a straight edge for the straight sections and a pair of scissors for the curved sections. Use 3M Super 77 Spray Adhesive to attach the patterns onto pieces of poster board. You’ll then need to trim the poster board with knife or scissors.
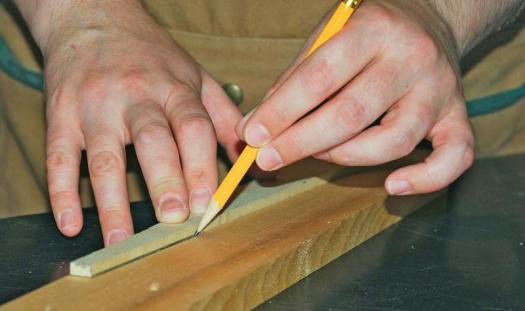
Place the pattern on a piece of stock. Keep in mind that grain running contrary to the curves on your pattern won’t enhance the look of the final product, so place the pattern accordingly. If it is a complex pattern you may wish to tape it in place. Use a sharp 2B pencil to trace the outline on your stock. Remove the pattern and then use the appropriate tools to shape the part. Remember that with a pattern you can transfer the shape onto your stock, but all of the processes to mill the part will still need to be done manually. The pattern mounted to poster board is fine for a limited number of uses, but it is not very durable and will deteriorate after a while.
The Template – A Pattern Built to Last
When you have more parts to make than a simple poster board pattern will allow it is time to make a template. A template is a more robust version of the pattern. To make a template, follow the same steps in drawing the pattern for the part on the graph paper; if your parts are longer than the paper, tape two sheets together. Use spray adhesive to attach the pattern to a piece of ⅛” hardboard and trim away the excess on the band saw. Refine the edges using a sander if necessary, but files are the best tools for fine-tuning a template. You can also use ¼” MDF or Baltic birch plywood for your template. MDF is a little sturdier than hardboard, it can be shaped easily, and its extra width will support a bearing guided router bit. Baltic birch is the ultimate in durable template stock because of its strength and rigidity. When fine-tuning the edge of a template that will be used with a piloted router bit be sure to keep the edge perpendicular to the face of the template.
The Jig – Repetitive Tasks Made Easier
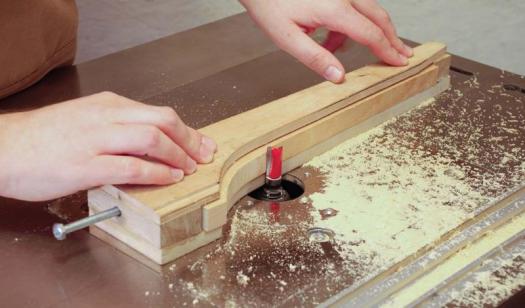
Jigs are production tools used to make a task easier, more productive and invariably more accurate. A template is often the starting point for a jig. If the template is sufficiently robust it can actually be used as the base for the jig – otherwise use the template as a guide to make the jig out of thicker, studier material, such as ½” Baltic birch. An essential part of most jigs are holding mechanisms for the stock that will be milled. Cam clamps are probably the most widely used jig hardware. In each issue of Canadian Woodworking we present a shop jig that will help you make various woodworking operations safer and more precise. Use these jigs as a guide for building your own.
How elaborate you get is a matter of personal choice. At the very least, spending the time to make full size patterns of complex or curved parts will reduce mistakes (and wasted wood) and increase the quality of your work. Time spent working on a pattern will often help resolve other construction issues. If you go all the way and build a jig, you will be able to produce any number of identical top quality copies of a part. Keep the jig for future use on other projects and it will quickly repay the time you invested in building it.
Patterns contain specifics of project
Use template to mark out stock
Use jig to mill multiple, identical pieces


Hi Michael. I recently transferred Adirondack chairs patterns onto 1/8″ templates, and have been back and forth on how I want to go about cutting out the actual pieces. I have a small, less than admirable router table, and a jig saw, and am on the fence whether I should buy a smaller band saw, as I want one anyway, but wondering which tool is going to be the best fit to get accurate cuts (taping the templates to wood for a project this size seems like a lot of router work, and jig saw seems like the wrong tool..) Any advice would be greatly appreciated.