TIPS & HOW TO
How to Teach a Young Woodworker To Carve Spoons

Rob Brown

Kids are often interested in how things are made. And making an item that gets used on a regular basis will also give them a lot of pride and satisfaction.
I think the key to having a good experience while making a wooden spoon with your child is to realize they very likely can’t do everything themselves, and they will get frustrated if you expect them to. If they don’t want to use a bandsaw to remove most of the waste, then do it yourself and show them how it’s done. If they find hogging off a lot of material isn’t easy or fun, maybe show them how you do it, but still include them in the process so they feel involved. Having a good first experience will mean they will likely be back for more one day.
Before we set to work to make this spoon, I let my eight-year-old son, Jonas, use a sloyd knife to whittle a 3/4″ x 3/4″ x 12″ long cedar stick. I showed him three grips: the elbow grip; the thumb push grip; and the pull grip. I also showed him the variation of the pull grip so he could use a few of the fingers of his left hand to carefully guide the blade and remove small amounts of wood while working towards his body. This allowed him to become a bit more comfortable with using the knife, and how it feels to remove a nice shaving of wood.
Design
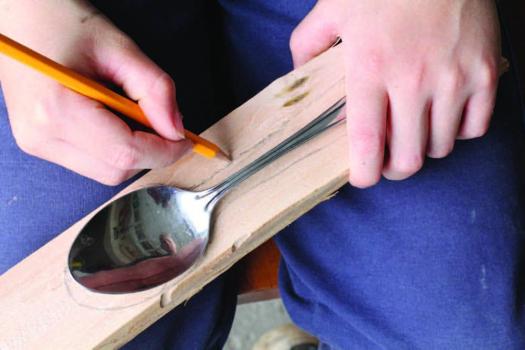
We decided to make a serving spoon. I felt anything smaller might be too hard to hold, while something larger might be too much work, causing boredom and frustration. I was really just aiming for success. We used a metal serving spoon as a rough template, then beefed up the neck and added a slight curve to the handle. A straight handle would have been easier, but the boy wanted some curves in his spoon, and I didn’t want to disagree with his sense of style. The apple doesn’t fall far from the tree.
Our approach
We chose a piece of straight-grained maple from the firewood pile. Greenwood is slightly easier to work with than kiln-dried wood, but if kiln-dried is all you have, go for it.
Machinery offers lots of benefits, but I mostly wanted my son to get familiar with the simple task of using a knife to carve a wooden spoon. Don’t get me wrong: I did use electricity to quickly dress the workpiece to rough thickness, and remove the vast majority of the waste. After the outline was marked on the blank, my son and I shared the task of removing much of the waste with a scroll saw. A scroll saw is a bit slow for cutting 1″ thick maple, but it’s quite safe and quiet. Cutting close to the line removed as much waste as possible, and left less material for the knife to remove.
I also secretly removed some of the excess material on the edges of the underside of the bowl, so he wouldn’t have as much wood to deal with. After all, I was aiming to keep Jonas from getting frustrated with a drawn-out process.
Hollowing the bowl
Many spoon carvers hollow the bowl late in the game, but I thought it would be easiest to do this towards the start, because we could clamp the workpiece down while we hollowed.
When it comes to hollowing out the bowl of a spoon there are many options, but I was focused on whatever method would be easiest for an eight-year old. Everyone’s different, but I felt a razor-sharp carving gouge would be the easiest and safest approach. We clamped the spoon blank to a solid chair, as the workbench was a bit too high. I also made sure to keep the chair steady as my son carved, as the last thing he needed was to carve a moving spoon.
We took turns—dad first—removing small chips of wood to form the bowl. By the time we were done, Jonas had a fairly good idea how to hold the gouge, how much pressure to use and how to take a light shaving from the workpiece. I still watched him like a hawk, as sharp gouges can slice through skin very easily. We just cut from the outside rim inwards, towards the bottom of the bowl, and repositioned our bodies around the spoon when needed. As we approached the finished bowl, I stressed how important it was to take only light shavings. It worked well, and we ended up with a nicely shaped spoon bowl that would be fine-tuned later. A quick glance at the smile on his face proved we were both proud.
Reach for the knife
Jonas had already practiced grasping a knife and whittling a piece of scrap wood, so he was eager to put his skills to use on something practical. After a quick review of the elbow grip, he was off.
We focused on easing a lot of the right angles on the four corners of the handle. He was soon successfully cutting “downhill” and, with less success, cutting “uphill.” With a short lesson on why it’s better to cut downhill, he was starting to learn some real carving techniques. Soon, he was rotating the spoon and switching it end-for-end when needed in order to obey our “downhill” rule, and starting to naturally switch between grips, though a few times I had to stop him from doing something outside-the-box with the sharp knife.
With the square cross section now eased to more of an octagon, we turned our attention to the neck and the underside of the bowl. This area is harder, as the turns are tighter. Switching between the bowl, neck and handle areas, we worked our way around the spoon a few times. Every so often I would ask him to pause, put the knife down, and not only grasp the spoon like he was using it, but to also look at it for any lumps or bumps that needed to be removed, before picking up the knife again. Having a narrower detail knife, as well as a standard knife, made dealing with the tighter curves a bit easier, but if you have only one knife, don’t let that stop you from taking on this fun project.
My role
Jonas was now doing virtually all the work, but I felt the need to keep a close eye on his technique. His tendency was to remove too much wood with each slice. We talked about how that’s not only more dangerous, but will also leave a rougher surface. He also started to realize how much harder it was on his muscles to remove larger shavings.
The “uphill” versus “downhill” situation was starting to come fairly natural to Jonas, and the odd bit of tearout quickly reminded him of these guidelines, so I didn’t have to.
While tearout is a great reminder of grain direction, and a cut on your hand is a great way to learn how sharp a carefully honed knife really is, I didn’t want him to learn the hard way. I kept reminding him about placing the spoon blank on his leg carefully when using the elbow grip, and keeping the base of his left thumb rotated out of the way while using both the standard and modified pull grip.
More finesse required
I found the initial hour or so was fairly easy, as the cuts didn’t need to be too accurate. Once the spoon was starting to look more like a real spoon, the knife cuts needed to be more precise. The same grips were still being employed, but some finesse was needed when it came to using the grips to remove wood as desired. Rotating the spoon slightly, as opposed to moving the knife to a different spot on the spoon, was something we focused on. Using the thumb push grip allowed for a lot of control at this stage.
It became extra tricky as we worked around the bottom of the bowl, as well as the neck area of the spoon. To demonstrate the small details of carving, I would stand behind Jonas (as he sat in the chair) and bring an arm around either side of him. This allowed me to show him the same view he would see while he carved. I slowly and clearly showed him how I would hold the spoon and the knife, and what motion I would use to remove the shaving.
It was sometimes hard, as his hands are a lot smaller and weaker than mine, but when one approach didn’t work, we tried a slightly different approach until something worked.
When to stop?
We could have probably spent another few hours refining the shape and feel of the spoon, but I didn’t think that’s what an eight-year-old would want to do. When attention spans are short, I think it’s best not to drag things out too much. His spoon felt good in the hand, and would surely excel at serving a wide range of foods. Celebrating an accomplishment and giving a lot of pats on the back was a great way to ensure this first wooden spoon project my son and I did together won’t be our last.
Finishing touches
Because the wood was green, we let it dry for over a week after carving it, then applied two coats of tung oil to the surfaces, paying extra attention to the end grain. When the oil had cured, it was time to celebrate. I said we should order a pizza with whatever he wanted on it, but he looked at me and said, “But then I can’t use my spoon.”
“Good point,” I replied. And for the first time in his life, he chose green peas and maple brown beans over pizza. What’s our next project, you ask? A pizza cutter, obviously.
Photos credit: Rob Brown
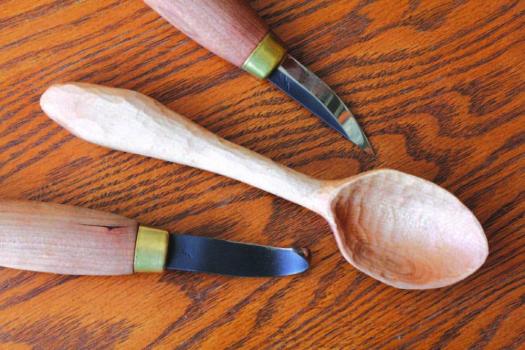
Copy Cat
There’s nothing wrong with finding a spoon you want to mimic, then tweaking the design to your liking. Brown and his son, Jonas, started with a metal spoon, then increased the width of the neck to make it stronger, and added an asymmetric handle.
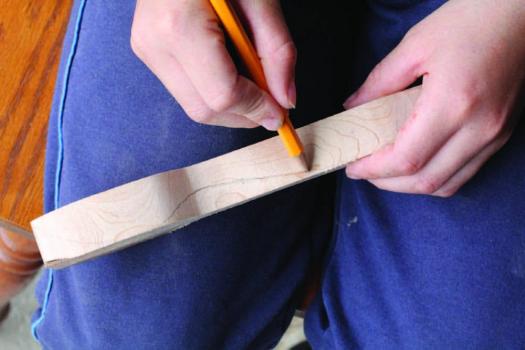
Another Trim
Add a few lines to the side view of the blank and remove the waste with a saw. Just make sure the spoon sits on the table of the saw without rocking, as it could be dangerous if the blank caught during a cut. You can even use the initial off-cut to support the blank during this cut.
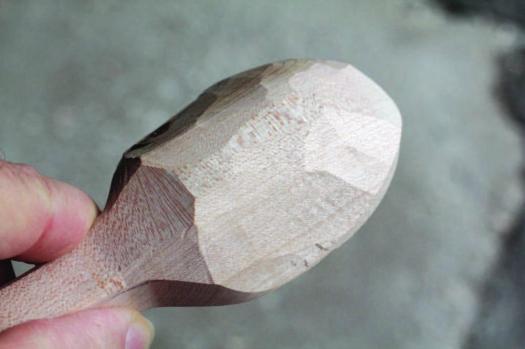
A Helping Hand
Brown removed a bunch of material on the underside of the bowl so when his son reached this part of the project he wouldn’t have as much material to deal with. This speeds up the process, and might be the difference between success and failure in some cases. Every kid’s skill level is different, and that should be taken into account.
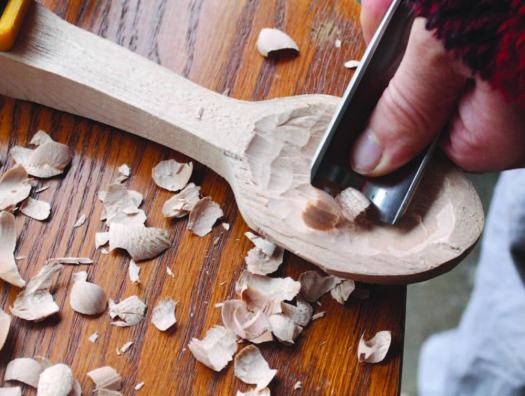
Hollow the Bowl
Though there are many options for this task, Brown opted to use a sharp gouge to remove small chips to create the bowl of the spoon.
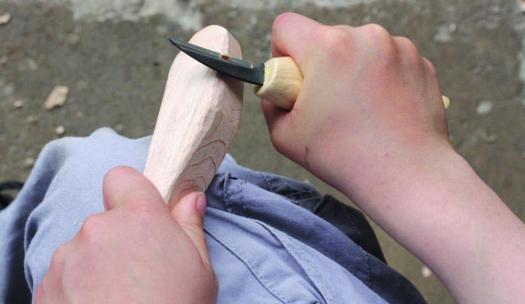
Elbow Grip
Probably the most natural for new carvers, the elbow grip can be used to remove many of the sharp edges. Watch a child for their technique, and don’t be afraid to encouragingly show them proper technique. The tendency might be for a child to remove too much material with each cut, so remind them of that, too.
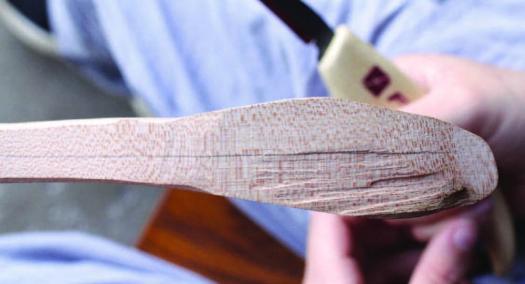
Uphill, Downhill
Teaching a new woodworker about the difference between uphill and downhill cutting isn’t easy. Brown drew a line parallel with the grain, then positioned it level with the ground. At this point it’s easier to visualize uphill and downhill cutting by looking at the edge of the wood above that line.
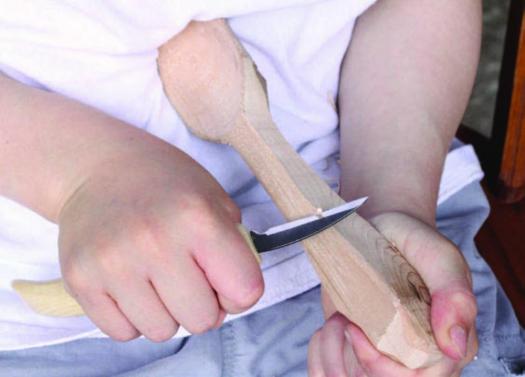
Pull Grip
Working towards the body can be scary at first, but if someone is following good technique, this grip will make many carving situations easier. Remind the user to keep the tip of the blade pointed away from their body at all times, and show them that the heel of the hand or thumb should hit their body first if a cut gets away from them.
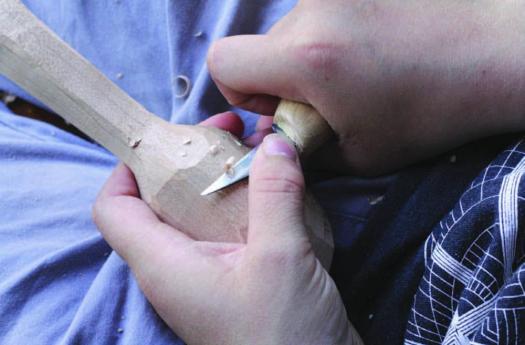
Thumb Push Grip
The thumb push grip offers a lot of control, but it might be difficult for someone with small hands. Switching to a knife with a narrower blade can making cutting tight curves easier.
Apply a Finish
Once the greenwood spoon was allowed to dry out, tung oil was applied to its surface. This helps protect the spoon from stains and keeps it looking newer for longer.


Hi Jim. Yes, putting a green piece of wood in a box with some loose shavings will slow the drying process and reduce cracking. Just check on it frequently, as this trick is also a great way to get mould to grow on the wood.
After cutting with green I heard you can put it in a box and cover it with shavings & let it cure that way for a week or so. ??