PROJECT
Turning a Pen

Jonathan Stoppels

Find more Woodturning projects
Inspired to create some sawdust but want something quick and easy? Turning a pen might just be the thing for you.
Easily one of the most gratifying forms of woodworking, you can turn out a finished product in as little as an hour. I even got Vic (the editor of Canadian Woodworking) away from his hand planes long enough to try one. It’s been in his pocket ever since!
The real beauty of penturning is that, compared to most forms of woodworking, it is relatively inexpensive and in no time at all you have created a beautiful piece of functional art. From simple twist pens to high-end executive pens, the possibilities for being creative are nearly endless. Penturners can choose from dozens of pen kits and a large variety of materials. Most pens are made with wood but some other options include acrylic, antler and polymer clay. Some pen turners even combine polyester resin with coffee beans, cereal, pine cones … you name it, they turn it! Others equipped with power tools like to slice up wood into thin layers and laminate them together to create their own unique designs.
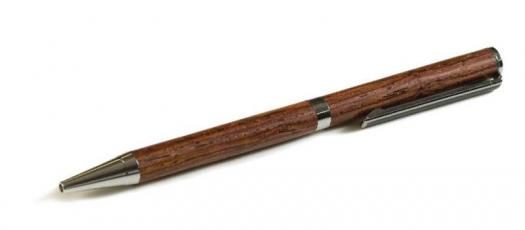
In this article I’m going to go through the basic steps of turning a simple twist pen, commonly known as a ‘Slimline Pen.’ Easily one of the most popular pens, it is relatively simple and affordable to make. For this pen, I have chosen a Rosewood pen blank and a Chrome plated Slimline Pen kit. When selecting your material, the dimensions required are ¾” x ¾” x 5″. Pen blanks can be purchased in that size or you can prepare your own.
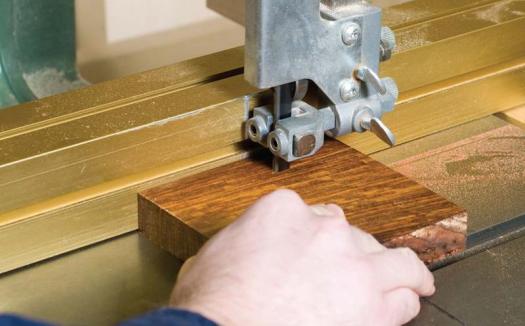
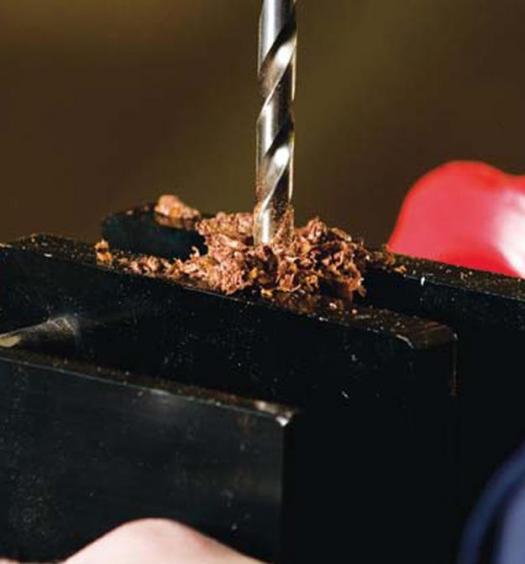
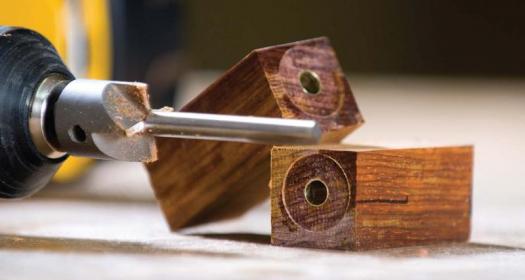
The first step is to mark out where the pen blank is going to be cut in relation to the length of the brass tube. Draw a line through the cross-cut mark so that when you mount the pen on the lathe later on you’ll be able to match the grain lines. Using your bandsaw, cut the pen blank approximately ¼” longer than the tubes from your pen kit. Using a standard 7mm drill bit (brad point recommended), drill the blanks through the center. The easiest way to do this is using a drill press and a pen vise. Avoid drilling too quickly or you’ll risk cracking your pen blank. If you don’t own a drill press, you can insert the drill bit into your lathe, and drill slowly and carefully.
Marking your blank – Use the brass tubes to mark the lengths for crosscutting. The long line that intersects the crosscut line indicates the original position of the blank.
Next we are going to prepare and glue the brass tubes. Using medium grit sandpaper, quickly rough sand each tube. Roughing the brass tube allows the glue to form a stronger bond between the tube and the wood. There are several options for adhesives but here I have opted for gap-filling CA glue. Apply the glue to the outside of the tube and insert it quickly into the side of the blank you have marked out as the center. This helps for grain matching later on. Quickly twist the tube as it is inserted into the blank to help spread the glue more evenly. Gluing the tubes must be done quickly, as the set time for the CA glue is relatively short. If you have excess glue on the outside of your blank you can use a CA accelerator to speed up the waiting time. Make sure to wear your safety glasses while gluing the tubes.
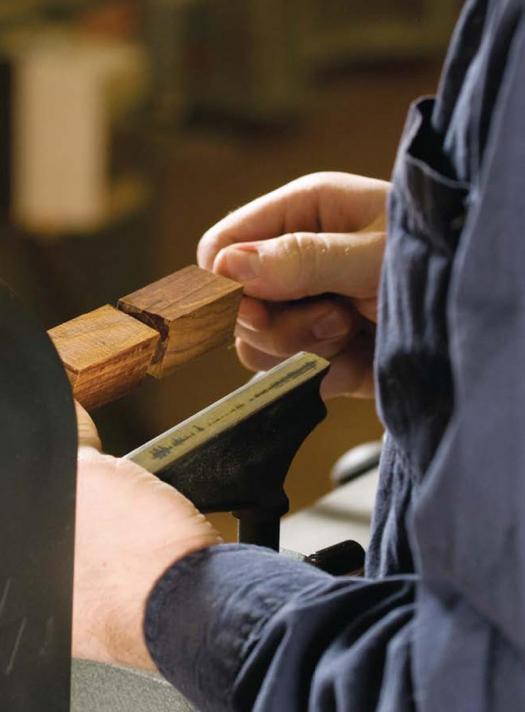
Next, use a 7mm barrel trimmer attached to a drill to clean the ends of the wood and cut it flush to the brass tubes. If the wood is not trimmed flush, you may have difficulties assembling your pen at a later stage. The use of a barrel trimmer also helps clean out any excess glue that has accumulated during the gluing stage. If you don’t own a barrel trimmer, you can carefully hold the blank to a sander. Use caution as heat is quickly built up and this method can cause your blank to overheat and crack.
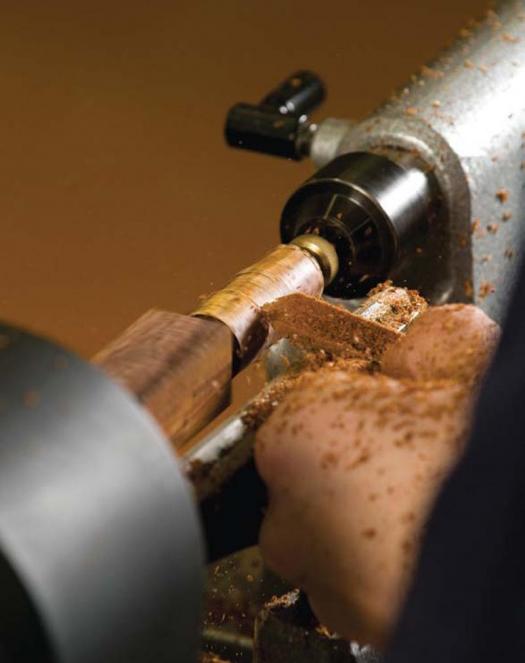
Insert the mandrel into the lathe and mount the pen blanks between the bushings. When you purchase a pen kit, specific instructions are provided telling you the order in which the bushings are aligned with the wood. The bushings are used to determine the finished diameter of the turned pen. Be sure to mount the pen blanks according to your grain match marks! Tighten the brass nut until it is snug. Over-tightening may cause your blanks to turn off-center. Slide your tail stock over and tighten. Now let’s make some sawdust. Don’t forget your eye protection as chips will be flying! Wearing a mask is highly recommended, especially when using some of the more exotic woods. Using a gauge, turn your pen blanks to just above the bushings. You may want to switch to a skew to make your finishing cuts. The cleaner your finishing cuts, the less sanding you will have to do. When your pen is turned down to approximately 1/64″ above the bushings, it’s time to switch to sanding.
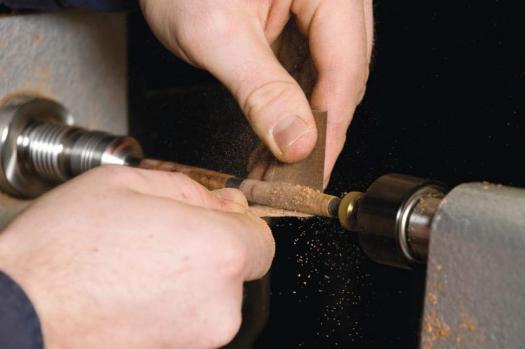
If you have turned your pen fairly smooth you should be able to start sanding with 120 grit. Wearing a mask is now required as you definitely do not want to be breathing in this fine dust. With your lathe running at a low speed, slide your sandpaper back and forth, maintaining equal pressure. Keep sanding until all chisel marks are gone and then proceed up to the next grit. Sand with this grit until the sanding marks from the previous grit have disappeared. Continue sanding with higher grits until you reach 400. If you are looking for a higher sheen, continue sanding up to 1500. Many pen turners also use Micro Mesh sanding pads to further polish their pens. Now you’re ready to apply your finish.
There are countless options for finishes. A few popular options include Shellawax, French polish and CA Glue. One of the quickest and easiest ways to finish a pen is just to use a friction polish, applied with a shop cloth while the lathe is turning at a high speed.
Turning a Pen
Assembling the pen
Before you start assembling the pens, lay out all the parts and read the instructions thoroughly. And then read them again. There’s nothing more frustrating than finishing a perfect pen and putting it together backwards! The pieces are friction fit and a vise or a pen press is required. Although pricy, investing in a pen press will save you time and headaches.
In this particular pen kit, both blanks are the same size. Select one of the blanks and put the writing tip in one side and the twist mechanism in the other side. Carefully press the mechanism in until reaching the indentation ring. Insert the pen refill and check to see if the pen extends about ⅛” past the writing tip. Adjust the twist mechanism accordingly.
Push together the clip and the finial. Grab your next blank and make sure the grain aligns accordingly. Press this clip/finial into one of the tubes. Slide the center band over the twist mechanism and then slide the cap onto the pen.
It’s that easy! Next time, try embellishing the shape or using a different material. The possibilities are endless. You can make pens to give away or even to sell. These simple turning projects really are fun to do.
Thanks to Ron Barter at Rosewood Studios for the use of their facilities for photography.
Photos by Brian Hargreaves
Prepare your blanks
You can buy premade blanks or you can use those small scraps of special wood that you just can't throw away.
Bore your holes
A commercially made pen vise used on a drill press will ensure that the blank is held plumb for drill. Making your own jig is an acceptable option as well.
Trim the blanks flush
Using an end mill, trim the blank flush with the tube. You can use the drill press or a handheld drill for this step.
Mount the blanks
Place the blanks on the mandrel and mount them on the lathe.
Start turning
Begin by roughing the blanks down then define a pleasing shape.
Switch to sandpaper
Once you get close to the bushings switch to sandpaper and work through the grits until the pen parts are flawless. Don't forget your dust mask.
Apply Finish
Using a shop towel to apply finish with the lathe running is much safer than a rag because if a rag catches the turning lathe it can reel in the rag and your hand. The shop towel will simply tear.

Assemble the pen
Using a pen press will make this process much less frustrating. Make sure you pay attention to grain when putting your pen together.

Fruits of your labor
In no time you will have your completed pen. Try experimenting with other styles and shapes for your future pens.