PROJECT
Telephone table

Chico Sakman

Find more Tables projects
This table is essentially a small cabinet held between four legs. It makes a great place to locate your telephone, and perhaps an accent lamp.
However, it provides ample storage for a lot more. It has a shallow drawer on top to store little knick-knacks, like your cell phone, MP3 player, purse, pocket change, keys and pens; a middle drawer to store a phone book or mail; and, a bottom section with door access to store larger items, or the inevitable mess of daily life. In short, this is a compact and functional table you can place anywhere you need to store those handy everyday items.
I used Baltic birch plywood, for this table, but you can use other wood combinations. Maple and cherry, or walnut and cherry are complementary woods that would work well together. Using oak would have the effect of making this piece look similar to Mission and or Arts & Crafts style furniture. You could also use cabinet grade ply or MDF in place of the Baltic birch.
There are two major steps in the construction of this table. First, you build the inner cabinet section, and then, you build the legs and the frame structure that goes around the inner cabinet.
Telephone table
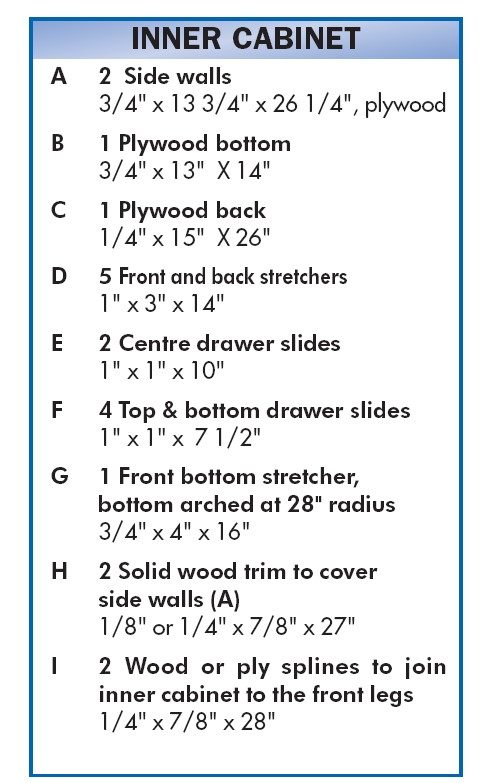
Inner Cabinet
On your table saw, cut the pieces for the sides (A) from 3/4″ plywood. Mill two solid wood trim pieces 27″ long, 7/8″ wide and 1/8″ or 1/4″ thick. These will cover the 27″ long edge of plywood side panels.
Glue and then trim the edging flush on the sides.
On the table saw trim the sides to 26 1/4″ x 13 3/4″. With the table saw or using a router, cut a 1/4″ wide x 1/2″ deep rabbet on the back edges of the sides. These rabbets accept the back piece (C).
Using a fine tooth hand saw or table saw, cut 3/4″ x 3/4″ notches on the bottom of the sides to accept the bottom front stretcher.
Using a router table and flush trim bit, or a bandsaw and spokeshave, cut a 28″ radius curve on the base of the front bottom stretcher.
Cut a 1/4″ wide x 1/2″ deep rabbet along the back edge of the bottom. This rabbet accepts the back piece (C). (See Bottom Detail Illustration).
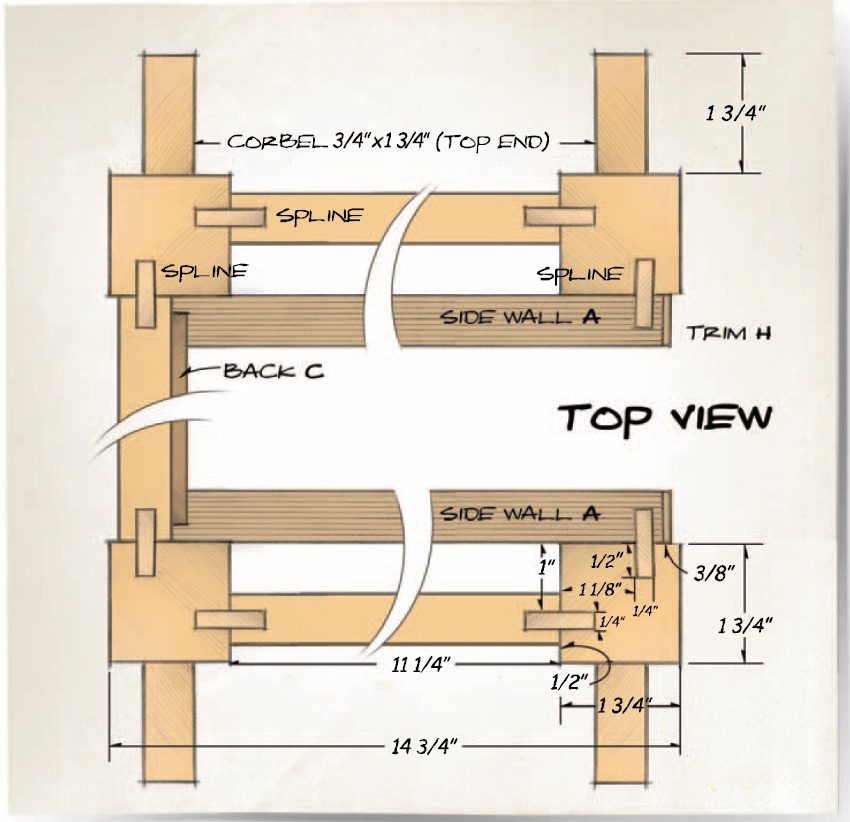
Use either biscuits or spline joinery to join the bottom to the bottom front stretcher. The top edge of the bottom front stretcher, and the top of bottom need to be level, with the bottom front stretcher protruding 3/4″ on each side. Remember that the two back stretchers (D) are 1/4″ away from the back edge of the sides to accommodate the back. As an option, you can use dowels or screws instead of biscuits and splines, except where joining the bottom (B) to the front bottom stretcher (G). You can reinforce the base by gluing corner blocks underneath.
Join the front and back stretchers to the sides with dowels or screws.
Mill the drawer slides (E and F) from solid wood, then screw them in place. You need to space these slides accurately because drawers will move on these pieces. To do this, cut out of scrap plywood, two pieces each six 12″ long pieces, two each of 4 1/8″, 6 1/4″ and 12 1/8″ by 12″ long. Use these as spacers to install the drawer slides which are placed in between the stretchers (D).
Using a 1/4″ slot cutter, groove the front sides of the inner cabinet 1/4″ away from the edge. In other words, set the top of the slot cutter 1/4″ away from your router’s base. For this I use a CMT slot cutter, part # 822.364.11B for a 1/2″ shank cutter (a 1/4″ shank cutter is also available). This bit gives an exact 1/2″ cutting depth.
Drawers and Door
The door (EE) is a simple piece of plywood, veneered on all four sides, with cockbeading applied around the outer edges. You could also use a frame and panel door. Feel free to experiment and put a mock-up door into the cabinet opening to see how different options may work better for your taste or design sense. You can use Blum inset European hinges (Lee Valley part #00B03.01) or butt hinges to hang the doors.
For the drawers you can use metal drawer slides (LV # 02K30.12); if you do, you won’t need to bother to use parts E and F, which are necessary for wood on wood drawer movement. If you use metal drawer sliders I suggest using 1″ x 1″ blocks glued with 1/4″ thick cork, which can be found in most hardware and craft stores. These blocks greatly reduce the noise when the drawers are pushed shut, as well as creating a really nice feel and sound to the closing action.
Use a 1/4″ dado blade on the table saw to create the 1/8″ x 1/8″ rabbet for the cockbeading. Make sure you cut across the grain first with a scrap piece of backer board, and then cut with the grain. Also, dust the table saw top off for the consecutive cuts. A little bit of dust may reduce the depth of the rabbet, which is only 1/8″ to begin with.
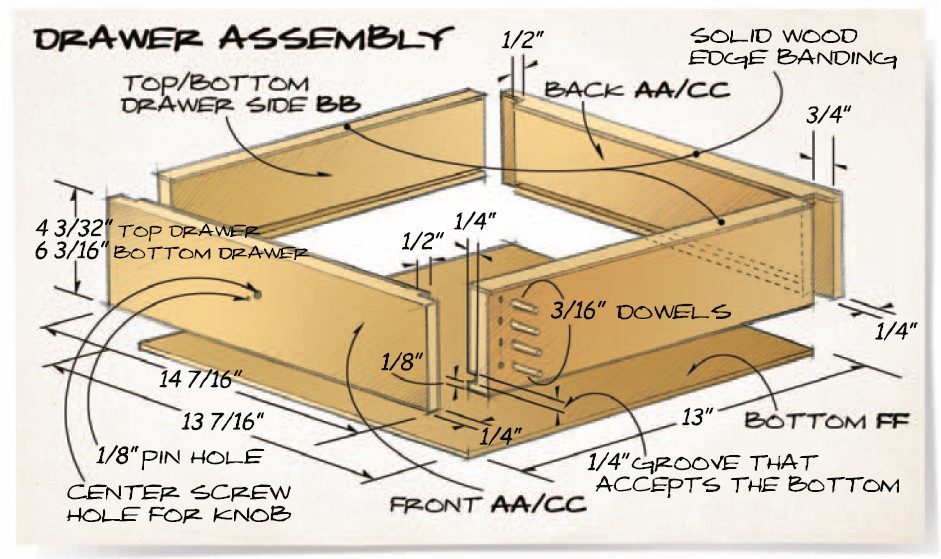
As for the door, I used Baltic birch ply for the drawer parts. The drawer fronts (AA, CC) are veneered on all four sides, and cockbeaded. The drawer backs (AA, CC) and sides (BB, DD) are not veneered, but I did apply solid wood edge banding along the top edges.
Cut the parts for the drawers and assemble using rabbet joints, reinforced with 3/16″ dowels. Slots for drawer bottoms are 1/4″ deep, 1/4″ wide and 1/8″ away from the bottom edges of the drawer sides, front and back. I see no problem with gluing the plywood bottom to the plywood drawer sides and fronts for a very strong joint. (see Drawer Assembly Illustration above)
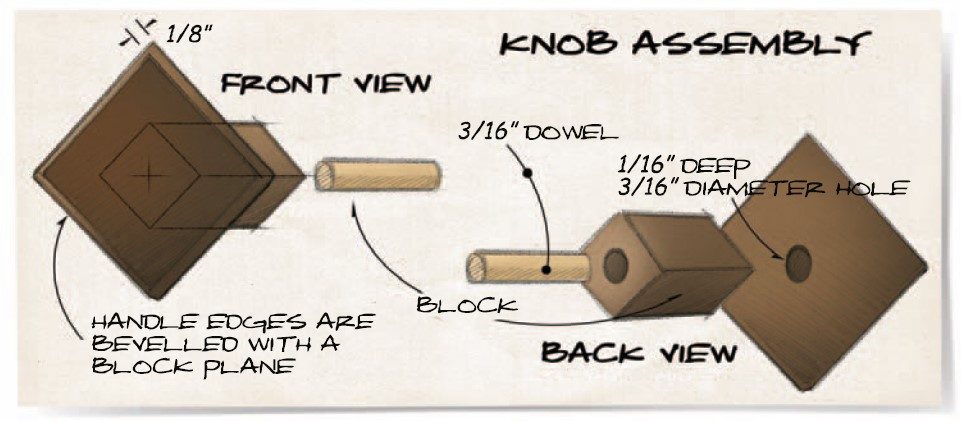
Make (or purchase) the handles. I made ebony handles, 1/8″ thick and 1 1/4″ square, glued to 3/4″ long, 5/8″ square posts. I drilled the posts with a 3/16″ bit and inserted a birch hardwood dowel into the hole to accept the screws that secure them to the drawer and door fronts. A screw is driven into the dowel, which prevents the ebony from splitting. I also inserted a 1/8″ dowel near the screw to act as a pin; this keeps the knobs from spinning. (see Knob Assembly illustration above)
Install the door and 2 drawers. Trim them with a handplane as necessary. Wax the bottom and top edges of the sides for ease of movement.
Install the back (C). The back does not have to cover the back of the drawer openings. It would suffice if it only covers the back of the compartment with the door. (You may shorten the height of the back panel (N) from 22-3/8″ to 13-1/8″)
The drawer part measurements provided are for a wood-on-wood movement. If you’re using steel drawer slides, you need to add a runner on the internal drawer boxes.
Outer Frame and Legs
Mill the leg stock (P) to 1 13/16″ x 1 13/16″ x 29 3/4″, then screw 1″ x 1 3/4″ x 1 3/4″ contrasting wood feet (R) to the bottom of the legs. Make sure to drill pilot holes to prevent possible splitting of the feet.
Dimension the legs to the final size of 1 3/4″ x 1 3/4″ x 30.
Take the screws off the feet and mark the mating legs and feet so they will be easy to re-assemble later.
Use a slot cutter to cut grooves on the legs that will accept the panels, stretchers and inner cabinet.
Glue and screw the feet back on the legs. The feet will create the “stopped dados”.
Cut to shape and glue the corbels (T) to the legs. I used a 1″ x 1/4″ slot cutter to install them.
Prepare the stretchers (J, K, L and M). Cut slots on the ends of the stretchers to accept loose tenons, and on the top edge to accept the panel. Cut a 28″ radius arch on stretchers K and M.
Mill 12 pieces of 1/4″ x 3/4″ x 3 1/4″ loose tenons. Glue them into the slots which are on both ends of J, K, L and M. That way, these pieces will not move when you’re assembling the legs, panels and stretchers.
Cut the back and side panels (N and O). Optionally, cut the inlays on the sides. I used a router to remove most of the material, and then chiseled the outer lines. The ebony diamond shaped inlays are 3/32″ thick.
Test fit the pieces to see that everything goes together smoothly. Glue the pieces together, starting with the sides, then the front and back legs, and then the panel and upper and lower stretchers.
Glue the back stretchers and panel in between the two sides.
Glue the inner cabinet to the outer frame and legs. Glue the splines (I) into the slots on the sides of the inner cabinet first. Use clamps to make sure they are pushed in all the way. Make sure everything is level at the top.
Top
The top (X) is Baltic birch plywood, veneered with 1/8″ thick crotch maple veneer, inlayed with 1/8″ x 1/8″ ebony string and edged with 13/16″ x 7/8″ curly maple.
You can put the inlay as cockbeading, and then apply the solid edging or apply the inlay later using your plunge router with an edge guide. Of course, you may just use solid wood as an option. You can use pocket screws to secure the top. If you choose a solid top, then you’ll need mounting blocks to allow for wood movement.
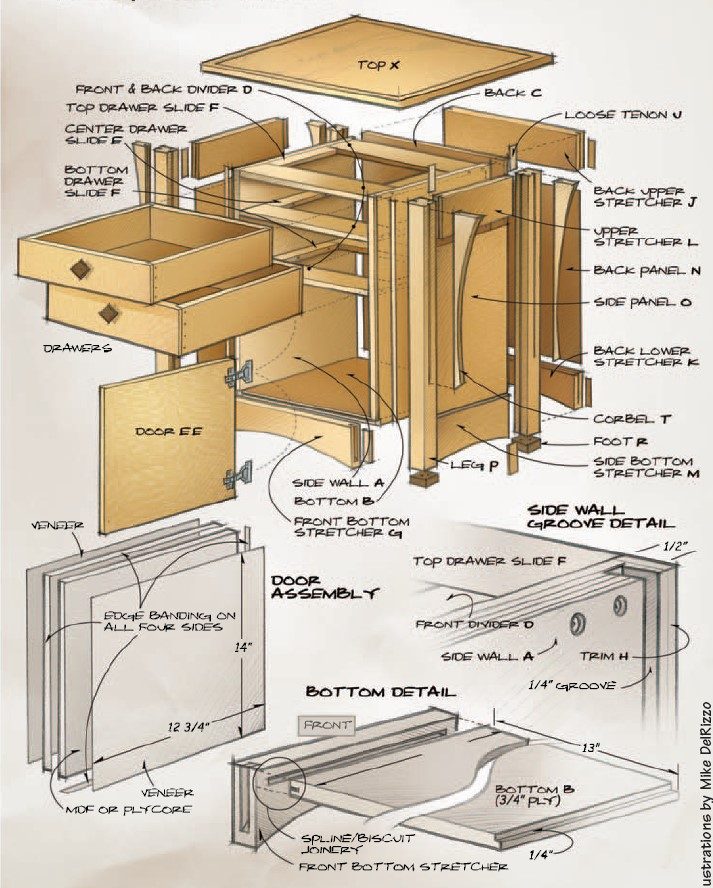
Top View
Drawer Assembly
Knob Assembly
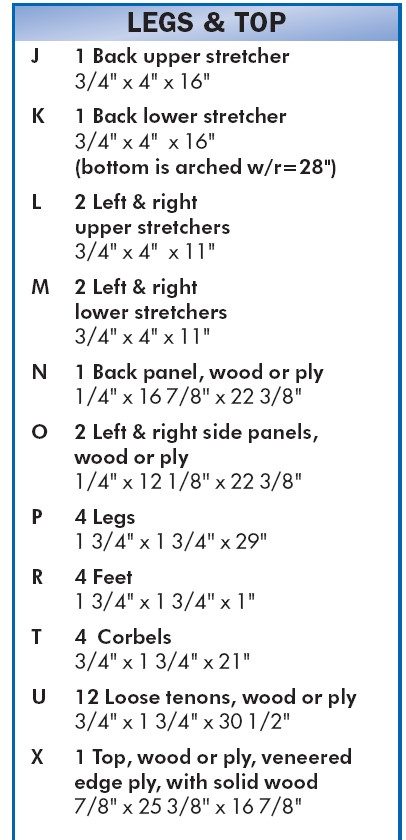
Legs & Top
Inner Cabinet
Door and Drawers
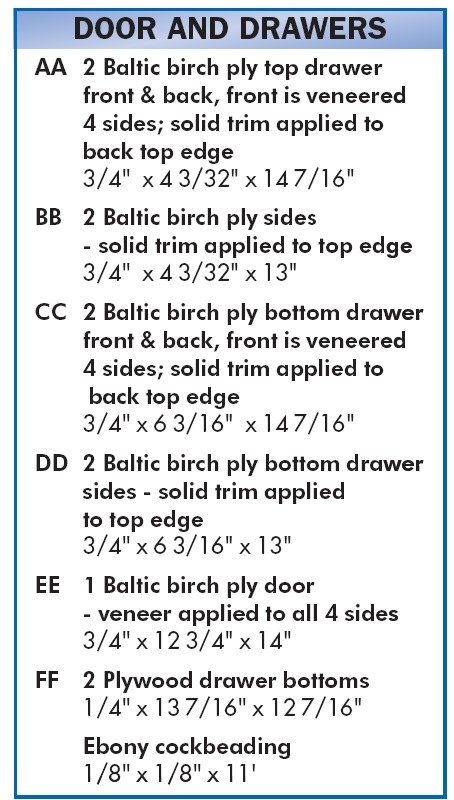
Illustration by Mike Del Rizzo