PROJECT
Make your own bow saw

Steve Der-Garabedian

Find more Tool projects projects
This traditional bow saw is great for many tasks around the shop. It’s also a lot of fun to make.
I’m a firm believer in the adage “he with the most tools in the end wins”. Nowhere does it say those tools all have to be the expensive variety. The tally could be increased simply by making your own bow saw for a mere $35.
Over the years, I have built several variations. Some with wooden pins integrated as part of the handle, others with pins made of either connector bolts or thick nails cut to accept various blades. In the end, I’ve settled on a variation of the pins and blades available from Gramercy Tools (toolsforworkingwood.com). Blades for bow saws, or frame saws as they are also known, come with varying teeth per inch as well as either pins or tiny holes with which to secure them on the aforementioned pins. Blades can also be had from gently used bandsaw blades from your own shop.
Make your own bow saw
Selecting the Right Wood
Although almost any hardwood can be used, a better choice is either hickory or ash. Saws that were made by European woodworkers tended to gravitate towards beech, another good choice. These woods are able to take the pressures exerted on them by a tensioned blade. Although making the wooden pieces thicker will also give the tool greater strength, it will start to become clumsy in the hands if left too thick. Selecting pieces that are straight-grained and free of defects will make sure your tool will last a lifetime.
You’ll need four pieces of wood. The cheeks need to be dimensioned to 3/4″ x 1-1/4″ x 12″ long. Mill the stretcher to 5/8″ x 7/8″ x 13-1/2″ long; perfect for 12″ blades. That also allows for a stubby 1/4″ tenon on each end of the stretcher. The final piece is the toggle that will tension the blade, with the help of some twine. The toggle can be cut 1/4″ x 1/2″ x 6″. Although these dimensions are not written in stone, they are a good starting point that will also leave you enough wood to let you give it a fancy shape, should you so choose.
Make a decision at this point whether you would like to add handles or not. If not, as I have chosen, use a hack saw to remove the tang that would normally be inserted into the knobs. Use a file or 120 grit sandpaper to clean the rough surface left by the hack saw on the shoulder. To save your fingers from cuts run a block plane two or three times along the corners of your freshly milled pieces to ease the sharp edges and make them finger-friendly.
Time to Bore
Start by marking the cheeks with a carpenter’s triangle. It might seem a trivial exercise on such a small and simple project, but I speak from experience, having several cheeks that were drilled from the wrong side. Bore a stopped hole starting on the outside of the cheek, centering it across the 3/4″ width and 3/8″ up from the bottom. A forstner bit, the same diameter as the shoulder on your pins, works best here. Cut only as deep as the thickness of the shoulder on your pin for a flush fit. Next use the center point of your freshly made hole to drill all the way through with a 17/64″ drill bit. Use a sacrificial piece of wood to stop the hole from blowing out on the opposite face. This last hole gives you the proper clearance for the body of the pin. When making your own pins, use the appropriate drill bit that enables you to smoothly insert it into the cheek. Repeat the process for the other cheek. Use a center punch to locate the holes. Making several shallow plunges with the drill bit, rather than punching through in one pass, will ensure your hole stays true and clean.
The mortises on the cheeks are used as pivot points. They need to be ever-so-slightly larger than the tenons, to give a loose fit. Neither a sloppy nor a snug fit will work here. Start by marking the location and size of the mortises on the inside faces of the two cheeks. Taking the extra step of marking the location with a knife and/or marking gauge will give your chisel a starting point to straighten the walls later. The mortises should have a final dimension of 5/16″ wide x 5/8″ long x 3/8″ deep. Start the mortise 6-1/2″ from the bottom of the cheek. Use a forstner bit to remove most of the waste then clean and square up the mortises with a sharp chisel.
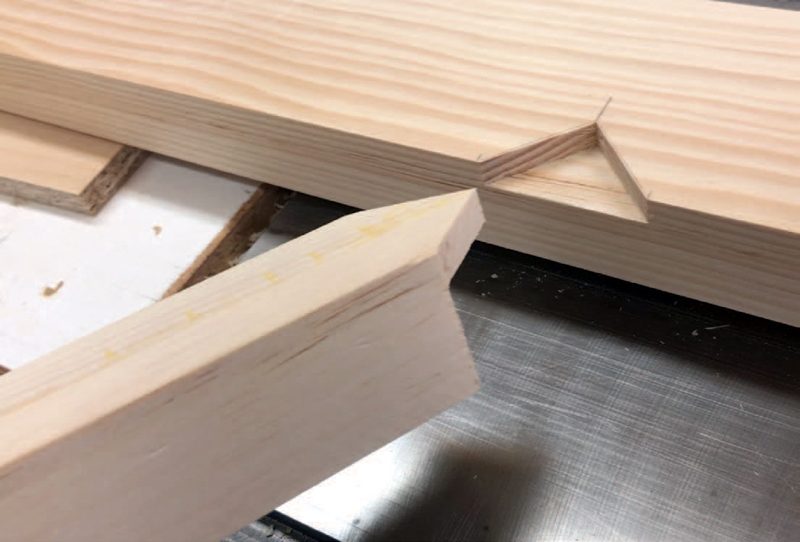
Tenons Come Next
Moving on to the stretcher, you’ll need to make a tenon on each end that is 1/4″ wide, 1/2″ long and 1/4″ deep. Although there are many ways to make the tenon, I find nibbling away at the ends with a tablesaw and crosscut sled work best. Place a stop block 1/8″ away from a 1/8″ saw blade and raise it a small amount. Keep in mind that each measure by which the blade is raised works out to be doubled, since waste is being removed from two faces. Take a pass on one face and then the opposite face cutting only the very tip, maybe half the width of the blade. This leaves a small step for you to measure the width of the tenon to see where you stand. Raise the blade slightly and make passes as you creep up on the proper width. Once the perfect width is obtained, finish the tenon by making passes all the way across to the stop block. Now that you have the correct height set on the saw blade, complete the same shoulders on the opposite end of the stretcher.
Next, lower the blade and repeat the above steps for the remaining two faces until you sneak up once more on the correct dimensions. The stop block will provide the proper depth required for the tenon. Slight cleaning of the tenons might be required and can be quickly done with a sharp chisel or small shoulder plane. Creating the mortise first and then cutting the tenon, as mentioned above, allows you to test fit the tenon, without having to have cut it completely.
Finishing Up
The toggle is nothing more than a rectangular piece of wood with which to twist the twine, and in turn tension the blade. Using a file, I create a slight groove to help position the twine on the toggle. It’s also possible to drill a small hole near the top of the toggle to pass the twine through.
I created slight grooves on the cheeks to keep the twine in place. I did this by clamping the two outside surfaces together, opposite of how they normally stand in use, then using a 1/2″ forstner bit to drill through the pieces. The hole is drilled 3/4″ down from the top.
Assembly
Erase any pencil marks you made and clean up the surfaces with either a few passes of a hand plane, scraper or sandpaper. The blade is best tensioned with a heavy braided nylon cord. Nothing too thick but something in the range of 190lb test will work fine. Heavy braided fishing line will also do the trick.
Assemble the bow saw by placing the pins in the cheeks, the blade on the pins and the stretcher between the cheeks. Loosely wrap the cord around the top of the cheeks to achieve two or three loops. Tie a knot joining the ends and set your toggle between the loops or through the hole in the toggle, if that’s the route you took.
Tension your blade by rotating the toggle, then placing one end of the toggle against the stretcher. There is no rule to correctly set the tension, other than by how the saw cuts, but typically you will need one or two more turns than you think. Take out a scrap piece of wood and see how your new creation works. Don’t force the cut, but rather let the blade do the work. If properly tensioned, the blade should not bounce when cutting. When not in use it is a good idea to unwind the cord a few turns to release some tension.
Final Thoughts
I don’t embellish my handmade tools with fancy carvings or protective finishes. I believe a good tool is one that is used, rather than put on display. However, this is your tool and if you choose to make handles, or give the four pieces of wood some shaping, then customize away. However, don’t compromise the strength of the saw by making the cheeks too thin. You now have one more tool, and in the end that increases your odds of winning.
View a Video of Steven making this project.
Photos by Steven Der-Garabedian
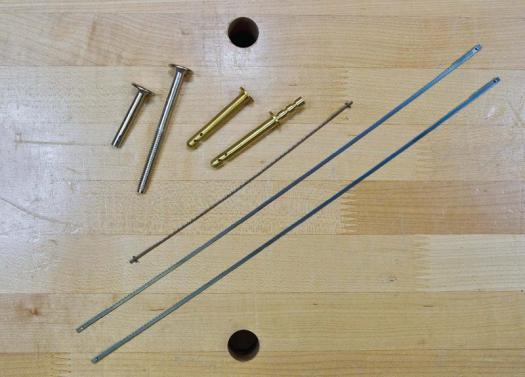
Hardware
Though you can make this bow saw with miscellaneous hardware and bandsaw blades, Der-Garabedian finds it easier to purchase the necessary items.
Comfortable Frame
Use a block plane to ease the edges of the wood, as you will grasp the frame directly when using the saw.

An Awl for Accuracy
Rather than have the drill bit skate around the wood before the exact location of the hole is determined, first mark the center point with an awl.

Shallow Hole
Create a shallow hole for the shoulder of the pin to fit into with a forstner bit. The end surface of the pin should finish flush with the wood’s surface when the saw is assembled.

Right Through
Drill a slightly oversized hole clear through the frame so the pin fits in nicely.

Precise Marking
Start the mortises in the cheeks 6-1/2” from the cheek end. It’s best to use a marking gauge or sharp knife to lay out the mortise location so you can later position a chisel in the line to finish up the mortise.

Remove Some Waste
Use a sharp forstner bit to remove most of the waste for the mortise (top), then clean it up with a sharp chisel (bottom).


The Correct Width
To determine the width of the tenon, Der Garabedian sneaks up on it using a crosscut sled on his tablesaw. By cutting the very end of the stretcher he can check the dimension until it’s dialed in (top), then he adds a stop block and cuts the entire length of the tenon (bottom).


Proper Tension
Once the notches are drilled in both cheeks, use the toggle to tension the blade. Typically, a few more turns are required than most people think, but use experience to guide you.