PROJECT
Fly-tying chest

Steve Der-Garabedian

Find more Cabinetry projects projects
If you're a fly fisherman and a woodworker, there's no better project than a fly-tying chest. With lots of storage for smaller items it will make your fly-tying easier. And mix it up with some colourful woods for drawer fronts, and you have yourself a trophy project.
A fly-tying chest was one of several things that pushed me into a career of woodworking back in my early 20’s. I had just taken up fly fishing and was on a trip to Montana. I came across a show where a gentleman was selling spectacular tying chests for a hefty sum. Well, like most woodworkers, I knew I could build one for a lot cheaper. Sure, I had to invest a ton of money into new tools. Ahem. That first one was made out of poplar core plywood and lots of screws and glue, plus the skills I had at the time.
I decided to tackle that fly-tying chest once more. While the first one served me well, there are things I wanted to change. The first and foremost of which was the size. Back then I envisioned tying every fly ever created and even dreaming up a few new ones. Sadly, the latter only caught fishing partners and not any fish. Grounding oneself does come with age and experience. A smaller chest makes it more portable so I can carry it a lot easier around the house or to store it. While not everyone will be tying flies, this chest can easily be adapted to suit other hobbies and crafts too.
Fly-tying chest
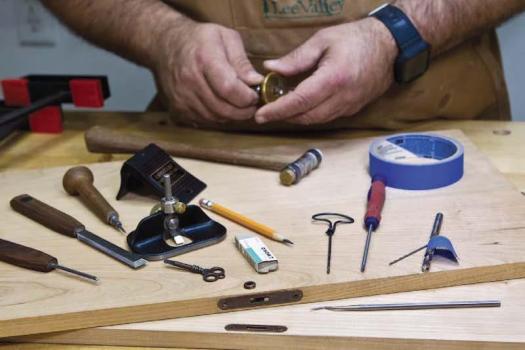
Mocking it up
I always like to have the hardware on hand before starting a project as this will dictate various dimensions as a minimum or maximum. These included the piano hinges, Veritas insert knobs (Lee Valley Part# 05H3603) and Tansu handles (Lee Valley Part# 00D5546) to carry the chest. One of the best pieces of design advice I received in school was not to use standard thicknesses for my work such as 1/2″, 3/4″ or even 1″. Our eyes develop a feel for those sizes and a slight deviation becomes visually appealing. For this project, I wanted to give it a “light” feel so all the main parts are 9/16″ thick. Adjust this to fit your hardware requirements such as hinge screw length.
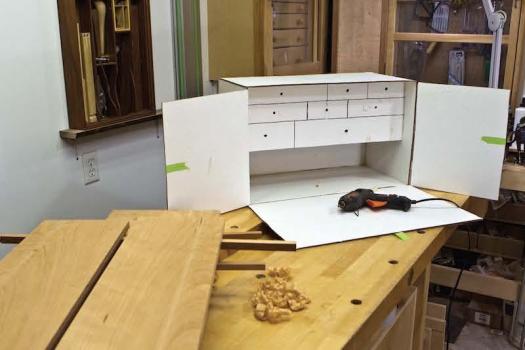
Using styrofoam, rough lumber, or in this case cardboard and hot glue, it is easy to mock up a design giving you a 3D model. I played with the overall size until I was happy with how it looked and felt. Part of the reason I chose cherry for the bulk of the carcase is that wide boards are readily available. If you need to glue up narrower pieces to fit the final size of the chest, glue them up at this point. In such circumstances I like to leave the pieces a little thicker so if the joints shift I have the room to flatten or flush them. While edge joints like these are very strong, using dowels or Dominos will help to keep pieces aligned during glue-up. Mill up all the pieces and let them sit for a while to see if they will warp or twist. In my case some did warp and couldn’t be salvaged for this project.
Rigid construction
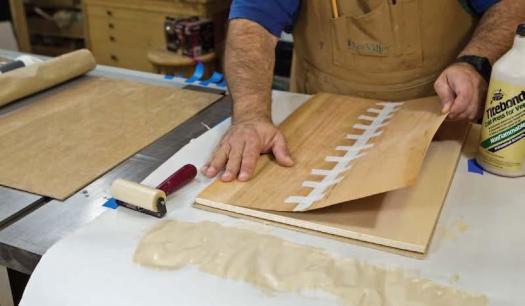
Since the chest will get moved I wanted to add some rigidity to it. I decided to glue the back panel in a groove set in the carcase. For this to work, I veneered a piece of 3/8″ Baltic birch plywood that started off slightly longer and wider than needed. Using cherry veneer, veneer glue and a Roarockit vacuum bag, I pressed the veneer onto the plywood. Alternatively, you can achieve this rigidity without veneering and just use the Baltic birch on its own. Raw plywood will reflect light making it seem as if there is an interior light source. However, veneering is not difficult at all and adds a bit of refinement to any project. The veneer was pressed in the bag for five hours then left another 24 hours to fully cure.
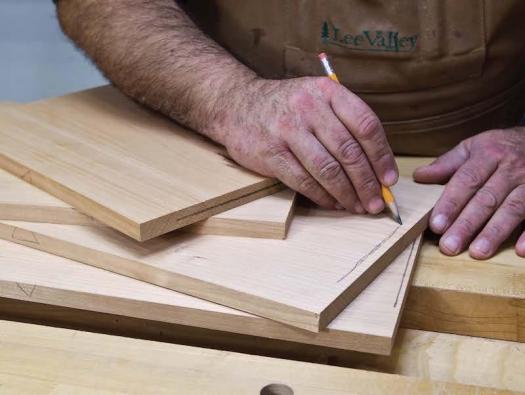
After cutting and marking all the pieces with a cabinetmaker’s triangle, we can tackle the joinery. Splines are a good choice for carcase construction as this can lead to strong joints and doesn’t require specialty tools such as a biscuit joiner, dowel jig or Domino, but rather only a router. If you have any of the previously mentioned tools they will work just as well. Choose a method that you are comfortable with and have the tools for.
Plenty of router work
The cabinetmaker’s triangle will keep your pieces in order and tell you where the joinery goes, but as a double check I place a pencil line where the pieces need to be routed. At the router table, place a 1/4″ Onsrud bit into the collet and set up stops to create the mortises for the splines. The mortises in the top and bottom of both side pieces are 1/2″ deep and 7-1/2″ long. For the top and bottom they are only 3/8″ deep. Set up stops on the fence to start these slots 1/2″ from the back of all pieces.
Our groove for the back panel will eventually cut into these mortises. Making these slots almost the full width of the sides, and cutting the splines a little shorter, allows for some play in alignment when gluing the pieces together. Cut the slots, keeping the outside surfaces of the carcase against the fence. This ensures your pieces line up should you not have the bit perfectly centered.
Next, mill up some hardwood, maple is a good choice, that is 1/4″ thick by 7/8″ wide and approximately 35″ long. This will allow for four pieces including the removal of any snipe at the ends from the thickness planer. It is important that they fit snugly along their thickness.
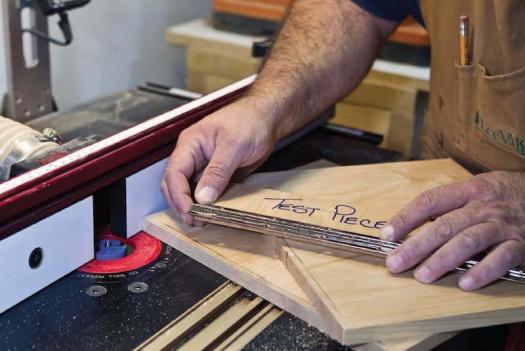
Going back to the router, chuck up a 3/8″ Onsrud, or straight bit, to cut the groove for the back panel. This groove is 1/4″ from the back edges and runs full length on the sides but stopped 5/16″ from the ends of the top and bottom pieces. Taking a cut-off piece from the carcase mark it as a test piece and run it against the bit and fence, checking for proper width and position. If you did not veneer your panel, you might have to switch to a 1/4″ bit, as Baltic birch typically comes in metric thickness and might be slightly thinner than 3/8″. With either method you will more than likely need to adjust the fence at least once to accommodate the style panel you chose to use. Keep in mind that sanding during the clean-up will render the panel a little thinner.
Some assembly required
Square up the ends of the grooves for the back panel in the top and bottom pieces using a chisel. Dry assemble the pieces with clamps, making sure the splines fit properly in their slots. While the pieces are clamped, measure for the actual width and length of the back panel. Cut this to size and give it a light sanding to bring it close to its final thickness. Dry fit once more to make sure it fits in its own groove.
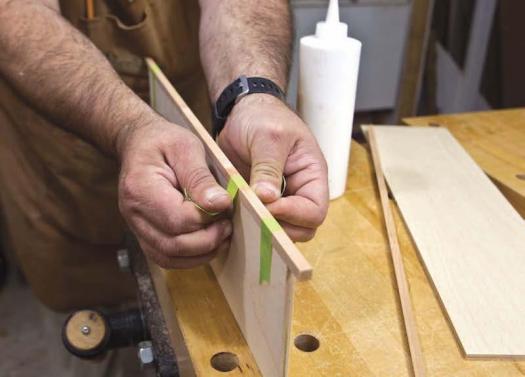
Next on the agenda is creating the drawer bank. These are nothing more than 1/4″ Baltic birch pieces with 1/4″ x 1/4″ cherry edging on their facing edges. Cut the plywood to get four pieces 5-1/4″ wide by 19-3/8″ long. Mill up four pieces of cherry 5/16″ x 5/16″ and approximately 25″ long. Thicker to allow us to flush them to the plywood, and longer to take care of any snipe from the thickness planer once more. Mark the back of three of the plywood pieces with the cabinetmaker’s triangle and collect the supplies to attach the edging. Apply glue to the long edges not marked and clamp the cherry to all four pieces. Parts like these are sometimes too small for clamps. Using tape is more than adequate for the job. I find in these circumstances that 3M Binding Tape works really well, as it holds and stretches a bit more without breaking and peels away cleanly.
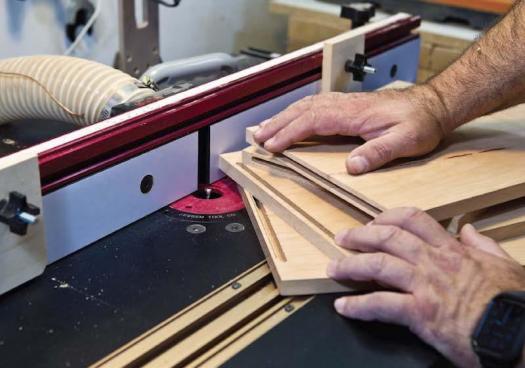
Back to the router
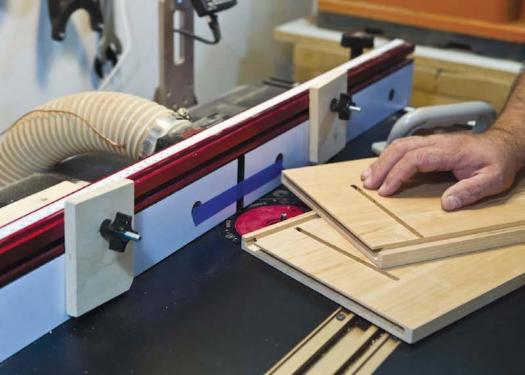
While the glue is curing on the plywood drawer shelves, it’s time to cut the slots in the carcase sides for them. The shelves are spaced 2″ from the top for the first two levels and 3″ for the bottom. Keep in mind that these are final heights of the openings and the thickness of the plywood is added on (see side view on the illustration). Adjust these to fit your needs whether they be for fly-tying, sewing or another use. Place a 1/4″ straight bit in the router and carefully set the distance from the fence for the top slot. These are stopped slots that extend 5-1/4″ forward from the back panel groove and are 1/4″ deep.
You’re going to need two sets of stops, one each for the left and right side members. A router in a table with a lift is perfect for this process, however, it is not the only way. A handheld trim router with stops and fences will also do the trick. Complete the task using what tools you have and are comfortable with. Once the top slots are cut, adjust the fence and cut the next set and finally the third. For the last set, I found it easier to work from the bottom of the sides adjusting the fence accordingly. If you’re off slightly in your heights it doesn’t matter as we will fit the drawers to the openings. However, it’s very important that the mating slots on both sides are at the same distances from the top or bottom. Finally, square the front end of the shelf slots with a sharp chisel.
Creating the bank
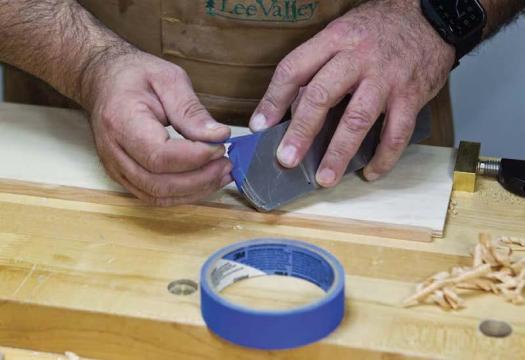
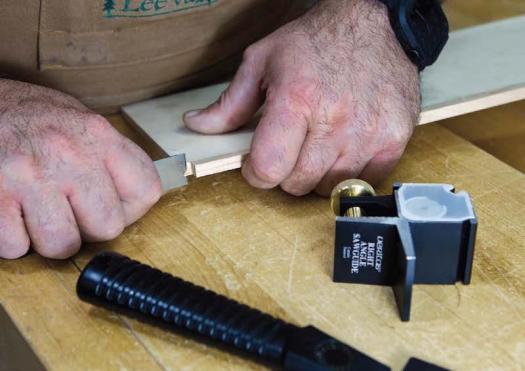
Once the glue has set on the drawer shelves, take the three marked pieces and cut the cherry edging leaving 1/4″ of plywood exposed on the left and right front edges. Using a right-angle guide will ensure you are cutting straight down. Stop these cuts when you reach the plywood and clean up any residual cherry with a chisel. Flush the cherry to the plywood using a block plane. I like to add two or three pieces of blue masking tape to the corner of the block plane to stop it from digging into the plywood. How did we ever work wood without masking tape?
Create the slots for the vertical drawer dividers using a mitre guide with a sacrificial fence. These slots are very shallow at 1/16″ deep and are cut full width of the horizontal parts. These slots are just really place holders, as there won’t be a lot of pressure put on them with such small drawers. Cut these slots on the router table with a 1/4″ straight bit. We do not cut slots in the top, but rather tack the top two vertical pieces so assembly is not made more difficult.
Dry assemble the chest with the drawer shelves, then cut and fit the vertical pieces from the remaining plywood and cherry assembly. You can push these in from the front, right up against the back panel.
Becoming hinged
Using a test piece once more, we will cut a shallow rabbet for the piano hinge. Cut this rabbet slightly deeper as it will get a little thinner during the clean-up with either hand planing or sanding. These rabbets are cut in the forward edge of the bottom and the inside edge of the drop-down door. They’re also cut on the inside edges of the left and right swinging doors. Part of the reason to incorporate piano hinges is that they open up past 270°. For the drop-down door and bottom connection, I place the hinge with the knuckle facing down so it doesn’t protrude into the working area of the chest. You might need to countersink the hinge screw holes from the back side. On the left and right swinging doors they are mounted traditionally.
When mounting the hinges, put them in place and mark for the screw holes. Drill them using the appropriate pilot hole bit for the hinges you bought. On small screws such as these it’s a good idea to pre-thread them as well. Auger gimlets do a great job of this task. With both the pilot hole and gimlet, be aware of your maximum depth.
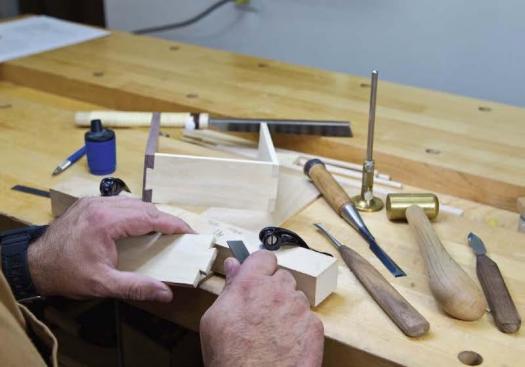
Trimming and fitting
Dry fit the carcase and attach the hinges using only three or four screws in each leaf. Start the final fit of the doors as you open and close them to see where they’re rubbing. Using a sharp block plane will quickly fix any issues. Once the left and right doors are opening and closing perfectly, mark a spot near the bottom third of the pair for a finger hole. Using a pair of clamps, squeeze them together and use a 1″ Forstner bit to drill an opening at your mark.
There are a number of ways to keep the chest closed during storage or travel. I chose a keyed lock that required a mortise. I wanted a clean installation, as the inside becomes a working surface and I didn’t want any obstructions. If using a mortised lock, a brad point drill and small router plane will easily get the job done. Pre-score the area with a marking gauge and use appropriately sized blades, drill bits and chisels.
Drawers, drawers, drawers
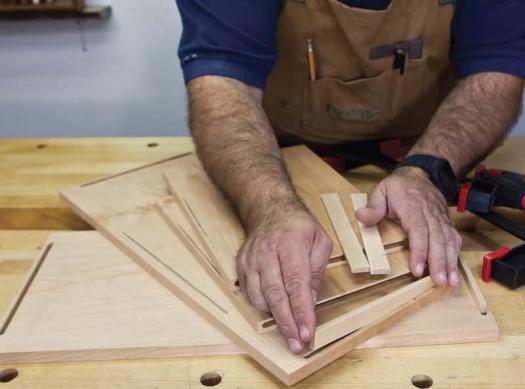
Once more, dry fit the complete chest to obtain the proper sizes for the drawers. I normally don’t like the use of more than two or three species of woods in a project. My preference is more calm pieces rather than lots of colours. However, I wanted to play a little with colours on the drawers. There are many colours that are associated with tying flies and since the drawers are small enough I didn’t think it would look like a flashing neon sign.
I wanted this to also be about texture and grain as well as colour. Using my camera, I took pictures of the empty chest and then pictures of the individual woods and played with them on my computer. I printed a pair of arrangements that made me happy and eventually chose one. If you follow my path the woods from the top left and left to right are: pau amarello, mahogany, cocobolo, black walnut, box elder, black limba, olive and honey locust.
For the drawer construction I kept it simple with half-blind single dovetails for the front and full dovetails on the back with a single tail once more. The bottom was grooved using the box slotting bit. There are many options for making drawers, from drawer lock router bits, to rabbeted and pinned to mitred and keyed. Choose a method you have the tools to accomplish the task, or try a new method and challenge yourself.
For the drawer knobs, I picked the 1/2″ Veritas insert knobs. I like these as you can add whatever wood you like to the centre. It’s important to choose a size that will not interfere with the opening and closing of the doors. Another option I considered was recessing a magnet on the inside face of the drawer front and using a magnetic knob to open and close them.
Finish and assembly
Once everything is fitting, take it all apart and get ready to apply a finish. Using a hand plane or sander, clean up the surfaces and remove any pencil marks and scratches. Any finish will do the trick, but since the working surfaces will get a fair bit of use, I chose Osmo TopOil.
Once the finish has cured mount the carry handles on the side. I chose a spot centered across the width of the sides and the second level of the drawers. Recess the mounting bolts on the inside so it does not interfere with opening and closing of the drawers.
Complete a dry rehearsal of how the glue-up will go. We already have a rough idea of the process as we have taken it apart and put it together a number of times. Get all the clamps you will need, glue, brushes and even recruit some help for this process.
A few more details
To hold the bobbins of thread and silk onto the door, make four 8″ x 1/-1/2″ x 1/2″ shelves. By making these removable, we can space them closer together. To make this removable storage system we are going to use 1/4″ dowels glued into the doors and protrude 1″. When laying out, marking and drilling these holes use masking tape so as not to mar your finish.
The bottom holder is centered 1-1/2″ from the bottom and each holder above is centered 2-3/4″ above the previous. To make sure any holder can fit on any spot we need to keep the spacing the same. The 1/4″ holes in the door are 3/8″ deep and are 5″ apart. Find the centre on the door from the beginning of the rabbet for the hinge to the opposite edge of the door. Locate your holes 2-1/2″ on both sides from this point. Centre the holes on the back of the holders 5″ apart as well. To aid in getting them on and off, enlarge the hole up one size to 17/64″. Next, drill the holes along the tops to hold the bobbins. Space these 1-1/2″ apart. The dowels get glued into these 3/8″ deep holes. Cut the 1/4″ hardwood dowels to length, 1-3/4″ for the bobbins and 1-3/8″ for the holders. Glue these into their respective spots.
When making the chest smaller, I lost some space dedicated to tools in one of the drawers. I also felt that the inside of the right door was under-utilized in my original version. Much like the bobbins on the left door, we can make a tool holder that can slide on and off. Size these according to the tools you use and attach them the same way as previously mentioned for the bobbins.
This project more than likely gave your router and your routing skills a workout. I know it did for me. It gave me a challenge of double checking my numbers and testing them with scrap pieces. There are lots of pieces in this puzzle and marking your work accurately will only help. I’m happier with this version as it is better suited to the type of fly-tying I actually do. Modify it to your style. Modify it to your craft or hobby. There is something about containers and keeping organized that’s very satisfying. While this is no H.O. Studley toolbox, it certainly is nice to have little drawers to keep organized and a work surface to let me enjoy my hobby almost anywhere, including my workshop. Now where did I put my fly rod?
Photos by Steve Der-Garabedian
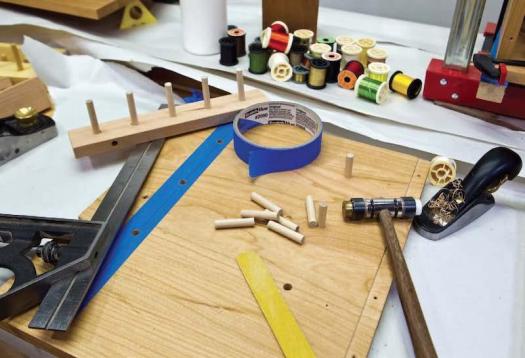
Mock It Up
A simple approach of cardboard and hot melt glue will allow you to quickly and cheaply mock up the chest for size and looks.
Veneer is an Option
Although you could just use plain plywood, adding veneer to both surfaces of the back panel is a nice look for this very refined chest.
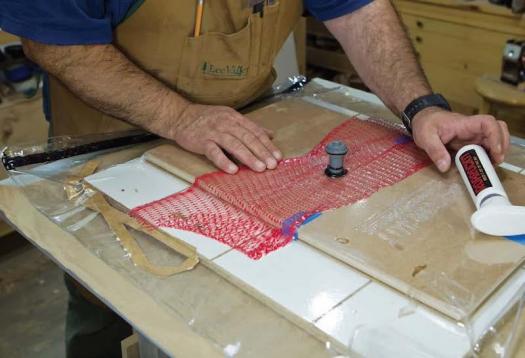
Lots of Options
Der-Garabedian chose a Roarockit vacuum kit to press his back panel, some cauls, a pair of platons and a bunch of clamps would have also worked nicely.
Draw it On
Adding pencil marks where joinery needs to be machined is a great approach to keeping all of the parts straight in your mind.
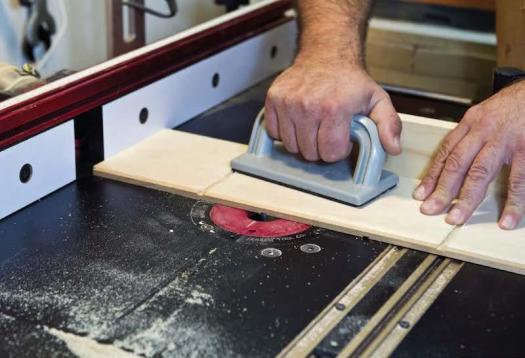
Case Grooves
A 1/4" diameter bit, chucked into the router table, will make quick work of the grooves that will hold the main carcase together. Stop blocks ensure the grooves stop before routing through a visible surface.
Splines for Strength
Solid wood splines will locate the joint during assembly, and add needed strength to the case.
Perfect Fit
A test piece will allow you to dial in the correct width of the groove that secures the back panel in place.

Nice and Simple
Tape is perfect for quickly and simply holding thin strips of solid wood edging to the edges of the shelf material.
Grooves for Shelves
Similar to machining the grooves to hold the case together, grooves across the grain in the gables will accept the shelves.
Square Them Off
These grooves will accept the sides, which will have 1/4" x 1/4" notches cut into their front corners.

Tape to the Rescue
A bit of masking tape along the front corner of a block plane will help stop the blade from digging into the plywood's surface while trimming the solid wood flush with the plywood.
Small Notches
Der-Garabedian uses a saw guide to ensure his cuts are at 90 degrees to the front of the shelf, then chisels away the waste. Most of the shelf will fit into the routed groove, while the end of the solid wood edging will sit flush against the main inner face of the gable.
Shallow Dados
Dados machined 1/16" deep help to locate the vertical dividers during assembly, and provide strength.
Hinge Rebate
A router, equipped with a large straight bit, or in Der-Garabedian's case a rabbet bit with its bearing removed, makes quick work of the rebate for the piano hinge.
No Splits, Please
With the hinge rebate complete, Der-Garabedian marks the hinge screw hole locations, bores a small pilot hole, then uses an auger gimlet to pre-thread the pilot holes. This process helps protect against splitting the wood when all the screws are driven home.

Closure Options
Although there are many ways to secure the lid in the closed position, Der-Garabedian chose a keyed lock that was mortised into the edge of the lid.
Drawer Joinery
There are a lot of options, when it comes to what joinery to use to secure the drawer parts together. Dovetails are the traditional approach, and give the finished chest a nice look.
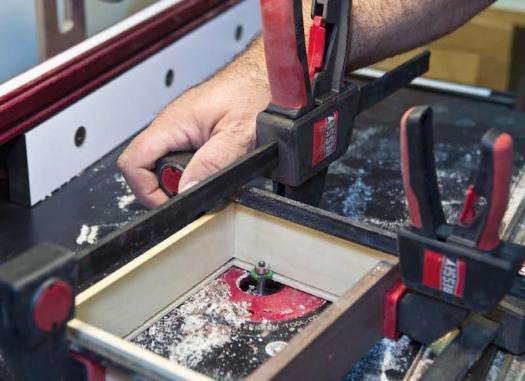
Aligned Grooves
Dry assemble the drawer boxes, clamp them together and run them past a box slotting bit chucked in your router table. This method ensures the grooves in the box are all in alignment.
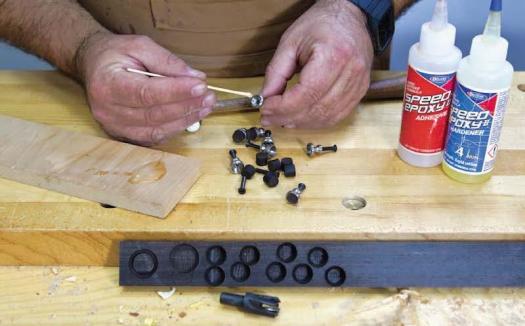
Small, But Positive Handles
Der-Garabedian chose a small handle that accepted wood plugs, in this case ebony. Whatever handle you select, make sure it doesn't interfere with the operation of the hinged doors.
Within Arm's Reach
Dowels secured to the inside of the hinged doors hold small removable shelves, with other dowels on them. Small, often used, items can be stored here.
Get Creative
Any combination of storage devices that make it easier for you to store and access small items will make using the chest that much more enjoyable.
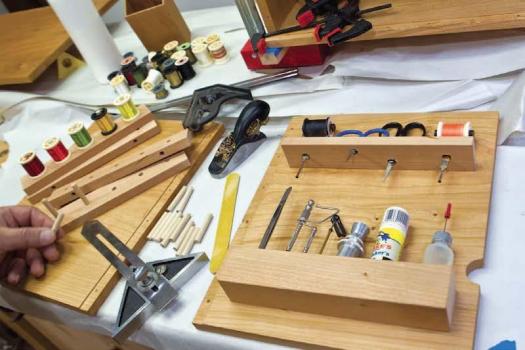
Illustration by Len Churchill


Thanks, I used your plans to make my 11-year-old grandson a fly-tying box.
My girlfriend has actually absconded with the cabinet and uses it for her jewellery. I love that!
Steve
I’d love to build this, and adapt it for different purposes, (like sewing kit) but can’t print the entire plan with drawings. It would be great if there was a PDF download of it.
Hi Dave – Subscribers to our print or digital magazine can download any of our project plans in a PDF format. Makes a great Christmas gift (to yourself or a friend!).