PROJECT
Flush trim router jig

Carl Duguay

Find more Jigs projects
When working with sheet stock, thick solid wood edge banding will give you greater design flexibility than thin commercially available iron-on veneer tape. Use this jig and your router to trim edge banding flush with the surface of your sheet stock.
When using a router to flush trim the edge banding on sheet stock, you have two options: balance a router equipped with a flush trim bit and fence on the narrow edge of the plywood, or run the router on the face side of the plywood using this jig and a mortising bit. We think you’ll find this jig much more stable than trying to balance the router on the edge. The extended length and extra handle make it extremely steady and easy to control. This version is sized to fit a Porter Cable 690 router (deltaportercable.com) so you will have to adjust the width to suit the router that you will be using.
Flush trim router jig
Making the Jig
• Cut all the pieces for the jig to dimension. Install a ¼” spiral bit in your router table, and adjust the fence to rout a 1″ slot, ¾” in from each edge of the router mounting plate (A) starting ⅜” at one end. Cut one slot with the material on one side of the bit and then flip it over to cut the slot on the opposite edge. Mark the position of the fence before removing it, and then switch to a ½” bottom cutting bit. Replace and run the piece through again to create a recess for the screw head.
• Carefully line up the base (B) with the mounting plate and glue them together. If you have an air nailer, shoot a couple of brads to help keep them aligned. Clamp the two pieces and set aside to dry. Glue together the two pieces for the fence (C). Line these up and clamp them in your bench vise to dry.
• Remove the base plate from your router and position it on top of the router mounting plate and mark the location of the mounting holes and the center of the bit opening. Drill out clearance holes for the router mounting screws and counterbore the holes from below. Use a 1″ Forstner bit to drill the router bit clearance hole.
• Place the glued-up fence block under the jig, mark the location of the bolt holes, and drill them out using a 5⁄16″ bit.
• Place the guide plate (D) between the fence (C) and a sacrificial block of wood, line everything up so the bottom edge is even and clamp this with your bench vise. Use the existing holes as a guide to drill the holes through the guide plate.
• Shape the front edge of the guide plate on a disk sander to give the two corners a softer rounded profile that will easily ride over small obstructions, like saw dust.
• Sand all pieces and give them a coat of paste wax to reduce friction.
• Assemble the pieces with the wing nuts facing down.
• Trace out the shape of a handle (E); a plane handle serves as a good template. Cut it out on a bandsaw, and then sand the surfaces with a drum sander and round the edges over with a ¼” round over bit. Attach the handle to the far end of the jig to provide a stable handhold to control and counterbalance the router.
Using the Jig
Install a hinge mortising bit or other bottom-cleaning bit like the Samona AD106455 (samona.com) in your router. Line up the edge banding with the center of the bit, set the fence and guide against the edge banding and tighten the wing nuts. Place the router and jig on a piece of plywood and lower the bit until it is just ever so slightly above the veneered surface. Carefully run the router over the overhanging edges of the banding to trim them flush and follow up with a light sanding.
Adjustable guide plate
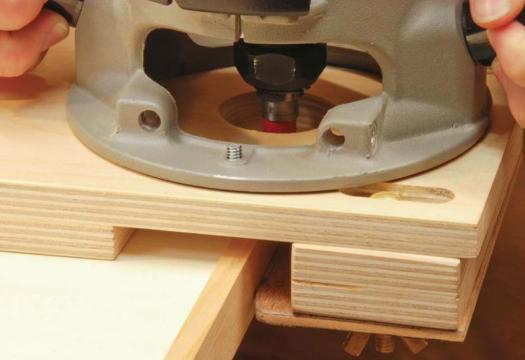
Illustration by James Provost


Do not understand are you routing the top of the edge banding?
Yes, Greg. The edge banding is about 1/32″ or so wider on both sides of the panel. This jig cuts the banding flush with the panel. You run the jig across one edge, then flip the panel over and flush the banding on the other side.
I used a plexiglass jig like this for several years and it makes this job easier and more predictable. I don’t know that you require two base thicknesses for this jig but in opaque material it will make depth setting easier. I do like the handle configuration better than a simple round post type handle
I’ve seen lots of methods of trimming edging for plywood. So far, none of them have been completely effective (mostly due to warping of the plywood or grain direction of the wood edging. This jig looks like it will solve a lot of the problems I’ve encountered in the past. I’m going to give it a go. Thanks!