PROJECT
Build a Modern Desk

Bill Maniotakis

Find more Desks projects
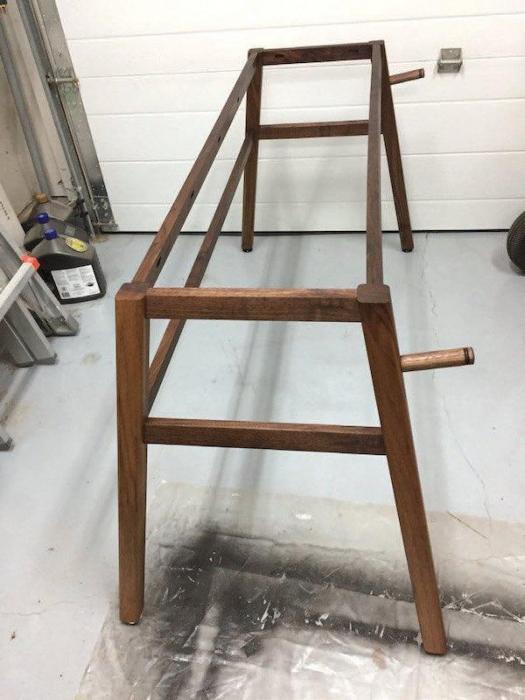
Angled legs add elegance and grace to this otherwise simple-looking modern desk.
The design for this modern desk was a collaborative effort between my son Bryan and myself. His initial description was that he wanted something simple and minimalistic for his small downtown Calgary apartment. Shortly after starting work on this desk, I named it ‘Simplicity’.
I prepared some 2D drawings to start the discussion and after a number of changes between his vision, the practical building process and joinery restrictions, we agreed on the final design and dimensions. I began the process with a full-sized drawing of the side profile on 1/4″ hardboard to work out the splay angles and joinery technique. I adjusted the leg splay angle from the planned 12° on the drawings to 10°, just because 12° looked to be too much, to my eye.
Build a Modern Desk
Milling and prep work
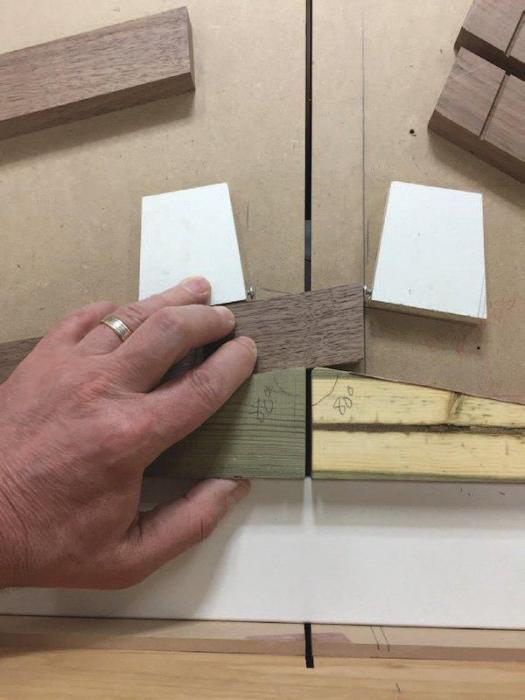
After milling the walnut and stickering it to acclimate for a few days, I made some 10° blocks that served a number of purposes. I used them on the drill press to drill out the mortises, on the table saw to cut the tenons, and finally as clamping cauls for the glue-up to compensate for the leg angles. By lining the angle blocks with sandpaper using spray adhesive, it provided some friction while clamping.
Joinery
I made a practice joint using a scrap piece of construction 2x4s and it helped with the setup and the joint layout. Seeing the joints full size and in real life, helped me size the real mortise and tenon joints. Since the legs are fairly narrow, there’s a fine line between making the mortises and tenons large enough and weakening the legs too much.
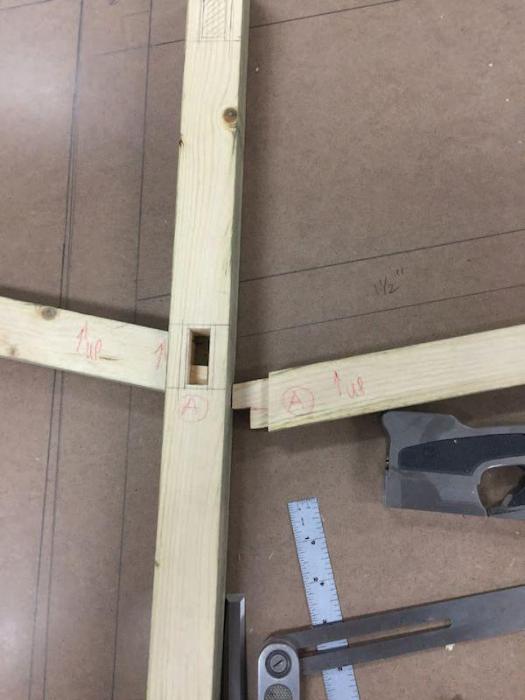
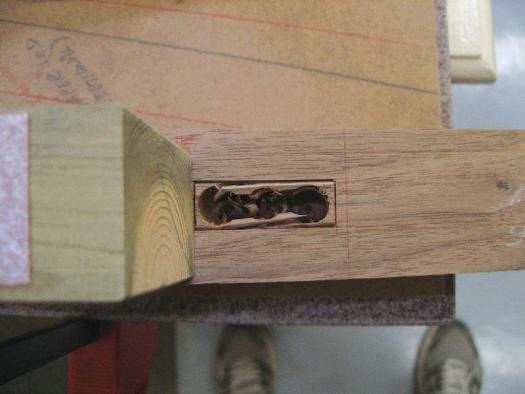
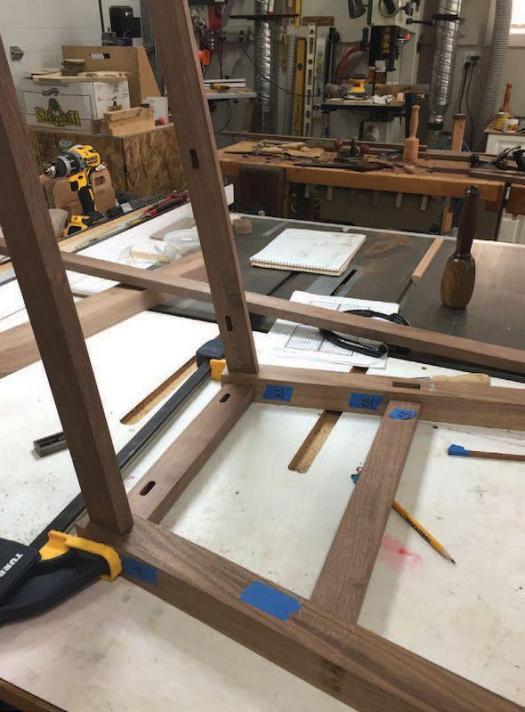
Fitting the angled mortise and tenon joints proved to be more time consuming than I expected. Marking each joint and fitting individually, I dry fitted each side leg assembly and fine tuned with hand tools as I went along. Eventually I was happy with the fit, but I also had to deal with some joints that were too loose for normal wood glue. Using the 10° wedges on the drill press table to angle the legs, I drilled three holes with a brad point bit, then excavated the mortise using chisels. The opposing tenons were notched to fit around each other and to maximize the surface area for the glue-up. Using a 1/2″ drill bit, I drilled three holes in series and cleaned out the waste, so the tenons are 1/2″ x 1-1/2″ x 1-1/2″ long. I left a 1/8″ shoulder all around the tenon for strength and to hide any epoxy squeeze out.
To mark the haunched portion of the tenon, I inserted one of the tenons then marked the shoulder of the haunch through the adjoining mortise. This gave me the exact location at which I could crosscut the haunched portion of the tenon. For the rip cut that forms the other portion of the haunch, I marked the midpoint of the tenon and left a bit of extra material on the tenon. I used a chisel to angle the haunched portion of each tenon and made sure to aim for a 10° angle, as each rail was on that angle. I didn’t get it exact, but that is another reason why using gap-filling, slow-setting epoxy for assembly was to my advantage. With the first haunched tenon cut, I fine tuned the mating tenon to fit properly.
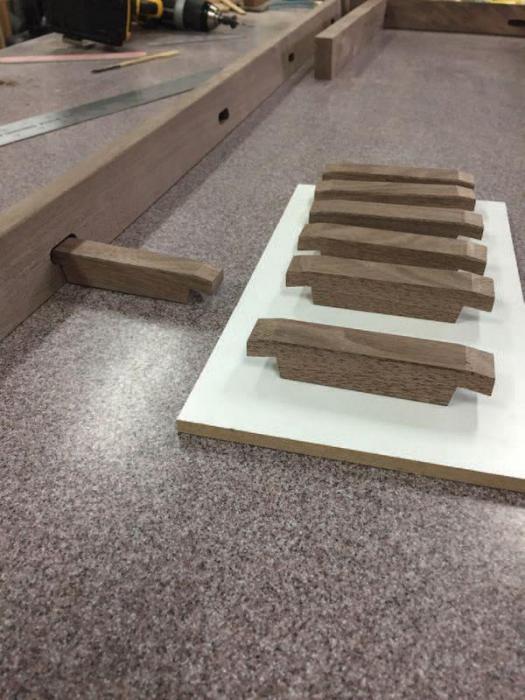
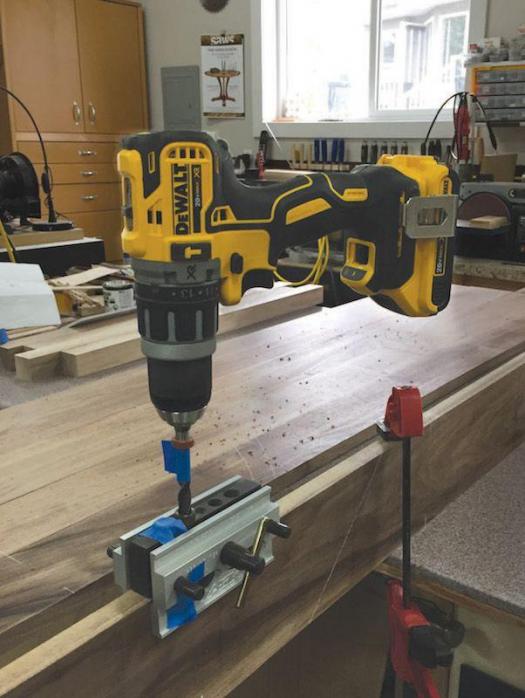
I notched the rails on the router table to receive wooden buttons for fastening the top to the base. By marking the location and length of each mortise from the visible side, I lined up the stretcher against the fence and plunged down on the spinning 1/2″ router bit. Using the markings to show where the bit started and stopped, I was able to control the length of the mortises. The depth of the mortises was done in three passes, raising the bit each time, to provide better control and safety while routing.
Modern Desk Details
Another detail that became obvious during dry assembly was that the top of the upper rails needed to be ripped at a 10° angle, which was quickly done on the table saw with the blade tilted at 10°. It was a good last-minute catch that saved me some hand planing, had I glued up the legs first.
The bottoms of the legs had to be cut on a 10° angle in two directions so they would mate evenly with the floor when complete. The tops of the legs were left oversized until after assembly when they would be cut to length with a hand saw.
Another request was for a place to hang up headphones. I turned a walnut spindle on my lathe, including the 1/2″ tenons used for attaching them into the legs, to make the two pegs. I then pillowed the end of each, added two small V-grooves, and used a wire to burn in the V-grooves for some visual interest. On the mounting end of the pegs I created a 1/2″-diameter tenon for attaching the headphone pegs to the legs. Corresponding holes were drilled into the front legs for mounting the headphone pegs. A slightly loose fit and gap-filling epoxy compensated for the pegs to be glued in place at the right angle in case the holes were not perfectly aligned.
Assembly
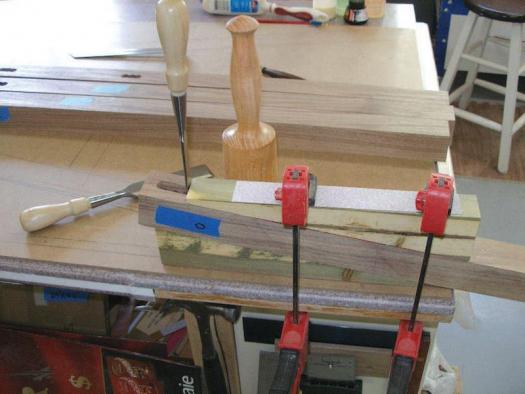
I chose to use slow-setting epoxy for a couple of reasons. Some joints were loose and needed gap filling. Epoxy also gave me a longer open time and a stressfree glue up. Epoxy isn’t as easy to use as standard wood glue, but with a bit of practice the joints can be kept neat and tidy. I didn’t have enough long clamps so I had to improvise by ganging two clamps together, which worked out fine. It’s true what is often said about clamps…you can never have enough.
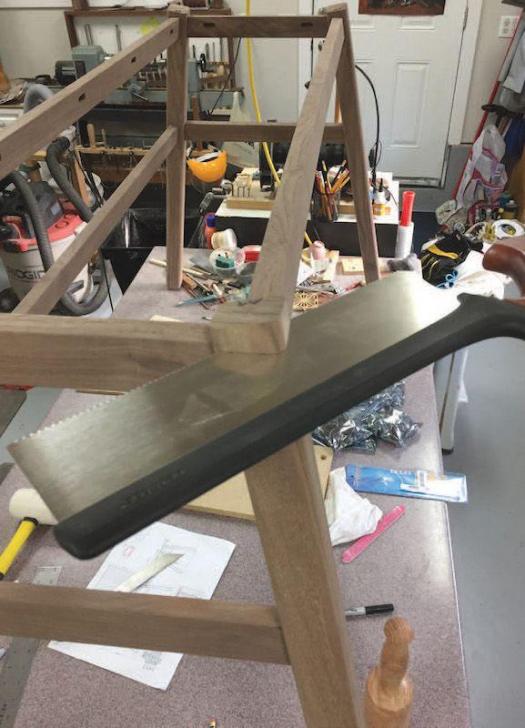
After removing the clamps the next day, I marked the top and bottom of the legs with a marking knife, relieved the knife line from the opposite angle so that my hand saw could sit against the knife wall, and cut the angles to provide flat horizontal surfaces for the top and the feet.
With the leg assembly lying upside down, it was time to make the mounting buttons, which also had to be cut at 10°. The buttons were batched in multiples from a wide piece of stock that allowed for safer table saw cuts. I also trimmed the exposed end of the buttons to 10° for a consistent look. The final width of the buttons were then ripped to size from the prepared pieces.
Down the stretch
For the leveling feet, I inserted the T-nuts, which were fitted flush by countersinking the T-nuts slightly. I experimented with the feet by spraying the aluminum on a set of four with some with black gloss paint. Bryan didn’t like the gloss look, so rubbing fine steel wool on the gloss black paint changed them to a more appropriate matte finish, which was approved.
For the desktop I selected, machined and glued up enough boards to give me the proper width and length. I glued up narrow pieces of walnut so each assembly would still fit through my benchtop planer, then dressed them flat when dry and glued them to each other. I used a dowel jig to accurately drill a few dowel holes in the sides of the boards to assist with location during assembly. This left only a slight bit of leveling, but nothing I couldn’t handle with a hand plane. Once the top was glued up and smoothed, I rounded the top edge with a 1/2″ roundover router bit to provide a more comfortable edge to rest arms against. On the bottom edge I routed a 1/8″ roundover to relieve the sharp edge and make it nicer to the touch.
Finish
The finish I chose was Lee Valley ‘Tried and True’ Oil/Varnish. Applying it as directed, it resulted in a great look that brought out the beauty of the walnut grain. Two coats were applied with a soft cloth, allowed to dry for an hour and then wiped clean and allowed to dry thoroughly between coats. When the oil/ varnish mixture was thoroughly dry, the top surface of the desk was given a few coats of wipe-on polyurethane for added protection. I then made a couple of natural edge coasters that were cut from a small apple wood stump to complement and further protect the surface.
What started out as a minimalistic modern desk proved to be more of a challenge than anticipated. This was mainly because of the splayed legs and angled mortise and tenons, which were cut in a fairly traditional method. Building this desk with legs perpendicular to the top would make this build much simpler, though I feel it wouldn’t look as interesting. Consequently, ‘Simplicity’ is a play on words because of the joinery challenges, and it’s nice to relate to specific objects by more than a generic name. Besides, it’s a little more interesting to name it ‘Simplicity’ for the purpose of the biennial SAWS 2017 Exhibition that it was entered into.
Photos by Bill Maniotakis; Lead Photo by Barry Blatz
Mock-Up
Maniotakis made a full-sized mock-up of the mortise and tenon joint before starting on the real thing. This allowed him to design and size the joinery to provide the most strength.
Angled Tenons
With the help of a pair of angled fences, and a couple of stop blocks, Maniotakis easily machined angled tenons on the ends of each rail.
Lower Mortises
Once he drilled out the majority of the waste with a drill bit, Maniotakis used his angled blocks as a chisel guide to help chop the lower mortises. With the block clamped in place, he could place his chisel on the end of the block.
Upper Mortises
The angled block could also be used as a guide for the upper mortise, but in a different way. Maniotakis used it as a visual guide to position his chisel at the correct angle, but he also could have used a rectangular block positioned on top of the angled block to physically guide his chisel.
Dry Assembly
Because the tenons fit so closely together, it’s crucial to do a dry assembly in order to ensure the tenons will fully seat inside their mortises.
Angled Blocks
Blocks, angled at 10°, help out with machining and assembly. Here they provide parallel surfaces to clamp against.

Trim it Flush
With the base assembled, it’s time to cut the tops of the legs flush with the tops of the rails.
Wood Fasteners
Shop-made wood screw blocks are made to fit into the routed grooves on the inside surfaces of the top rails. The blocks shown here will be drilled with a screw clearance hole, then cut into two smaller blocks before being screwed to the underside of the top.
Round Supports
Because Maniotakis’ son was going to use this desk in part as a place to listen to music, he turned and installed pegs to hold headphones. You can skip this step if the dowels don’t serve a purpose for you.
Proper Alignment
A dowel jig will help drill dowel holes accurately and quickly. These dowel holes will keep the board edges for the top even during assembly.
Narrow Glue-Ups
The top boards were planed to final thickness before gluing. The boards were then glued two at a time so Maniotakis had adequate time for assembly. Dowels provided alignment and minimized the amount of material removal to flatten the top after the glue dried.

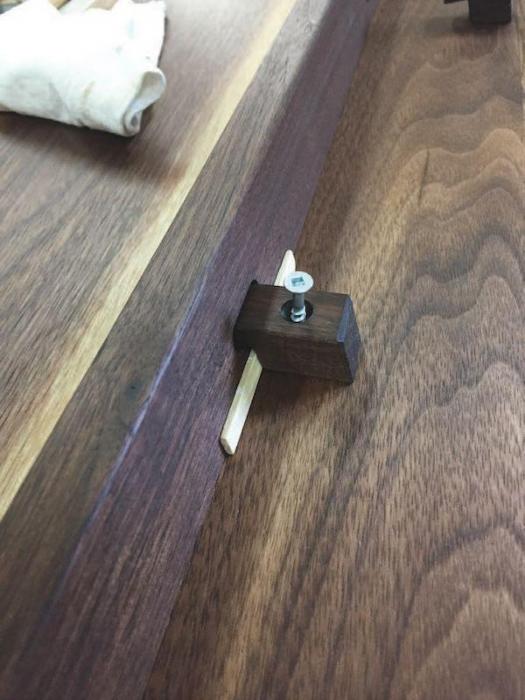
Install the Buttons
With a thin strip of wood as a spacer, Maniotakis screwed all the buttons to the underside of the top. They will keep the top secured to the base and also allow seasonal movement to take place.
Smooth the Top
To remove any irregularities you can use a hand plane and card scraper. This leaves you with a smooth top surface.
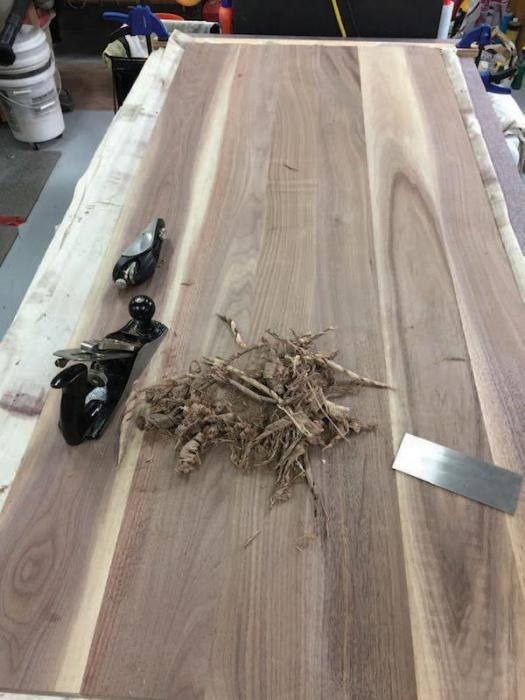
Illustration by Len Churchill


Hey Im in high school and I am wondering what the total board footage is because I have calculated it to be 251.5 board feet but that seems like a hell of a lot of wood please get back to me. Thanks!
Allowing for waste you’re looking at around 30 bf or less.
You’re very welcome Scott. Happy to share my hobby whenever possible.
Bill, thank you providing free plans. New wood workers need all the help we can get. There are thousands of beautiful furniture plans, but being new at this it is tough finding the extra cash for these plans, some are very expensive. So, thank you for providing plans for newbies.