PROJECT
A spoon carver’s toolbox

Steve Der-Garabedian

Find more Shop projects projects
It’s important to have a place to store your tools. While this toolbox was specifically designed to hold spoon-carving tools, there’s no reason you couldn’t design it to hold other tools, whether for traveling storage or for shop storage.
I received a request to make this box specifically for spoon-making tools, however, with a bit of modification this design could fit other tools or even other applications. Although there are many ways woodworkers can machine different joints, I usually reach for the router, as it is multi-functional and does a good job machining the small joints associated with this fine toolbox.
My goal was to make this toolbox as light as possible, yet very sturdy. Intentional or not, it’ll end up taking some abuse, as most toolboxes do. In order to accomplish the sturdiness, we’ll need to glue the panels into their grooves. Solid wood won’t work well because it moves with the seasons. While a piece of Baltic birch on its own would suffice, why not go a little further and jazz it up with veneer?
A spoon carver’s toolbox
Time to design
The box halves pivot open via four butt hinges. When travelling or, alternatively, not in use, they’re held closed with a pair of draw latches. Since this toolbox will hit the road, I added rails and flip-stops to the internal dividers to make sure everything stays in their respective places. The right half also has a section behind a flip-down door to house sharpening stones, gloves, scrapers and more.
I like to have the hardware on hand before getting too deep into a project to make sure it fits my design. I ordered the hardware from Lee Valley Tools, including two pairs of brass butt hinges 00D0201 and a pair of round draw latches 00S5551. I chose case handle 00S6220. Finally, for the flip-down door I ordered Lee Valley Tools’ hidden hinge pins 05H0201 in the 1/8″ size.
Keeping things light, I chose 1/2″ thick walls for the carcass, made the larger dividers 3/8″ thick and the smaller tool dividers 1/4″ thick. Joinery was kept simple, with slots and grooves cut on the router table. For the carcass joinery, I chose a pair of 4mm × 20mm Festool Dominos in each corner of the smaller left half and 6mm × 40mm Dominos for the bigger right side. Other joints, such as dowels or mortise and tenons, would work equally well on the box corners. Use the method that you’re comfortable with and have the tools for.
Practical layout
It’s much easier to design a box with a specific purpose by using the actual contents you plan to store to determine the size. Try different positions for tools or group the ones used together. When laying out the tools on your workbench, keep in mind that the back panels will need to be added to the overall depth. Take your time with this stage as the dimensions will be determined by this step. I grouped the thinner tools on the left side of the box and the bulkier, odd-shaped items on the right. For added accuracy, mill up pieces of scrap wood to size and confirm that everything fits. The final dimensions ended up being 13-1/4″ wide × 20″ long. The box is 2″ deep on the left and 3-1/4″ on the right.
Jazzing it up
The veneered panels will need to fully cure once out of the vacuum bag so we should start with them. I opted for 6mm Baltic birch cut oversized at 22″ wide by 23″ long. The outer faces got pressed with redwood stump/root burl that not only had beautiful grain but was the perfect size. For the inside I had some short pieces of cherry veneer that would complement the piece nicely. I needed to joint and join three pieces to make up the width, and this was easily accomplished with editor Rob Brown’s veneer-cutting jig covered in the June/July 2020 issue.
Using Roarockit’s inexpensive vacuum-pressing kit, press the panels one at a time. Any PVA glue will work, but Titebond’s Cold Press for Veneer adhesive is specifically made for this job. Press each panel for at least five hours, and once out of the bag, let the glue fully cure by propping up the panels overnight or longer. Don’t lay them flat on a bench as this might cause them to warp or curl.
Creating the framework
I milled up pieces of cherry that were slightly thicker than the final 1/2″ to allow for hand planing and sanding. Starting off with a roughly 6″ wide plank, I ripped pieces that were 2″ wide and 3-1/4″ wide. If you keep track of the pieces as they’re sliced off the plank you can create an attractive visual effect when the box is closed. Using a cross cut sled and a stop block, cut the sides of both halves to 20″ and the tops and bottoms to 12-1/4″ long.
If you’re going to use Festool’s DF 500 Domino joiner, there are a couple of considerations to take into account. I used the narrowest setting for the width of the mortises and slightly shaved the width of the Dominos with a block plane to allow for some lateral adjustment. The shortest depth for the 6mm Domino would almost have it poking through the side of the box. To work around this, I shimmed the unit away with a 1/8″ thick piece of poplar. You’ll also need to trim the Dominos shorter by at least 1/8″ although 3/16″ will give you a bit more wiggle room. While the smaller 4mm Dominos would work throughout, I wanted as large a Domino as would fit into the larger half.
Next, I milled up pieces of cherry that were 1/4″ and 3/8″ thick for the internal dividers. You’ll need some widths that are roughly 2″ and some 3-1/4″ wide. This extra bit of material lets us trim off any tear-out from the router.
Getting groovy
We’ll need to create a groove for the panels at the bottom of each half. A simple method I’ve been using for some time now is with a box slotting bit 16J8312 available from Lee Valley Tools. This bit cuts a 1/8″ thick groove and comes with two bearings allowing for different depths of cut. Put the smaller of the two bearings on the bit for a 5/16″ deep groove.
In order to size the slots we need to know the final thickness of our panels. Clean up both faces of the panels with sandpaper, keeping in mind we have only so much veneer to work with. I like to do an initial pass with a random orbit sander at 180x, then switch to scraping and hand sanding to tackle any remaining spots.
Dry assemble the left half of your box using clamps, making sure everything is flush. Raise the bit so it will cut a groove 1/8″ from the bottom. Get a scrap piece of wood and run a groove in it. We’ll use this to hone in on the perfect fit. Next, set your box on the router table and run the bit counterclockwise along the inside. Raise the bit slightly and run the test piece against the bit. Try and fit the panel into this groove. Chances are it’s still undersized. Run the box around the bit again. Go back and forth between the test piece, the panel and the box until you get a nice fit. While a tight fit might be tempting, you don’t want to risk breaking the lip and you’ll need room for glue. Repeat these steps once more for the other half of the toolbox.
Use story sticks to measure the length and width of the panels directly. It’s easy to make them from scraps of wood by re-sawing a 1/8″ thick piece that’s approximately 3/4″ wide and longer than the box is wide. Using a chisel, put points on both ends and start fitting it into the groove. Trim a bit off of the points, going back and forth until the story stick is parallel to the ends and fits in the groove. Repeat these steps for the length of the panel. Set up your cuts on the table saw using these sticks. Since the box slotting bit leaves rounded corners, we can either square the grooves or round the panel corners. I find the latter much easier, using a washer or an offset wheel gauge that matches the bit diameter along with a chisel and file.
Slots and more slots
Work on one half of the box and one section of each box at a time to avoid any confusion. Similar to a box slotting jig on the table saw, we will set up the router table to cut matching slots in our components. Some of these will be through cuts while others will need to be stopped. It’s very important during this process to keep track of the orientation of the pieces. Using the following steps, we will cut the slots in our box frame and the thicker dividers. Position and space these to accommodate your tools.
Add an auxiliary fence to the mitre guide and make sure it is locked at 90°. Chuck in a 3/8″ straight bit and, if you have it, a 3/8″ onsrud up-cut spiral bit, which will work nicely to pull the waste down and out of the slot. Make yourself a non-slip, shop-made stop block by adhering sandpaper onto the back.
Raise the router bit to 1/4″ and cut the slot in the auxiliary fence. Next, space and clamp the stop block the distance required for the pocket, in this case 2-1/2″. We need to stop this slot at the groove for the panel. This is easily accomplished using a long piece of wood clamped to the left edge of the table, stopping us from sliding further into the bit than the groove. For the mating piece, we will need to put this long stop on the right side of the table. First, lower the bit below the table then pull the mitre gauge back against the stop. Raise the bit to the 1/4″ height and push through once more. I found clamping the piece being cut to the auxiliary fence let me use a much more comfortable grip, rather than a white-knuckled approach.
Dry assemble the box and cut a length of the previously milled 3/8″ cherry divider material just a bit longer than needed. Sneak up on the perfect fit using a shooting board to dial it in. Now we will divide the section to the left of this divider. Disassemble the box and head back to the router table. Using the steps above, create a stopped slot in the left side of the frame 1/4″ deep at the appropriate location. Next, create a through slot in the freshly made divider, however, offset the distance by 1/4″ as that’s the amount it’s inset into the frame.
To assist in accurate positioning of the dividers, use either a marking knife or pencil while the box is assembled. At the router table it’s easy to position the piece by first unplugging the router, placing a square against the router bit and component, then spinning the bit by hand.
Using the steps above, continue to create slots in each part. Go back and forth between cutting the slots and fitting the dividers. Use stopped slots when working on the outer frame and through cuts on the internal pieces. When working on pieces that will get multiple slots, use an indexing pin and cut the components together. The top 3/8″ horizontal divider on the right half along with the horizontal and 3/8″ vertical divider on the left half get 1/4″ deep slots cut for them. The remainder of the dividers are seated in slots 1/8″ deep. Remember to take these offsets into account. There are a lot of intricate steps to completing this internal network. If you take your time, they will be accurate and the results will speak for themselves.
Flips and rails
Once all the dividers are completed, trim them down to their proper height, flush with the box frame, getting rid of any tear-out in the process. To hold the tools in their respective pockets we need to create a set of flip-stops and rails. The rails are located with a 1/4″ space near the bottom. This ensures wood chips and shavings don’t get trapped. The flip-stops sit atop alternating dividers, spanning the width of two pockets. To keep things simple, both rail and flip-stop mortises are 1/4″ deep. Cut mortises in the top of the respective dividers with this in mind. The length of mortises for the rails will be 1-1/4″. The length of the mortise for the flip-stops will be determined by the width of the two pockets it will span, minus approximately 1/8″ for clearance.
Gang and tape like components together and cut the mortises for the rails with sacrificial pieces of MDF, or similar, on both sides. This will not only stop tear-out, but also help balance the router. A compact router with a straight bit is well suited for this. Come as close to your end points as you comfortably can, then use a sharp chisel to clean and square them up. Next, repeat the process for the flip-stops, removing any dividers that don’t get them.
From leftover pieces of milled cherry, cut the flip-stop pieces to fit into their mortises. Centre them on the dividers by using a small clamp. Drill a pilot hole for a #4 × 3/4″ screw. Next, drill a clearance hole through the flip-stop and finally countersink for the flat head screw.
Start off by cutting the rails slightly oversized, then trim them back with a block plane until they slide in smoothly. Using the rail, a marking knife and marking gauge, score the recess for the rail ends. Trim out the waste with a sharp chisel.
Pivoting door
The door is made using a 3/8″ thick piece of black Limba, trimmed to let it slip into its opening. To let the door sit flush, we’ll need to remove 3/8″ from the top of the divider. This is better done on a band saw or with a saw and chisel. A router would more than likely rip the small ears off the ends. Clean up any rough edges with a file and sandpaper and use a sharp chisel for the final fit. To keep the door shut we’ll add a couple of square blocks at the top with magnets after the finish is applied. A knob would only get in the way so a 3/4″ finger hole was drilled and chamfered near the top. To allow the door to pivot, a set of hidden hinge pins, mentioned above, was used. Follow the instructions that come with the set as they are well written and easy to follow.
Some assembly required
Applying a finish will be much easier if the whole box is still in pieces. Clean the interior of the box frame components with a hand plane or sander. Gather your parts and glue them up, keeping everything lined up as much as possible. Don’t forget to apply glue into the grooves for the panels.
Once the glue has cured, remove the assemblies from the clamps and flush the corners as well as the tops and bottoms. A sharp block plane will work wonders on the ends and a jack or jointer plane will easily level any high or low spots. Test fit both halves to make sure they come together nice and flush.
At this point we can add our hinges and clasps. Clamp the two halves together, propping up the thinner half with scraps of wood. Using double-sided tape, stick the hinges at evenly spaced locations and use a marking knife to score their locations. Transfer these lines to the inside and outside faces and use a marking gauge set at the thickness of the hinges to complete the scoring. Re-clamp the two halves together and use a router freehand to mortise for the hinges, staying within the lines. Use a chisel to finish the fit.
Mount the hinges with matching screws, but use only one or two holes at this point. Make sure to use the right pilot size bit, as you don’t want to break the head off the screw. Alternatively, using gimlets or a steel screw would aid in this step. We can also now locate and mount the draw latches. The screws that came with the latches were slightly too long so I substituted shorter ones.
Seeing the finish line
Assemble the toolbox one more time. You’ll more than likely have to trim the dividers, as some material was removed when levelling the openings with the jack plane earlier. Mark up the bottoms of the rails and dividers to keep track of where they’re located. Clean up any scratches that have popped up and tape off all edges that need to be glued during the final assembly.
I went with Osmo TopOil for the finish, as it will provide a durable finish and still let the grain shine through. I applied two coats, letting the first cure fully. I propped up the components on dowels to increase air circulation and allow the finish to cure. I also like to apply a fine furniture wax, like Clapham’s Beeswax Polish, after the second application of the finish has fully cured.
Wrapping up
Once the finish has fully cured, remove any tape. Sand any spots the finish penetrated or, alternatively, touch up any spots you missed after gluing and assembling the toolbox one last time. Glue some 1/4″ diameter rare-earth magnets onto the top of the square blocks for the flip-down door. Glue these on after adding another pair of magnets to the inside top of the door. Screw the flip-stops, hinges and draw latches into position. Finally, centre the handle between the latches. Some compartments were left a little larger than required, especially on the larger right half, to allow spoon blanks to be carried in this travelling toolbox.
Like with most things in woodworking, there are numerous ways to accomplish a task. Some methods and tools are better for certain operations, like the router in this case. The steps above count on a router table with a mitre slot. If you don’t have this slot, you can create a sled to do the same work. Always use test pieces to check your bit height, especially if you don’t have a height gauge. The router is truly a versatile tool and you will give it a good workout when building this project.
Photos by Steven Der-Garabedian
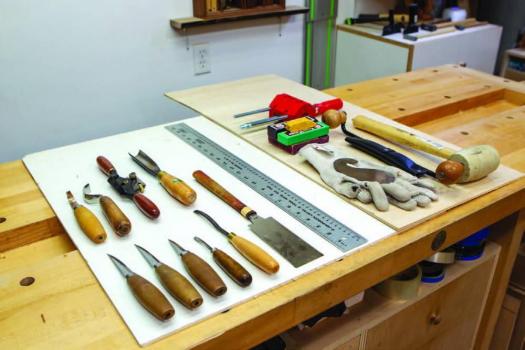
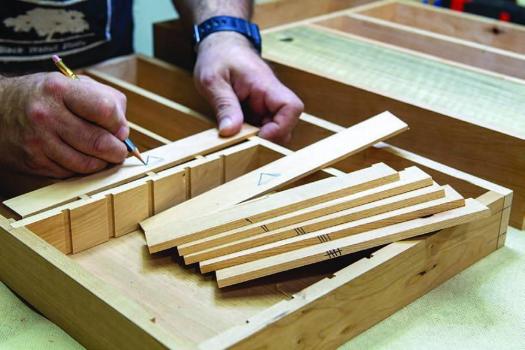
Proper Layout
Determining where to locate each tool is an important step. Generally speaking, a project like this needs to be as small as possible, though it’s just as important to be able to hold all the necessary tools in one toolbox. Der-Garabedian lays out the tools on a piece of material and records how much space is needed.
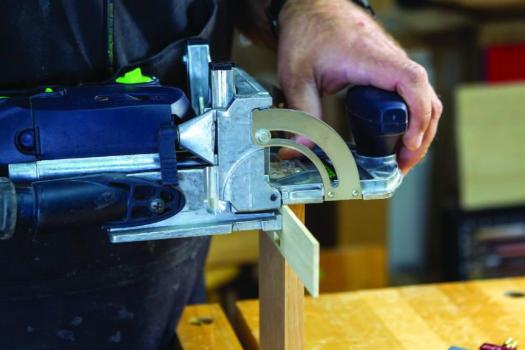
Dominos, with a Shim
Even on its shallowest setting, the Domino mortises would protrude out the other face of the workpiece. Der-Garabedian adds a shim between the cutter and the workpiece to save the day.
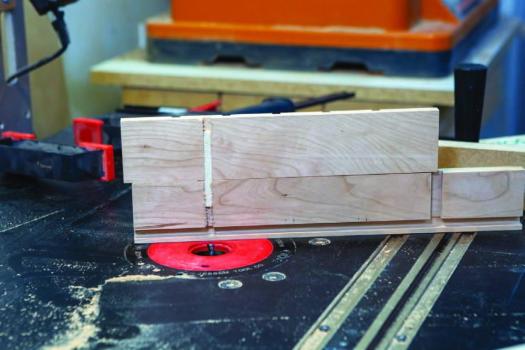
Slot Cutter
To cut the slots in the inside face of the carcass to accept the back panel, Der-Garabedian installs a slot-cutting bit in his router table and makes a few passes at different bit heights. Bearings of different diameters will give you some flexibility, as they all leave grooves of different depths.
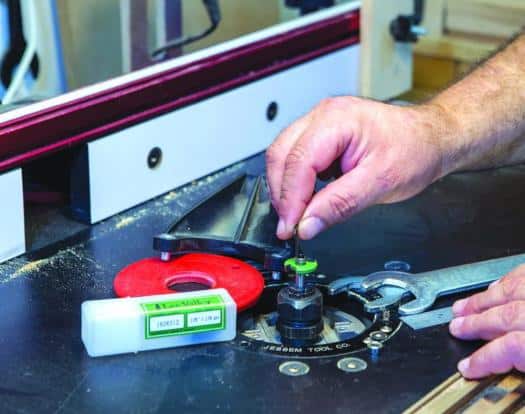
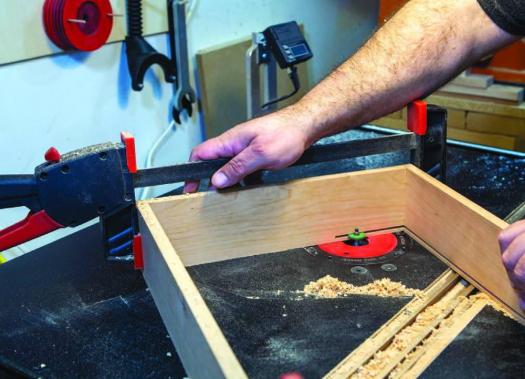
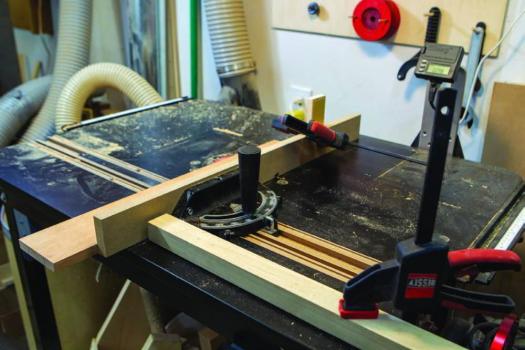
Nice Grooves
The router table provides a large, flat surface to support the dry-assembled carcass while the joinery to accept the back is machined. Multiple passes allow you to customize the grooves to accept any back thickness.
Direct Measurements
Thin strips of wood pared to length with a chisel will measure the distance between the bottom of the grooves. Der-Garabedian uses these strips to transfer the measurements directly to the table saw.
Mock It Up
Sometimes you need to mockup the tool-holding cavities to get a better feel for how much space you really need. Der-Garabedian milled up some softwood scraps to determine the finished sizes of the parts.
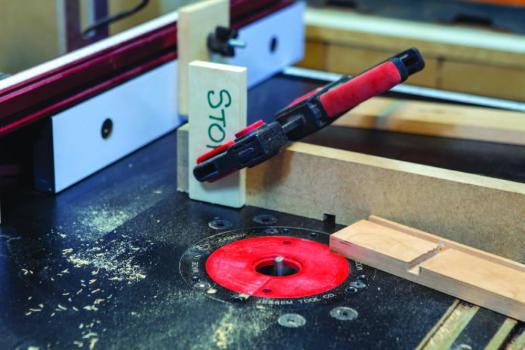
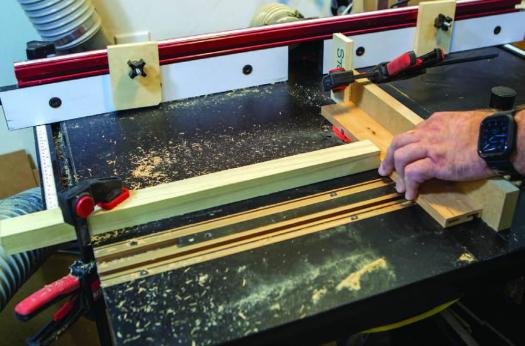
Accurate Dadoes
Many of the dadoes needed to complete the joinery in this toolbox are stopped. Rather than free-handing it (and likely making a mistake), Der-Garabedian uses a stop block clamped to his router table either in front of the mitre gauge or behind it, depending on the situation.
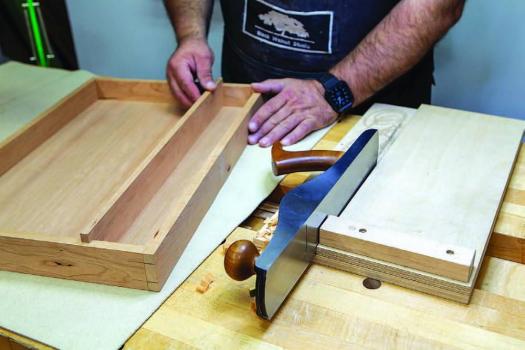
Trim to Length
Der-Garabedian uses a hand plane and jig to ever so slightly trim the interior parts to length, one pass at a time. The benefit of using hand tools for this is that it’s much easier to arrive at the correct length, and only very rarely do you end up with a workpiece that’s cut too short.
Where’s the Cut?
In order to mark the edge of the spiral router bit, Der-Garabedian rotates the bit while placing a small square against the workpiece and bit. When the square moves to its furthest point away from the center of the bit, he knows that’s the outer limit of the cutting circle, and he marks the location on the mitre gauge for future use.

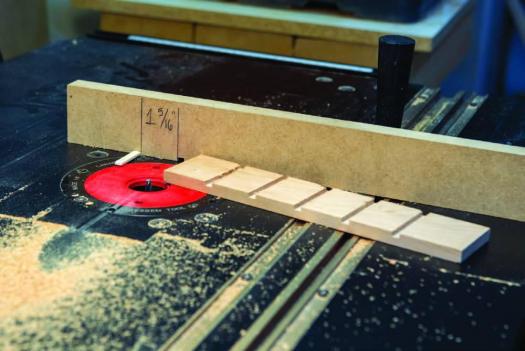
Simple Spacing Jig
To make a jig to cut evenly spaced dadoes, make a notch in a piece of MDF with the bit you’ll use for the dadoes, then glue a strip of solid wood into that slot that fits the notch snugly. Next, move the piece of MDF to one side by the width of gap you want, plus the width of the dado you’re cutting.
Easy Alignment
You can make matching parts by routing a dado in two parts, then temporarily fixing them together with a strip that fits across both dadoes. The rest of the dadoes machined on these parts’ faces will be aligned.
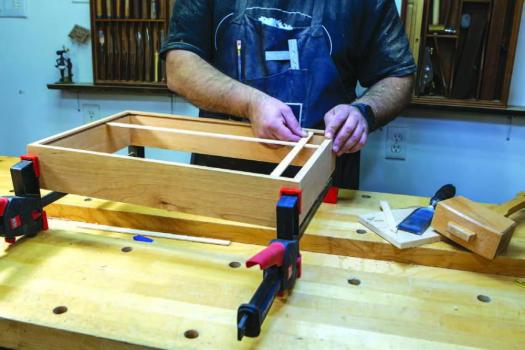
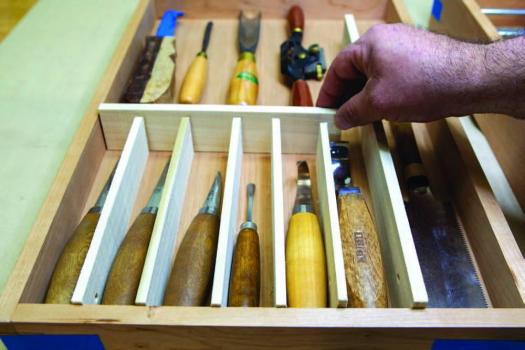
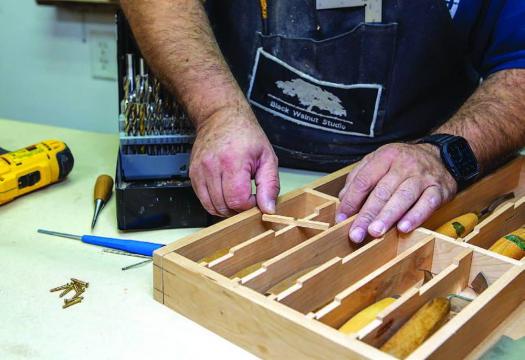
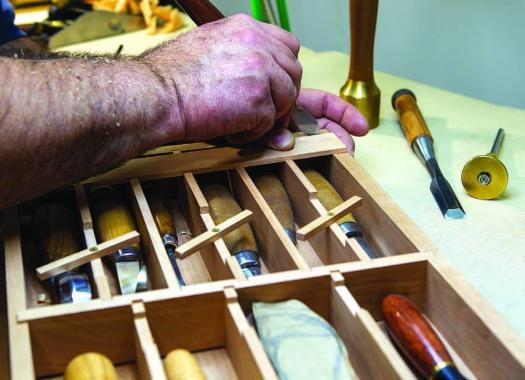
Looking Good
With the dividers in their slots and tools in their pockets, a final trim of their height can be completed while also removing any tear-out.

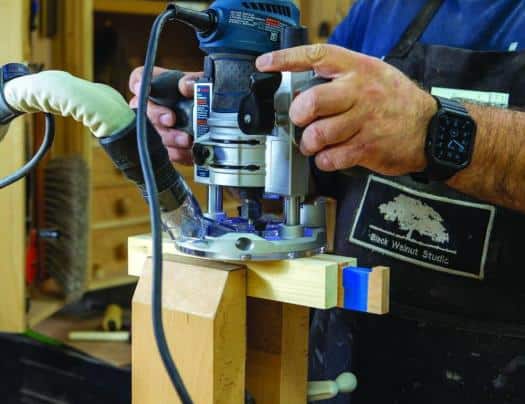
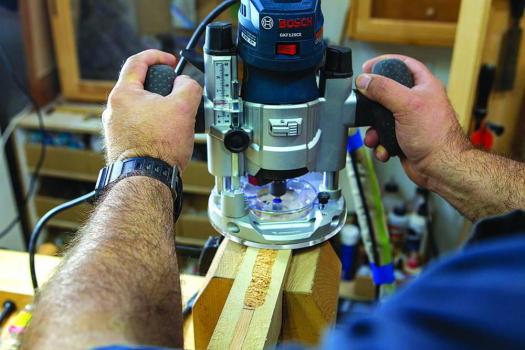
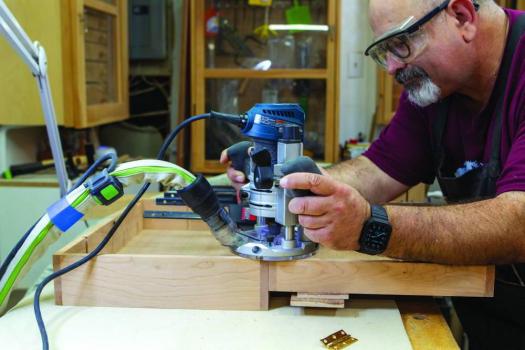
Balancing Act
Routing the rail and flip-stop slots in the top of dividers is easily accomplished with a hand-held router. Der-Garabedian adds thicker sacrificial pieces on both sides to aid not only in balancing, but also to prevent tear-out.
Snug But Not Tight
Der-Garabedian adds the flip-stops to the dividers by first drilling a pilot hole through the pair, then a clearance hole through the flip-stop and finally countersinking for a flat-head screw.
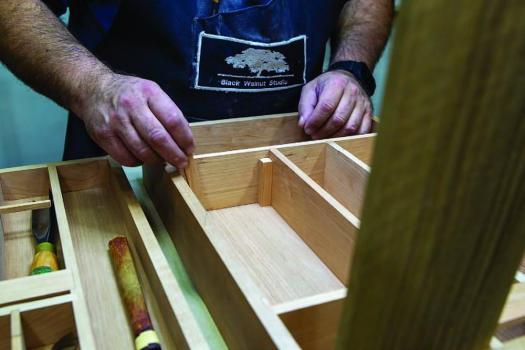
Finish Preparations
It’s much easier to apply a finish if the dividers aren’t in the box. Keeping track of where everything goes is just a matter of marking the bottoms of all the removable pieces.
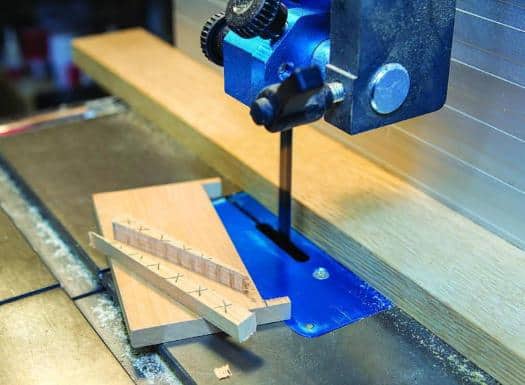
Door Relief
The band saw is a safe and simple way of relieving the top of the divider for the door compartment. Cleanup can be accomplished with a file and sandpaper.
Line Transfer
Once dividers are slotted and placed in position, a marking knife and the rail are used to transfer the location of the mortise to the box frame. Notice the small gap between the long edge of the strip and the case end. This allows any trapped sawdust to easily exit the cavity.
Door Stops
Simple square blocks will stop the door from swinging further into its opening and, paired with magnets near the end, will firmly hold the door shut.
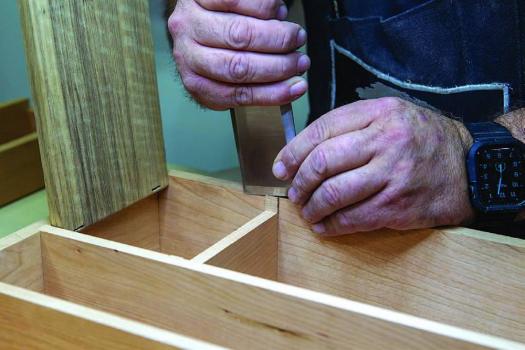
Close Shave
Final trimming of the door compartment divider is completed in place with a sharp chisel.
Hinged
Der-Garabedian mortises for the toolbox hinges after supporting the thinner half and clamping the pair together.
Finishing Touches
A durable finish will help keep this toolbox looking great for many years to come.
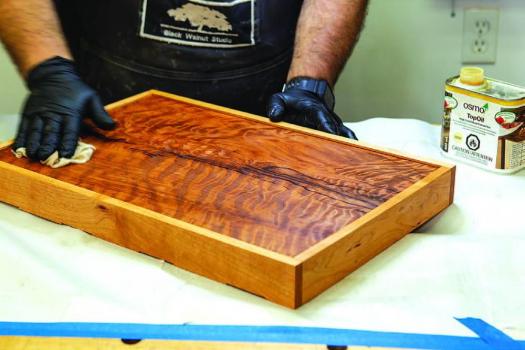
Illustration by Len Churchill