Driving nails with a hammer has its time and place. But when you need to drive a lot of nails quickly and efficiently, there’s nothing quite like a pneumatic fastener.
Nails have been around for as long as there has been metal to make them. The first nails were all custom forged and were made one at a time by a craftsman, and as you might well imagine, were rather expensive. With advances in technology brought about by the industrial revolution, machines were developed to shear these nails from a sheet of steel, making mass produced, inexpensive nails, widely available. Later advances in manufacturing resulted in machines that could stamp out nails at extremely high speeds from a continuous roll of wire. Additional investments in research saw the addition of ridges and rings on nail shanks for better holding power and coatings to improve nail penetration and reduce corrosion.
Just as the nail has evolved and improved over the years, so have the tools used to drive them home. Early hammers were essentially a heavy metal weight, flat on one face and mounted on the end of a long handle, which was swung to strike the nail. We’ve come a long way from those days with the new generation of anti-vibration hammers constructed of space age materials. While these hammers are a marked improvement over earlier models, they still rely on the operator for the energy to drive the nail, and this can easily lead to repetitive strain injuries. Using compressed air to drive fasteners is not new; they have been used in the manufacturing and construction sectors for decades. Fortunately, anyone with a portable compressor can take advantage of one of the many varieties of pneumatic fasteners on the market.
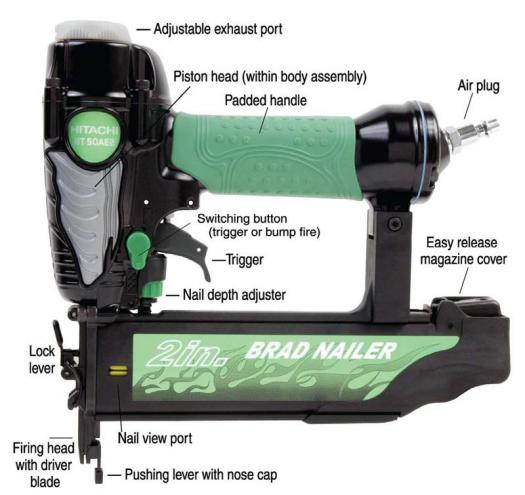
Pneumatic fasteners, or ‘nail guns’ as they are more commonly referred to, all share the same basic features, including a magazine to hold the nails, an air fitting through which compressed air enters the nailer, a piston that powers the firing head, a lock lever that enables access to the firing head to remove jammed nails, and a trigger (some incorporate safety features).
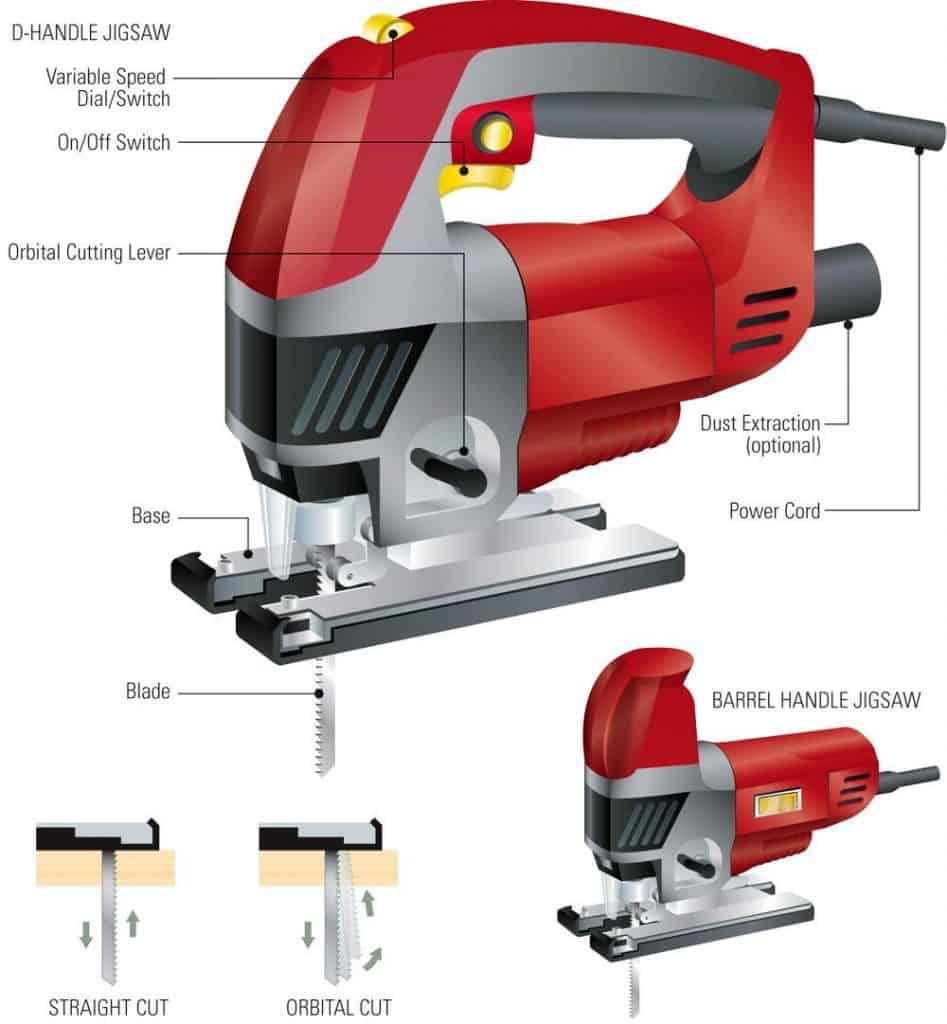
When the tool is connected to an air source, it is armed and ready to fire, so do not connect the tool until you are ready to use it. A two-way trigger controls the compressed air. When the trigger is pulled, it passes compressed air on to the top of the piston. The piston is connected to a driver blade and the blade drives the nail into the wood as the compressed air forces the piston down. As the trigger is released, the second half of the valve is activated and the compressed air is passed to the underside of the piston, which then cycles it back to the start position ready for the next nail. Some nailers offer two modes of firing the nails – trigger mode (which is the standard for most nailers) and bump mode. These modes are user selectable and may require fitting an alternate trigger on some models. In bump mode the firing action is activated by pressing, and quickly releasing, the push lever onto the work piece. Bump mode is favoured by carpenters who want to fire a lot of nails quickly.
Using air to drive a nail or a pin offers several distinct advantages, especially for the commercial market (for which these tools have been developed). You can certainly drive a lot more nails in eight hours with compressed air than you could with a hammer. This may not be as important in a home workshop situation, but when faced with a renovation involving a lot of trim, it can be well worth it to invest in one of these nailers. The real advantages to the woodworker with these tools are the increase in precision and quality.
A nail or pin placed with a nailer yields a structurally stronger connection than one driven with a hammer. When using a hammer to drive a nail, the pointed tip of the nail will tend to sever the fi bres in the wood, which increases the risk of it splitting. The repetitive blows from the hammer will also create a looser joint as everything is repeatedly struck and shaken.
Using a nailer to fasten two pieces of wood also results in a more accurate joint. It can be a challenge to hold two pieces in the proper place as you start a nail and then drive it in. Before the pieces are locked in place, the blows from the hammer will likely have caused the pieces to shift relative to each other. When using a nailer you hold the piece in place with one hand and then place the tip of the nailer where you want the nail, applying downward force to push the pieces together, and then pull the trigger. The nail is driven into the material full depth instantly in one stroke. The relatively dull end of the nail pushes its way between the fibres instead of severing them and this results in superior holding power. To maximize the holding power, some nails are coated at the factory with a polymer that melts as the nail is driven into the wood and then hardens when it is fully driven into the piece.

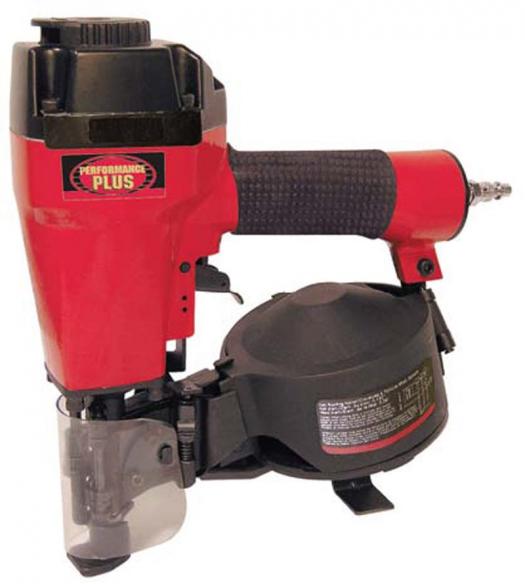
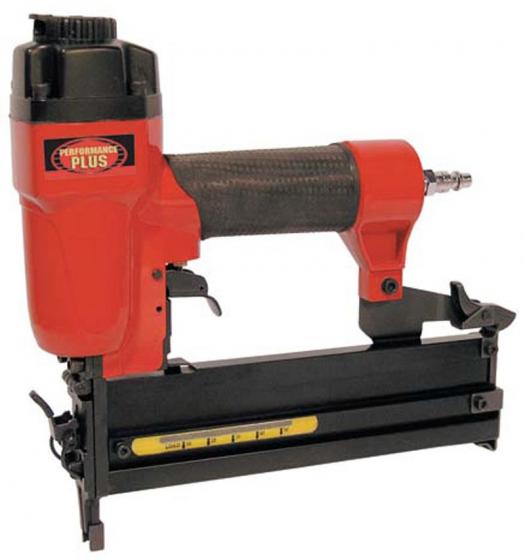
Nailers come in several different sizes and configurations, each suited to a specific task. The big boys are the framing nailers. These nailers aren’t likely to see enough use with the average woodworker to justify purchasing one, but if you are contemplating a major renovation or the construction of a shop, or if you do carpentry work on the side, it could very well be a worthwhile investment. Framing nailers are used for everything from house framing, and sheathing to pallet and crate making. They come in two different styles, stick nailers, like the Hitachi NR90AD (metabo-hpt.com), and coil nailers, like the King 8245R (kingcanada.com). Stick nailers use nails that are collated by strips of paper, plastic or thin wire. Nails come in various lengths up to 3 1/2″, and there are generally no more than 100 nails on each stick. Coil nailers use nails that are collated in rolls of up to 400 nails. Both have their advantages and disadvantages. Nailers that use stick nails often have a better balance but they hold fewer nails and are physically larger. Coil nailers are smaller, which means you can get into tighter areas and they hold a lot more nails, which means less time spent reloading.

The original clipped head nails, named for the section of the head that is clipped off so that it can rest flat against the next one in the magazine, remain popular in much of the country. However, there are various jurisdictions in North America which have restricted their use. In areas prone to hurricane force winds or in earthquake zones, concerns about clipped head nails being overdriven have required that full round head nails be used instead. Because these nails cannot sit next to each other, they are either collated in a coil with wire or in a strip with plastic. One of the issues with plastic collated nails is that pieces of the plastic do have a tendency to get imbedded in the wood, caught under the head of the nail.
The remaining four variations on the nailer are worthy contenders for space in any shop. Each is specifically designed to serve a different purpose and each uses a different type of fastener. These nailers don’t require large compressors; they typically operate at 90 PSI, and consume from around two SCFM (Standard Cubic Feet per Minute) for the smaller pin nailers and up to six SCFM for the larger finish nailers.
For most woodworkers, a finish nailer, such as the Craftex CT124 (busybeetools.com) is the largest nailer they would need. This tool is ideal for cabinet carcase assembly, interior trim, large crown mouldings, face frames, baseboards, door jambs and casings. The nailers come in two formats – straight or angled, and they shoot either a 15 or 16 gauge brad nail from 3/4″ to 2 1/2″ long. The nails are bound into a stick of 100 and the coating that binds them together melts as the nail is fired into the wood. It then hardens, locking the nail in with a tenacious grip. While this may provide a structurally superior connection, it can make the nail virtually impossible to remove if you make a mistake. For areas where corrosion is a problem, these are also available in aluminum and stainless steel.

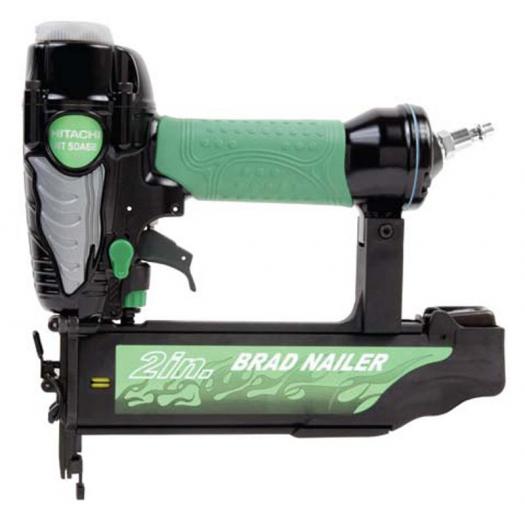
The next step down in size is the brad nailer, as exemplified by the Hitachi NT50AE2. They are smaller than finish nailers and use an 18 gauge nail. Brad nailers are ideal for door trim at the jamb edge as well as assembling and installing mouldings, fastening cabinet backs and other situations where you require an inconspicuous nail with a small head. These can often be hidden effectively in a quirk or where a fillet meets a cove. When looking for a brad nailer, pay attention to the size of the nosepiece. Some nosepieces can be large and bulky which will obstruct your view and make placing the brad accurately more challenging. A nailer with a small, easily seen nosepiece makes precision placement of the nail a breeze.
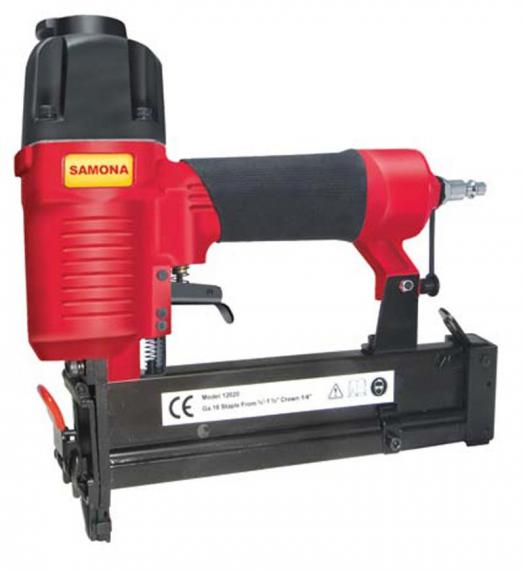
In areas where the fasteners will be hidden (on a cabinet back or on a carcase behind some applied trim) or when attaching upholstery, a stapler such as the Samona 12020 (samona.com) will provide considerable holding power. For most woodworkers, either a smaller stapler that uses 18 gauge ¼” narrow crown staples, from ⅜” to 1″ in length, or a mid size unit that shoots 16 gauge 7⁄16″ medium crown staples, from about ¾” to 2″ in length, will suffice. The small heads on brad nails don’t provide a lot of resistance when being driven into thin cabinet backs or into upholstery fabric, and can often be shot right through the material. Staples have thinner shanks than the brad nails which reduce the chance of splitting your material when nailing near ends and edges, while still delivering great holding power.
If your budget will only cover a single nailer, then consider a combination tool that uses both nails and staples, like the King 8210NS. This tool shoots 18 gauge brad nails from ¾” to 2″ in length, and 18 gauge ¼” narrow crown staples from ⅜” to 1 ⅝” in length. A tool like this will likely cover the majority of your fastening requirements.
The Cadex CPB2350 (cadextools.com) is an example of the most recent addition to the nailer line, the pinner. The Cadex is a combination 23 gauge headless pinnernailers_11and brad nailer. Pinners range widely in price and quality, from inexpensive models that cost less than $50 to professional models costing upwards of four hundred dollars. One of the advantages of these nailers is that they are very light (around two lbs), and they fit into tight spaces much easier than larger brad nailers. They also shoot very thin pins, from ⅜” to 2″ long, that won’t split even the hardest wood. Tolerances on these pinners is critical, and professional quality pinners make all the difference between an enjoyable experience and one that is frustrating. Features that are not readily noticeable can make a huge difference over the life of a tool.
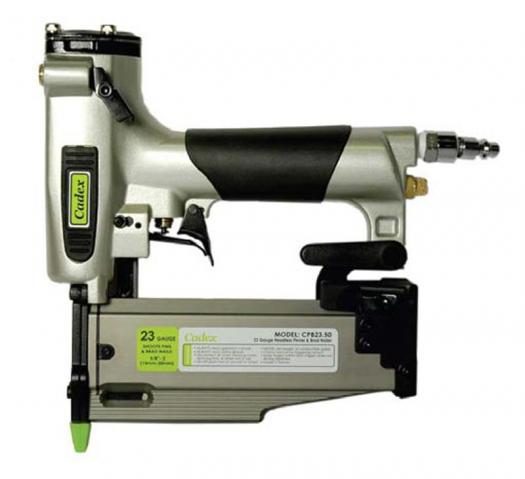
The driver blade is a key component of the pinner. It’s the part that pushes the pin into the work piece. Driver tolerances run from well under .001″ to over .005″ (a factor of over 5X). Pinners manufactured to tight tolerances will operate reliably without jamming while those with a looser tolerance will be much more prone to jamming. Lower quality pinners have drivers made of mild steel, which not only have a short life span, but in many cases can’t be replaced. A pinner with a driver made of hardened Swedish steel will last for upwards of 50,000 shots before needing to be replaced. Pinners have gained increasing popularity with woodworkers because of the very tiny hole that they leave in the surface of your material. These are easily filled with finish and sawdust or wax, making them almost impossible to detect. If one of these pins were to be deflected and blow out the side of a piece, they can be removed by working them back and forth until they break just below the surface, and then the small hole can be easily filled.
Because these small pins are headless, they provide limited holding power. In most cases they are used to hold delicate parts in place until glue dries, but they can also be used to hold pieces without glue, particularly where clamping is impossible. To provide the maximum holding power, alternate the angles of adjacent nails by toeing them in to each other. Angling the pins has another advantage as well; one half of the small holes left behind by the pins will be almost invisible when the work is viewed from any particular angle.
Among the various types of nailers there are several common features worth considering. Some of these are minor, but others can make a big difference in daily use.
An adjustable exhaust port can be a very nice feature when working inside dusty cabinets. A sudden blast of exhaust air shot into an inside corner filled with sawdust can potentially cause an eye injury; some models with the exhaust port on top of the housing allow you to direct the exhaust into the open space away from adjacent surfaces.
How you adjust and set your depth of cut is another consideration. There are two ways to adjust the depth of set (how deep the nail is set into the wood) on nailers. Different wood species will offer more resistance in nailing. Some models come with an onboard dial that allows you to adjust depth of set at the nailer without adjusting the pressure at your compressor. If the nail is not setting just slightly below the surface at the maximum setting you will have to increase the pressure available at the compressors regulator. If the nailer doesn’t have an onboard adjustment then all adjustments will need to be made at the compressor. Be sure not to exceed the pressure rating of the nailer as stated in the owners’ manual.
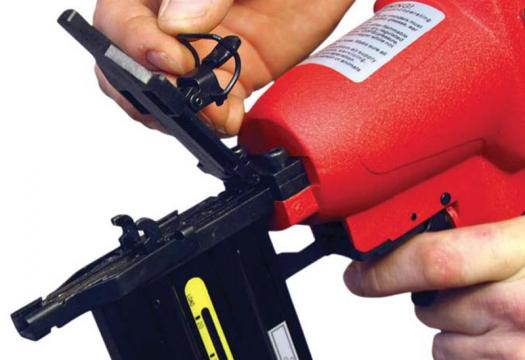
It is an inevitable fact that your nailer will jam at some point. When this happens you will need to remove the drive-way cover to clear the jam. On some models this is accomplished by simply releasing a lunch box clasp and flipping the cover aside. Other models require an Allen key to remove a number of set screws; this can be a time consuming chore. When the contact safety mechanism is on the front of the nailer it may also interfere with the removal of the front guard.
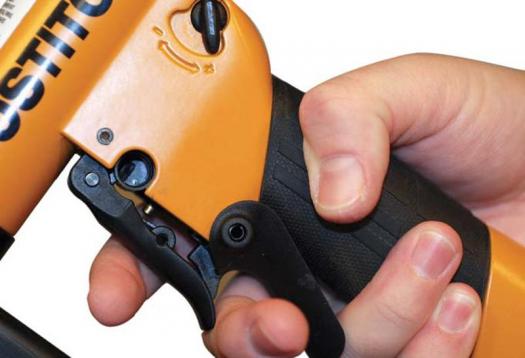
Other convenient features include a simple one-handed magazine cover release, and a magazine cover with a clear window to allow you to see the number of nails remaining. A small number of nailers lock out the trigger when the magazine is empty, which can be a very handy feature.
While some nailers are constructed with materials that do not need the addition of any lubricant (these are referred to as oil-less nailers), most must be oiled every time they are used. A couple of drops of pneumatic tool oil dropped into the air inlet is all it takes. If you have a dedicated air line to your nailer, you could add an oiler to the line instead. If your nailer won’t fully set the nails at the maximum pressure then it may be time to replace the seals and O rings in the nailer. Most manufacturers offer kits for this procedure that includes a full set of the commonly replaced pieces. Replacement is pretty straightforward.
When using these tools, safety is paramount, both for the operator as well as for other people in the vicinity. Safety glasses are crucial; there is always the chance of material being dislodged or the exhaust blast blowing dust and debris. Although it doesn’t happen often, it is possible that a nail being driven close to the edge can break through and fly across the shop.
Many nailers have a trigger safety that requires the nosepiece to be in contact with the wood before the trigger will release the air. Other nailers have a two-part trigger, both of which must be pulled for the air to be released. The down side to the two-part trigger is that it does not guarantee that the tool is in contact with the material.
Nails and staples are driven at high speed in a single stroke and if they encounter an obstacle inside the wood they can do a complete 180º turn and come directly back at you. They won’t break free of the wood, but you should never hold the material with your hand close to the point of nailing or you will risk it penetrating your finger should the nail emerge unexpectedly.
Finally, you’ll want to wear a proper set of foam earplugs or a muff-type hearing protector, as nailers generate a loud, sharp noise when they discharge.
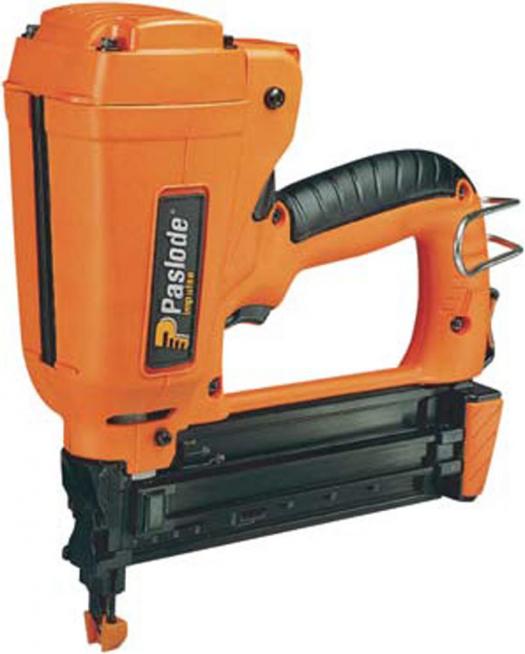
You’ll find that most nailers require you to have an air compressor. If you don’t have a compressor, there are a couple of options to consider. Gas fired nailers, pioneered by Paslode, have been around since 1987. The Paslode 901000 (paslode.com) contains a disposable fuel cell and rechargeable battery. Gas is injected into the combustion chamber above a piston and an electric charge from the battery ignites the gas, which explodes and drives the piston, dispensing a nail. You can shoot about 1,200 nails per fuel cell and about 5,000 nails per battery charge. A very light tool that finish carpenters love.
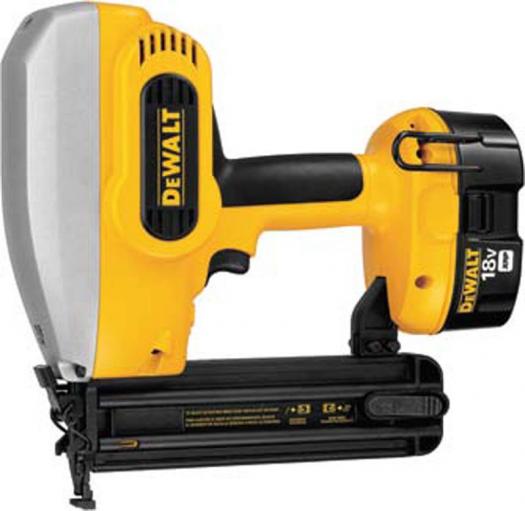
Battery powered nailers, like the DeWalt DC608K (dewalt.com), are somewhat newer on the market. You can expect to shoot up to 500 nails on a full charge. The nailers_13newer generation of cordless nailers offer greater power in a lighter package.
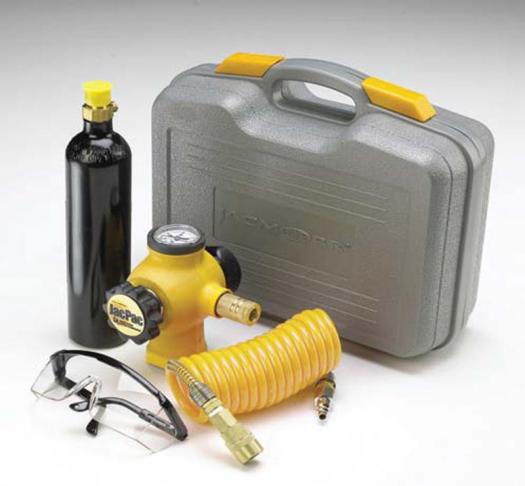
The Jacpac CO2 Power System (stapleheadquarters.com) provides a unique approach to cordless nailers. A cylinder charged with CO2 supplies pressure through a regulator to the nailer. With a fully charged cylinder you can shoot about 350 brad nails. For the home hobbyist or woodworker who has only occasional use for a nailer, this makes a good choice. The cylinder can be charged at most sport supply stores.