TIPS & HOW TO
Wood cuts and shrinkage

Clive Smith
The location of a specific cut in a log determines its grain pattern or figure. Let's look at wood shrinkage, and the effect that drying has on the various cuts.
The word shrinkage might bring to mind a picture of a woolen sweater that has gone into the dryer as an extra large, and came out as a petite. Wood doesn’t react quite to that extreme when it dries, but it does show a marked and predictable effect when moisture is removed.
Moisture Content
The reason why there is so much moisture in wood is because of the very way in which it grows. The tree uses water as part of the growth medium, taking it in at the root and leaf areas. By the process of photosynthesis at the leaf or needle level, the tree is using air, sunlight, chlorophyll and water to create sap. The sugar or caloric content is used in the outer layer of the tree (ie. the ‘cambium’ or the ‘living layer’), just below the bark, to create cellulose or wood. The amount of water present in the wood varies according to the season. During the primary growing seasons of spring and summer, the tree has the most amount of moisture. In the fall and winter, moisture is stored in the roots, as little or no growth is occurring.
Wood has an incredible capacity to hold moisture. It is capable of holding twice its weight in water. Imagine, a piece of wood weighing 50 lbs per cubic foot, absorbing 100 lbs per cubic foot of water!
Wood Shrinkage
As the log is converted (sawn) into boards, water leaves the wood by surface evaporation. As water is evaporated at the surface, interior moisture migrates to the surface and is also evaporated. This is the natural drying process.
Gradually, the moisture content drops to the 30% level, which means 30% by weight, compared to the dry weight of the wood. At this point, we still have fibre saturation in the wood. Up to this point, there is no physical change in the size and shape of the board. Once the percentage of water content drops below 30%, the cell walls start to shrink and distortion of the piece of lumber starts to occur.
Generally, wood shrinks more around its circumference than it does across its radius. If you think of the annual growth rings, the shrinkage ‘along the rings’ is about twice as much as the shrinkage ‘between the rings’. Therefore, shrinkage is not equal in both directions. It is this unequal shrinkage that causes distortion in wood as it dries.
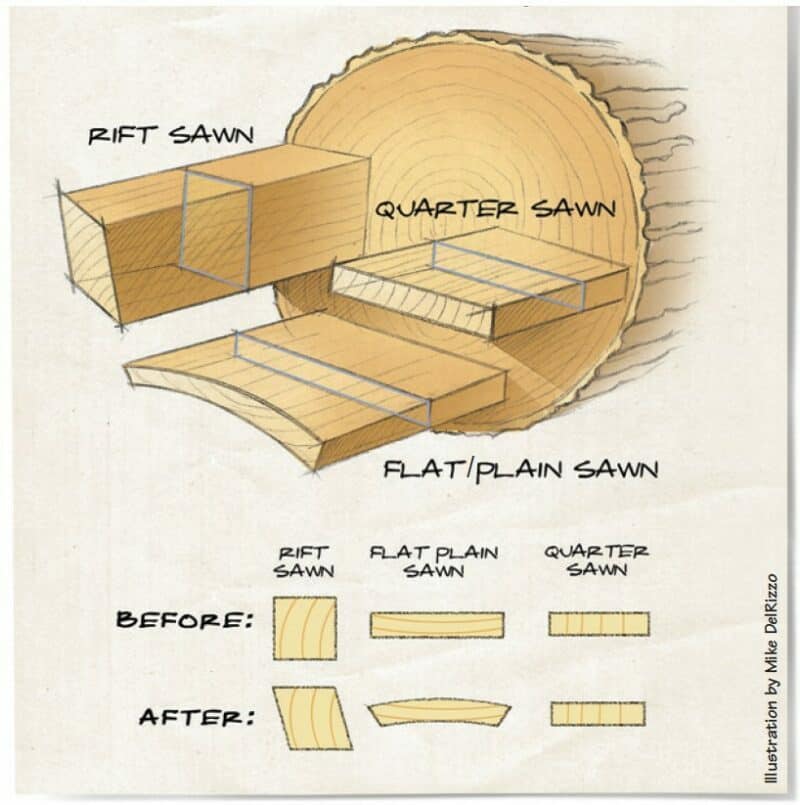
Wood Cuts and Shrinkage
You can see in the diagram why the location of the cut causes a different type of shrinkage. Aplain sawn board has annular rings running almost across the width of the board. The outer rings have a longer circumference than the inner rings. Therefore, when shrinkage occurs, it will tend to cup the board in the direction of the outer ring surface.
A rift sawn board will shrink and change its shape from a square or rectangle to a diamond. That is because the annular rings are providing more shrinkage from one diagonal corner to the opposite one, than the shrinkage between the rings from the opposite diagonal corners.
Quartersawn is the most desirable cut, because the shrinkage along the annular rings is restricted to the thickness of the board. Shrinkage does occur in the other direction, but to a much lesser degree.
Plan for Shrinkage
So how big of an issue is shrinkage for woodworking? It is an extremely important one. In fact, you should consider wood shrinkage both in the design and in the fabrication of anything that will be assembled (glued together) using solid wood. First of all, you need to know where your finished project will be used. Is it going to be used inside or outside; in a high or a low humidity area? Also, remember wood’s capacity to absorb water. If your project will go to an area that has a high humidity, the wood will take on water and swell. If your project will go to an area that is very dry, the wood will loose moisture and shrink. It is therefore essential that you know both the moisture content of the wood that you are using, and the area of its intended use.
The best way to determine moisture content is to use a moisture meter. There are excellent ones available, with reliable levels of accuracy. It is always a safe precaution to check a new delivery of lumber for moisture content before using it. If you know that the finished project is going into a home or office for example, then a moisture content of 6% to 8% would be appropriate. Higher levels of moisture would be acceptable for outdoor or pool enclosure uses.
What happens to woodworking projects when you ignore moisture content? The first signs of moisture reduction, or shrinkage, show as sheared glue lines and cupped boards. For instance, you may have glued up several boards to make a chair seat, and relied on glue to hold the boards together. Then, when moisture content is lowered in adjacent boards (after they were glued together) the thickness of the board shrinks differently with each board. This shrinkage at the glue joint will shear the glue line, regardless of the type of glue. Similarly, when boards are glued up to create a table top. If the moisture content is lowered after the boards have been glued up, the irregular cupping effect of adjacent flat sawn boards can twist the entire table top, or provide stress cracks in some of the boards. It is always worth your time to examine the end grain of the boards to determine how it will react to moisture change.
Knowing the moisture content of the wood that you are using allows you to deal with potential problems, before they are built into your projects.