TIPS & HOW TO
Table tops and wood movement

Hendrik Varju

We look at why table tops split, crack and warp - and what you can do to prevent this from happening.
Most people have seen one form or another of failed table tops. Sometimes they crack down the middle. Sometimes they are so badly warped that they’ve pulled screws right out of the aprons below. These failures can be attributed to one phenomenon: wood movement.
I’ll start by reviewing the well accepted wisdom that one should alternate the growth rings of boards glued together to make a solid wood table top (or any panel, for that matter). This is an important step when using flat-sawn lumber, which is the most common cut of lumber you’re likely to buy. Fig. 1 shows the reason for this arrangement.
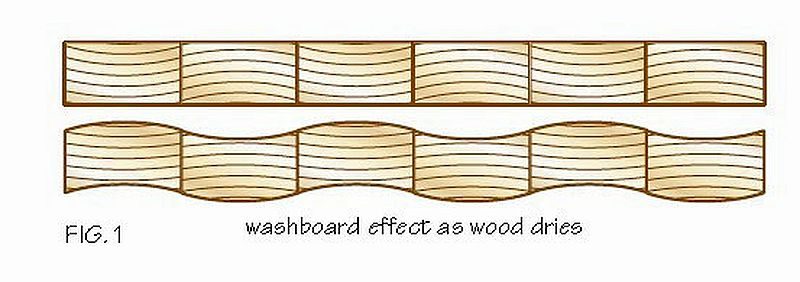
If you remember back a couple of articles, you’ll recall that flat-sawn boards cup in the opposite direction to the curvature of the growth rings as they dry. They will actually curve the other way when taking on moisture, but that doesn’t matter. The point is that each board will cup in the opposite direction to the next one if you alternate the growth rings from one board to the next. Over time, this results in a slight “wash-board” effect across the table top. Keep in mind that the amount of cupping will be extremely small if the lumber is already properly dried and if you limit the width of each board.
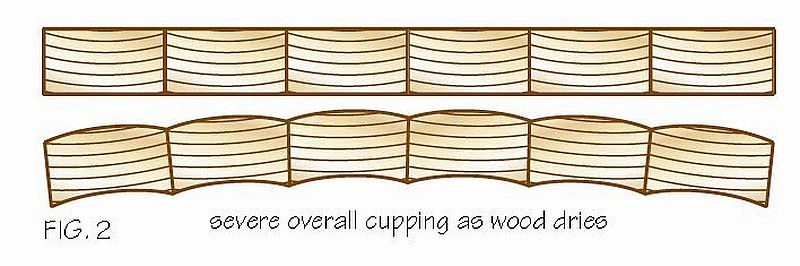
If you do not alternate the growth rings and, instead, orient the growth rings all in one direction, you will get severe warpage because the effect is multiplied over the entire panel (Fig. 2).
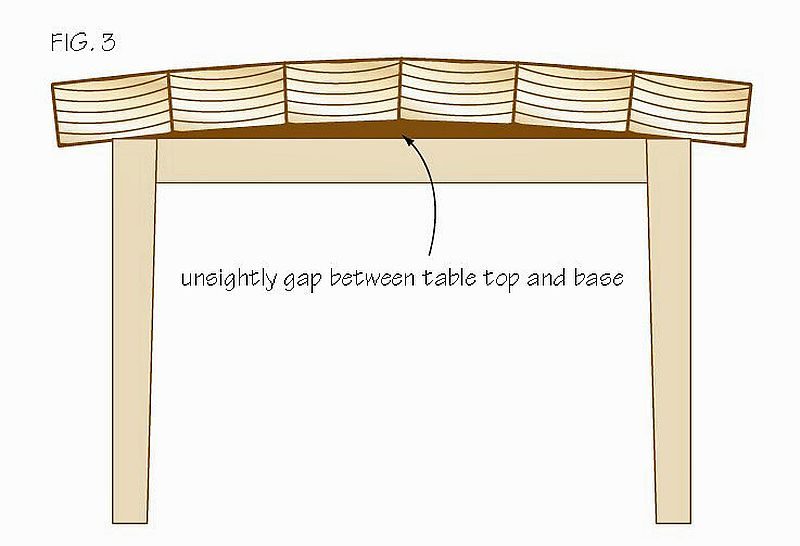
This may not seem all that bad, but remember that the curved top is resting on a flat base (Fig. 3). An unsightly gap will form between the top and base.
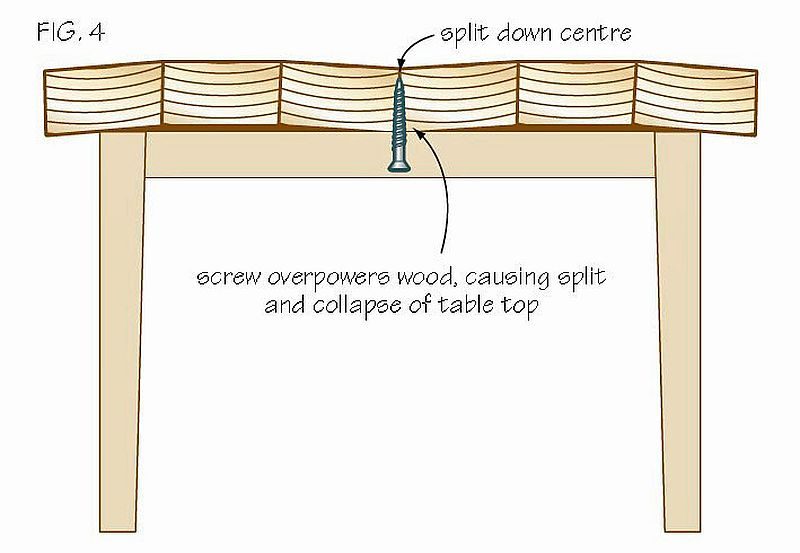
Even worse, there is likely to be a screw holding the centre of the table top ends to the base. As the table top cups upwards, the screw will strip out of the table top. Or the screw might hold on, and the table top will collapse and split down its centre (Fig. 4). Nature’s laws require the table top to cup. But the screw, made of a stronger material, doesn’t allow such cupping, so the wood breaks.
LIMIT BOARD WIDTH
Remember that limiting the width of each board is important because the wider the board, the more severe the curvature of the growth rings. The more severe the growth ring curves, the worse the cupping. My rule of thumb is to keep boards 4″ wide or less. You might push the limits occasionally where striking grain patterns would be ruined by using narrower boards. But, in my opinion, that is where veneered materials should come into play. I always keep the boards four inches or less in width when working with flat-sawn, solid wood.
ATTACHMENT METHOD
Although different table top attachment methods exist, depending on the type of table being considered (such as trestle tables, frame-top tables, breadboard-end tables, etc.), the scope of this article doesn’t allow a review of each one. Instead, we’ll take a look at a standard design, consisting of four legs, four aprons and a top.
If you analyze how each furniture part moves (Fig. 5), you’ll understand why special attachment methods are required for the table top. Looking at the aprons, you’ll see that they don’t expand or contract in length. As discussed in my last article, longitudinal wood movement is considered zero for furniture building purposes.
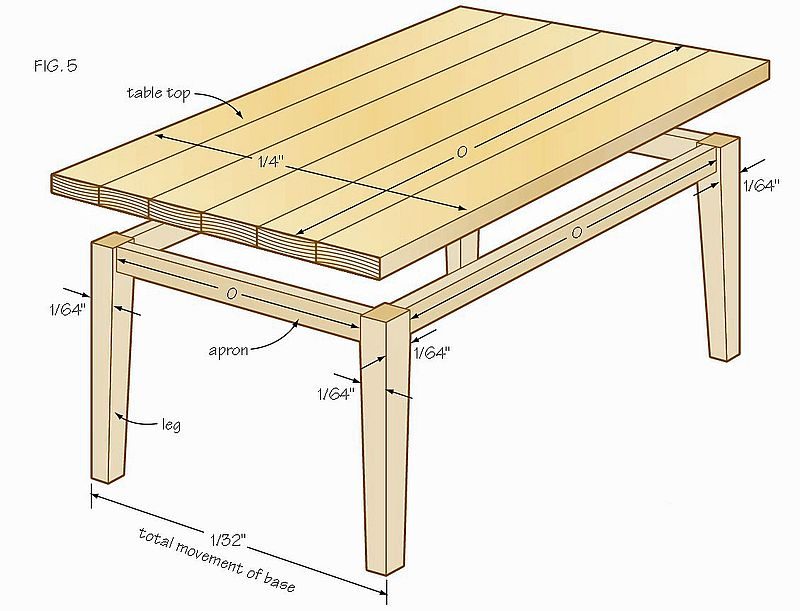
The legs, on the other hand, expand and contract in width and thickness. We don’t know the amount of movement until we know the dimensions of the legs, the cut of wood, the species, relative humidity fluctuations, etc. But let’s assume that the legs are about 3″ by 3″ in size, and rift sawn. The wood movement you might see, both in width and thickness (the same rate of movement for both in rift sawn lumber), is 1/64″. Looking at the end of the table base, its total change in width from winter to summer is 1/32″. The base’s length will change by the same amount.
The table top, however, is a different story. If the boards run the length of the table (such as a harvest table), the length of the table top will not move from season to season (longitudinal movement is zero). But the width of the table could easily move by 1/4″ for a table that is 36″ wide. A wider table could easily move more. So here we have the crux of the problem. The table top moves by 1/4″ in width while the base moves by only 1/32″. If the table top is simply screwed down onto the base all around, we will have a serious problem.
The length dimension isn’t an issue at all, with the base moving just 1/32″ and the table top zero. But we have a problem across the width. As the table top expands, it will break the joint connecting the end aprons to the legs. As the table top contracts, it will split, because it is restricted from contracting.
ALLOW FOR VARIED WOOD MOVEMENT
The solution is to attach the top to the base such that it can still move freely as required. Table top ends can be attached at the centre points to the centre of each end apron, with a screw (Fig. 6). While this might look like a problem, it merely fixes the table top to the base at one point along its width. The screw isn’t necessary, but it keeps the table top centred on the base through all seasons. Yet the table top is free to expand and contract across its width as relative humidity and moisture content change.
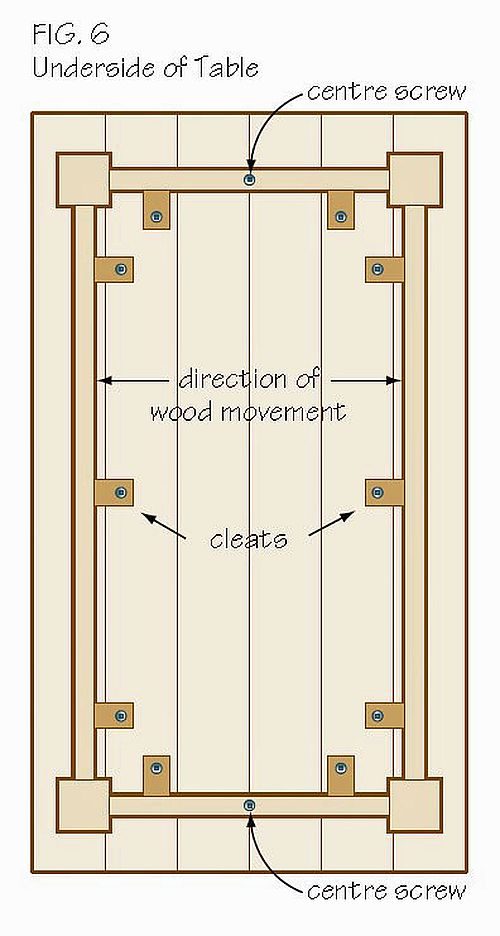
Of course, the rest of the table top needs to be attached as well. In Fig. 6, you’ll see other bits of hardware around the inside perimeter of the base, called “cleats”. These can be metal ones you buy or wooden ones you make yourself. The whole purpose of cleats is to attach a table top to its base in a non permanent way that still allows the top to expand and contract freely.
In Fig. 7 you’ll see a close-up view of the end of a long apron, showing how a cleat works. A groove is cut on the inside of the apron, which accepts the cleat. The cleat has a single hole on one end, through which a screw is driven into the table top. As shown in the drawing, it’s important that the cleats are positioned only half-way into the groove so there’s room for the table top to expand and contract. Remember that the direction of wood movement will cause the cleats to move in and out of the long aprons (as shown in Fig. 6). The cleats on the short aprons can actually be positioned fully into the grooves, since those cleats will move from side to side instead of in and out (because there is no wood movement along the length of the tabletop).
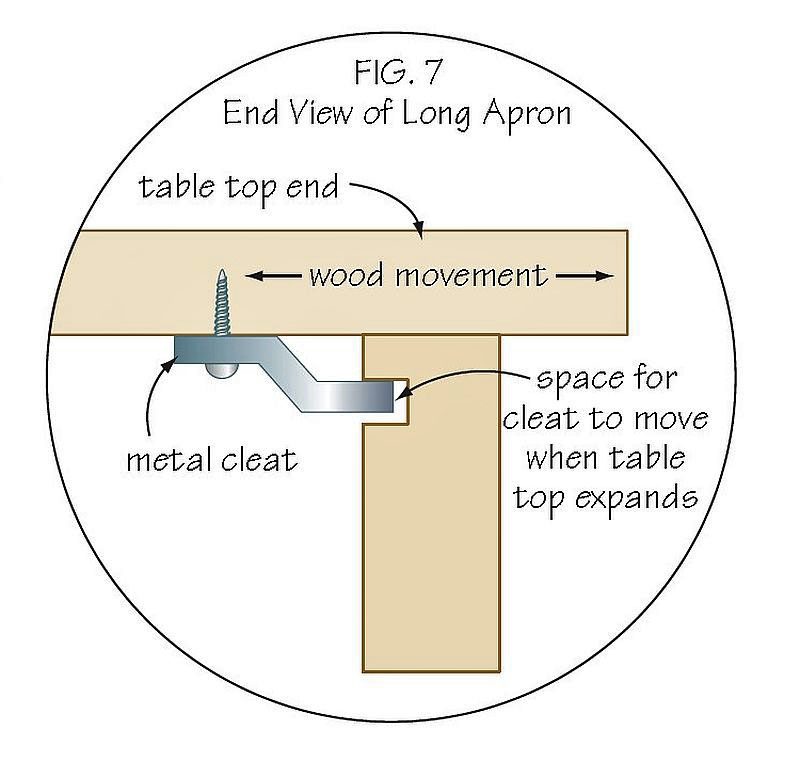
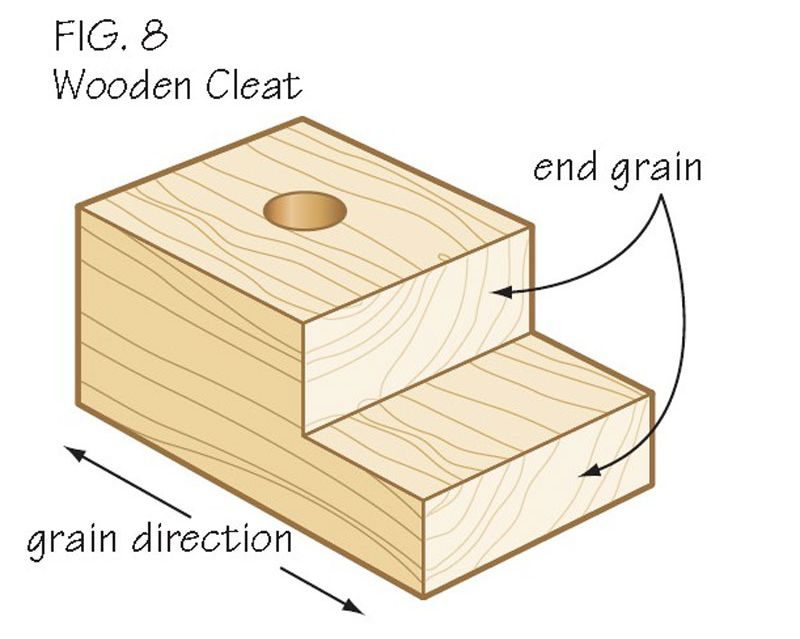
Fig. 8 shows a wooden cleat, to help you if you are going to make your own. Notice the proper wood grain direction, which is from the back of the cleat to its tongue. This is especially important for larger tables, as the tongue will have greater strength with the grain direction running as shown.
So here we see just how simple, yet important, it is to account for wood movement in designing a standard table. These types of examples are commonplace, yet too often overlooked. In my next article, I’ll look at frame-and panel design, which is an important design concept used for doors and other furniture parts.


Thanks
What thickness of hardwood can I use to cover end grain on my HuntBoard hutch
Using Cherry
Top is 1-1/4 in thickness
What’s best way to attach a veneer if possible
Iam trying to eliminate bread board ends