TIPS & HOW TO
Frame and panel design

Hendrik Varju

In this article we cover how wood science affects doors, specifically the frame-and-panel design.
In my last article, I showed how wood science is considered when designing a table. In this article, I will cover how wood science affects doors, specifically the frame-and-panel design.
It’s Not Just For Looks
The frame-and-panel design (f & p design) serves an important purpose. Although it is attractive, it is not just for looks. A metal door with a f & p look, is strictly aesthetic, but that is not the case when the door is made of wood.
To show how wood movement effects solid doors, look at the simple night table in Fig. 1. If this night table were built during a period of low relative humidity, the door would be at its smallest dimension. A gap of 1/16” around the entire door may look good aesthetically, but the door could expand by 1/8” across its width as humidity increases later in the year. The hinge side can’t offer any room for movement, because the door is permanently fixed in one position by the hinges.
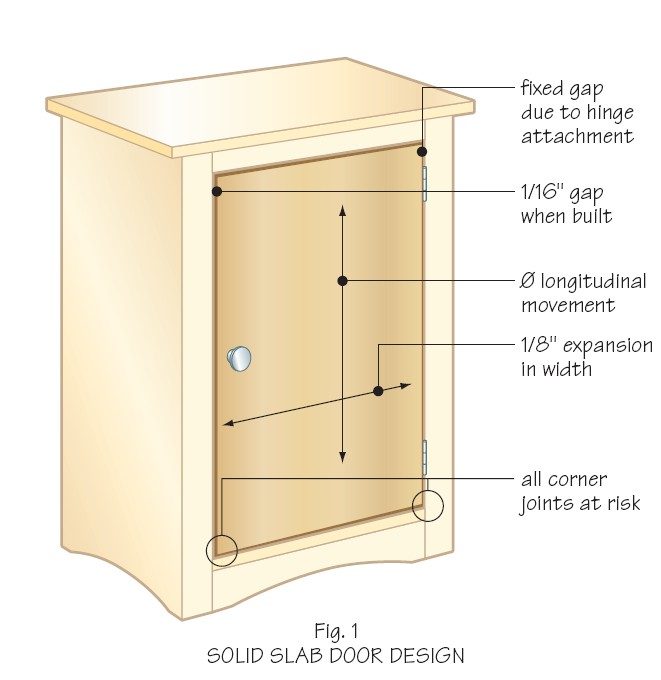
At best, the door will become so tightly wedged in its opening that it would not be able to open during high humidity seasons. At worst, the door could exert so much pressure inside the opening that it would force joinery apart. The joints where the top and bottom panels meet the side panels are the ones at risk.
Notice that longitudinal movement is zero for the door, so it won’t become wedged in at the top and bottom, only at the left side (the non-hinge side). The opening itself doesn’t change in size, because the opening is defined completely by longitudinal movement of the top, bottom, and side panels. Actually, the opening size will change very slightly, based on the radial movement of those carcase panels. This is the movement in thickness, assuming flat-sawn lumber.
But the actual thickness change of 3/4” to 1” thick material will be extremely small. Fig. 2, shows the same example again, but this time with a f & p door. The frame itself will expand by only 1/64” in width.
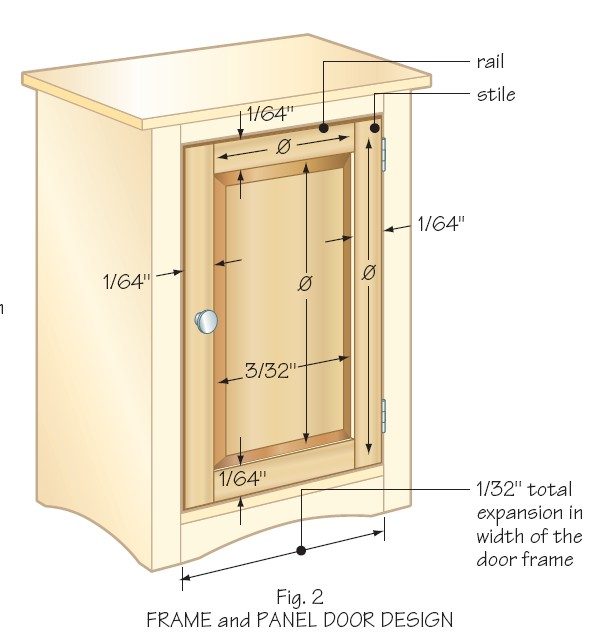
The solid wood panel in the middle will expand by 3/32” in width, with no movement in height. Hence, the total door expansion in width is 1/8”, just as in Fig. 1. But 3/32” (or 3/4 of the total expansion) is accounted for within the panel itself. The outer proportions of the door only expand by 1/32” in width. So the 1/16” gap on the left side of the door is twice as large as needed. This is a door that will swing freely from season to season, without risking damaged joints.
The Door Panel Must Move Freely
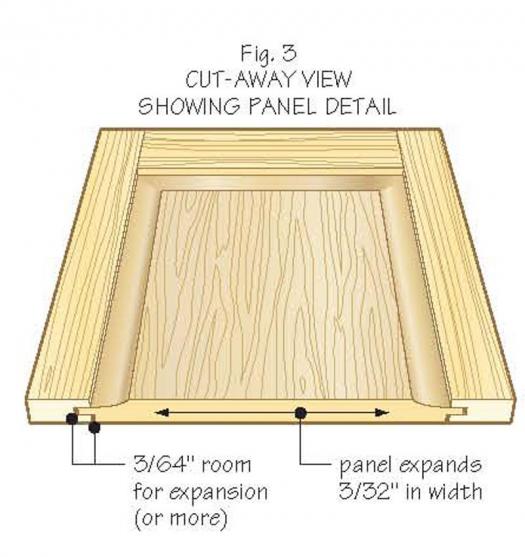
All of this begs the question of how the panel is free to move, even though the frame itself is barely moving at all. The answer is known as a ‘floating panel’. That is, the panel itself cannot be permanently glued or otherwise attached to the frame. If it is, the panel’s expansion will break the frame apart at the corner joints, or the panel will crack when it tries to contract but is not allowed to. (This is similar to the example of the tabletop and base in the last article.) The trick is to cut or rout dados in the frames inside edges to accept the outer edges of the panel. There must be enough extra depth of the dados to accommodate the maximum expansion expected from the panel. Also, the panel must go far enough into the dados that it never contracts so much (during low relative humidity periods) as to fall out of the frame altogether. Fig. 3 shows the concept in the case of a raised f & p door.
Note that you technically don’t need any extra dado depth on the door rails, because the panel’s longitudinal movement is zero. In practice, though, you would normally leave some space to ensure that the panel fits into the frame easily at glue-up. A bit of room is also a good idea to accommodate some width wise movement of the rails themselves, although it is minimal. Some woodworkers prefer to make all of the dados the same depth, just to simplify machinery set-up time.(Fig. 4.)
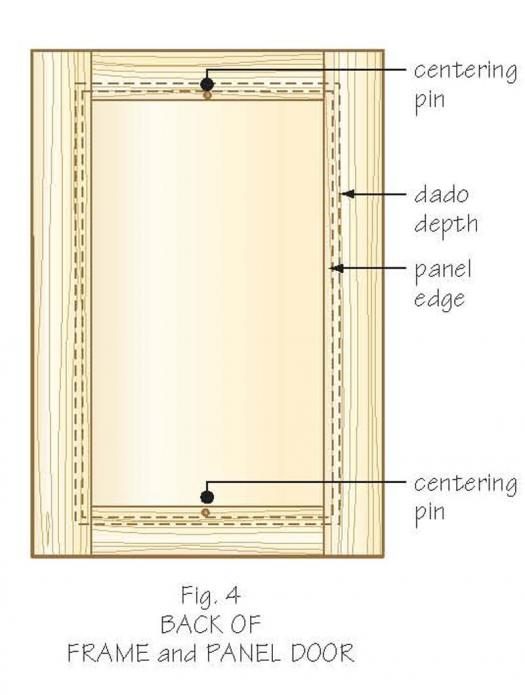
Pinning The Panel
You’ll recall from my last article, that I like to secure the middle of a table top to its base to guarantee that the top is always centred. I do the same thing with an f & p door. In Fig. 4, (above) you’ll see a centering pin in the middle of the panel at top and bottom. After gluing the door together, I will nudge the panel into the centred position with a rubber mallet struck on an angle. It helps to put a small pencil mark at the centre of the panel and rails before glue-up. After unclamping, I’ll drill a tiny hole through the back of the door rails, which goes through the end of the panel too. It can even go partially into the other side of the rail, but make sure it doesn’t go right through. Then I’ll insert a tiny wooden dowel or an antique nail. A 1/8” diameter dowel works fine for large doors. But for smaller doors where there isn’t enough room for a wooden dowel, I’ll use a black squareheaded reproduction nail. A 1/16” diam. hole usually works well and the tiny square head in the round hole is a nice touch. Don’t skip the step of pre-drilling for the nail, as you’re likely to split the panel.
It’s Not Just For Doors
We always think of doors when we think of f & p design. But the same approach is used in all kinds of furniture parts, such as whole cabinet sides. In Fig. 5, for example, we see a cabinet side built in the f & p style. Notice that the wooden drawer runners can be screwed directly to the stiles, and also to the centre of the panel.
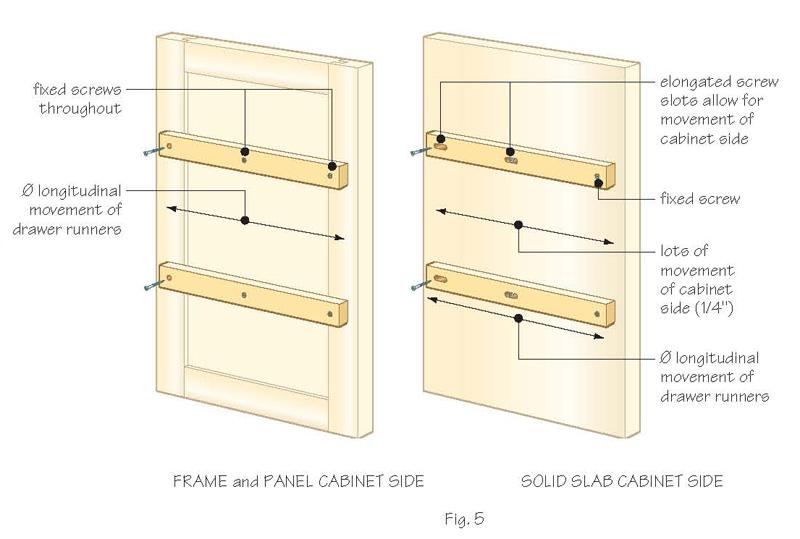
Even though the longitudinal movement of the runners is zero, the frame of the cabinet side hardly moves in width at all. And the screw in the centre of the panel merely helps to keep it centred. The second diagram in Fig. 5 shows the same set-up, but with a solid panel side. In that case, the solid panel will expand and contract significantly in width, particularly if made of flat-sawn lumber. On the other hand, the drawer runners have zero longitudinal movement, which brings a cross-grain construction issue to the forefront.
The solution is to fix one end of the runners only, while the centre and other end are fixed with elongated screw slots. The fixing screw could be at either end or even in the middle, but only one can be fixed, while the others are elongated slots.
Conclusion
The frame-and-panel design was developed to solve wood movement issues, not because of looks. However, the added benefit of good looks can be exploited to the fullest, with a variety of possible panel and frame styles. Never lose sight of the real purpose of this design method, which is to ensure that wood movement doesn’t wreak havoc with your furniture. We want things to work as well in 100 years as they do now.
In my next article, I’ll look at the problem of breadboard ends, and similar cross-grain issues.