TIPS & HOW TO
Solutions to cross-grain problems

Hendrik Varju

Here is a look at how to properly make breadboard ends, and a couple of examples of cross-grain solutions. Use them in your woodworking projects to give your furniture that finished look and avoid cross-grain problems.
Many of you are familiar with the use of breadboard ends to finish off projects. Breadboard ends are very good at giving a project that finished look. However, it is important to understand how to construct breadboard ends properly to avoid cross grain problems. Here is a look at how to properly make breadboard ends, and a couple of examples of cross-grain solutions. Use them in your woodworking projects to give your furniture that finished look and avoid cross-grain problems.
Breadboard Ends
The primary purpose is to cap the end grain of the table top to give it a more finished look. Some people don’t like the look of end grain, particularly if they don’t know how to handle it when staining. These are known as “breadboard ends”, but they’re also used on other assemblies, such as solid wood table tops.
Cross Grain Problems
Depending on the width of the table top (Fig.1), it could easily expand by 1/4″ or more. The end caps do not expand and contract in length, because longitudinal movement is considered zero for short lengths. So here we have a classic example of “cross-grain construction” and it’s inherent problems.
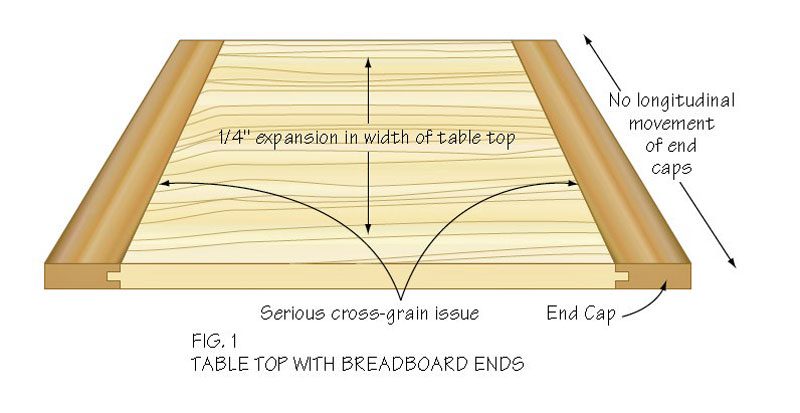
If the end caps are simply glued on, the centre panel will crack during periods of low relative humidity (RH). As RH increases, the centre panel will try to expand, but won’t have enough strength to break the end caps parallel to the grain direction. The glue might fail instead, or the centre panel will take on permanent compression, giving it an even higher likelihood of cracking when the RH comes back down.
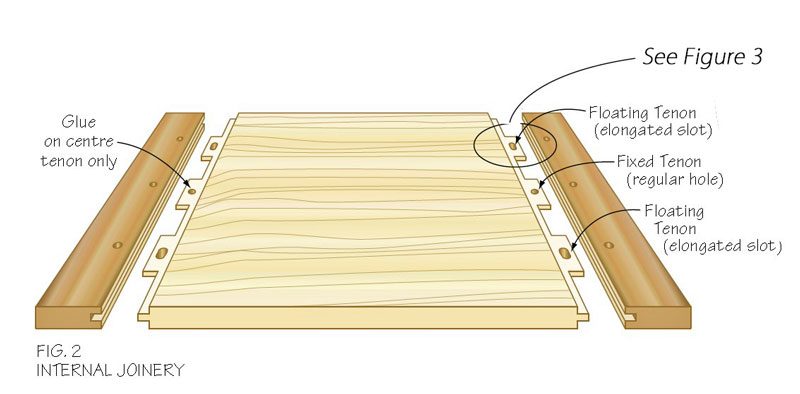
To avoid problems when using breadboard ends, the ends of the centre panel are cut into three or more tenons (Fig 2). One huge tenon going across the whole width would weaken the end caps too much (i.e. too much material removed for the mortise). So the tenon is divided into smaller tenons, leaving a short area in between each to keep the mating surfaces stiffer across the width of the table top. Then one very shallow mortise (or dado) is cut into the end caps’ edges. Several areas are cut out deeper to form three or more deeper mortises.
More Than Meets The Eye
This all looks very logical, except that some special considerations are necessary to allow the centre panel to float freely inside the end caps.
Allow For Expansion
Only the centre tenon should be glued into the centre mortise. Glue can’t be used on the outside tenons, or it would restrict wood movement.
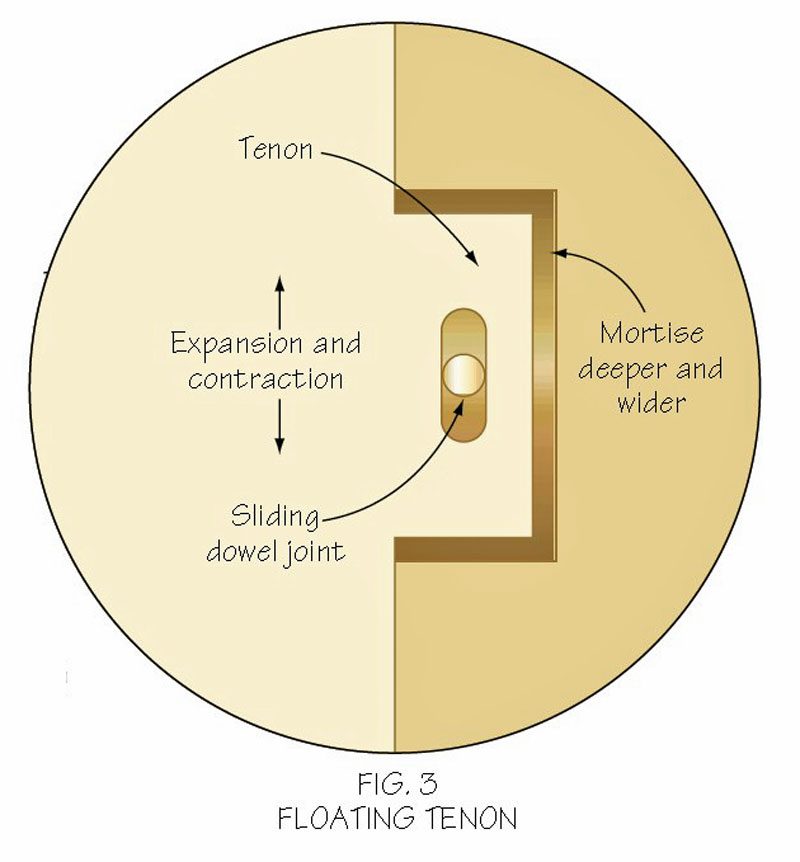
The outer mortises must be wider than the tenons by the maximum amount you expect the table top to expand from season to season. Leaving a bit more than you need is better than not enough. (Fig.3)
Be sure to leave extra width in the mortise of the outer tenons.
Notice that a tiny bit of room is left at the bottom of the mortise. Although this isn’t technically necessary for the outer tenons (which will not be glued) it is standard practice to allow room for excess glue. Since the outer tenons are not glued in the traditional sense, they must still be attached somehow to keep the end caps firmly in place. While the centre tenon can be pinned with a dowel (in addition to glue on the entire tenon), the outer tenons must be free to move sideways in the mortises.
The solution is to make an elongated dowel hole (or slot) in the tenon. A dowel will then go through the regular hole at the top and bottom walls of the mortise (on the end caps), and through the slot of the tenons. There must be no glue between the tenon and the mortise, nor between the tenon and the dowel.
The dowels can be glued to the end caps, but not to the tenons (except for the centre one). Easier said than done. The easiest way is to put glue high enough on the dowel that it will not reach into the tenon slot. If the dowel fits the hole snugly, then the glue will travel up the dowel (not down) when driven in with light hammer taps.
The dowel holes drilled into the end caps can stop just shy of pushing through the opposite side. If you like the look of three or more precisely placed dowels (as a decorative accent) then have them showing on the top of the table top. They can also be done in a contrasting wood to stand out even more. But even dowels of the same species will stand out quite nicely, as their ends are composed of end grain and will appear darker than the rest of the table after finishing.
If you don’t like the look, or if this is beyond your skill level, then have them going in from the bottom where they won’t be seen.
Similar Situations
You may be wondering how often you’ll actually need this technique if you don’t plan on using breadboard ends on your next table tops, or if you’re not planning on building any breadboards in the near future. Take note: this theory and technique applies to all kinds of cross-grain situations where a panel would otherwise have its movement restricted by another furniture part.
If you want a large solid wood panel fixed between two bed posts (Fig.4) (with the panel’s wood grain running horizontally) then you have a “cross grain” problem. The solution is a variation of the above. You use mortise-and-tenon joinery and sliding dowels. The upper tenon fits its mortise snugly and is glued everywhere. A dowel can also be used (called a “pinned” mortise-and-tenon joint).
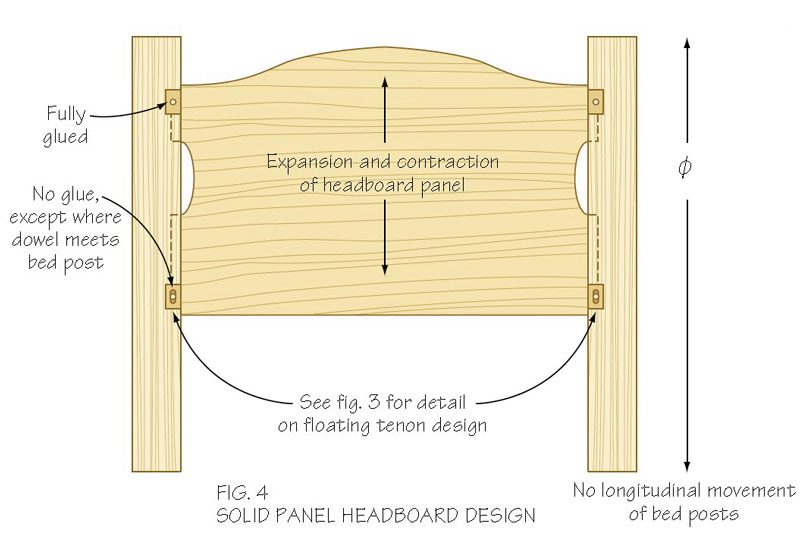
The lower mortise has to be wider than the tenon. The dowel slides through a hole in the bed post and an elongated slot in the tenon. Glue is restricted to the bedpost and dowel only. There can’t be any glue on the tenon or on the mortise walls.
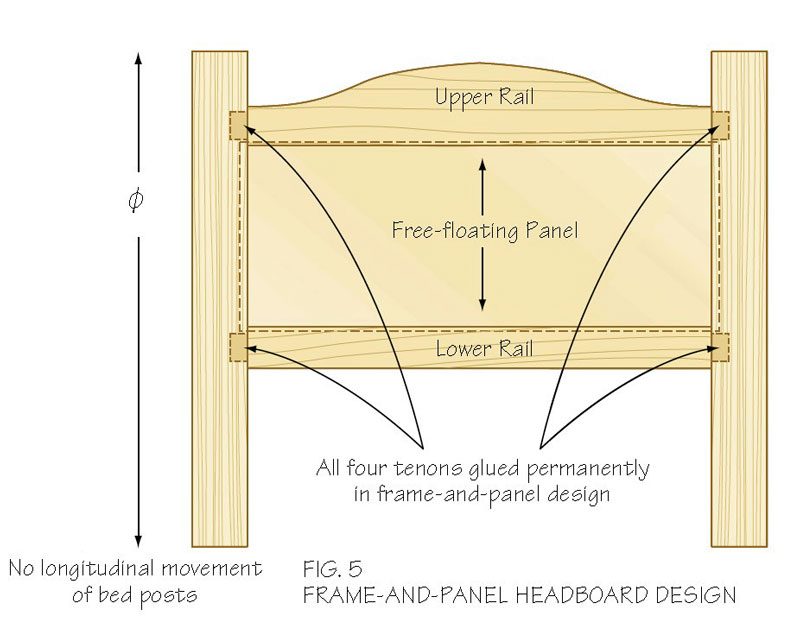
Another solution to the cross grain problem is frame-and-panel design (Fig.5). The bed posts become stiles in a frame-and-panel set-up, allowing the panel to float in the middle. The frame and panel design is easier to achieve, but if you prefer the style of the headboard in figure 4, you can achieve this look only by using the sliding dowel technique as shown.
Conclusion
One of the most important things you can do to improve your woodworking projects is to learn more about the material you’re working with. Wood is a unique building material. Learn how it moves and why. Learn to design and build so as to take into account wood’s inevitable movement.
There is no single design error as serious as failing to account for such movement. No matter how beautiful, or well built a final piece may be, if it doesn’t allow for wood movement, it will not stand the test of time.