TIPS & HOW TO
How to choose a wood feature wall

Carl Duguay

When thoughtfully chosen and installed, a feature wall made of wood panelling can enhance both the aesthetics and functionality of any room in your home.
Interior wood wall panelling is a versatile design element that brings texture, style and character to virtually any room in your home. It also offers some other functional and practical benefits. When properly installed and maintained, wood panelling can last for decades, resisting dents and scratches better than drywall. An avid DIYer should have no problem with this project, while even a relatively new DIYer can set themselves up for success easily with a sound approach and a few tools.
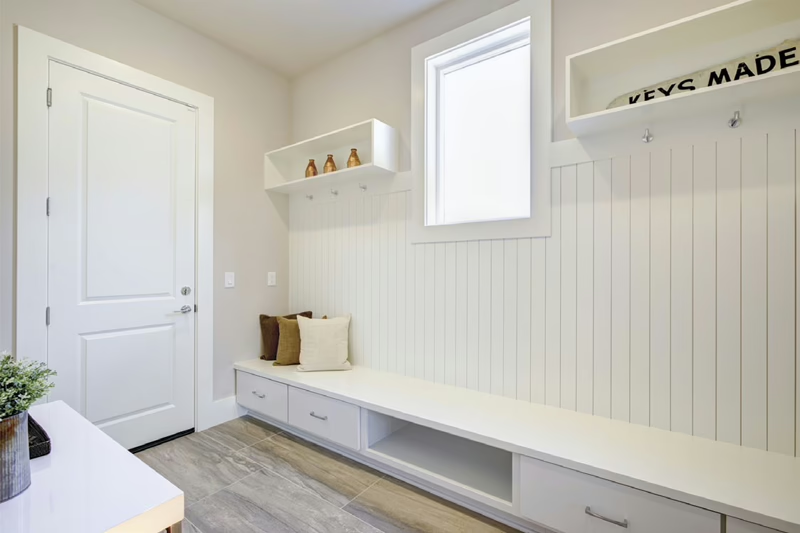
In living rooms, it adds warmth and flair, creating a cozy, inviting atmosphere. In dining rooms and kitchens, panelling elevates the room’s visual appeal and formality. When installed at chair-rail height, it also protects walls from scuffs and wear. In bedrooms, panelling creates a calming ambiance, especially when finished with a soft sheen or muted stain. In bathrooms, it offers a blend of charm and luxury while protecting walls from moisture, particularly around bathtubs or sinks. In high-traffic areas like hallways, entryways or mudrooms, panelling not only adds visual interest to otherwise plain spaces but also shields walls from everyday wear and tear.
Types of panelling
Shop-made wall panelling is typically made of individual boards or a combination of boards and plywood panels. You can also purchase commercially made panelling consisting of solid wood, hardboard, MDF, PVC or a combination of these materials. For an eco-friendly, unique aesthetic you could use reclaimed lumber in your panelling.
Some types of panelling, such as shiplap and tongue-and-groove, consist solely of boards, while others combine boards with panels (typically plywood). For DIYers, it’s best to purchase pre-milled boards unless you have the tools and skills to mill and profile the boards yourself. Pre-milled boards from building-supply centres are commonly available in pine or cedar and come in a limited range of widths. These boards often require sanding before painting or staining. Specialty lumber dealers typically offer a broader selection of wood species and widths.
You can install panelling flush to the ceiling or floor; make sure to leave an expansion gap of about 1/8″ to 1/4″. Alternatively, it can be installed on the lower half or three-quarters of a wall, known as wainscoting. For a more refined appearance, consider adding cap trim to the top edge and a lower rail and shoe trim to the bottom.
Choosing the right panelling style depends on the design of your space, your budget and the functional needs of the room.
There are a few caveats when it comes to wood panelling. Wood requires regular care, such as dusting and occasional refinishing, to keep it looking its best. It’s also susceptible to moisture damage if not sealed properly. Panelling can make small rooms feel even smaller or darker if not balanced with other design elements. Remember that wood never sleeps. Changes in humidity and temperature can cause wood to warp or shrink if not properly installed and regularly maintained.
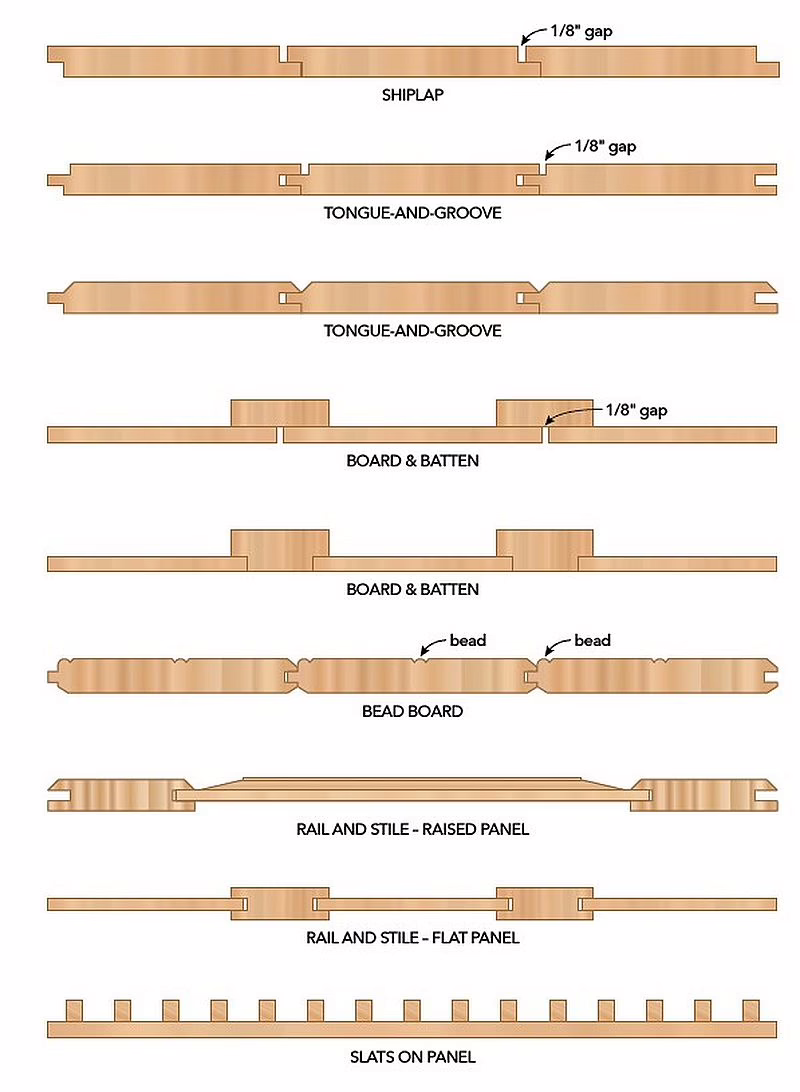
Here are some of the more common types of interior wall panelling. As you’ll see, the joints that allow the different panels to fit together are likely the most defining feature of the different types.
Shiplap panelling is characterized by its unique rabbeted edges that allow the boards to overlap slightly, creating a distinctive horizontal or vertical groove between each plank. This design makes shiplap visually appealing and functional for many spaces. While shiplap panelling is quite easy to install it can warp if not properly installed, particularly during periods of high humidity. It requires periodic cleaning to prevent dust and dirt from collecting in the gaps between the boards.
Tongue-and-groove panelling consists of boards with interlocking edges (a tongue that fits into a groove) for a seamless, secure connection with no visible gaps. The interlocking design simplifies the installation process. Boards can be bevelled along the lengthwise edge (V-groove) or unbevelled (known as flush joint or square edge) and can be installed vertically or horizontally.
Beadboard panelling consists of narrow boards with a distinctive ridge (bead) between each board. The boards are usually joined by tongue-and-groove joints. Beadboard is frequently used in wainscoting and provides a classic, traditional look. Beadboard is available in a variety of styles, from simple and understated to ornate and decorative. It’s one of the styles that’s commonly available in 4’ × 8’ engineered wood panels.
Board-and-batten panelling is made from wide boards separated by thin strips (battens). The battens can also be placed over the gaps left between the boards, allowing the boards to move with the seasons, yet cover any unsightly gaps. It’s associated with a cottage or farmhouse look. You can modify board width and spacing for a customized look. As with tongue-and-groove, it’s both slightly more expensive and more time-intensive to install, and it requires precise measurements to ensure a symmetrical appearance.
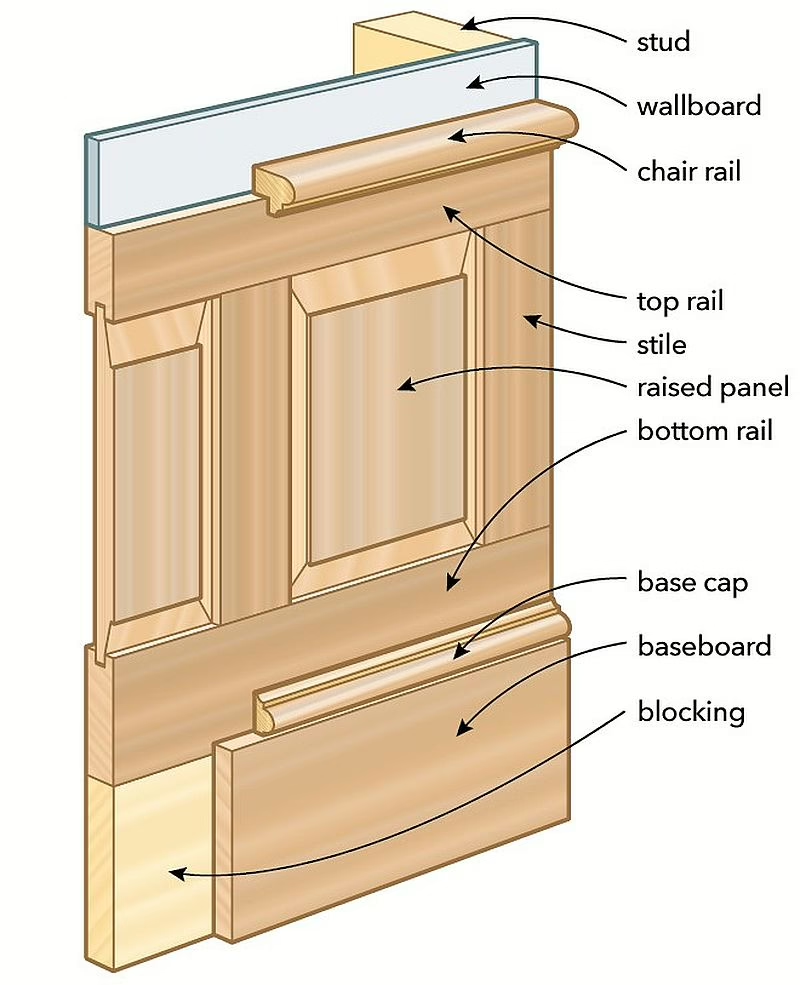
Rail and stile panelling adds depth and visual interest to a room. In addition to the series of horizontal rails and vertical stiles that frame the edges of the area and divide the wall up into smaller, visually pleasing sections, panels are added between the rails and stiles. The joints securing the rails and stiles are commonly mortise and tenons, though similar joints like cope and stick can also be used. The panels are secured in place by protruding into grooves machined in the edges of the rails and stiles. The panels can have either raised centres or are completely flat. Raised panels create a three-dimensional effect, making the wall more dynamic and luxurious. This is the most expensive and complex type of panelling to install. Like beadboard, it’s often used in wainscoting.
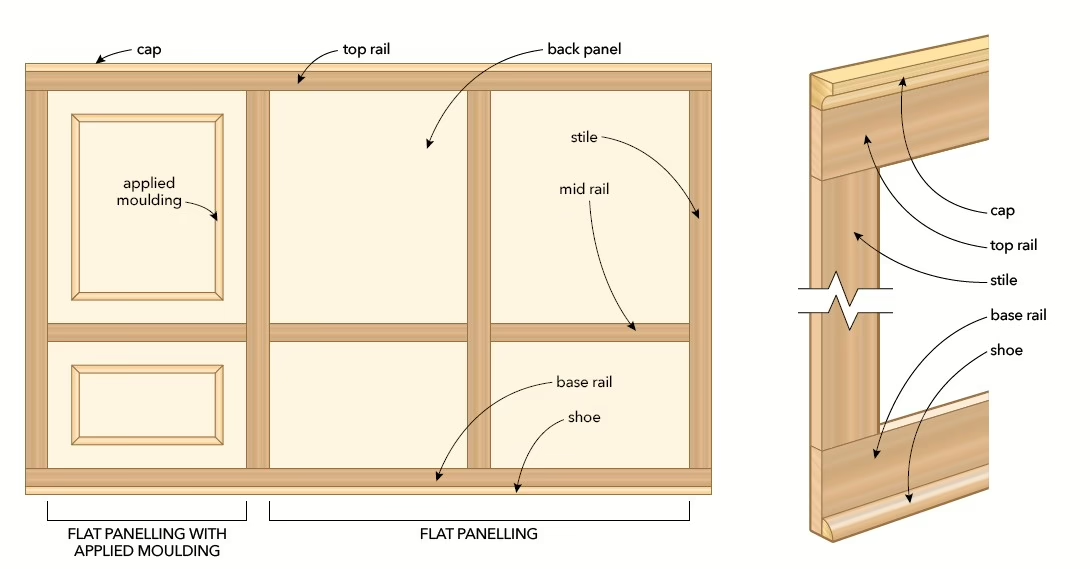
Slat-on-panel panelling consists of simple, flat panels as a base. Solid wood slats of any thickness, width, length or species can be attached to the faces of these panels to provide a strong visual. It’s also possible to leave the slats off the faces of these flat panels, to create a smooth and minimalist look. These panels are often made from materials such as MDF, plywood or PVC. It’s even possible to use milled lumber as the flat panel and attach one or many pieces directly to a wall. Slat material is typically solid wood. Flat panelling is typically cost-effective, quick to install, and easy to clean and maintain. However, if not executed thoughtfully, it can lack texture and visual depth, potentially appearing plain in large spaces without additional decor. Adding decorative moulding to the panels can enhance their appearance, giving them a more elaborate look.
Tools and tips for installation
Installing wood wall panelling can be a DIY-friendly project, but it does require some basic carpentry skills and tools. The difficulty level can vary depending on the type of panelling and the complexity of the installation. Having the right tools ensures your project is efficient and professional-looking.
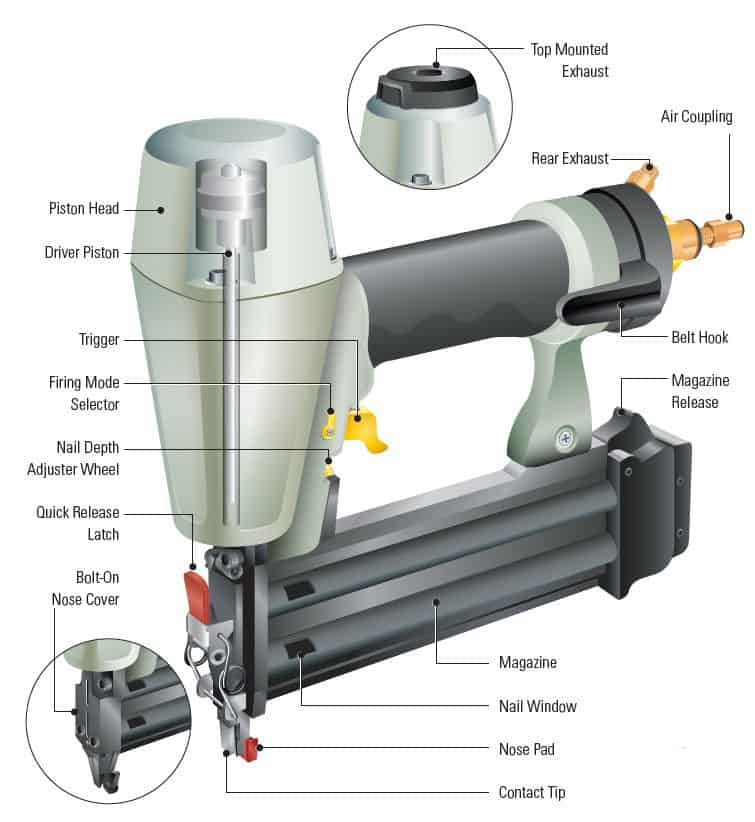
You’ll need a few basic hand tools like a level, chalk line, measuring tape, stud finder and caulking gun. You’ll also need construction adhesive. To cut the boards you’ll need a hand, table, mitre or track saw. For installation, you can use a nail gun and fasteners or drill/driver and screws. If you choose the latter you’ll want to cover the screw holes, either by applying trim on top of the area with screws, plugging the holes with glue and plugs, or some sort of filler / compound.
Regardless of the type of panelling you choose to install, if your walls are uneven or require significant preparation, the installation will be a tad more challenging. If this is the case you may need to shim the panels during installation.
Begin by measuring the area to calculate the square footage to be panelled. Make sure to add about 15% extra for waste or mistakes. Wood expands and contracts with changes in temperature and humidity, so let the material sit in the room you’ll be panelling for a couple of days before installation to acclimate to the environment. Your next step is to prepare the wall by removing any obstacles like outlet covers, switch plates and baseboards, and then cleaning the wall surface. Use a stud finder to locate and mark the studs.
Double check all your measurements before cutting. It’s a good idea to lay out the panels to ensure they fit correctly and adjust if necessary. At this stage you can paint or stain the panels. Alternatively, you can apply a finish after installation.
Generally, it’s best to begin installing the panelling from a corner and work your way around the room. You can use either nails, screws or construction adhesive to secure the panels to the wall. Just remember that nailed or screwed panels can be more easily removed if necessary. As you install, use a level to ensure the panels are straight and adjust as needed. Remember the adage that wood never sleeps and leave a small gap (about 1/8″) at the edges to allow for wood expansion.
Finally, it’s a good idea to caulk any visible gaps between seams to create a clean, finished look. Once the panelling is installed and the caulk has dried, reattach baseboards or trim and replace outlet covers and switch plates for a polished look.
Finish before or after installation
Applying a finish to your panelling can be done either before or after installation, depending on your specific circumstances and preferences. Regardless of the approach, consider sealing the panels before installation by applying a sealer or base paint coat to ensure dimensional stability. Applying a stain and topcoat finish before installation is ideal for panelling with complex profiles or grooves, as it’s easier to ensure full coverage, especially on edges and ends that may be hard to reach once installed. Finishing panels before installation also allows you to better control drips, runs and overlaps since the panels can be laid flat. However, if you’ll be painting the panelling, it might be better to do so after installation. This approach ensures a seamless finish, allowing you to fill any gaps and achieve consistency across joints.
Solid wood or sheet goods?
When choosing between solid wood and sheet goods for interior wall panelling, both have distinct advantages and disadvantages. Solid wood offers natural beauty with unique grain patterns and textures, making it an excellent choice for those seeking a high-end aesthetic. It’s durable, customizable and can be refinished or repaired if damaged. However, solid wood tends to be more expensive, is prone to warping or shrinking with humidity changes, and can be heavier and more challenging to install. It also requires proper sealing to maintain stability.
On the other hand, sheet goods like plywood, MDF or particleboard are cost-effective, dimensionally stable and easier to install due to their light weight and large sheet sizes. They’re versatile and can be finished with veneers, laminates or paint to achieve a variety of looks. However, sheet goods lack the natural depth and beauty of solid wood, and their surfaces may wear or chip over time. They’re less durable overall, harder to repair if damaged, and may contain adhesives that release VOCs, making them less eco-friendly than sustainably sourced solid wood.
Ultimately, solid wood is ideal for projects where natural aesthetics and durability are key, while sheet goods are better suited for budget-conscious projects requiring stability and versatility. A hybrid approach, such as using sheet goods with solid wood, can combine the best of both options.
Wainscoting and panelling – what’s the difference?
While wainscoting and panelling involve using decorative panels to cover walls, they differ in terms of their scope and purpose. Wainscoting covers the lower portion of a wall, usually up to chair rail height, but sometimes higher. Its purpose is primarily decorative, adding visual interest and a touch of elegance to a room. It can also protect walls from damage. Panelling can cover entire walls or even ceilings. It’s more functional, often used to improve insulation, reduce noise or hide imperfections in the wall.
Photos credit: Lead Photo by 1benmu.com
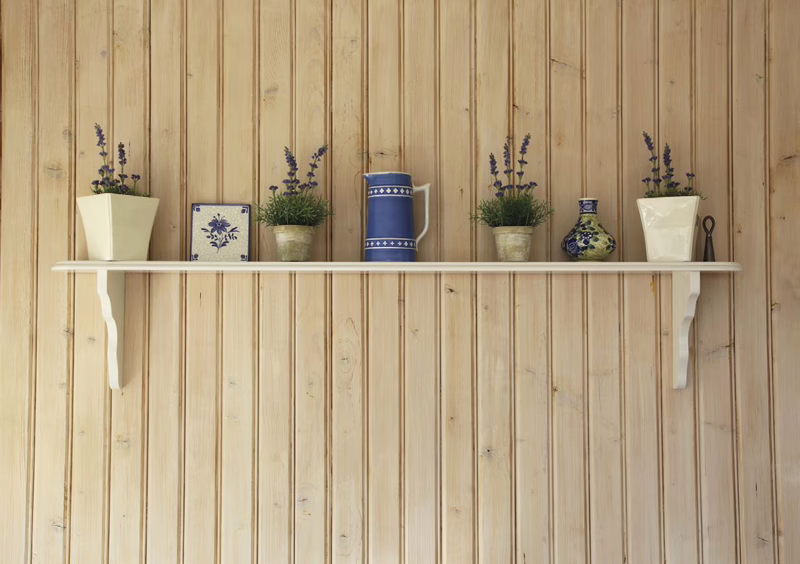
Many Functions
Wall panelling of any kind can help add a visual detail to an otherwise dull space. Framed nicely, this approach helps define the area, in addition to providing some protection from daily use. Wood panelling is much more durable than drywall. (Photo by Irina88w, Dreamstime.com)
Shiplap
Although some shiplap will look much flatter than this, shiplap panelling can come in a variety of looks. The one thing that remains the same is that each piece gets overlapped by the next piece you install. (Photo by AdobeStock.com)

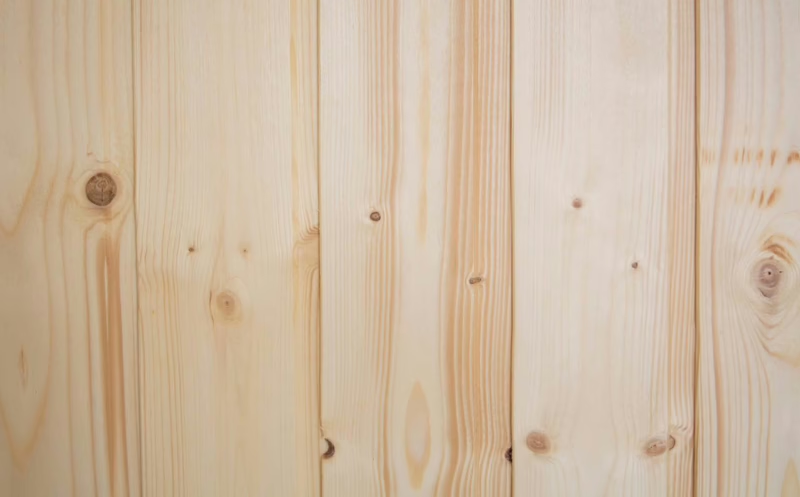
Tongue and Groove
Some shiplap and tongue and groove designs can look virtually identical once installed, like this tongue and groove installation. The difference is only in how the different segments of wood mate with each other. (Photo by Mvhelena74, Dreamstime.com)
Beadboard
Very similar to many tongue and groove approaches, beadboard’s main defining factor is the fact that it has a bead machined into its face, right beside the joint. The joint is typically a tongue and groove. (Photo by AdobeStock.com)
Flat panelling installation
Rail and stile panelling
Types of panelling