TIPS & HOW TO
Easy kitchen countertops

Carl Duguay

Invariably, if you update your kitchen cabinets you’ll think about replacing the countertops.
While solid wood is ideal for cabinetry, it’s much less desirable as a work surface in a kitchen. For this you’re better to go with a natural stone or a man-made material – granite, quartz, marble, stainless steel, concrete, a solid surface (like DuPont’s Corian) or plastic resin laminate (like Wilsonart’s High Definition laminate).
Laminate – Easy to Use, Stellar Looks
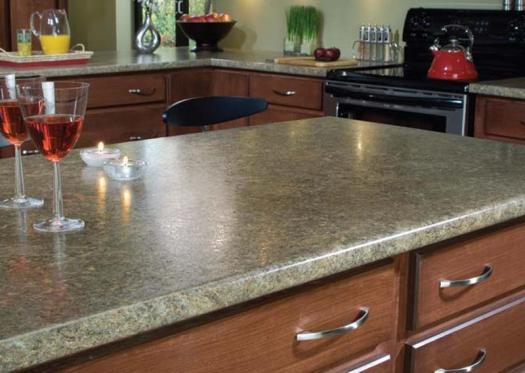
By far, the most popular choice in countertops is plastic laminate – it’s durable, easy to maintain, comes in an astonishing array of colours and patterns, and is the least expensive of the lot. Laminates are available in a variety of textures and sheens that take away the plastic look so common to melamine resin products. You can purchase made-to-order countertops, or you can build your own laminate countertop. A made-to-order countertop will typically come with a formed laminate edge. With a shop-made countertop you have the option of attaching a flush or bevelled laminate edge at the front, or a solid wood edge that can have a milled profile of your choice. Expect to pay around$25/sq ft for a made-to-order countertop, compared to $100/sq ft for a solid surface like Corian. A shop-made countertop will cost around $10/sq ft, which includes the price of a high quality laminate, substrate and adhesive.
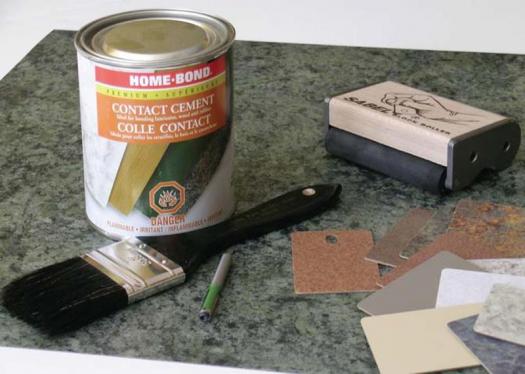
Laminate in the Shop
For the woodworker, laminates are easy to machine, and their drawbacks are manageable (see Working with Laminate sidebar). You don’t need any special tools to cut laminate in your shop – a table saw and router will do the job nicely. Likewise, bonding laminate to a substrate, such as plywood, is very easy. All you need is some contact cement, a nylon brush for applying the adhesive, a laminate roller, and a few long dowels. You can cover the edges of the countertop with laminate or with solid wood trim. If you use laminate you’ll want to make the sharp edges more ‘user friendly’ by routing a bevel along all laminate edges. For this use a bevel trim router bit, available in a range of bevel angles from 7º to 30º.
TIP
While glossy laminates look great they require more effort to keep clean than do matte finishes.
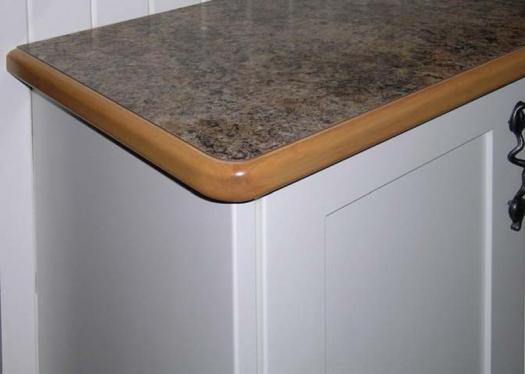
Solid Wood Edging
Solid wood edges do away with the black glue line that occurs where two pieces of laminate butt together; they are stronger and more impact resistant than laminate; you can rout all kinds of decorative edges in solid wood; and you can use edge trimming that matches the wood on your kitchen cabinetry.
If you go with solid wood edging, you can glue it to the substrate before or after you apply the laminate, depending on the look you want to achieve. Either way, always cut the laminate a few inches longer and wider than the substrate and then trim it flush with a hand held router and a 90º flush trim bit.
While the new water-based contact cements don’t give off the strong odours commonly associated with contact cement, it’s still advisable to use a respirator when working with this adhesive. You’ll want to follow the manufacturer’s instructions for applying the product. Typically this involves applying contact cement to the bottom side of the laminate and to the top side of the substrate, and then allowing the cement to set for around 30 minutes. Once you are ready to apply the laminate remember that contact cement isn’t slippery like PVA glue – it will ‘grab’ onto the laminate and the substrate. This means that the pieces must be in the right position before you press them together.
The best way to ensure that the laminate ends up in the right place is to lay several dowels on top of the substrate, and then lay the laminate on the dowels. Next, slowly pull the dowels out from between the two, making sure that the laminate stays in place – as the dowel has a small bearing surface it won’t stick very tightly to the substrate. Now roll the laminate down with a laminate roller, starting at the center of the panel, moving out to the edges. Occasionally run your hand over the surface of the laminate to make sure that it’s flat and that there are no trapped air bubbles between the laminate and substrate.
Don’t Forget the Backsplash
A backsplash keeps debris and liquids from finding their way behind the back of the countertop, and it can help to balance out the look of the countertop solid wood edging. While you can apply a partial or full backsplash to the wall behind the countertop, it’s much easier to install a 3″ to 6″ high backsplash directly on the back top of the countertop. Begin by applying laminate on the front face of a substrate. You then have the same options for the top edge of the backsplash as on the countertop front edge – apply laminate or apply solid wood. After finishing the top of the backsplash glue and screw it onto the countertop.
You really can enhance the look of your kitchen (or bathroom for that matter) with a new countertop. And it’s not as difficult as you might think.
TIP
Titebond III is an excellent glue for bonding solid wood to sheet stock. It has a long open time, so you don’t have to rush the job, it has a high solids content, and it’s waterproof.
Photos credit: Lead Photo Courtesy of Wilsonart International
Lamination tools
Formed laminate edge
Solid wood edge


People have lots of options when it comes to counter tops. Some of the cheaper options that I have used have been resurfacing kits that you can buy at hardware stores and big box stores. These can work very well and give good results for a very reasonable price. You can also take steps to extend the life of these finishes suck as applying two coats of the final finish coat and three coats on edges and other areas that are likely to see more wear. I have also used large ceramic tile on a 3/4″ base to make countertops where low cost was a consideration. As these are custom tops, I design and size the tile to minimize and hide any tile cuts. A lot of the tile these days are made with very sharp and precise edges. I was surprised at how almost seamless the tile looked when I butted the edges against each other. Also porcelain tile (used for outdoor work because of its hardness and ability to withstand weather) gives you an extremely hard and durable surface. I was looking for a very cheap countertop and used a large smooth cheap big box store tile . I was very happily surprised with the results that rivalled the look that one would have got with many purchased and much more expensive tops. Any way lots of options when it comes to counter tops.