TIPS & HOW TO
Adding texture to wood

Mark Salusbury

Adding texture to a wood surface creates visual and physical interest. And since wood is a material that can be textured quite easily, and in many ways, it would almost be a crime not to give wood more of what it wants.
I think wood must be the most adaptable of all the materials we have at our disposal. Depending on how we work it, any given piece of wood can be made massively rigid or quite flexible, thinned right down to translucency if that’s our desire. At once it’s both structural and porous. It can also accept a broad variety of surface treatments, and that’s what I will discuss here.
What is texture and how do we experience it?
Texture is the surface condition of any object. For example, we can describe it as being smooth or rough, sharp or rounded, waxy, oily, glassy or pebbled, leathery or gritty. Logically, texture is most identified with the sense of touch. But before we touch the object, most often we see it first and it is that interaction that either attracts us or repels us from touching the object.
What does texture add to our woodwork?
Texture produces the surface features of reflection, refraction or absorption of light and the colours within the visible spectrum which are the properties of the species of wood we’re working with. It’s those colours and the way we see light interacting with the surface of our woodwork that makes or breaks the finished skin of our work.
The real value of texture comes when you incorporate a variety of textures within one piece. Often we feel our woodwork should be resolved simply with a uniform finish and crisp details; but that doesn’t mean we can’t include contrasting textures as accents or features. By incorporating a texture or two, we can add depth to a piece, define a border, frame the piece, add focus to one or more areas, add interest or intrigue or create a softer or harder look than the basic design or species of wood might impart on its own.
How can we apply texture to wood?
Texture may be achieved in as many forms as your imagination permits. Of course, wood’s natural beauty can excel under a finely applied and polished clear finish brought to a glossy sheen. It can also be simply cut with very keen tools or sanded to extremely fine grits (+1000) and burnished with its own shavings and dust, producing a rich natural glow, unaltered by any oil or film. But to frame or add a counterpoint to that lovely natural glow, a contrasting texture may be just the ticket.
I’ve been finding as many ways as possible to add textural accompaniment to my work, both on and off the lathe. Generally the texture alone, with its contrasting refractions of light, is enough on a simple design and a stellar piece of wood. But as we know, not all woods are created equal. Often we find ourselves needing to overcome a defect, hidden until we start shaping or planing, without unduly altering the design of a piece. Here I’ll perhaps add opaque black, a dark neutral colour, or a translucent wood-toned dye or stain to my textures to shift the focus from the unplanned natural defect back to the overall design. Or maybe I’ll add colour locally to the textured area simply for supportive punch to an otherwise pleasantly plain piece of wood. I like a little sizzle along with my steak.
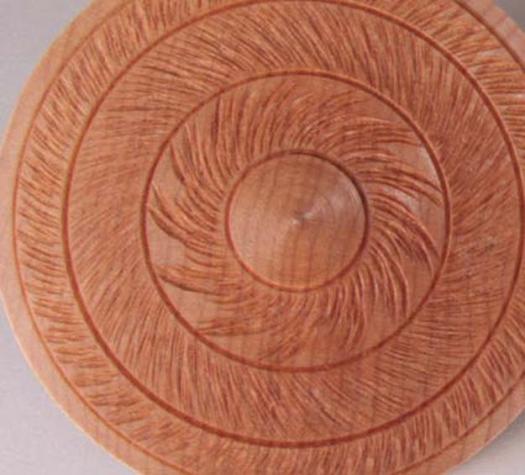
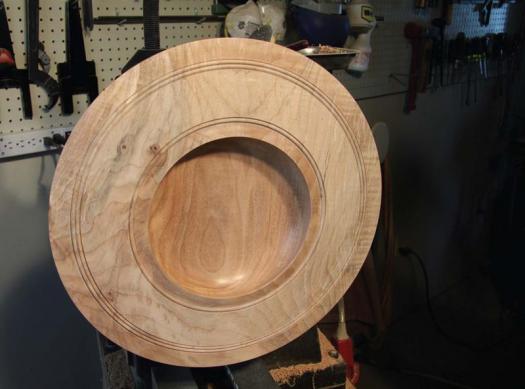
One versatile design I’ve been playing with since the early ’90s can be executed “plain” or with seared and ebonized features. Its strongest asset is the arrangement of beads surrounding the bowl portion. If you imagine this piece without the beads, regardless of how dynamic the woods grain or figure is, it would be quite monotone.
The beads simple texture, radiating like ripples on water, allow light to reflect and refract from the surface adding visual interest from a distance and a really nice tactile treat when touched. They anchor the piece visually, framing the bowl and its contents with both whimsy and mass.
I find that details and elements are best created and arranged in odd numbers: 1, 3, 5 or 7 (beyond that it doesn’t really matter as the volume becomes overwhelming). To create the beads, a deep incision is made with the point of a skew chisel to establish the depth and margin of each bead then the beads are shaped with a 3/8″ shallow-fluted (spindle) gouge. Turning “downhill” from what will be the crown of each bead, I turn the left-hand or outside (relative to the central bowl) profiles of each bead first, then change positions and coordination to turn all the right-hand or inside profiles.
The point and burr of the freshly sharpened straight-ground skew used to create the beads margins is now used to detail and finely “average” each beads profile; this is done with the skew laying flat on the toolrest and angled slightly downward to avoid catches. Once the beads are shaped to perfection, careful sanding begins at 180 grit and I take this to 320 grit and no further to leave “tooth” for varnish or shellac. Sanding is always done with fresh, sharp abrasives and a light touch so as to abrade the wood fibres, cutting them cleanly without changing the shape of the beads.
Beads must be uniform in height, width and profile and cleanly executed, which is easily done with sharp tools and abrasives, a light controlled touch and only a bit of practice.
If I’m happy with the results I move on, leaving the beads natural and burnished, defining the margins of the beads and turning and sanding the bowl area next then reversing the piece to finish turning the underneath are and the foot.
If I feel more is required to add to the texture of the beads, I’ll skip the sanding step. Instead, I’ll lightly sear the beads and wire brush them with a small brass bristled brush, removing the softer surface fibres, leaving the harder fibres proud for added texture. Searing also darkens the beads surface which may be attractive depending on the desired effect. This texture can be further deepen the colour of the wood and/or change the beads surface texture once again by filling the pores of the wood. Liquid shoe polish, which is generally alcohol-based, does a stunning job here and will not interact with any oil or water based topcoats applied later. This is a style of work I have named “Centerpiece”.
Alternately, to enhance the wood’s texture but retain its natural hues, liberally apply methyl hydrate to the wood to soften the fibres (distilled water works too but takes longer to dry) then wire brush with a brass bristled brush.
In either case, brush the wood equally in both directions to remove the softer fibres regardless of grain orientation using a brass brush only to avoid tannin staining.
It’s important to note that the inner and outer margins of any applied beads or carvings should be cut away only after the surface has been crafted to satisfaction. This is especially important if colour is applied, so any overlaps can be cut away, leaving a crisp transition between the textured/coloured area and the rest of the piece.
For cabinet makers, mouldings can be routed to shape or store-bought then treated the same way as the beads I turn. Apply this custom detail to your casework and finish with the completed piece once you’ve dealt with any brad holes or glue squeeze-out.
Add some power
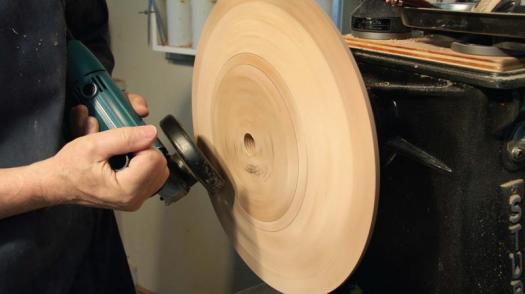
Another texture I enjoy using involves selectively powercarving the surface of the work. Here I use an electric angle grinder equipped with a wood shaping cutter such as an Arbortech or Lancelot, a rotary carving burr (Kutzall) or a fresh coarse-grit (36–60) sanding disc. As the lathe revolves in its normal counter-clockwise direction, the face of the workpiece spins toward the turner then down and away.
The angle grinder and its cutter also spin in a counterclockwise rotation. With the profile of the area to be carved already turned (important), by turning the angle grinder over so the cutter is facing upward and held angled downward, then contacting the rotating workpiece well below the lathe centerline, a pattern can be created.
By slowly and evenly panning the cutter across the turned profile, from the inner area toward the outer rim of the piece, this pattern will be continually elongated across the surface. The angle and fineness of the pattern is controlled by the lathe RPM, the speed the pass is taken and the angle the cutter is at when it contacts the workpiece. At all times, the grinder must be angled downwards to reduce cutting aggression and the risk of a dangerous catch. Again, a firmly guiding, light, sensitive touch and sharp cutters is the charm, resulting in crisp carving with no tearout. Burnished with a natural (hogshair) bristle brush with the bristles clipped short for increased effect, such carvings make for great textural contrast. Next, cut the carvings margins away to define the area then resume turning the other elements of the piece.
Texture more than your turnings
For cabinetry and other furniture, borders, edges and accents can also be power-carved or sanded. With the work surface stationary, a deftly controlled angle-grinder powered carving burr, a flex-shaft driven power carver (Dremel/ Foredom) with a spherical or ball end carving burr, drill-mounted coarse sanding disc, or belt sander can apply as much or little texture as we wish. Once satisfied, cut away the margins for crisp results.
So, we’ve seen that wood can be shaped, polished, sanded, seared, wirebrushed and carved but that’s just the beginning.
Texture can also be achieved by indenting it, swelling it, working it “green” (freshly cut and worked before letting it dry) and so on, bounded only by your imagination. By crafting texture directly onto the wood we’re working or by applying it separately as an inlay or molding, it adds depth and interest to woodwork, creates a style, makes a statement and can be dramatic or very refined to suit your taste or those you do your woodworking for.
Specialty Turning Tools
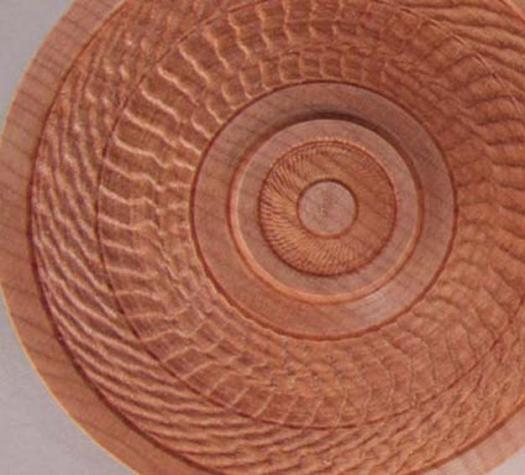
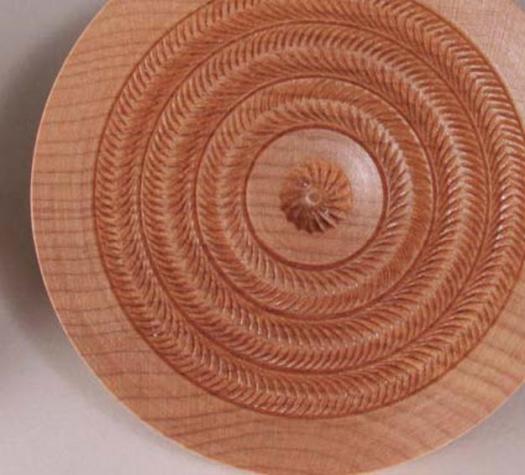
In the early ’90s, small object turner Bonnie Klein designed a tool to impart “chatterwork” on the hard, uniform endgrain of the boxes and spinning tops she crafted.
A simple device consisting of a strip of spring steel with a profile on one end, held at the other end in a steel handgrip, the tool is capable of cutting an amazing range of patterns/textures into a revolving piece of hardwood. Held stationary or passed across the face of the wood, the design can be localized, or elongated to cover an entire surface.
The pattern can be manipulated by simply increasing or decreasing lathe rpm, changing the angle the cutter is presented against the spinning wood, shortening the tool length as it projects from the holder (which alters its vibrating frequency), changing the cutters profile from pointed to radiused, flat, etc. or any combination of the above. Chatter tools are available made by both Sorby and Hamlet or can be easily made following widely available directions on the internet.
I’m also aware of the Henry Taylor “Decorating Elf”, the Robert Sorby Texturing Tool and the Wagner Texturing Tool.
These all produce different results but by the same means; pressing a design into the wood as it rotates in the lathe. All stunningly decorative.
Photos credit: Mark Salusbury; Lead photo by Rob Brown
Aiming for Perfection
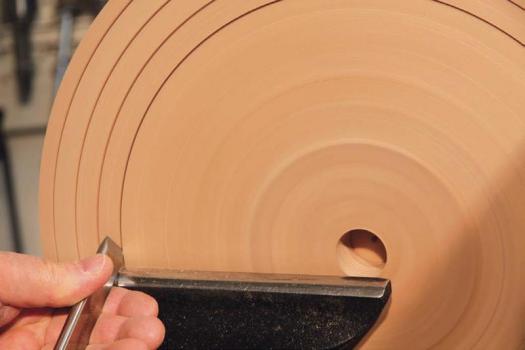
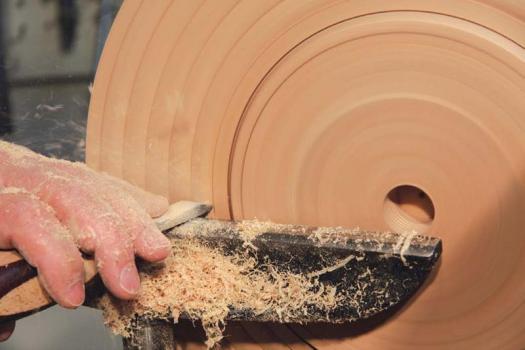
Salusbury uses a skew chisel to create deep incision in one of his signature pieces (above). From there he uses a variety of tools to shape the beads to perfection (below).
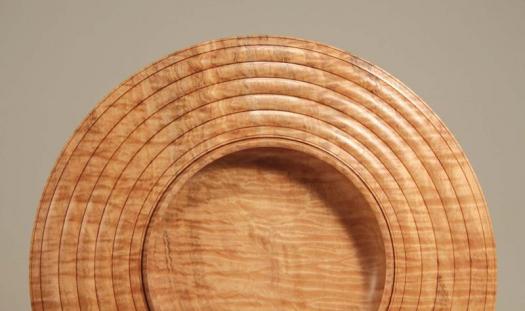
Simple Beads
Once the beads have been sanded and a finish has been applied, the even beads on the piece call out to be touched.
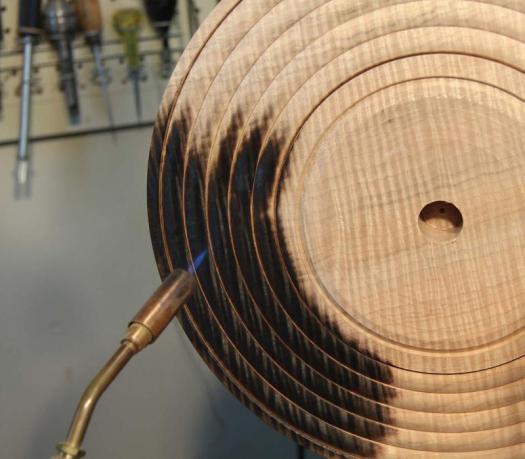
Heat it Up
With a propane torch the beads can be seared and wire brushed, creating much more texture.
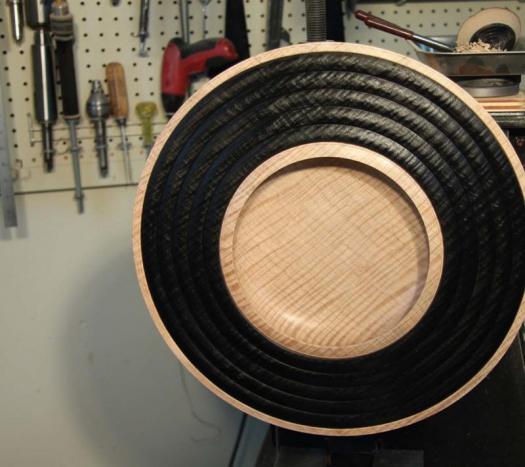
Patience is a Must
After the beads have been seared, Salusbury finishes turning the piece. This final procedure will clearly separate the burnt area from the unaffected wood.
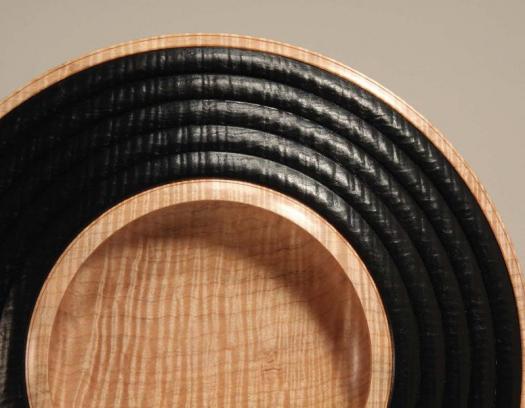
Eye-Catching
A dramatic effect is produced with the colour of the seared area and the additional texture it created.
Use Power Carefully
Because both the wood and the power carving blade are rotating, be sure to hold the grinder correctly.
A Nice, Even Texture
Many effects are possible and experimentation is highly recommended. This was done with a Kutzall attachment.
Simple and Effective
The edge of this bowl was textured with a Lancelot power carving set.
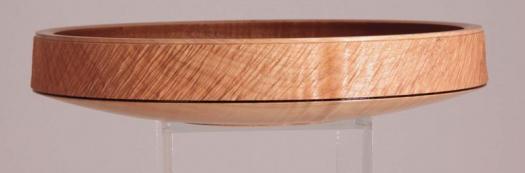
Subtle Contrast
The difference between the textured surface and the burnished rim and bowl doesn’t have to be night and day to achieve good results.

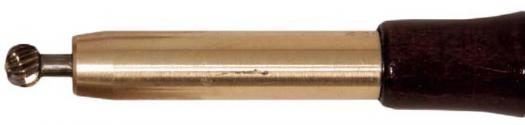
Chatter tool
a vibrating cutter
Decorating Elf
a compression burr
Texturing / Spiralling Tool
a compression knurling tool