PROJECT
Turn a Salad Bowl with a Textured Band

Allan Cusworth

Find more Woodturning projects
A large salad bowl is one of the most sought after woodturning bowl designs. Here’s how to turn one that you can be proud of.
The salad bowl in this project is approximately 8″ in diameter by 4″ high, however, any size of block can be used. This salad bowl has some unique design features. First, there’s a decorative textured band just below the rim. Second, there’s a slight undercut inside the top of the rim to allow the bowl to be picked up more easily and to help direct the salad leaves back into the bowl rather than onto the table.
Turn a Salad Bowl with a Textured Band
Preparing the blank
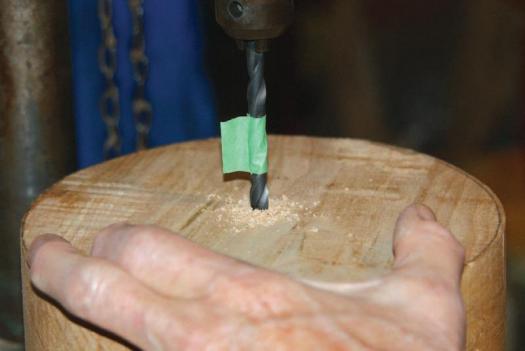
This salad bowl is made from an 8-1/2″ diameter by 4-1/2″ round disk. The first step is to decide the best grain pattern in the blank. Select and mark the side that will be the top of the bowl. Put a dimple at the center of the block on both sides. Drill a perpendicular hole in the center of the top suitable for a woodworm-type screw mount for your chuck. A drill press is best for this. I drilled a 5/16″ × 1″-deep hole to fit the Woodworm screw in my Super Nova chuck. Check your chuck’s requirements, as each manufacturer is different.
Mount the chuck on the lathe spindle, and twist the blank onto the screw chuck until the face seats firmly against the chuck jaws. If you don’t have a chuck, you can center the blank on a faceplate and modify the mounting procedure to suit.
Shaping the outside surface and base of the salad bowl
Place the tool rest on about a 45° angle to the ways of the lathe and about 1/4″ away from the highest point of the blank’s corner. Set its height so a 1/2″ bowl gouge will cut at the centerline of the lathe’s axis.
Bring the tailstock up for support, tighten and lock it in place and hand spin the blank to make sure it does not hit the tool rest. Select a slow speed (about 500 RPM), and shape the outside surface of the bowl while moving the tool rest frequently to keep it close to the cutting surface of the blank.
Make the gouge cuts following the wood grain from the narrow diameter to the wide diameter of the blank to reduce tear-out. If the blank has an uneven grain pattern you can often reduce tearout by using Claphams sanding and cutting compound to soften the wood fibers. To date, this product has not caused any problems with my final finish.
You can increase the lathe speed as the vibration level decreases. A faster speed not only removes wood more quickly, it also provides a smoother surface for easier sanding.
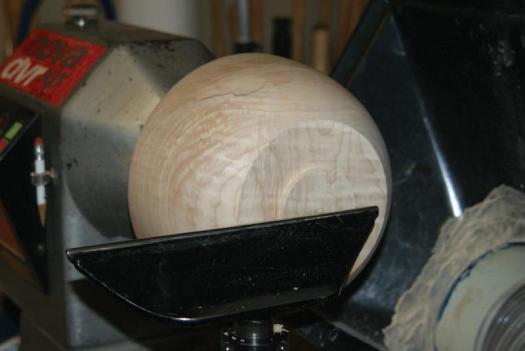
Make a tenon at the tailstock end to fit your chuck. Some chucks require a straight-sided tenon. While others, like the Nova chuck that I use, require a dovetailed tenon. Make sure that the tenon length will allow the tips of the chuck jaws to seat firmly against the bowl at the base of the tenon, and the tenon does not touch the inside bottom of the jaws. This provides a stronger and more accurate hold on the bowl blank.
Remove the bowl from the Woodworm screw and reverse it into the chuck jaws. Because it is virtually impossible to remount the blank perfectly, there will probably be a little wobble when the blank is reversed. True up the outside surface to reduce the vibration. True up the face of the blank.
Turn the lathe speed down to about 500 RPM, and finish sand the outside surface. I usually sand with 4″-diameter disks on a 3″-diameter sanding pad with a sponge spacer in an angle power drill/sander. The 4″-diameter disks allow them to flex and do not gouge the surface. I sand through the grits starting at 80-grit to remove the tool marks, all the way to 320-grit, and then hand sand with 400- or 600-grit. Hand sanding the entire outside surface will also work; it just takes a lot longer.
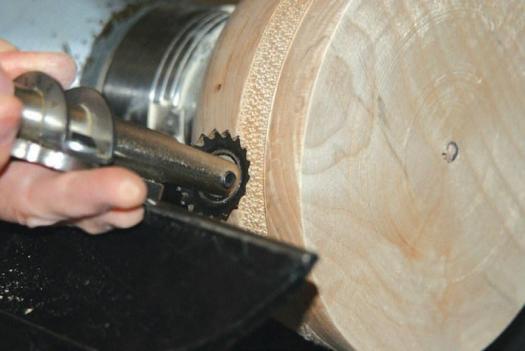
Making the textured band
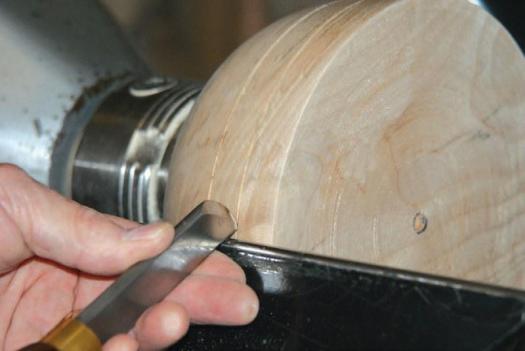
The textured band should be done before hollowing out the inside, because the bowl walls have not been turned and will not flex. The textured band on this bowl is 3/4″ wide and is located 3/4″ from the top of the rim. Mark the location of the edges of the band on the bowl surface. Locate the tool rest about 1/4″ from the surface and placed so a skew will cut on center. Make two small grooves where the marks are.
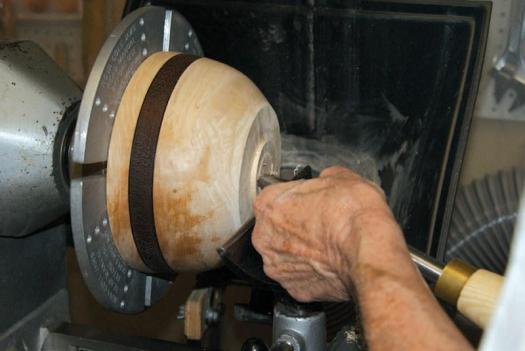
Create a texture pattern between the two grooves. You can use whatever texturing tool you prefer. The tool I used is a Robert Sorby Spiraling/Texturing tool with the 1-1/2″-diameter texturing cutter attached. I located the adjustable tool saddle 90° to the cutter. Position the tool rest so about 3″ from the bowl’s surface. Place the texturing tool on the tool rest so it can be pivoted up to create the texturing design. The texturing cutter should contact the bowl surface just below the center axis of the bowl to prevent a catch. With the lathe speed at about 500 RPM, using a lever action, press the cutter against the wood between the grooves. You can experiment with the cutter wheels, settings, and lathe speeds to create the texture design you want.
The textured band can be left natural; however, if you want to colour it later, the ends of the wood pores must be sealed in the grooves so the dye used to colour the textured area will not bleed past the grooves. To do this, it is necessary to burn these grooves with a wire wood-burning tool.
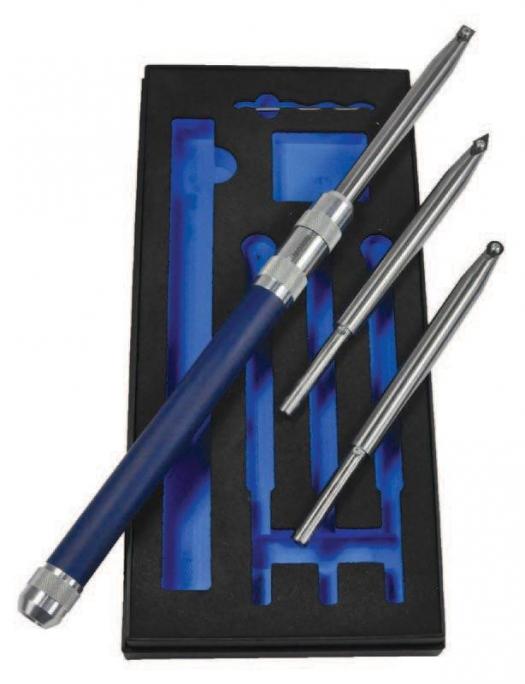 Turning tools with insert cutters are ideal for the novice or experienced wood turner. RIKON’s #70-800 set includes a 16″ long, machined aluminum handle with an anti-vibration grip and features a forward, internal chucking system for attaching the three 8-3/8″ long shafts with cutters to the handle. Included are Circle, Square and Diamond shaped carbide cutters. if a cutter becomes dull, just rotate it to work with another new side of the edge. Changes only take seconds. Wood turning has never been easier than with the Rikon Woodturning System. RikonTool.com Turning tools with insert cutters are ideal for the novice or experienced wood turner. RIKON’s #70-800 set includes a 16″ long, machined aluminum handle with an anti-vibration grip and features a forward, internal chucking system for attaching the three 8-3/8″ long shafts with cutters to the handle. Included are Circle, Square and Diamond shaped carbide cutters. if a cutter becomes dull, just rotate it to work with another new side of the edge. Changes only take seconds. Wood turning has never been easier than with the Rikon Woodturning System. RikonTool.com |
The burning is done by creating friction heat in the groove, which will burn the wood and seal the ends of the pores. It also makes two dark lines that emphasize the textured band feature. It is important that the wire tool not be wrapped around your fingers because it gets very hot and could easily burn them. Turn the dust collector off during this process in case a hot spark is produced.
Using a faster lathe speed, around 1500 RPM, hold the wire burning tool in the grooves till the wood is charred. This only takes a few seconds. After the grooves are burned, you can burnish the textured area with some shavings to remove any fuzz. The band is now ready for finishing.
Colouring the textured band can be done later but I like to do it at this time to give it time to dry completely while I’m turning the inside of the bowl. I prefer to use dye rather than stain so that the colour penetrates the wood. Metal acid dyes provide the best colour fastness but aniline dyes will work. Carefully brush the dye onto the textured area with the lathe turned off. Take your time, as a mark outside the band is very difficult to remove.
Wire wood burning tool
A wire wood-burning tool is used to char grooves in a wood surface and is used in this project to seal the wood pores to prevent the dye from bleeding past the textured band.
It is made using a 12″-long piece of 20-gauge wire, or as I prefer, a used wrapped 3rd (G) guitar string. Any guitar player or music store that tunes guitars should be able to give you one or two of these.
Cut two 2″-long pieces of dowel, and make a groove at the middle of each one.
Twist the ends of the wire onto the dowel pieces and the tool is complete. I like to wrap the twisted wire with masking tape to cover the exposed sharp point.
Forming the inside surface of the salad bowl
It’s a good idea to establish the inside depth of the bowl by drilling a depth hole to about 1/4″ – 1/2″ less than the finished depth dimension. I do this with a long shank 3/8″ drill bit mounted in a handle. Place the tool rest to align the bit on center. Mark the desired inside depth on the bit shank with a piece of masking tape and then align the drill bit with the ways of the lathe and drill straight into the blank using a very slow lathe speed (around 250 RPM). Remove it often to clear the flutes until the required depth is reached.
Adjust the tool rest height to allow the 1/2″ bowl gouge to cut at the center line. Start cutting with the gouge set at 90° to the tool rest, and with the bevel rubbing, make cuts towards the center. Cutting in this direction allows the cut to follow the direction of the wood grain and will help reduce tear-out. If you have a curved tool rest, it can be used to reduce the gouge’s extension over the tool rest. Continue making long, sweeping cuts following the contour of the outside surface. Gradually rotate the gouge to about 45° to make the cuts a little more aggressive and remove the wood a little faster.
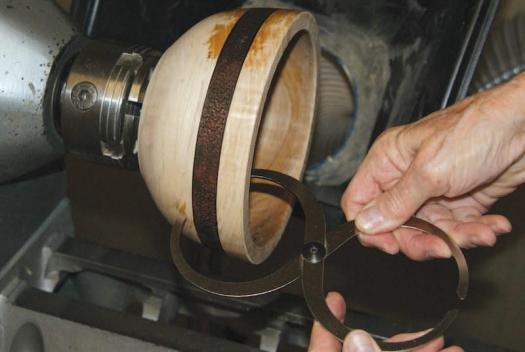
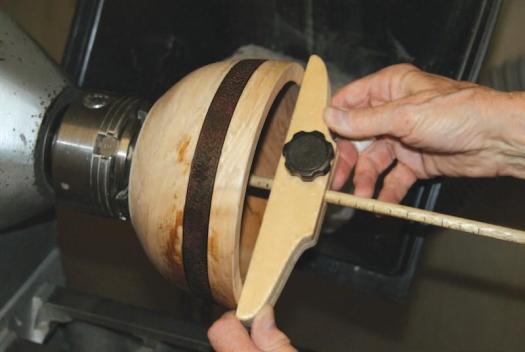
Take frequent wall-thickness measurements with calipers. I like a double-ended caliper because it lets you see the wall thickness immediately on its outside end.
As you get closer to the completed bowl wall thickness near the bowl rim, create an undercut just below the top of the inside.
As you get to the bottom of the bowl you will notice that the bottom of the depth hole disappears, letting you know that the bowl bottom is close. Switching to a bowl gouge with a steeper bevel makes it easier to get a good cut on the bottom surface because you can continue to rub the bevel. This will also ensure that you have enough wood to form the outside of the base. Use a depth-measuring tool to keep track of the bowl’s depth. Take the measurement, and then align the tool across the rim so you can sight along its end to see where the inside bottom of the bowl is.
Make light cuts to finish shaping the bottom. Leave the bottom of the bowl a little thicker than the walls to make the bowl more stable in use. I often shear scrape the surface with a large side scraper to make it smoother. Make the edges of the rim crisp but not sharp.
Sand the inside surface the same way I described earlier, with sanding disks and a sponge spacer to allow the sandpaper to conform to the inside surface without digging into the surface.
Completing the base
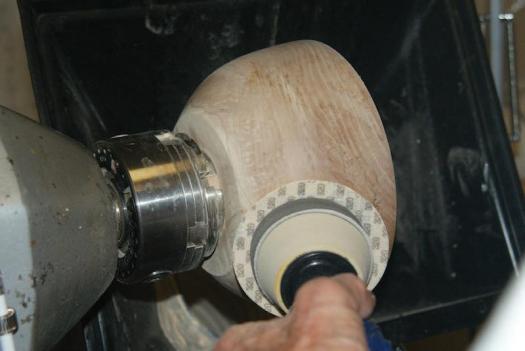
After the bowl is sanded to your satisfaction, you will need to remove the tenon and complete the base. The bowl has to be reversed and mounted with the bottom exposed. There are many ways to do this, including a vacuum chuck and making a jam chuck. There are various other chucks that will grasp the bowl. For this project, I chose to use Cole jaws mounted on the chuck. These jaws are also called jumbo jaws.
Remove the bowl from the chuck, and set the depth gauge at the inside depth of the bowl. This depth measurement will be needed later to see where the inside bottom is as the base is being turned.
There are two ways to mount a bowl in Cole jaws. Compression mode clamps the bowl by its outside edge while expansion mode holds the bowl by its inside edge. If you are using expansion mode, as I did for this project, do not over tighten the chuck to expand the jaws too far and split the bowl. Also, make sure the bowl is pressed securely against the chuck base to provide maximum holding strength.
Place the tool rest about 1/4″ away from the bottom surface and hand spin the lathe to make sure the bowl does not hit anything. Chucks with Cole jaws attached are designed to turn at a maximum lathe speed of 600 RPM. Start the lathe at a very slow speed.
Gradually increase the speed. Using a sharp 1/2″ bowl gouge and very light cuts to nibble away at the tenon.
Shape the base creating a slightly concave surface. This prevents the bowl from wobbling on a table. Check the thickness of the bottom with the depth gauge that was set earlier. The bottom of the bowl should be a little thicker than the wall to increase its stability when the bowl is being used.
Sand the base to 400- or 600-grit, and add any decorative rings. I like to engrave my signature on my bowl while it’s still on the lathe so I can give the base a final sand to remove any fuzz created by the engraver. Remove the bowl from the lathe before finishing.
Finishing
There are numerous materials that can be used to finish bowls. I prefer to finish my salad bowls off the lathe with three to five applications of curing oil. The number of coats depends on the absorption quality of the wood and the amount of surface finish desired. A curing oil penetrates the surface of the bowl, leaves a little surface buildup, and seals the wood as it cures. This prevents salad oils, etc. from seeping in and becoming rancid. Some curing oils include tung oil, walnut oil, linseed oil, and some proprietary combinations of these. I mostly use a Danish oil, which is mostly linseed oil. Vegetable, mineral and other non-curing oils never cure, and some can become rancid after application. I don’t use them.
When applying oil, flood the surfaces, and let it soak in. After a few minutes, wipe off the excess oil, and let the bowl dry for a few hours. Apply succeeding coats the same way, and leave the last one to cure until no odor can be detected. This can take a few weeks. The final finish can be buffed if desired.
Some turners prefer to use a polyurethane finish to create a shiny surface. These provide a film-type finish and in my opinion are not satisfactory because they can crack and peel off and are difficult to repair.
After the finish has cured, your beautiful salad bowl is ready to prepare your favourite tossed salad for the dinner table.
Photos by Allan Cusworth
Woodworm Screw
A hole drilled in the blank will allow Cusworth to secure the blank to his lathe.
Spin it On
The hole in the back of the blank will thread right onto the Woodworm screw, and ready the blank for turning.

Turn a Tenon
Cusworth shapes the outside of the bowl, then adds a tenon on the bottom of the blank that will be used to secure the workpiece while turning the inside of the bowl.
Finish Sanding
Though you could use your hand, machine sanding is faster while the blank is still mounted in the lathe.
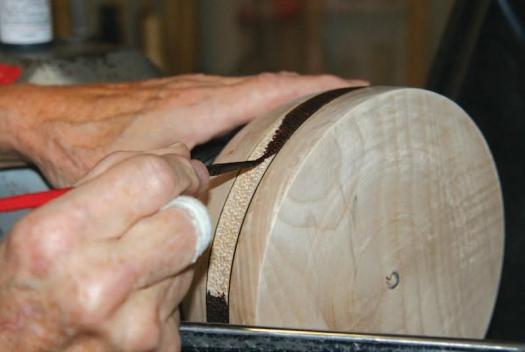
Define the Boundaries
Two narrow grooves are added to the outside of the bowl in order to define the width of the textured band.
Add Texture
A texturing tool, in this case a Robert Sorby spiralling / texturing tool, is used to create the detailed band on the side of the blank.
Add Some Colour
A band of colour helps highlight the textured band. Be very careful to not get any colour outside of the band, as it sticks out like a sore thumb.
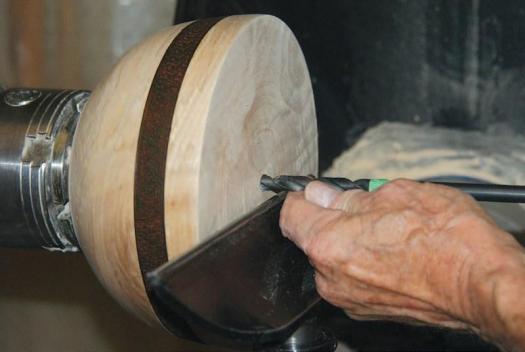
Depth Hole
Cusworth uses a long 3/8" drill bit to mark the depth of the bowl, so while he’s turning he doesn’t go through the other side by accident.
Hollow the Inside
Use the tool rest and proper tool selection to safely remove the waste from the center of the bowl.

A Quick Look
Double-ended calipers will give you an instant visual of how thick the walls of your turning are.
Depth Gauge
A shop-made depth gauge will help you tell exactly how deep your turning is.
Power Sanding
Sand the inside surface of the bowl to produce a nice, even finished piece.
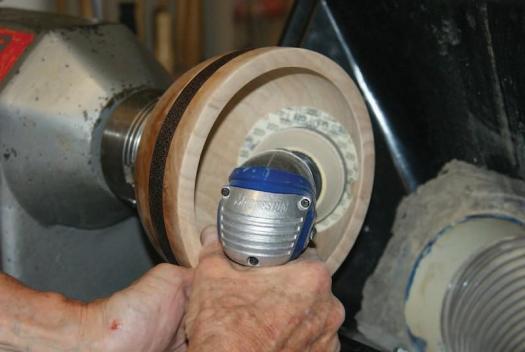
Concave Bottom
Remove the tenon, and create a slightly concave bottom. This will help protect against the bowl rocking on your table when it’s complete.