PROJECT
Under sink organizer

Jim Sinclair

Find more Home Improvement projects
Bringing order to the under-sink chaos in your kitchen is a project that will exercise your creativity and provide you with a lasting functional improvement in your kitchen.
For this project you will have to adapt the design to fit your own needs and the space you have available. The choice of wood will depend upon your kitchen circumstances. Even the finish may vary, for example if you want to match a particular paint colour. As well, the installation details will vary depending upon what type of drawer slides you select.
The first step in creating your design is to remove everything from under your sink as you create an inventory of what gets kept there. With everything out from under the sink it is time to prepare an accurate drawing of the space available, including any obstacles in the way and anything (like shutoff valves) that must remain accessible. Once your drawing is complete, it’s probably a good idea to put everything back under the sink. This isn’t a one-afternoon project.
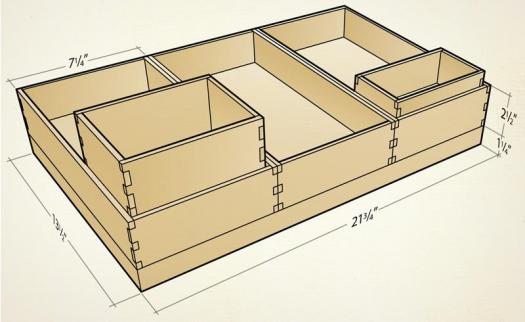
For my design I went with two pull-out structures. The pull-out structures provide easy access to all the items stored on them, much like drawers provide easier access to items in lower cabinets than shelves. The first is a 13 ½” by 21 ¾” structure located on the left-hand side of the cabinet. It accommodates three 13½” by 7 ¼” trays. The trays fit into a set of rabbets and dados that are cut in the top of the base. The trays are all the same size so that they can be arranged on the pull-out structure in any order and they were designed to be large enough to hold the largest boxes found under our sink. A pair of small open-ended boxes that fit crossways within the trays completes the first structure. The small boxes can be placed in any location in any tray, again providing flexibility in organizing content. The first small box has 4 ½” high sides. These relatively high sides accommodate a number of cleaning brushes stored vertically. The second small box has 2 ½” high sides and is for keeping together some small items we use for maintaining a fish tank. By keeping these small supplies in a removable box they can all be conveniently taken out, used and then returned to storage under the sink. You can add additional small boxes to your design to add places for additional groups of small items at the cost of reducing the space for larger objects.
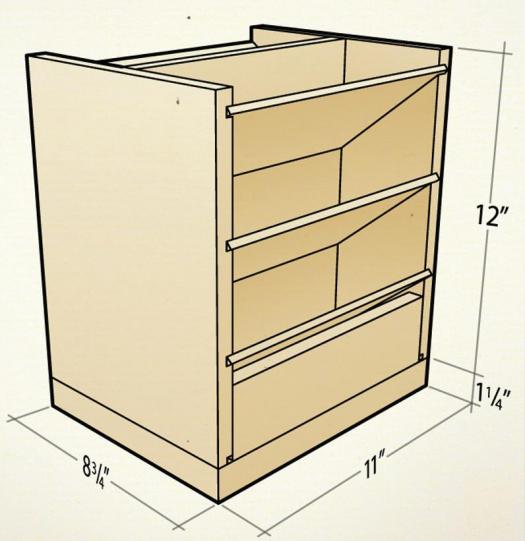
The second pull-out structure is 8 ⅝” by 11″ located in the middle of the cabinet in front of the main plumbing. It accommodates a single set of six sloped shelves that attach to rabbets in the base similar to the trays. The shelf structure is removable from the base in order to allow easy access to the under-sink plumbing. The shelves are sloped at 50° to secure the contents on the shelves and to make seeing the contents of all the shelves easy from above.
I considered putting a small set of fixed shelves on the right-hand side of the cabinet for infrequently used items, but it turned out that everything we had under the sink fit nicely in the first two pull-out structures with lots of room to spare.
Under sink organizer
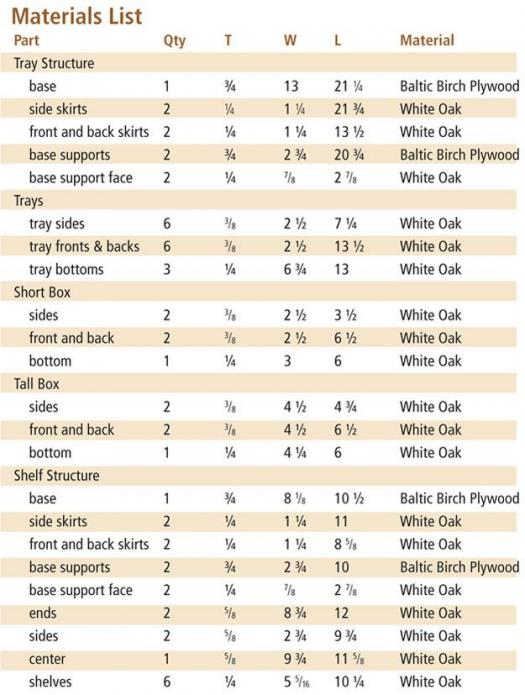
Material Selection
I chose to make the visible portions of the organizer out of white oak to match our existing kitchen cabinetry. The structural parts of the pull-outs I made out of 18mm Baltic birch plywood, for its strength and stability. Although not entirely accurate, for consistency with the rest of the measurements in this article I will refer to this as ¾” plywood from now on. A skirt of white oak around the outside edges of the pullout bases hides the plywood edges and provides a convenient handle for pulling out the structures. An alternative to solid wood would be to use plywood for the entire unit.
Basic Preparation
Cut the two base pieces to size on the table saw. Next, cut the dados and rabbets. The dados and rabbets in the base pieces can be cut on the table saw with only minor adjustments between cutting the dados and the rabbets. Start by installing the dado blade set to the appropriate width for the dados, in this case ¾”. I used a shop-made zero clearance insert since neither of the inserts that come with my table saw are wide enough to accommodate a ¾” dado setup. Next, set the blades to the proper height, in this case ¼”. Set the rip fence and make the two dado cuts on the tray base. Now attach a sacrificial fence to the rip fence and position the fence to expose ⅛” of dado blade. Now cut the rabbets around both the base pieces. Use a shoulder plane to clean up any inconsistencies at the corners of the rabbets and dados before moving on to attaching the skirts to the base pieces.
Cut the sides and bottoms of all the trays and boxes to finished size. For the two end pieces and the center piece of the shelf structure you will most likely need to glue up a pair of boards to get sufficient width. Once these three panels have been glued up, cut all the parts for the shelf structure to finished size. For the shelf structure, cut the rabbets at the bottom of the two end pieces and the two side pieces. On one of the end pieces layout the angled shelf grooves. Clamp the work piece and a fence in place to rout each groove.
Once the first end piece has been fully routed, clamp it together with the other end piece, inside faces together and transfer the exact start locations of the six shelf grooves to the second end piece, lay out the rest of the grooves, and then rout the grooves in it.
Joinery
The base supports are held to the cabinet bottom with a set of round-headed wood screws. To prepare the supports, set the fence on your drill press so that the holes will be drilled in the center of the plywood boards. Drill several evenly spaced clearance holes completely through the width of the base supports. I used five for each of the longer base supports and three for each of the shorter base supports. Leave the fence in place and switch to a forstner bit. Counter-bore each clearance hole deep enough that the screw will protrude beyond the bottom of the base support approximately the thickness of the cabinet bottom into which you will be attaching the base support.
The trays and boxes are all constructed using similar techniques. The sides are joined together with through dovetails. The bottoms float in stopped ¼” grooves cut ¼” up from the bottom edge of the sides. I used a dovetail jig to cut the dovetails with a router.
The stopped grooves were cut on a router table. Mount a ¼” spiral bit and raise it 3/16″ above the surface of the router table. Position a solid fence ¼” away from the bit. Mark start and stop lines on the solid fence to show where to position the pieces. Lower each piece on to the bit keeping the leading edge of the piece even with the start line. Push the piece through until the trailing edge reaches the stop line, then back the piece off a bit and lift it up clear of the bit. And with a cut like this, move the work piece from right to left so the rotation of the router bit will keep the work piece tight to the fence, as opposed to pushing it away from the fence.
The shelf structure is held together with ¼” dowels. A pair of evenly spaced dowels at the end of each side piece should do the trick and six evenly spaced dowels along each end of the center piece to hold it to the ends. Drill one dowel hole then insert a dowel center in the hole to mark the location of the mating hole. The shelves themselves simply slide into the grooves in the end pieces without any need for glue.
Some custom modifications will most likely need to be done to the base structures in order to make them work with the particular drawer slides you choose to use. Because I used Blum Tandem Plus drawer slides, I needed to cut a pair of slots in the back skirt in order to allow the drawer slides to pass through the skirt at the back. As well I needed to drill a pair of holes in the back skirt in order to provide a place for the drawer slides to hook into the base structure at the back.
At the front of the base structures I needed to glue a pair of plywood blocks to the under side of the base to attach the drawer slide clips.
Once all the joinery has been done, but before assembly, it is time to do the surface preparation for all of the pieces. For all the ¼” pieces that are going to fit into ¼” slots or grooves, surface preparation time is the time to smooth them down so that once they are finished they will still be slightly less than ¼” and will fit easily into the ¼” slots or grooves.
Pre-finishing Assembly
For this project’s glue-up, I suggest using waterproof glue. Even without major accidents, water will get under the sink from such things as rubber gloves, wet towels and minor splashes. There is no point in tempting fate with your glue choice. Glue the skirts on to the base pieces one at a time. Position them so they protrude slightly above the surface of the adjacent rabbet. Once the glue has dried and the clamps have been removed, use a shoulder plane to smooth the skirt piece even with the rabbet before gluing on the next skirt. This gives a nice level extended rabbet and avoids any difficulty with tear-out at the skirt miters.
Glue the base support face pieces on to the front of each base support so that they extend beyond the base support in all four directions. Once the glue has dried and the clamps have been removed, use a block plane to trim the face piece even with the rest of the base support.
When gluing the shelf structure together, a small amount of glue on the dowels and in the dowel holes is all that’s needed. The glued dowels will provide all the strength you need for these joints. Clamp the joints together and check that everything is square. Once the glue is dry and the clamps removed, use a block plane to even out any minor inconsistencies at the top and bottom of the structure. You may also need a shoulder plane and a chisel to even up the rabbets at the bottom.
Finishing
For floating construction like the trays and boxes, I prefer to finish the parts before assembly. This avoids any problems with finish build-up in corners and the floating panel moving later and exposing an unfinished surface. A little bit of masking tape on the inside edges of the dovetail joints will protect the glue surface and discourage you from splashing the finish into the rest of the joint surfaces. As well, the shelves should be finished before they are put into the shelf structure. All the remaining parts for this project can easily be finished after they are assembled.
Final Assembly
Use a small brush (an old artist’s brush or toothbrush will do) to put a light coating of glue on all the mating portions of the dovetails. Be careful to keep the glue out of the grooves. Put the two pin boards together with one of the tail boards and then slide the bottom into place in the grooves. Finally, put the remaining tail board in place and push everything together. Check to make sure everything is square; if not, adjust with a bit of diagonal clamping pressure and then clamp the joints and wait for the glue to set.
The six shelf pieces should just slide into place between the end pieces. If you find they are slightly too long in either dimension, a quick pass or two with a plane should fix that. Just remember not to plane the finished front edge.
Installation
Use a horizontal spacer board to position the first base support parallel to the cabinet side and sufficiently clear of the door and any hinge mechanism that may be present. A spring clamp works well to establish a consistent depth from the front of the cabinet. Mark each of the screw locations. I used a long screw as a center punch, putting it into each of the predrilled holes and tapping it with a hammer. Move things out of the way and drill pilot holes in the base of the cabinet. Put the spacer board, spring clamp and base support back in place and attach the base support using the appropriately sized screws.
After installing the first base support, use a second spacer board to position the second base support parallel to the first. Again, use a spring clamp to establish the depth from the front of the cabinet.
When drilling pilot holes, a simple shop-made stop block with a hole drilled through the middle can be slipped over the drill bit to give you holes of consistent depth. You can fine tune the depth by modifying the distance the drill bit protrudes from the chuck when you’re tightening the drill bit in the chuck.
Use a vertical spacer board to position the slide at the appropriate height next to the base support. Check the slide to see if it is level; if not, shim between the slide and the spacer board until the slide is level. Drill pilot holes in the base support and attach the slide with screws.
With the base supports attached to the cabinet and the drawer slides attached to the base supports, it’s time to attach the pull-out bases. Once the pull-out bases are attached, drop the trays, small boxes and the shelf structure in place. Now all you have left to do is put everything back under the sink using your new organizers.
Photos by Jim Sinclair, Lead photo by Vic Tesolin
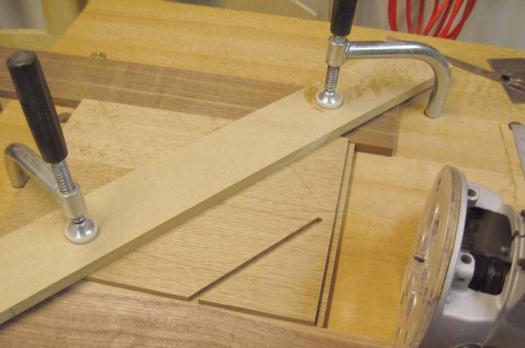
Angled Grooves Made Easy
Clamp the work piece and the fence in place when routing the angled shelf grooves.
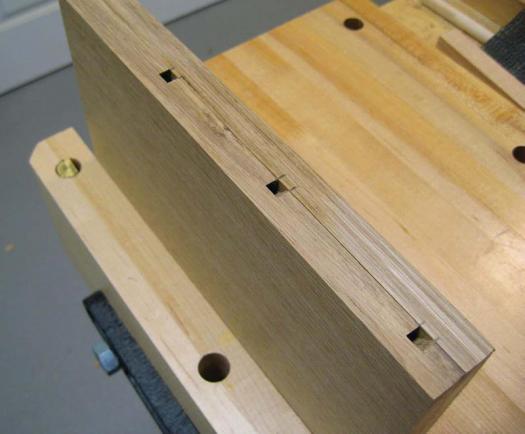
Transferring will Result in Fewer Mistakes
Use the first completed end piece to layout the second end piece.
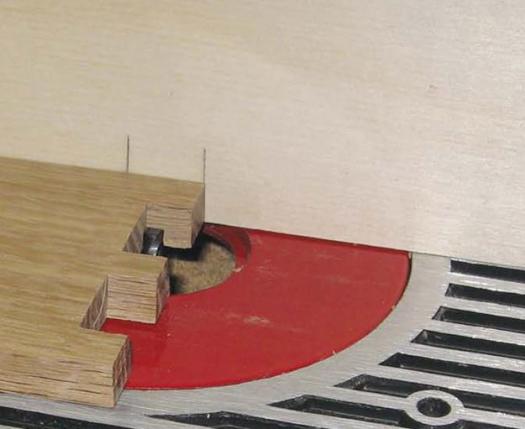
Easy Dovetails
A dovetail jig makes quick work of repetitive dovetailing.

A Pencil Mark
Use a pencil to mark start and stop lines for routing the grooves for the tray bottoms.
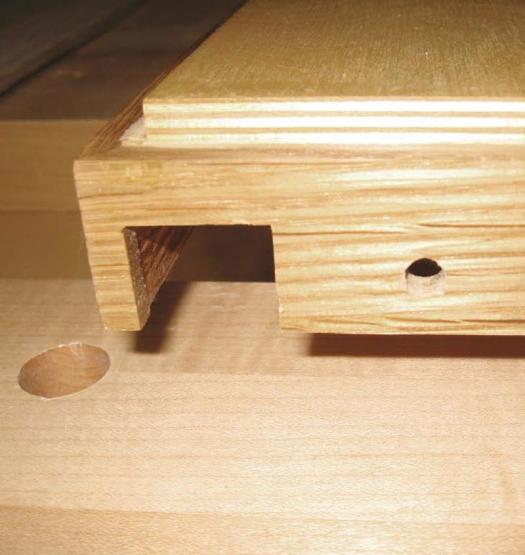
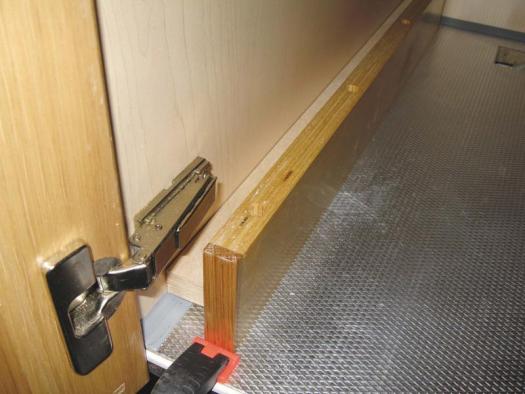
Only Do What You Have To
The drawer slides I used run through the notch and hook to the base through the 5/16" drilled hole. The drawer slides you use will likely be different, so plan accordingly.
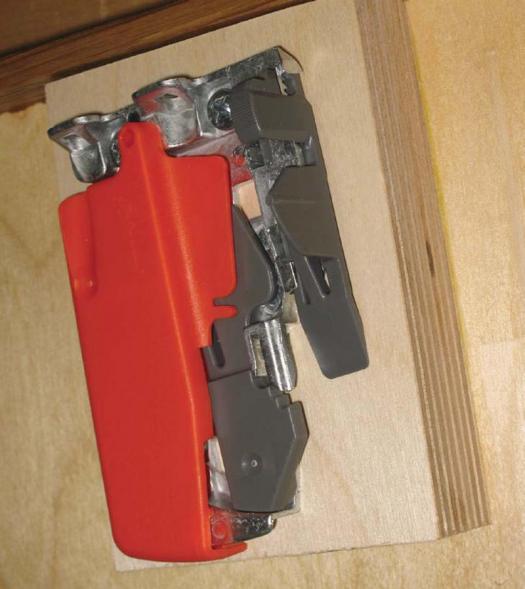
Fancy Hardware
Some drawer slides work different than others. For my installation the drawer slide clip needed to be mounted on the underside of the pull-out base.
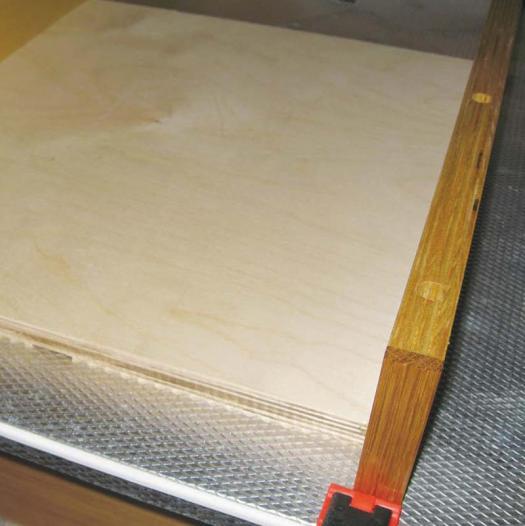
Start Small
A spacer board keeps the support parallel to the cabinet side and clear of obstructions.
A Second Spacer
A larger spacer board positions the second support parallel to the first.
Simpler is Always Better
A shop-made depth stop makes drilling tasks simpler
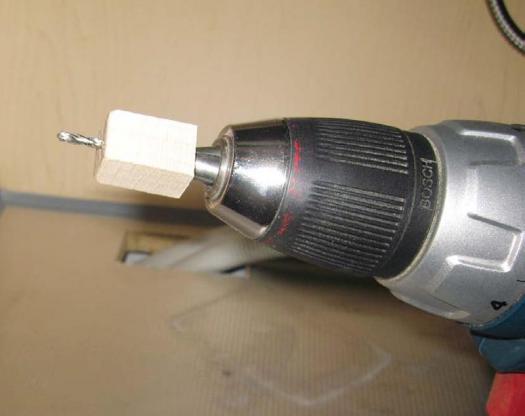
Illustration by James Provost