PROJECT
The mighty foldable sawhorse: strong and stable

Rob Brown

Find more Shop projects projects
There’s nothing better than a silent partner you can always rely on. Build a pair of foldable sawhorses and you might not have to wait for your spouse or neighbour to come home in order to get some work done in your shop.
A strong sawhorse is usually just as good as a second pair of hands. In fact, it’s sometimes better. If made well, it’s certainly stronger than many people. It also doesn’t get distracted by your shiny new tools or the whirr of your table saw blade, nor ask if it can borrow that tool on the shelf. And it’s always ready and waiting in your shop, which I don’t expect other people to be. A sawhorse is made even better if it’s built to the right height and has a few basic accessories to make it even more flexible in different situations.
My pair of sawhorses are critical to the work I do in my one-person workshop. They’re strong, stable, foldable and sized so their top surfaces are just below my table saw’s outfeed surface when they have a support accessory rail on them.
The mighty foldable sawhorse: strong and stable
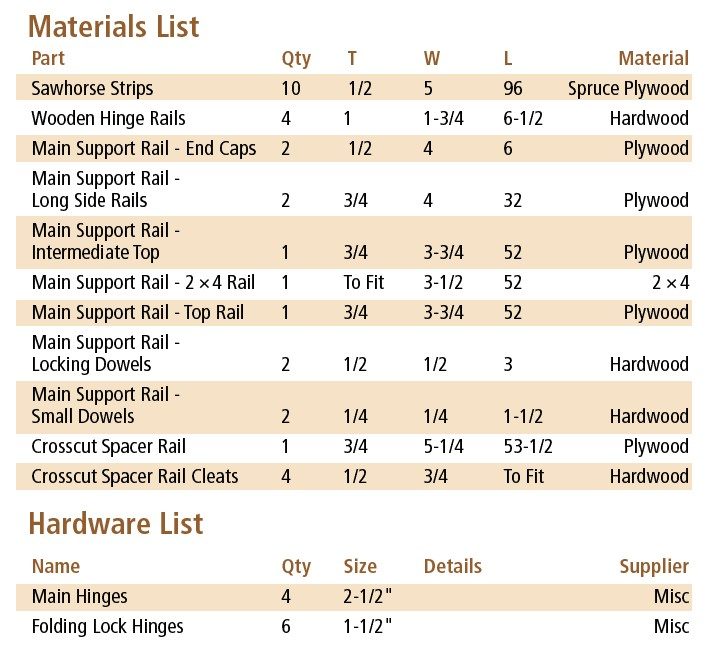
Materials
There’s no reason to break the bank on this project. Strong is all I’m going for. I made my sawhorses from 1/2″ spruce plywood, which is cost effective and strong.
I laminated two layers for strength, but if you wanted truly bombproof sawhorses you could add a third layer. Another option would be to build these sawhorses out of full pieces, rather than piece them together with 5″ wide strips that overlap each other. To give you an idea of what sort of load these sawhorses can hold, they spent considerable time supporting a solid white oak tabletop that was about 90″ × 50″ × 2″ without any problems. Having said that, I wouldn’t want to push them any further.
The only other materials needed are a small amount of solid for the lower locking hinges and a few pairs of metal hinges to keep the tops of the sawhorses together.
Rip them up
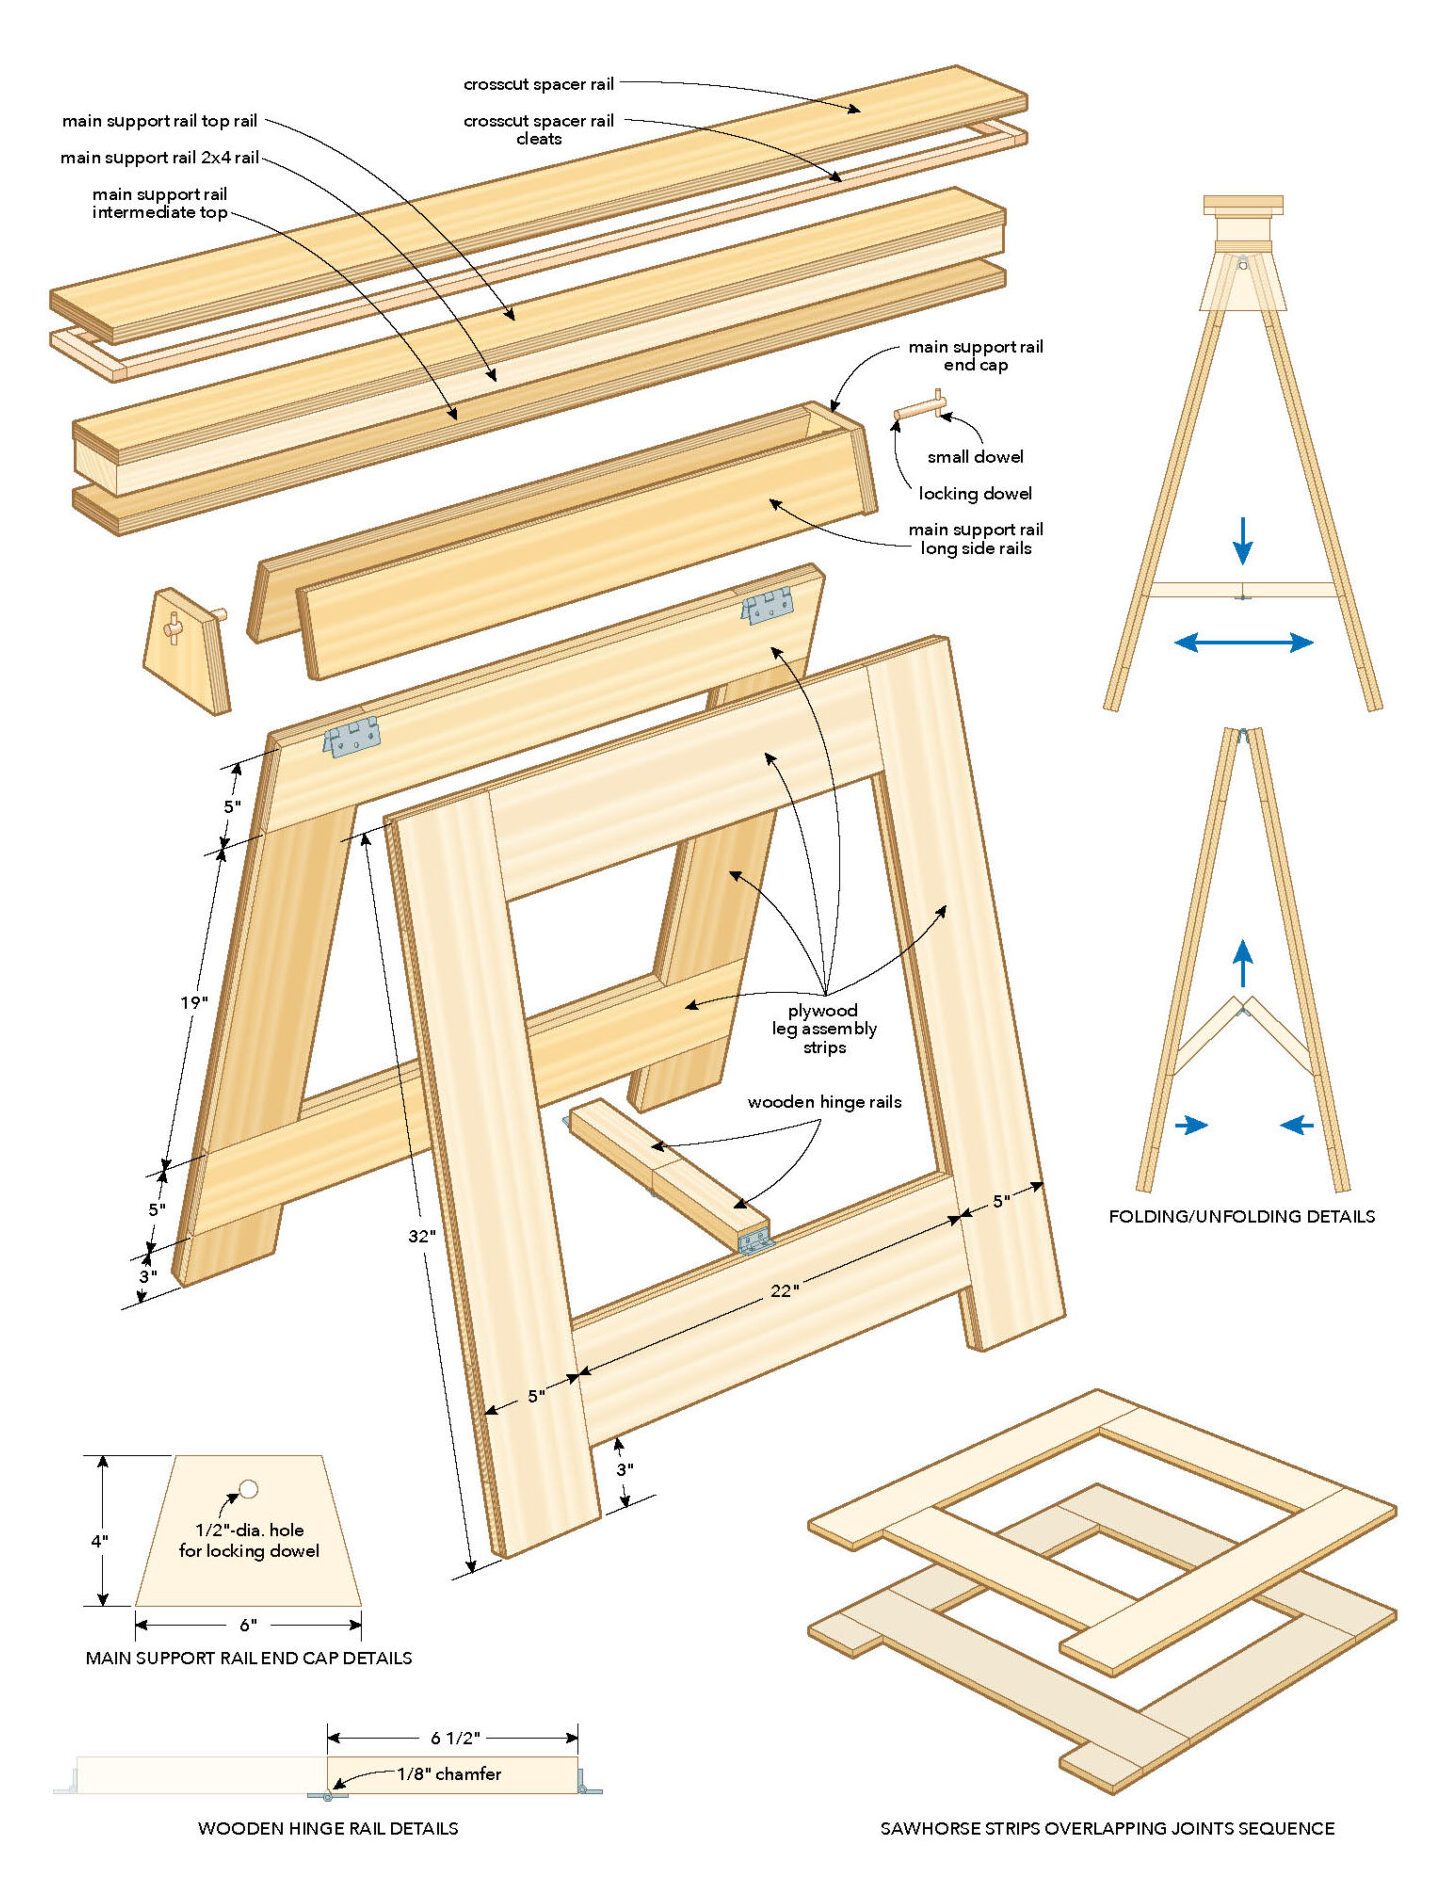
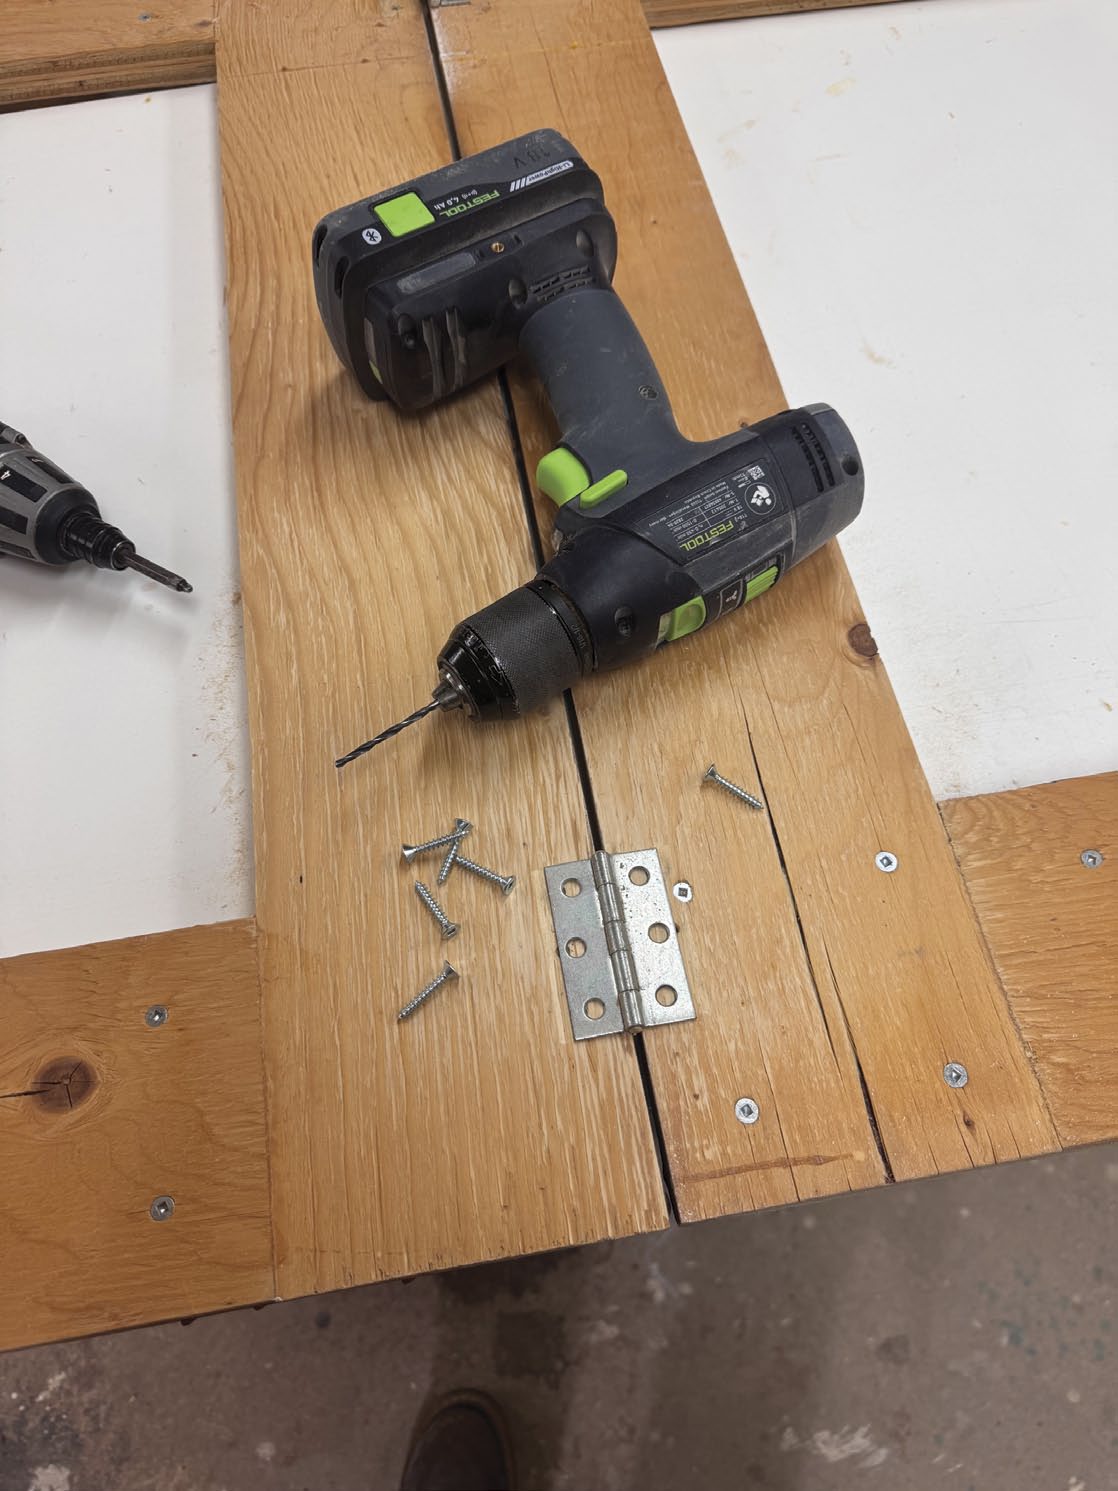
I ripped 10 strips of plywood at 5″ wide to make two sawhorses. The joints all overlap each other for strength. I started by crosscutting 16 pieces to 32″ long to give me eight verticals (legs, essentially) and eight horizontals (upper and lower cross rails). Next, I cut eight horizontal pieces 22″ long. These run between the vertical legs. Then I cut eight pieces 19″ long to give me the vertical pieces that run between the upper and lower cross rails. At this point, I only needed the eight 3″ long pieces that get fastened to the bottom sections of the vertical legs, but I waited until later to cut these to exact length.
Start square
I set up a pair of straightedges to assist with keeping the assemblies square while I glued, pinned and screwed everything together. I started by placing a 32″ long upper rail in the corner of the straightedges, then butted one 19″ long piece perpendicularly up to it. The faces of these pieces both rested on my assembly table. Next, I brought in a 32″ long vertical leg, applied a generous amount of glue to its face and positioned it on top of the other two pieces, overlapping the butt joint between the first two parts. A few 3/4″ long brad nails to keep the parts from moving around, followed by a series of 1″ long screws, and the first assembly was well underway.
Working somewhat quickly, I continued to bring other parts into place, pin them and screw them together. When the assembly was complete, I added a few clamps, along with a few cauls, to spread out the clamping pressure around the entire sawhorse.
As I turned the clamp handles, the glue squeezed out a bit as I had applied a generous amount of glue during assembly. Spruce plywood isn’t overly smooth, and I wanted to be sure not to starve the joint. I wiped some of it away, but didn’t worry too much about it. This relaxed approach is just one of the many joys of building shop projects.
To make my two sawhorses, I glued up four of these 1″ thick sub-assemblies.
Screws?
As I mentioned, I used a few screws here and there. The challenge was that these 1″ long screws often finished with their sharp tips protruding slightly through the other face of the assembly. Plywood is rarely a full 1/2″ thick and I often drive screwheads ever so slightly below the surface.
Shorter screws wouldn’t have added enough gripping power. As long as you clamped the entire assembly before it dried, you could easily rely just on the brad nails to temporarily hold the parts together, but it didn’t take me long to use my belt sander to remove the screw tips once the assemblies were all dry. Again, a bit rough, but these are workshop fixtures.
Bring them together
With the glue dry, ease any sharp edges. You could even hit the edges with a small chamfer or roundover router bit if you wanted to. I found heavily easing the lower ends of the legs, where the sawhorses come into contact with the ground, makes the legs less likely to chip or splinter as they get dragged across the shop floor in the future.
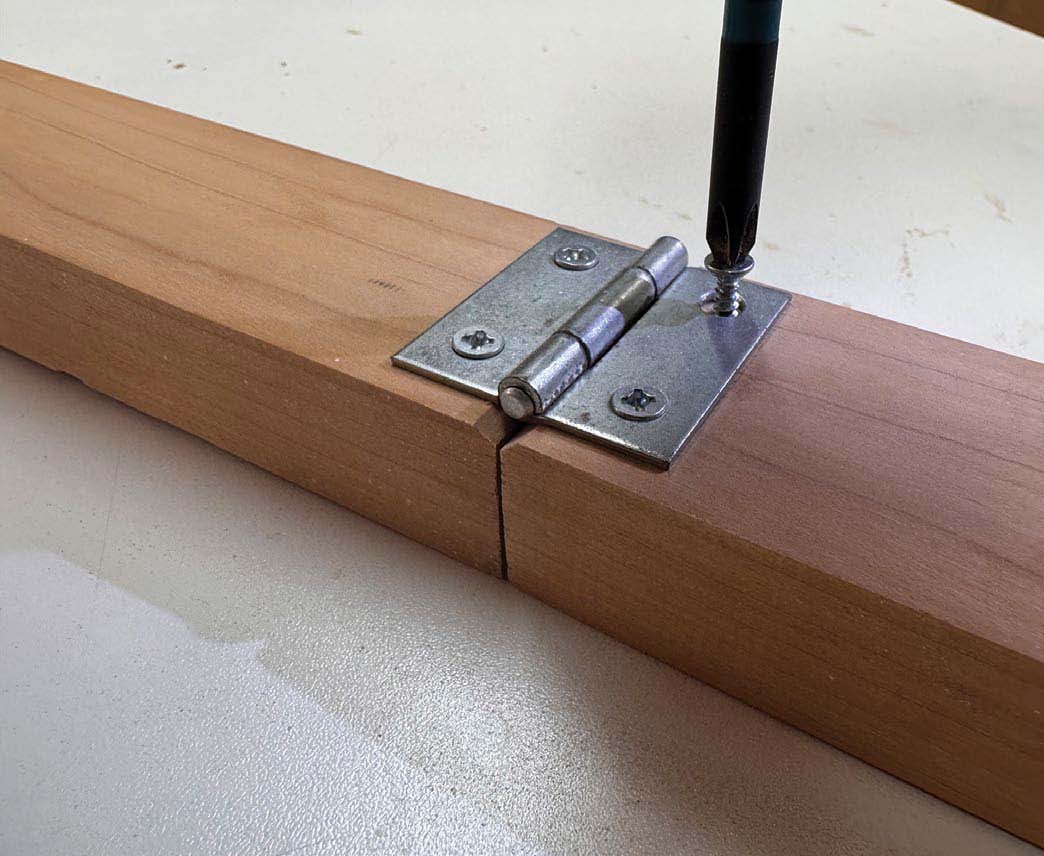
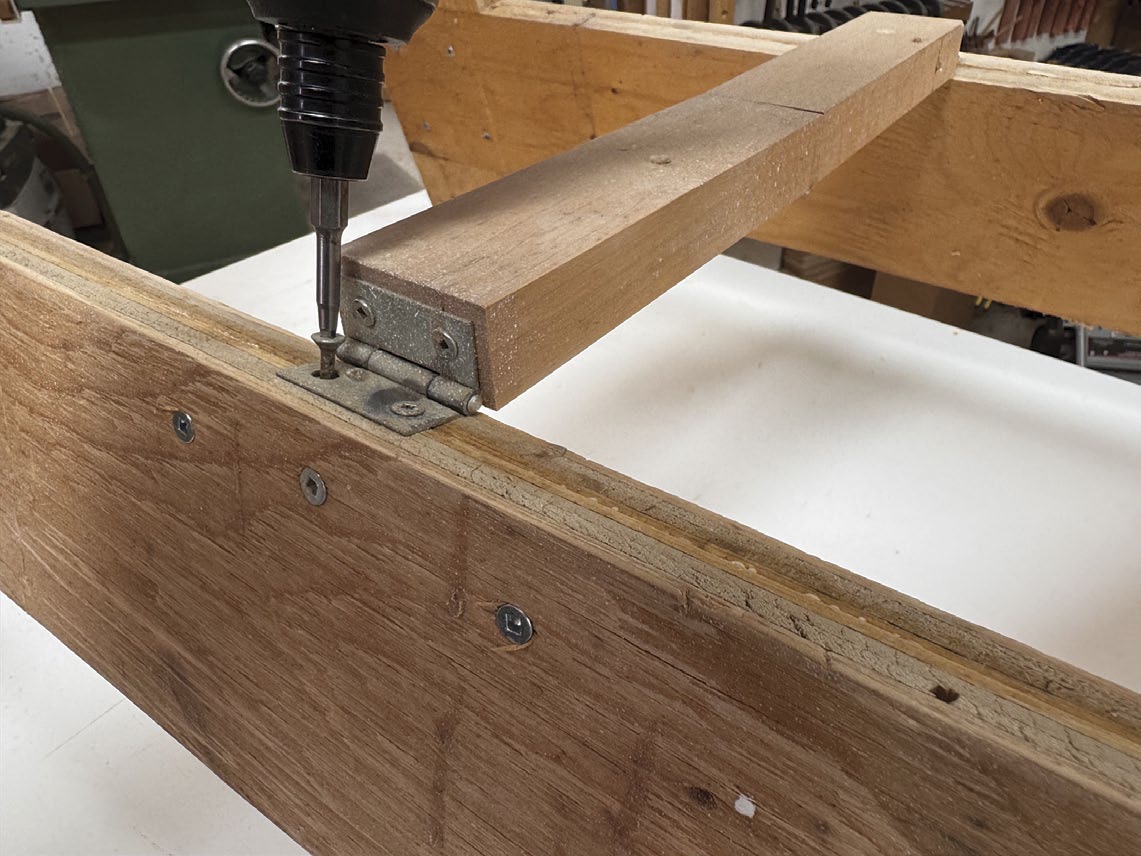
Position the upper edges of two sub-assemblies together, separated by about 3/16″ or the width of the knuckle. Open the metal hinges and centre them over the narrow gap, ensuring they’re facing the correct way. You’ll need the two sub-assemblies to be able to close completely, like the covers of a book, once the hinges are installed. Attach them with screws.
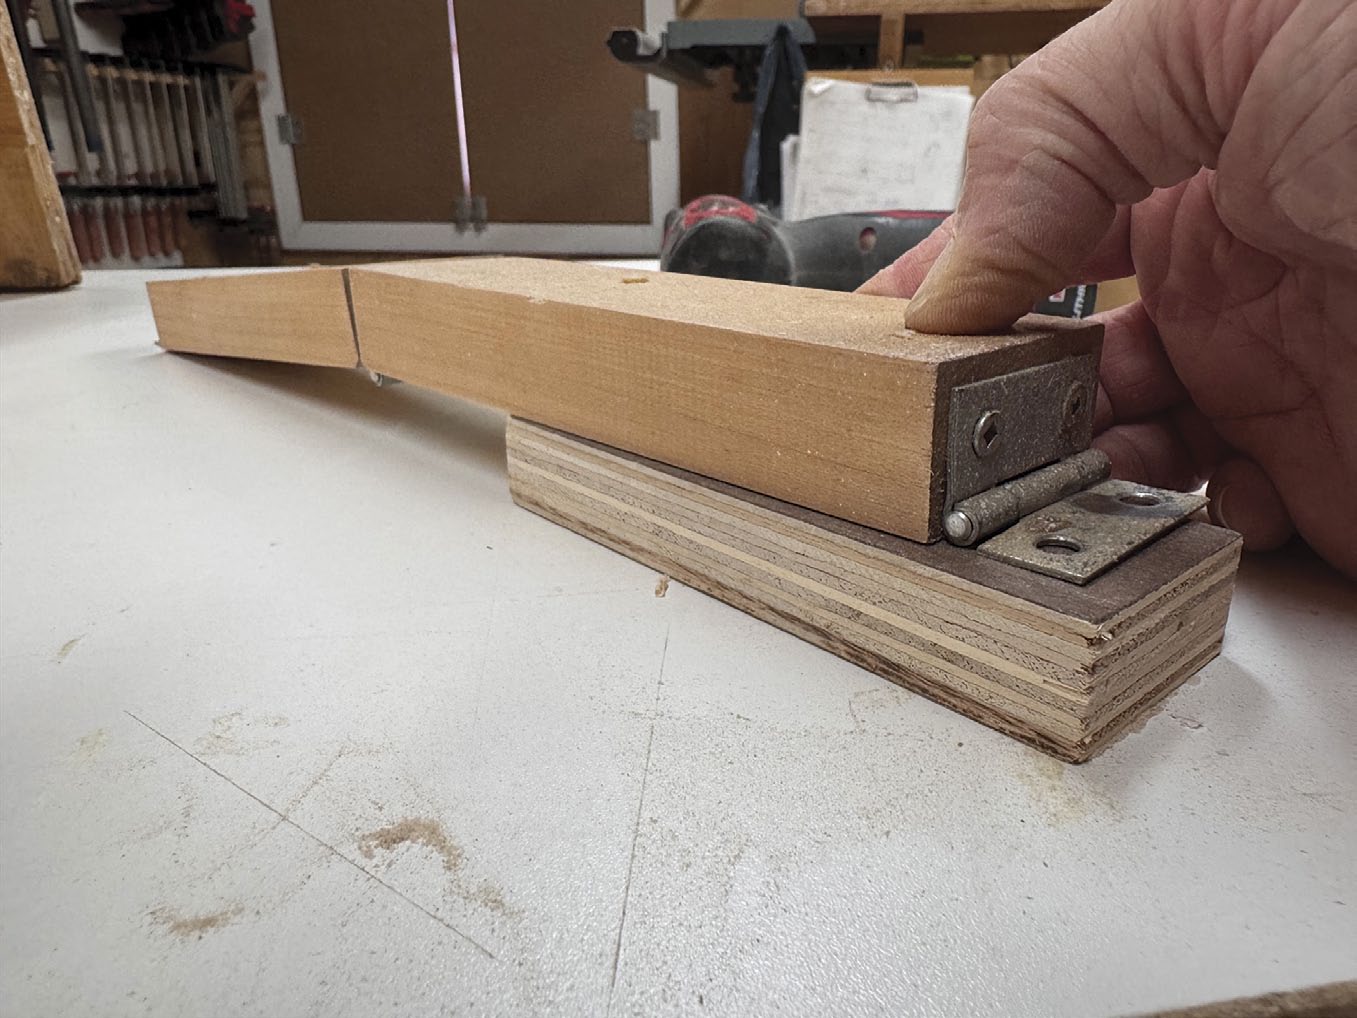
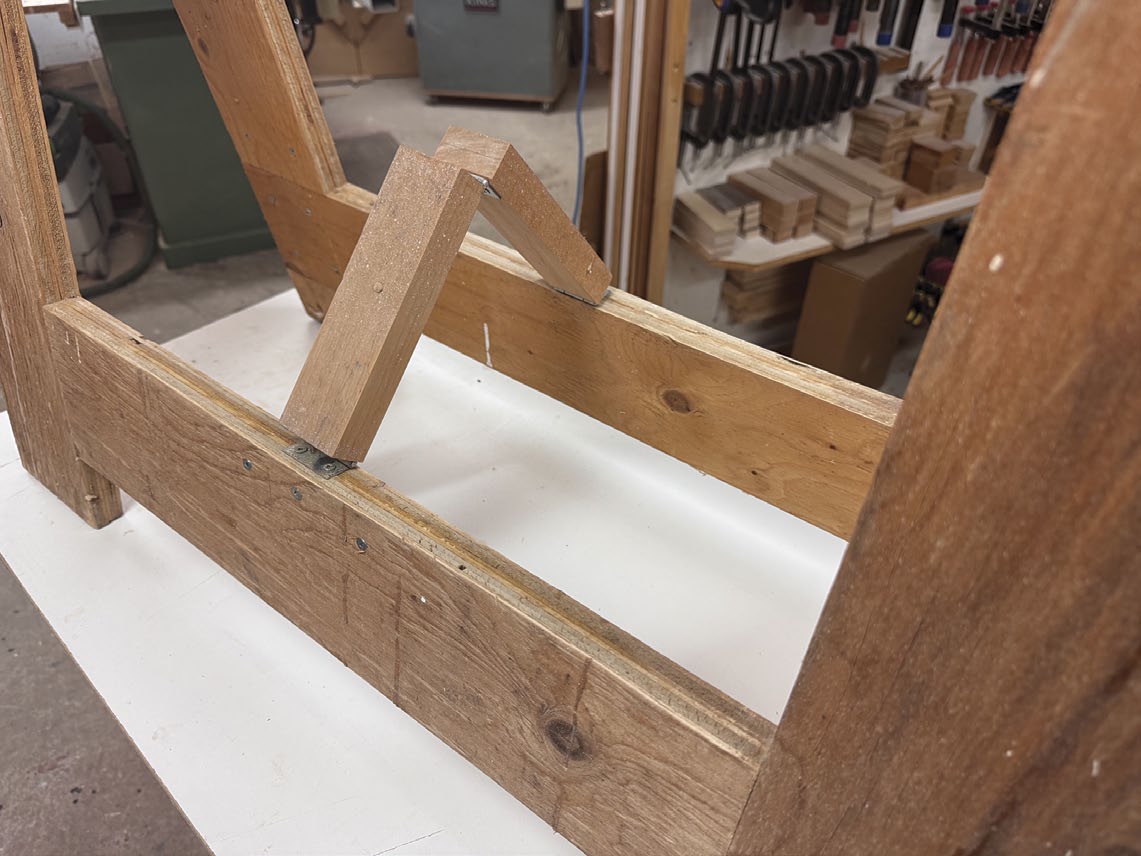
The wooden hinge
This hinge is designed so it easily drops into its open and locked position when you separate the two lower ends of each assembly. It’s also designed to hold the base of the assemblies open until you pull up on the centre of the hinge to release the tension. The lower two faces of each wooden hinge more or less rest together when each sawhorse is in its closed position. If the wooden hinges stop the mating sub-assemblies from fully closing, they’re positioned slightly incorrectly.
Start by milling up a blank of hardwood about 28″ long × 1-3/4″ wide. I made mine about 1″ thick, but even somewhere just over 3/4″ would work. Cut four pieces 6-1/2″ long from that blank. Butt two hinge sections end-for-end so there’s no gap between them, and install the smaller hinge across the joint, centred on the joint. Repeat for the other pair. Note you may have to slightly relieve the mating edge of both of the 6-1/2″ long wooden pieces to make room for the knuckle of the hinge in order for the hinge plates to sit flat on both wooden hinge pieces. A simple chamfer or roundover with a few passes from a block plane should work nicely.
To install the wooden hinge pairs on each sawhorse, first attach the hinges on either end. Rest one 6-1/2″ long hinge rail on a piece of scrap and fasten the hinge to the end of the hinge rail so the opposite leaf of the hinge is sitting flat on the piece of scrap. Repeat this for the other end, too. Next, butt the wooden hinge assembly up against the lower cross rails of one of the sawhorses, centred on its length. The lower / inner face of both the hinge rail and sawhorse sub-assembly should be in the same plane. If you made the hinge rails 1″ thick, both front and back faces of these parts will all be aligned. Mark where the hinge should be located, then open both assemblies and screw the hinges in place. It might be best to start with just one screw on each side, so you can close the sawhorse and make sure it opens and closes nicely, before installing the remaining screws. The hinge allows the sawhorse to open to about 30° and gives it a base width of about 19″, though these dimensions aren’t critical.
To finish, or not to finish?
At this stage, you can put the sawhorses to work; they’ll give you decades of quiet assistance around the shop. But if you made these out of nicer material than spruce plywood and wanted to add a few coats of finish to further refine the look of your new best friend I wouldn’t judge you harshly.
Accessorize
As-is, these sawhorses are strong and stable, not to mention able to be folded away so they virtually disappear when you don’t need them. But with a few custom-made accessories, you can turn these two workhorses into workshop stallions.
I made a support rail that fits on top of the sawhorses. I made only one, as that’s all I need, but if you’d prefer a support rail on top of both sawhorses at once to support full 4′ × 8′ sheets, or other large assemblies, go for it.
Main support rail
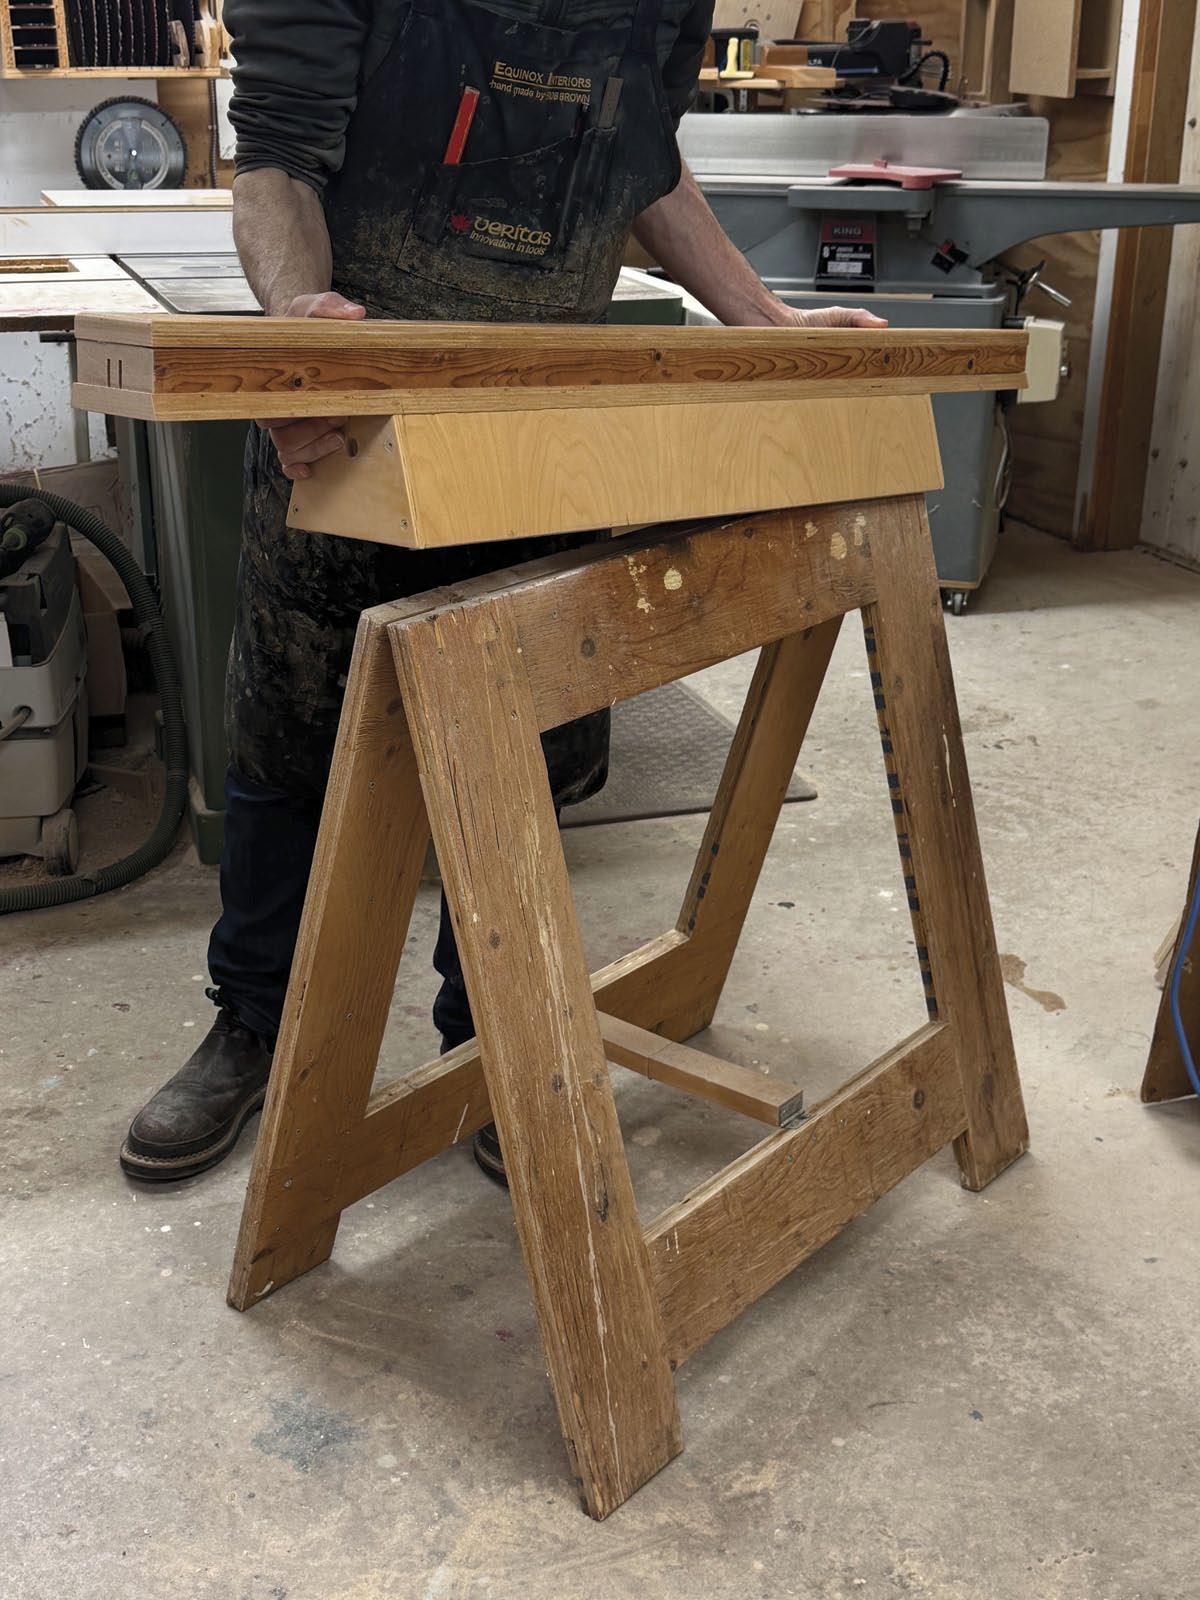
I found it easier to build the sawhorses so they were a few inches below the height of my table saw’s surface, then customize the thickness of this main support rail so its upper surface is about 1/8″ below my table saw’s surface. This surface will give me plenty of support when ripping full sheets, if I ever need it. Only one of these support rails are likely needed.
While there’s nothing wrong with making two main support rails, I only needed one.
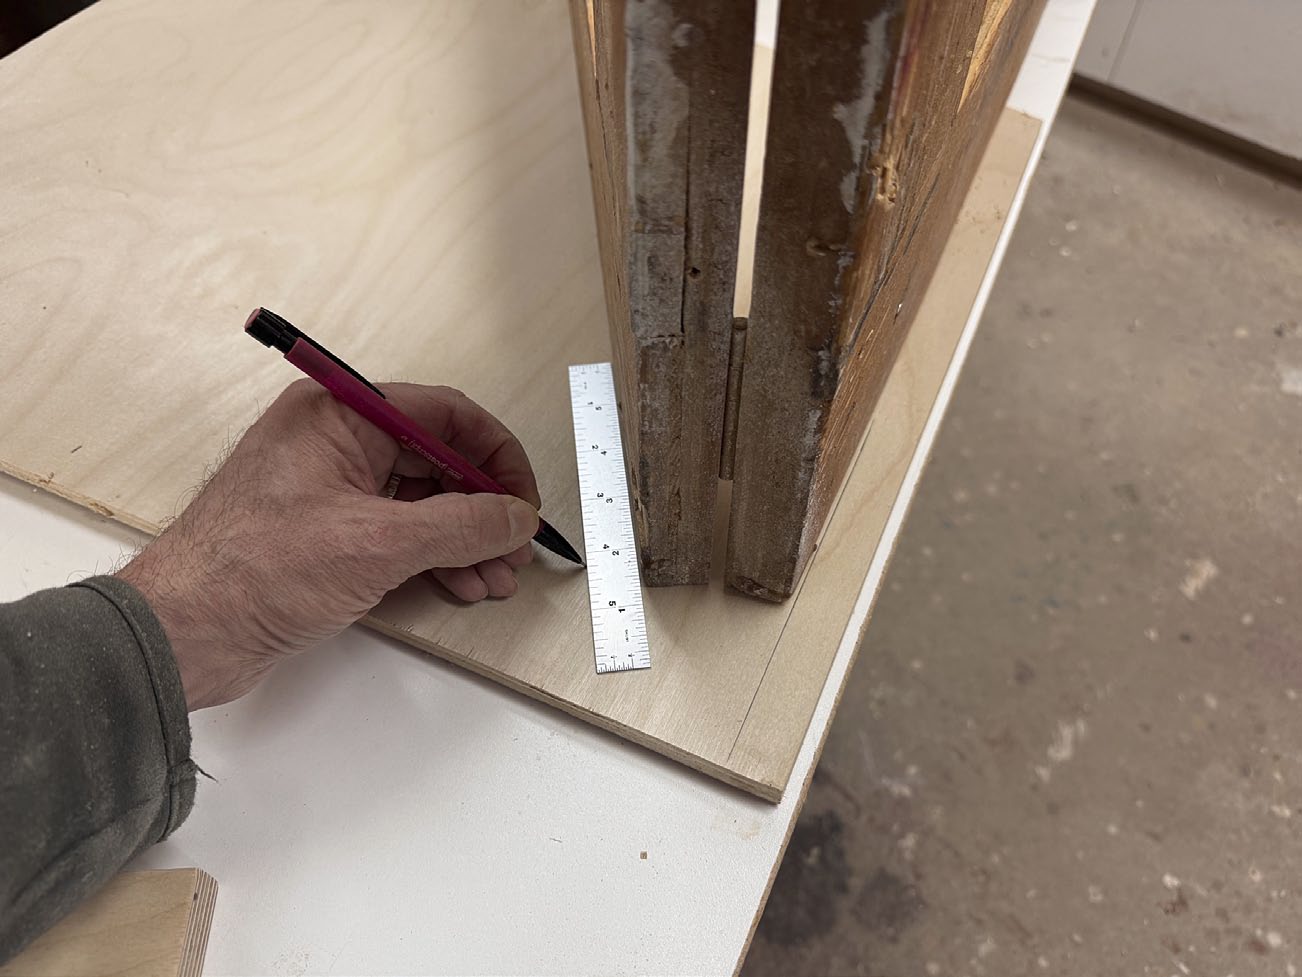
When machining the parts for the main support rail, the most important thing is that they fit your sawhorse, so you might have to adjust the dimensions a bit. To check the sizing, place a piece of 1/2″ plywood on your workbench and position a completed sawhorse on top of the plywood, resting on its side. Mark a line on the plywood 3/4″ in from one of its straight edges and align the sawhorse up with that. The 3/4″ will account for the long side rail that the 1/2″ plywood end caps are joined to. From there, mark the angle of your sawhorse, as well as how wide and long the end cap needs to be. Trim that piece on the bandsaw and then make three more just like it.
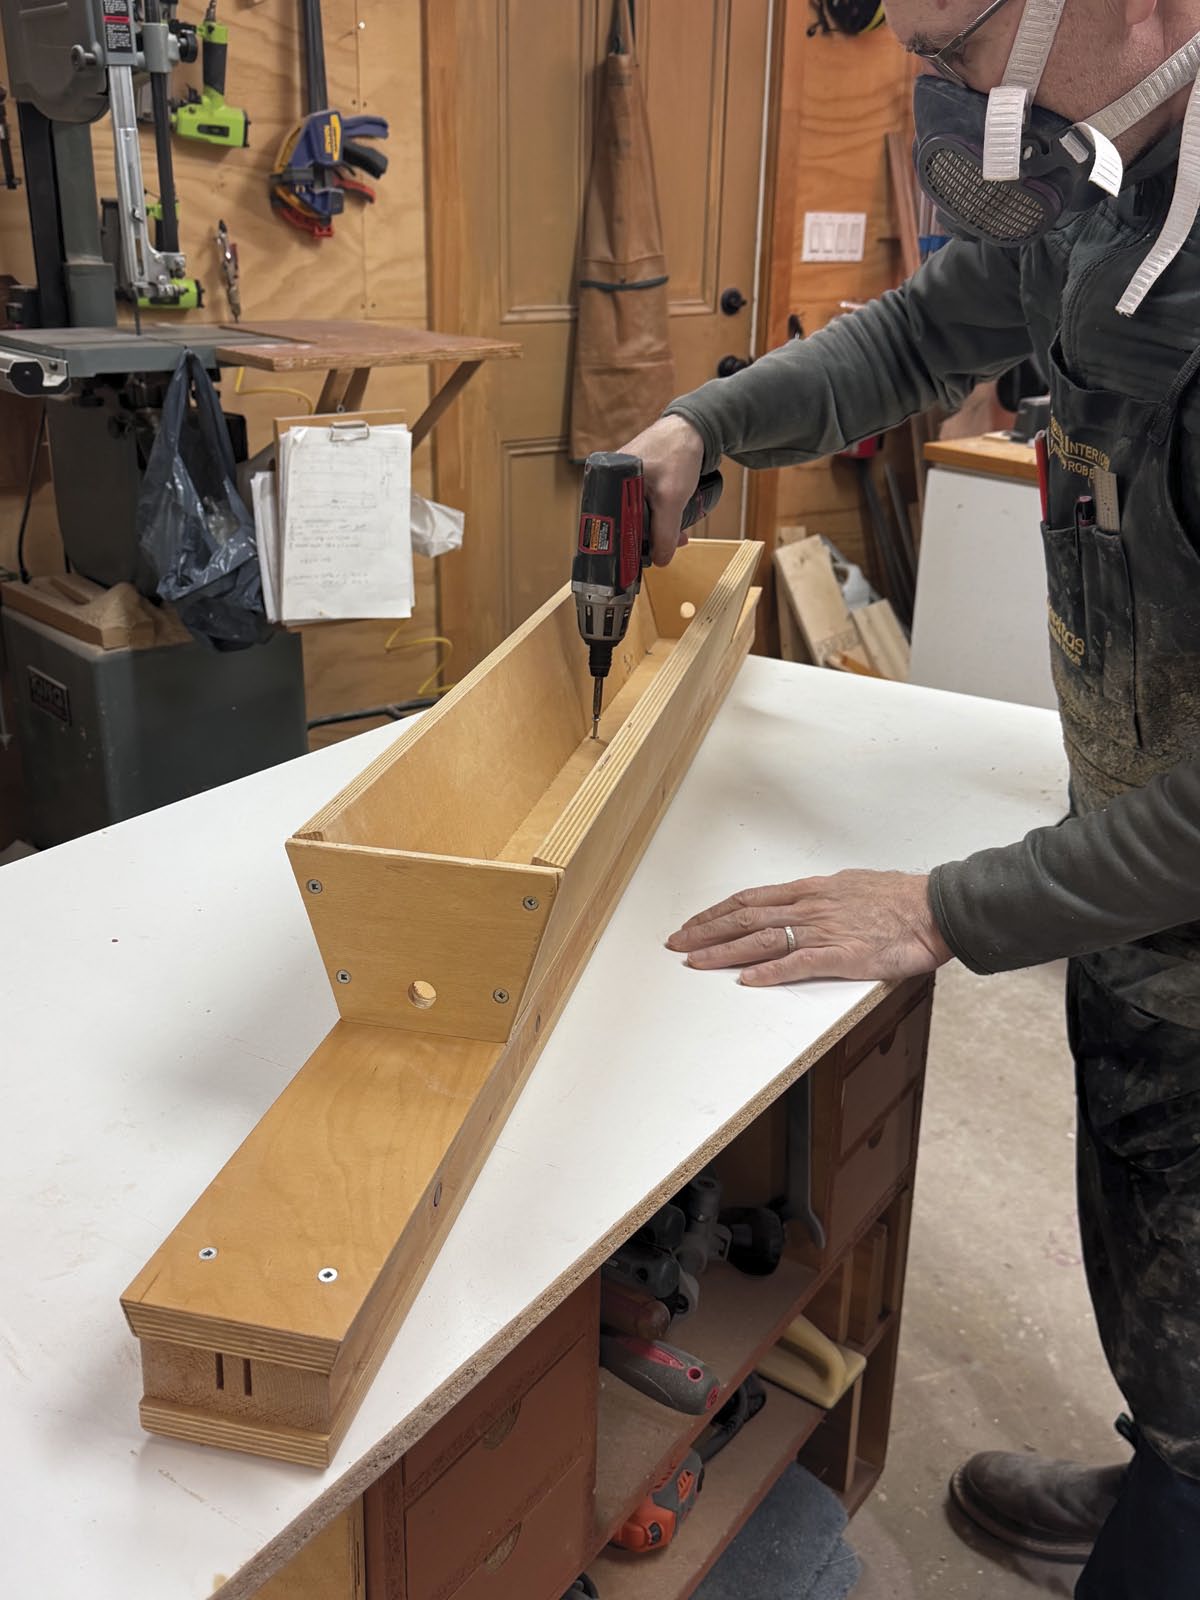
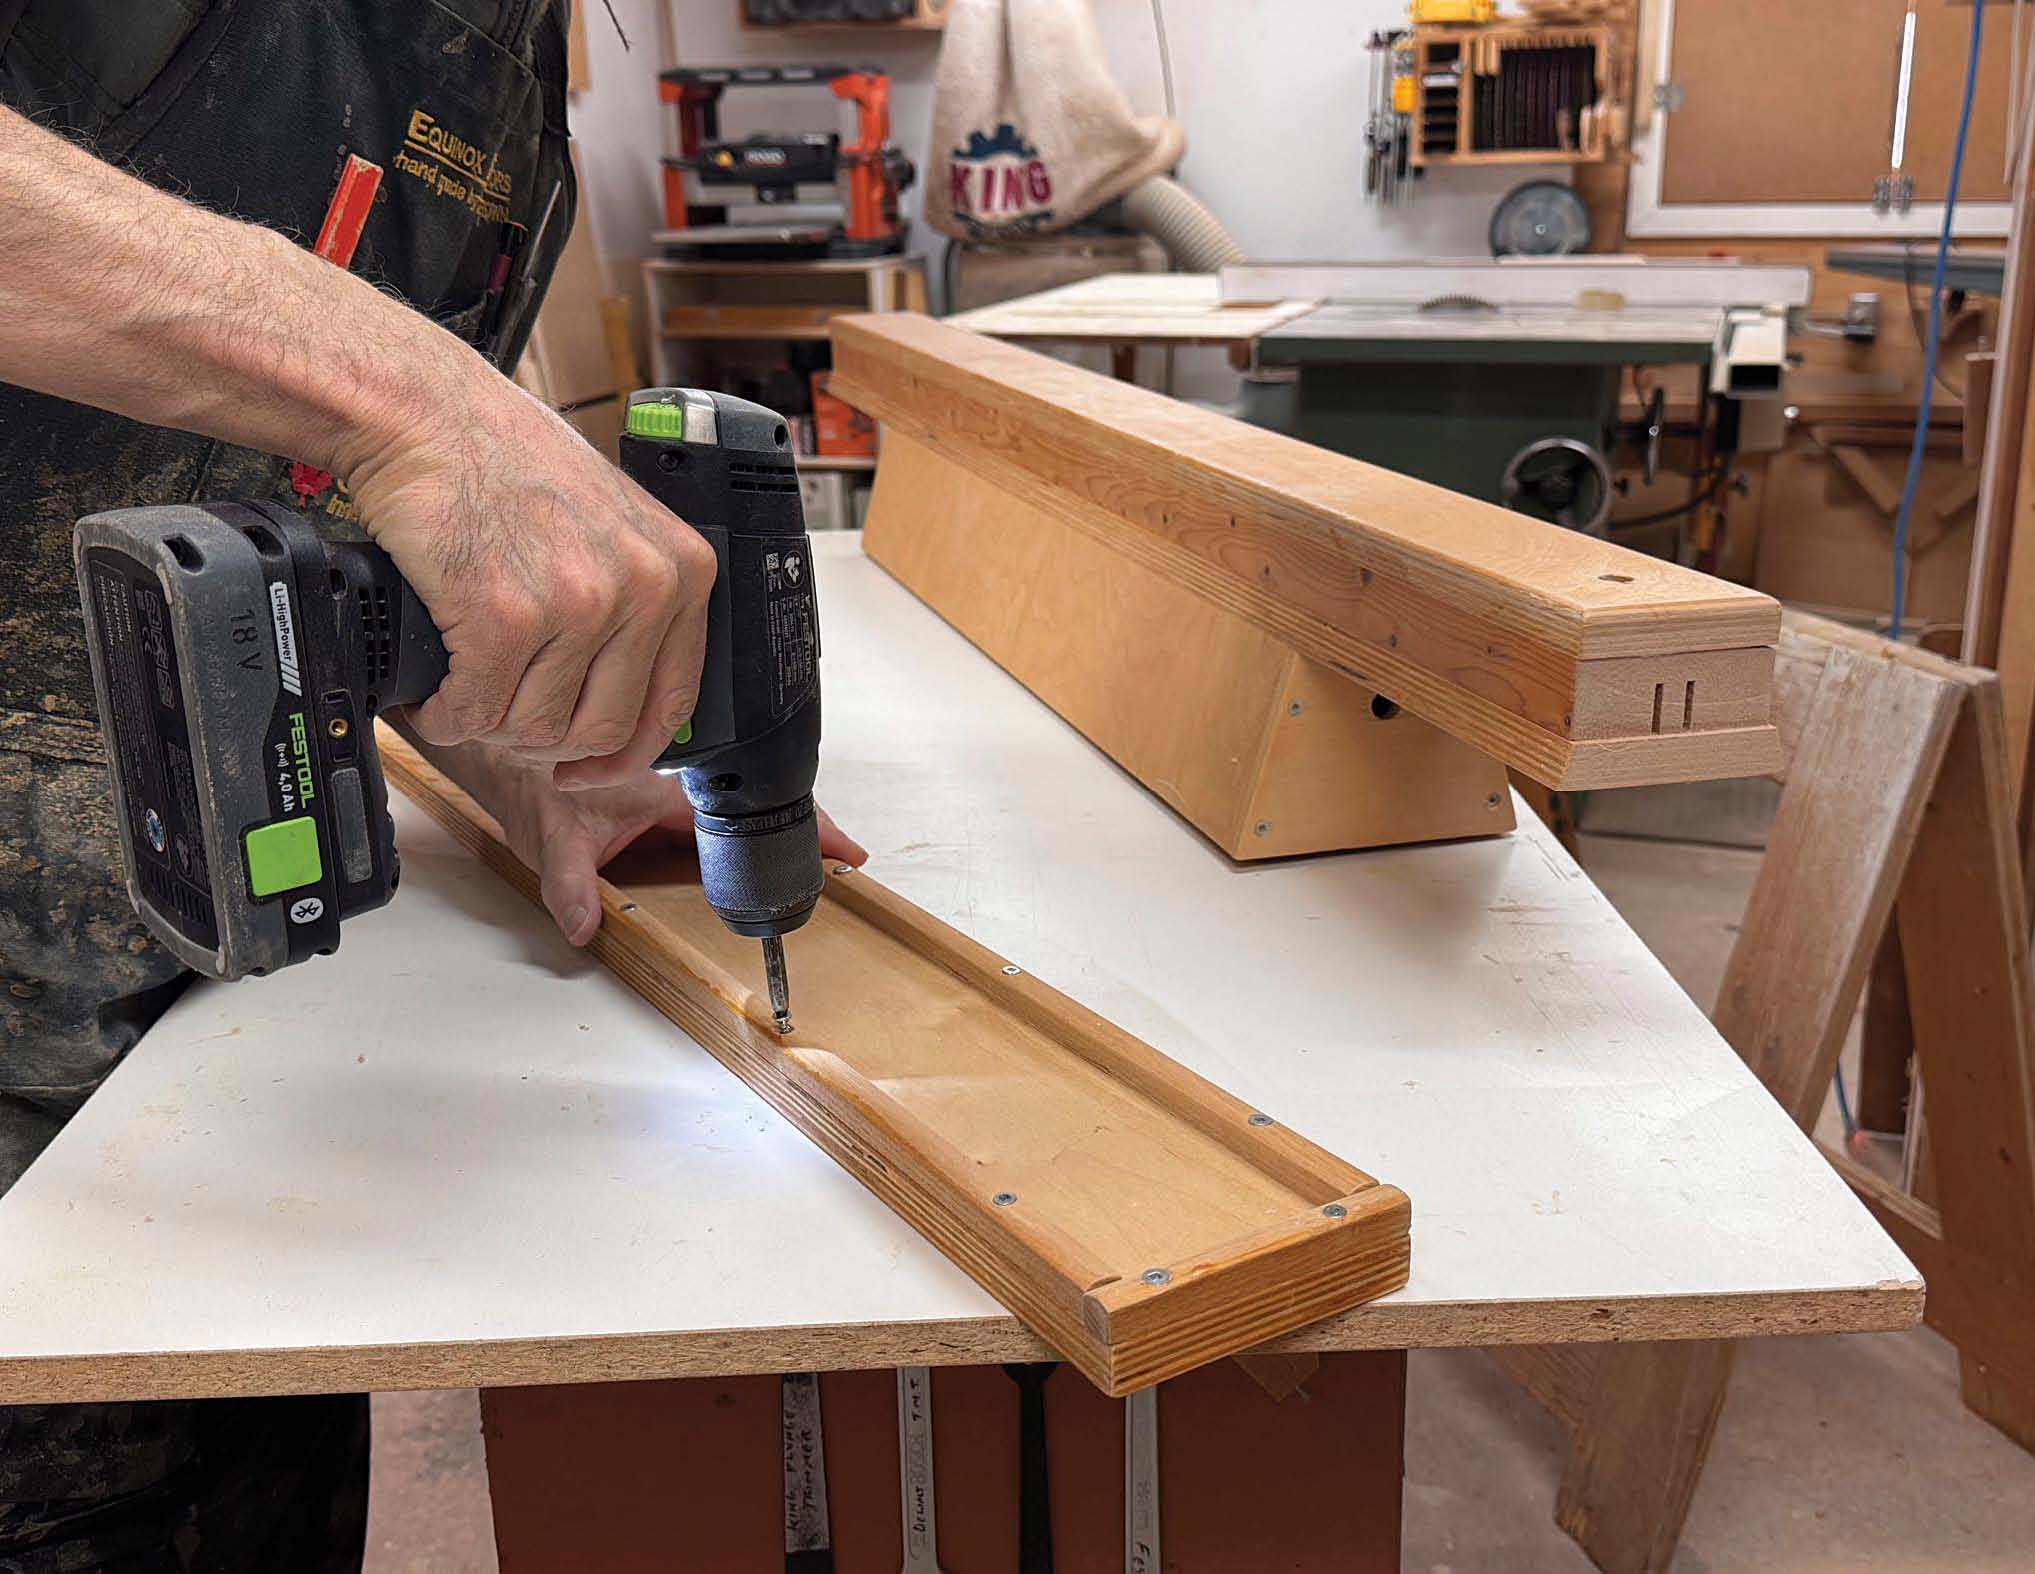
Attach one long side rail between two end caps, add the intermediate top, then place the sub-assembly on top of a sawhorse and attach the other long side rail. Doing so while it’s on the sawhorse ensures the main support rail will fit nicely on the sawhorse when it’s all together.
This is where a bit of math is needed. Once the main support rail is on the sawhorse, it needs to be just below the height of my table saw, so work can be fed directly onto it. Set the sub-assembly on the sawhorse, bring it up beside the table saw and measure the difference. You have to add enough material to bring the upper surface of the main support rail to the right height. For me, I added a piece of 3/4″ plywood on the very top, so the surface was as smooth as possible, and dressed a 2 × 4 to thickness to make up the rest of the difference. I screwed through the 2 × 4 rail, up into the top rail, then fastened that sub-assembly to the rest with a few screws driven up through the intermediate rail. That way no screws were visible on the top of the main support rail.
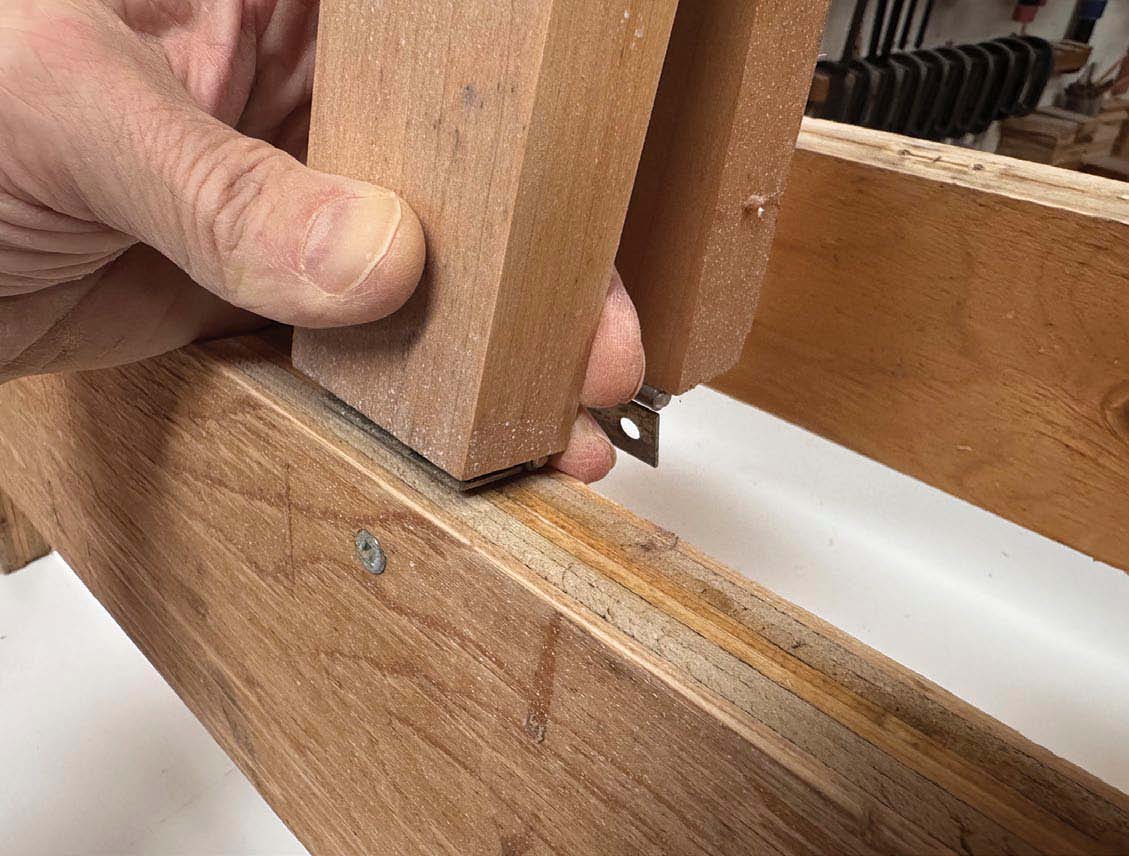
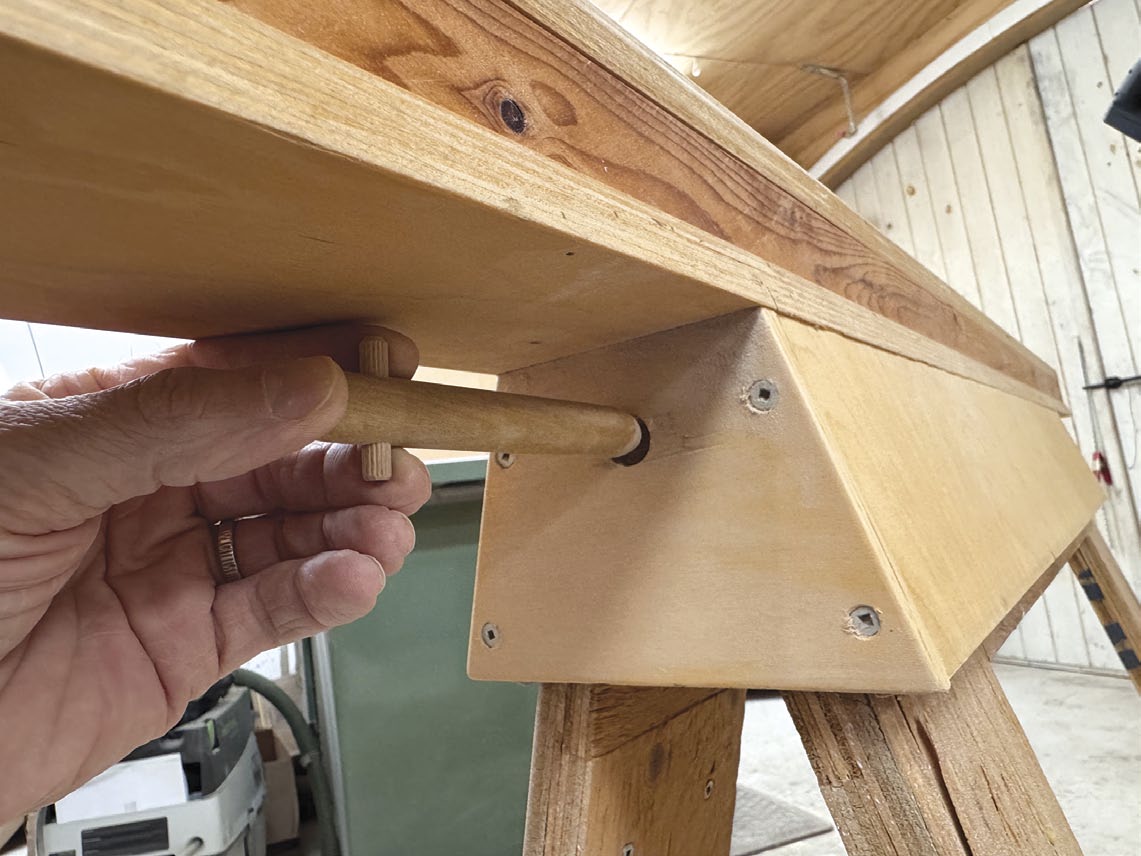
The final touch is a locking dowel that stops the main support rail from tilting up if a lot of weight is applied to one end. Any diameter dowel around 1/2″ will work. Mark it for length, clamp it in a vice, then drill a hole in it so you can add a smaller dowel across its diameter. This smaller dowel is so the main dowel won’t fall completely through a hole that gets drilled in the support rail. Flip the main support rail upside down on your workbench, then rotate your sawhorse upside down and place it in the main support rail. Drill a single hole through both of the end caps. This hole should be the same size as your dowel and as high up into the “V” of the sawhorse as possible. Once the sawhorse is right side up and the dowel is inserted into the hole, it will keep the main support rail in place.
The upper surface of the support rail is then finished with at least three coats of a durable finish, mainly to create a nice smooth surface for workpieces to slide across. I chose an oil-based polyurethane.
Top it off with a crosscut spacer rail
As of now, this approach gives me a support surface the same height as my table saw’s top. I quickly realized that when I’m using my crosscut sled, which has a 3/4″ thick base, my support was 3/4″ too low. I made a fairly simple accessory that fits on top of the main support rail and brings the overall height up equal to my crosscut sled.
A piece of plywood, sized about 1-1/2″ longer and wider than the top surface of the support rail, is where I started. Cleats measuring 3/4″ wide were installed flush with the outer edge of this surface, carefully located so the rail sits nicely on top of the main support rail when it’s done. Again, I finished it with three coats of oil-based polyurethane. A hole in both the main support rail, as well as the 3/4″ spacer, allows both of these accessories to be hung on the wall, ready for action.
Over the years these sawhorses and accessories have gotten me out of many jams. Working alone in a shop is a lot of fun, but there are times now and then when I wished I had a second pair of hands. These sawhorses don’t take care of all those times, but certainly many.
Photos by Rob Brown
Bring Them Together
Once the sub-assemblies are built, lay them on their outer faces, with their upper edges about 3/16" apart, and attach the hinges.
Joined in the Middle
Join a pair of wooden hinge rails in the centre. Note the small chamfer that allows the hinge to sit flush on the rails. Also notice how the ends of the two rails butt up against one another when installing the hinge.
Install the End Hinges
It’s easiest to install the end hinges next. Use a piece of scrap to allow each part of the wooden hinge to sit flush on another surface, then fasten the hinge to the end of each rail so the other leaf of the hinge rests flat on the piece of scrap.
Careful Location
With the rear face of the hinge rail in the same plane as the rear face of the sawhorse sub-assembly, locate where the hinge should be attached.
Secure the Wooden Hinge
With both the wooden hinge and the sawhorse open, install the last few screws to fix the wooden hinge in place. Make sure to predrill so you don’t split the plywood.
Easy to Open and Close
Here, the wooden hinge is shown partially open. By lightly pressing the centre of the hinge downward, the hinge is locked in its open position. Gently lifting up the centre of the hinge releases the tension and allows the sawhorse to fold into its closed position for storage.
End Cap Layout
By placing the open sawhorse directly on top of a piece of 1/2" plywood, you can easily lay out the size and shape of the end cap. The 3/4" wide gaps will account for the space the long side rails will take up.
Finally Secured
With all the parts of the main support rail complete, Brown screws them together.
A Nice Fit
The main support rail should easily fit onto the open sawhorse. If there’s a bit too much friction, sand the sawhorse edges or faces until the fit is right.
Dowels to the Rescue
A dowel in either end of the main support rail that protrudes into the “V” the two sawhorse halves create will ensure the main support rail stays in place.
A Snug Fit
When Brown built the crosscut spacer rail, he made it a friction fit. Once it’s on top of the main support rail it provides support when crosscutting long workpieces.
Helping Hand
All the parts working in tandem allow Brown the flexibility to take care of many cuts and operations that would otherwise need another set of hands.
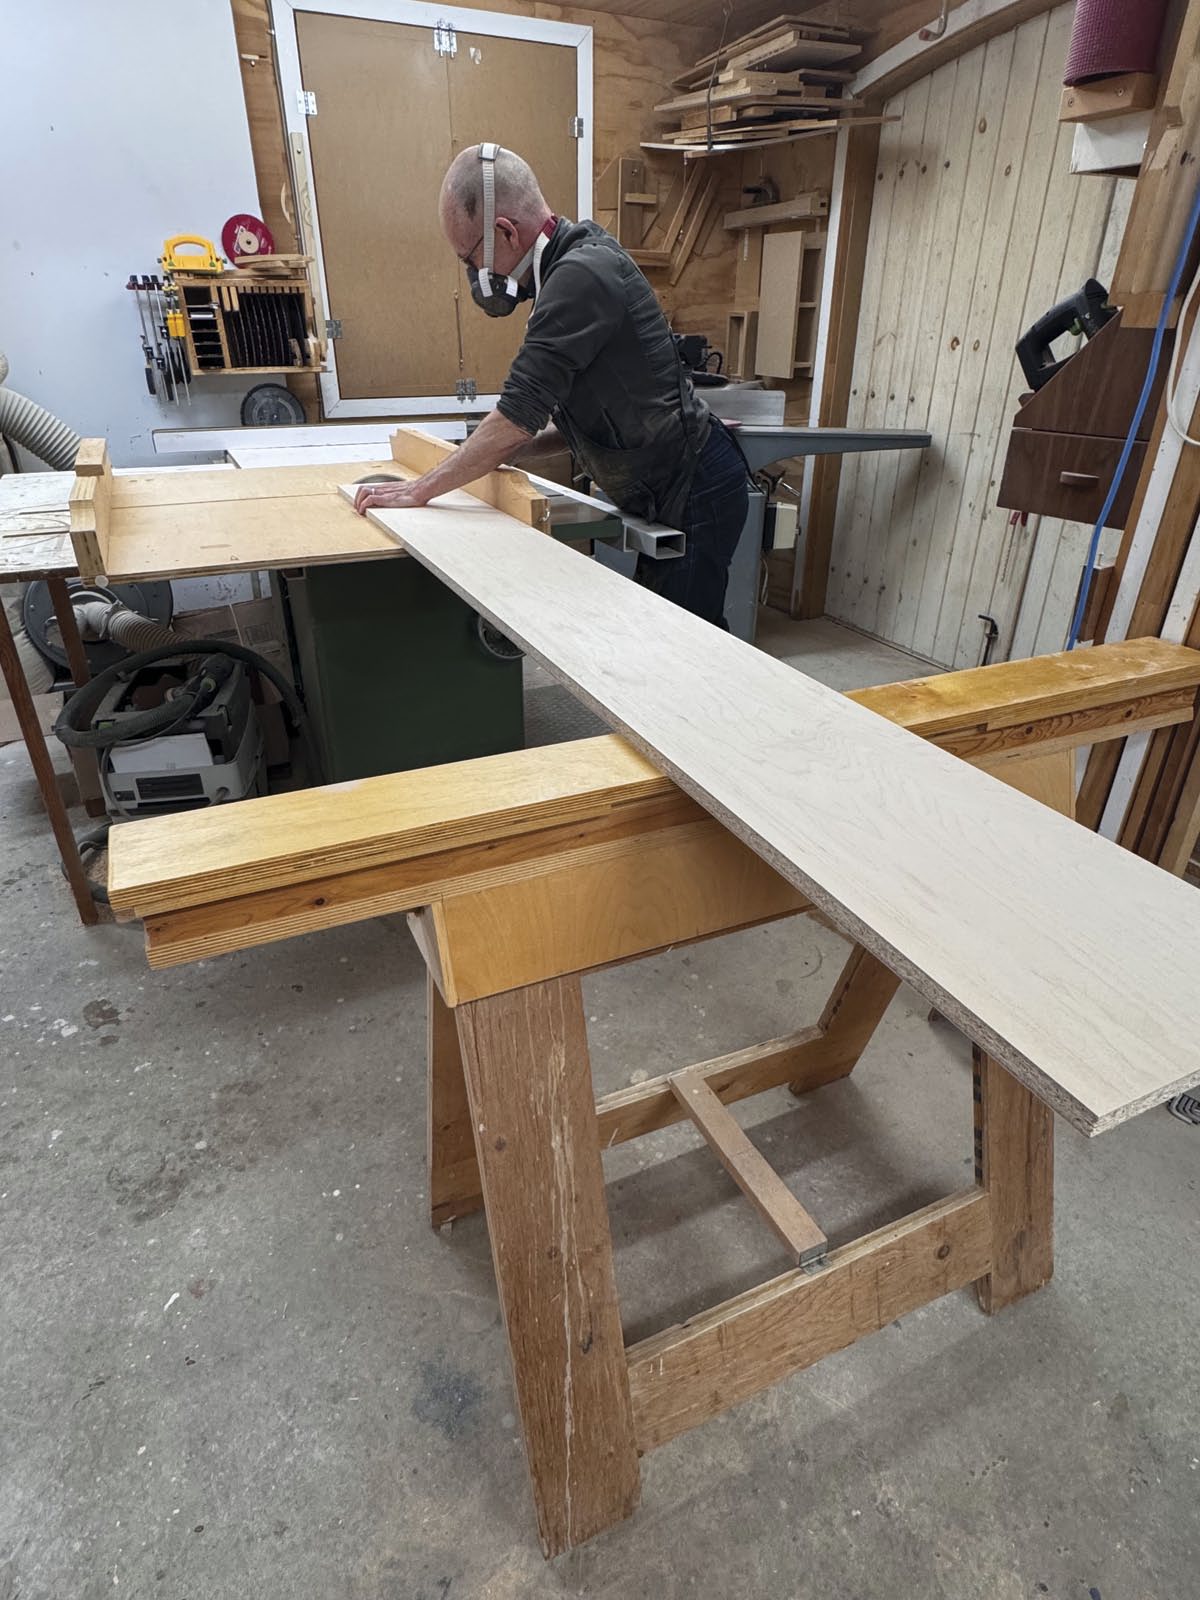
Illustration by Len Churchill