PROJECT
The humble hammer

Steve Der-Garabedian

Find more Tool projects projects
This ancient tool is just as crucial to have in your workshop as it ever was. Though there are many options when building a hammer, here’s one with a brass head and nicely shaped wood handle.
Just over 2.5 million years ago our very ancient ancestors used a rock to break bones and shape rocks and wood. Later, around 30,000 BC, man started attaching appropriately shaped stones to sticks, closer resembling the modern version of this humble tool. Archeologists must have used a specialized hammer to dig evidence of these up. It can be argued that it is one of the most used tools by a woodworker.
The humble hammer
Symbolism
Hammers have been used as symbols over the years. The hammer and sickle emblazoned the red flag of the former Soviet Union and still continues to represent Communist parties and movements today. When the symbol was conceived, the hammer stood for labourers and the sickle for the peasantry. Blacksmiths used a hammer in their shop logos. The tradition continues to this day. If you want justice, you need not look further than a judge’s gavel. The Norse mythological deity Thor used an enchanted version called Mjolnir.
Variations abound
Hammers have evolved to meet the requirements of the individual labourers. Woodworkers and carpenters have their framing and claw versions. Geologists have a modified pick at one end. The mighty sledgehammer is more a construction tool, or more than likely a deconstruction implement. Jewellers have smaller versions to work with gold and silver, which can also work well for woodworkers.
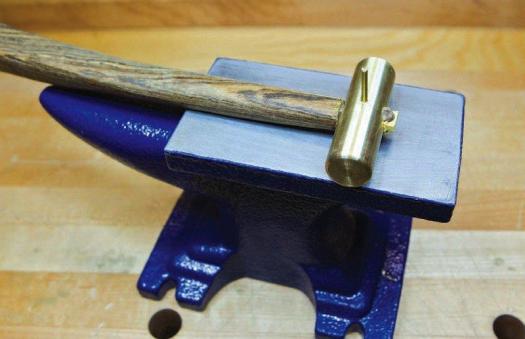
I stood in my shop one morning and realized I have a hammer obsession. While I’ve used the side of my hand balled up in a fist to press fit some joinery (it is the best non-marring type of hammer that I have), my collection of hammers seems to be getting larger and larger with each antique show or tool exhibit I visit. Over the years I’ve made quite a few using a small piece of brass rod and some short lengths of wood left over from other projects.
Build your own
This hammer isn’t for framing a house or installing a deck. It’s for much smaller, delicate jobs like adjusting the blade of a wooden plane, or other light tasks.
A trip to your local metal supplier will yield a length of 3/4″ diameter brass rod. A 12″ length, enough to make a few, costs approximately $12. The local hobby shop will have 12″ lengths of 1/8″ brass rods that can be used to pin the heads to the handle for $2.
While various steels are hard to work, brass is soft and can be cut, shaped and drilled with tools that woodworkers already have. From the length of brass cut a piece that is 2-1/2″ long. A hacksaw with a metal cutting blade will make quick work of this. Using a belt sander and a fence set up for 90°, true both ends of the freshly cut piece. In order to ensure that the head doesn’t mar your work, chamfer the ends by raising the rod and holding it at a slight angle while rotating it against the sanding belt. Another method is to do this work on a lathe. While our high-speed steel lathe tools will tackle brass, care must be taken to ensure light and shallow cuts. However, a file will also do the work on the rod while it is mounted in the lathe. To do this, ensure the piece is mounted securely and centered, then gently file the ends while the rod is spinning. The lighter the cut, the less chattering, and the cleaner your work will be. The added advantage of this method is that it can be polished with fine sandpaper while spinning.
While the above methods use a power sander and lathe, brass can easily be worked with a file and hand-sanding.
Drilling Jig
Next comes the bore for mounting the handle and a small shop-made jig will make sure that it’s centered across both the width and length. Mill a piece of maple to 12″ long x 2-1/4″ wide by 1-3/4″ high. Draw a center line across the faces and then cross-hairs on the center of the width and height of the piece. On the 1-3/4″ face drill a 3/4″ hole completely through the jig. Now place your brass rod in the jig ensuring that an equal amount sticks out from both sides. If you sanded your brass head a little too much and it’s loose in the jig, wrap a layer or two of masking tape until the fit is snug. Starting with a 3/8″ brad point bit, drill into the jig no more than 3/8″ deep, stopping before you reach the brass head. Switch to a 3/8″ twist bit and finish boring through the brass. Starting with the brad point bit ensures the hole is exactly centered on the brass head. You only need to drill through the brass, not completely through the jig. It is important to use clamps while drilling the brass head, as the bit could grab and spin the whole assembly.
Make a handle
I’ve never liked round handles on my hammers. I’ve almost always replaced the factory handles with hand-shaped versions that are more comfortable to hold and have a slight curve to them. Handles can be fashioned from any hardwoods, and in this case some left-over bocote fit the bill. Ash, maple, walnut and most other dense hardwoods will work fine. Rough-cut the piece for the handle on a bandsaw and, if you like, introduce a bit of a curve into the shape. Switch to a spoke-shave then a rasp and file, and finish refining the shape and texture. Of course, if a rounded handle is preferred, it can be made using the lathe. The tip of the handle needs to be reduced to a round 3/8″ diameter tenon to fit in the brass head. Do this using a knife, chisel and file. This thinner portion of the handle is approximately 1″ long. I like to see the tenon protrude beyond the brass head.
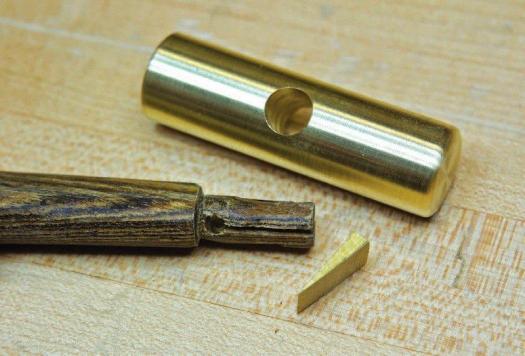
Secure the head
Even small taps of the hammer can cause the head to fall off or rotate around the handle. To make sure this doesn’t happen we can use a double method of securing the two pieces together. First drill a 1/8″ hole 3/4 of the way down the tip of the handle that fits into the brass head. Next, using either a bandsaw or handsaw, cut down to the hole. The hole will stop the split from travelling further down the handle. Mount the brass head to your handle and align the split along the length of the head. Make yourself a small wedge out of some contrasting wood and with a drop of glue tap it home.
While this will stop the head from coming off the handle, the 1/8″ brass rod will ensure it doesn’t spin about the handle. Drill a 1/8″ hole through your assembly and use a length slightly longer than the width of the brass head. The extra length will let you meld the rod into the head.
Clean up the protruding part of the handle by either rounding it off or cutting it flush. Inevitably you will have some scratches on your brass head, which can be cleaned up with some fine sandpaper.
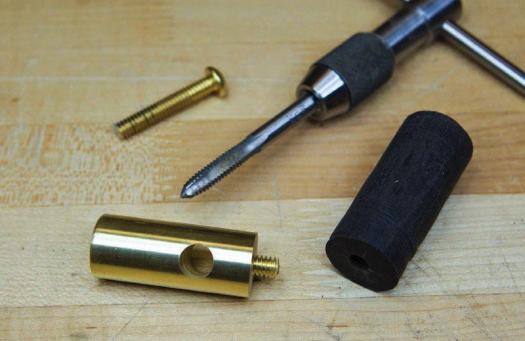
Wooden button
Another option for the head of your brass hammer is to face it with a small wooden button. Some metal working tools are needed for this version. Proceed as before in making your hammer, but leave one face flat without any chamfering. Center-punch a starting point and using the correct drill bit for a 1/4″-20 tap drill into the brass face to a depth of approximately 1/2″. Stop short of the bore used to mount the handle. Use a 1/4″-20 tap and proceed to put threads into your hammer’s face. Screw in a 1/4″ brass bolt then cut the head off leaving approximately 3/8″ protruding. Turn yourself a hardwood dowel, slightly bigger than 3/4″ diameter and tap the end of this piece. The larger diameter will let you flush the button to the brass, even if you have drilled and tapped slightly off center. Wood takes well to threading, but be careful not to tap so deep as to ruin the threads by bottoming out. The same goes for tapping into brass. Taps do come in sets complete with starter, middle and bottoming bits. To strengthen the wooden threads add a few drops of cyanoacrylate glue and thread your wooden button on. Using the lathe or hand tools bring the two diameters together being careful when approaching the brass head. Make and attach your handle as before.
No matter what version you make, it won’t take long before you’re reaching for your newly made hammer and tapping into a bit of hammer history yourself.
Photos by Steven Der-Garabedian
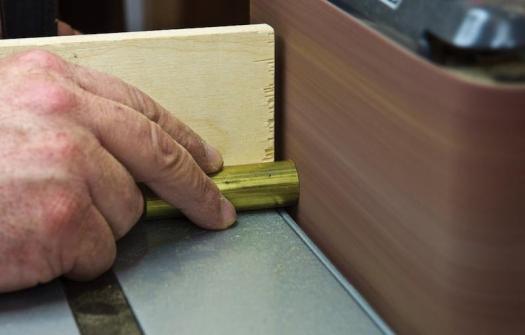
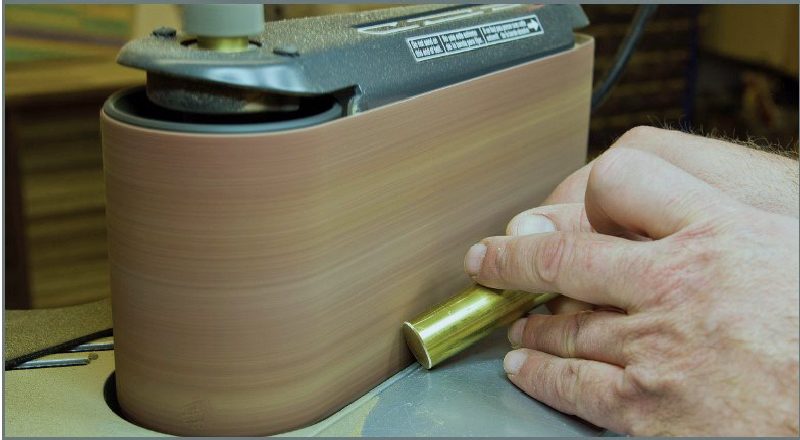
Smooth Two Ends
Using a block set at a right angle to the sanding belt, Der-Garabedian sands the ends of the brass stock smooth.
Small Chamfer
Adding a small chamfer to the brass head will reduce the chance of marring a surface when the hammer is being used.
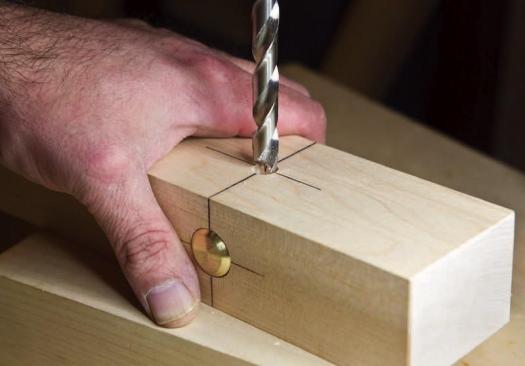
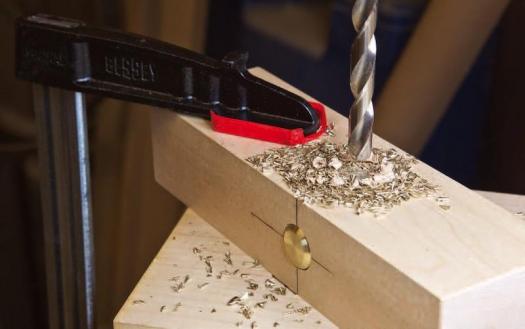
Drilling Jig
Once he has the brass head positioned in a simple jig, Der-Garabedian starts the 3/8" diameter hole with a brad point bit (left). Once the hole is about 3/8" deep he switches to a standard twist bit to bore a hole through the brass head (right). He starts with the brad point bit to ensure the hole is centered directly over the brass head.
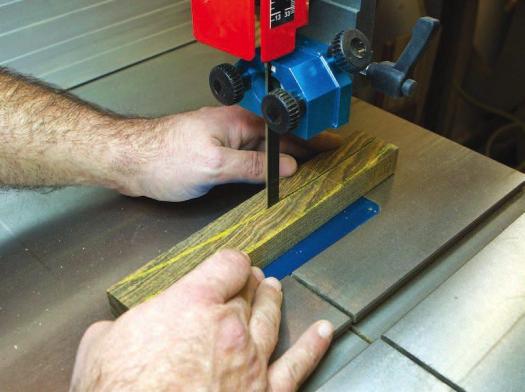
Shapely Handle
Rough out a pleasing and comfortable handle on the bandsaw. If this is your first hammer handle, it might make sense to make a few practice handles out of scrap 2x4 material to find a comfortable shape.
No Spinning
To keep the head from spinning on the handle, a 1/8" diameter brass rod can be inserted through a hole. Once the brass rod is through, its ends can be rounded over the main head, in order to keep it in place.
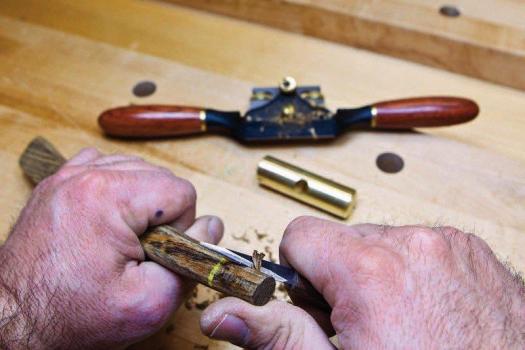
Shape a Tenon
With the handle shape complete, Der-Garabedian cuts a tenon on the end of the handle. He does most of the work with a knife, but files and some other miscellaneous tools come in handy to produce an even tenon.
A Different Option
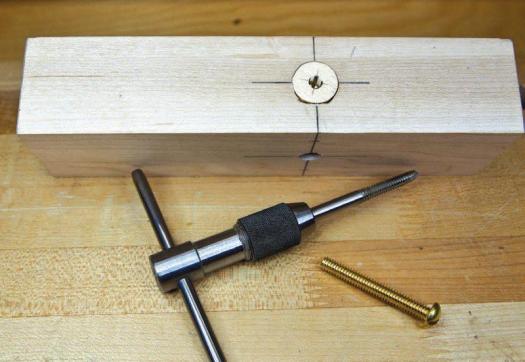
To add a wooden button to the end of a shortened brass head you can tap the brass, insert a corresponding bolt and cut it so it protrudes about 3/8".
Wedged in Place
Drill a small hole near the base of the tenon, in order to stop any future splitting, then make a cut along the length of the tenon. A wedge can be cut to fit into this kerf and will go a long way to keeping the head on the handle.
Attach the Wood Button
Once the wooden button has been created and tapped, it can be screwed into position. A few drops of cyanoacrylate glue will help create a strong bond. Once secured, the wooden head can be flushed to the brass and installed on the handle.