PROJECT
Tea light holder with a planished copper reflector

Rob Brown

Find more Gifts / Crafts projects
This easy project makes a great present for anyone on your gift-giving list. Just be sure to make an extra for yourself.
There’s something wonderful about starting and finishing a project in one afternoon, especially when that project is a gift for a number of your friends and loved ones, and it’s a week before Christmas. Tea lights give off a soft, warm glow, and as long as you keep curious pets and kids away from them, there should be no safety problem.
Tea light holder with a planished copper reflector
Customize yours
This tea light holder can be kept simple and straightforward. Even leaving the copper reflector off is an option, though it really adds a nice touch to this project. Changing the reflector to a thin, bent lamination made from a few layers of veneer is a fun option. You could even pierce and carve a wood reflector, adding an entirely different look to the finished tea light holder.
With a small piece like this, a bit of texture can go a long way. There are so many options when it comes to texture. Experiment with some of the tools you already have in your shop – nail heads, awls, knives and many other tools can be used to add texture to wood’s surface, even if that’s not their main purpose.
I’ve used a shape similar to a half circle for the footprint of this tea light holder, but any geometric or organic shape will likely work wonders.
Keep it oversized
Small workpieces aren’t easy to secure while you work on them, so ensure you leave some waste on your workpiece. This will allow you to screw the workpiece down as your rout the reflector groove and clamp the piece as you’re drilling the tea light cavity. The extra material will also support the trim router as you create the groove to house the reflector.
Once the workpiece has been dressed to final thickness (this holder is 1″ thick) draw the final shape of each tea light holder onto the blank. The holder I made is 3″ wide x 4″ deep x 1″ thick. If I had straight edges for a trim router to reference against, I could have used an edge guide attachment to guide the router while it created the reflector groove. Since the back edge of my holder was curved, I used the trim router freehand. To help guide me, I clearly marked the location of the groove on the wood’s surface. If you were going to create many of the exact same shape, it might be worth your while to create a pattern for your trim router to run against.
Rout a groove
The first step is to fix your workpiece to a workbench so it doesn’t move at all. With a 1/8″ diameter straight bit chucked into my trim router, and its cutting depth set to about 1/8″, I turned on the trim router and slowly lowered the bit into the end of the desired groove. I slowly and carefully moved the trim router along the marked line, leaving a fairly even groove in the wood. The groove doesn’t have to be perfect, as epoxy will hide some inconsistencies.
If you happen to really mess up, you can dress your wood down by 1/8″ to remove any evidence of wrongdoing. As you’re doing this, just say to yourself. “I think this holder would look better if it were a bit thinner.” It’s amazing what we can trick ourselves into if we put our minds to it.
Tea light holes
While the blank is still oversized, drill the holes that will accept the tea lights. Securing a large blank while boring is easy. A 1-1/2″ diameter hole accepts all tea lights I have ever come across, but I don’t honestly know if they come in different sizes. As always, have all your hardware on hand before starting this project. I have also found a 5/8″-deep hole allows the tea lights to sit ever so slightly above the surface of the wood and gives you just enough to grasp onto when removing a spent tea light.
Cut and sand
A bandsaw will cut each holder from the blank, while a disk or edge sander smooths the cut edges. Another option for customization – cut the holder from the blank with your band saw table on an angle. This approach takes you away from a common right angle look. Sand the entire piece and ready it for a finish.
Apply a finish
Durability isn’t of huge concern with a tea light holder, but looks sure are. I find the only type of application I don’t use at this stage is an aerosol spray can, as it will cover the pores of the wood in the reflector groove and weaken the bond between the reflector and the holder’s base. A wipe-on finish is relatively easy to keep out of the groove, though if some finish gets in there, it’s not the end of the world. I applied a few coats of Osmo Polyx-Oil, but you can use a finish of your choice.
Make the reflector
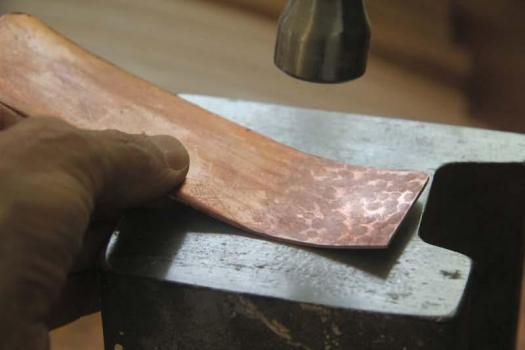
I like the look of copper, and in terms of metals, it’s pretty easy to work with. You can buy small pieces of copper from metal stores. I first used a pair of snips to cut a piece slightly oversized, and sanded its edges smooth. I used a ball peen hammer to help curve the copper reflector and left the hammer marks on the visible surface of the copper. It’s a long process, but if you take your time, you will be rewarded with a stunning look.
I used a cross section of railway line I happen to have, but for this one project I would think almost anything that was very hard and smooth would work.
When planishing the copper you don’t need hard blows, just medium-strength hits that are fairly evenly spaced across the copper’s surface. If you happen to miss an area just return to it to briefly to give it a few hits. The act of planishing the copper starts to curve the metal, but to fine-tune the shape to fit your reflector groove isn’t too hard. Using just your hands is enough to easily work it to shape so it fits the groove nicely.
Treat the copper?
The copper will accept a patina with time, but if you want to keep the copper surface looking shiny and new for as long as possible, you can apply a finish over its surface. On the other hand, if you want to speed up the weathering process there are chemicals to add to its surface and simple ways of darkening copper’s surface to a duller look. I didn’t add anything to the copper’s surface, and I’m looking forward to seeing what it will look like in a few years.
Secure the reflector
Now that the reflector fits the groove, and the wood and reflector are finished how you want, mix up some epoxy, and put some in the groove so it’s as even as possible. It’s a good idea to leave the epoxy a little below the upper surface of the wood, so when you install the reflector, the epoxy will finish about level with the wood. It’s also smart to wait a few minutes after adding the epoxy to install the reflector, so the epoxy can level out in the groove. You can only do this with slow-setting epoxy, as 5-minute epoxy will be dry before you install the reflector. Using a toothpick or other small piece of material to spread out the epoxy works well, as long as you don’t make a mess – epoxy is hard to remove.
Once the epoxy is dry, it’s time to pop in a tea light, light it and watch the small flame dance.
Photos by Rob Brown
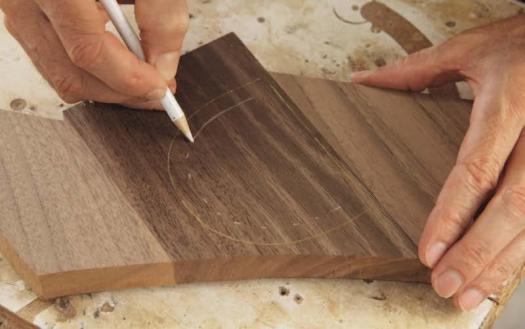
Draw the Outline
Mark a visible line on the blank, that outlines all of the tea light holders you plan on making. Add a second line on each holder marking the location of the reflector groove.
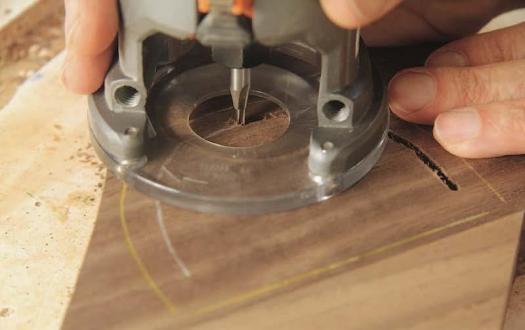
Gettin' Groovy
With a 1/8" straight bit chucked in the trim router, Brown carefully moves the trim router freehand to create as even a groove as possible.
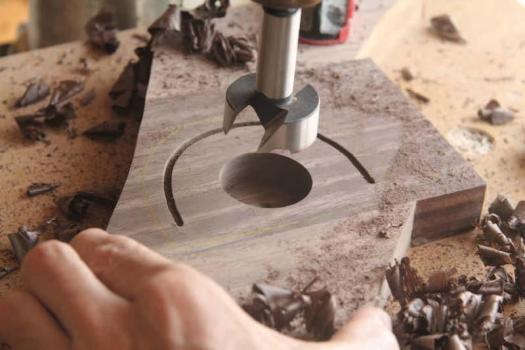
Bore a Hole
Brown finds a 1-1/2" diameter hole works perfectly for tea lights. Drilling it to the perfect depth is also important.
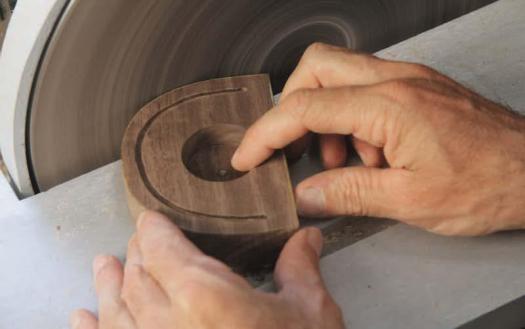
Smooth the Edges
After a band saw cuts each tea light holder from the blank, Brown sands the edges on a disk sander.
Time to Planish
A ball peen hammer and a hard surface allow small divots to be hammered into the front surface of the copper Brown is shaping. The copper reflector will have to be fine-tuned by hand to fit into the routed groove in the holder.


I love this and think it would make a great gift for friends and family! It’s really beautiful!!
Can you tell me the dimensions of the copper piece you used? And since the groove was 1/8 inch thick, I’m assuming the copper was as well?
Thank you!!
Hi Carol. Sorry for the late reply. I didn’t see your message. 1/8″ thick copper would be too think to easily work with. I can’t recall exactly, but I think it was about half that thickness. It’s thinner than the groove so you don’t have to have a perfect fit when you fit the copper piece into the groove. The epoxy will fill up the slightly oversized groove and keep the copper piece in place for good. Send me a photo of your project!