PROJECT
Outdoor dining set

Danny Proulx

Find more Outdoor projects
This is an easy-to-build dining set that’s sturdy and won’t cost you a small fortune for materials.
But don’t let the simplicity fool you, the table and chairs will serve you well for many years.
I designed and built a prototype set for my deck over five years ago and we’re still using it today. The table and chairs have been outside each summer and they are still as sound as the day they were built.
I used construction grade cedar for this set because of its availability and the relatively low cost. However, the choice of materials is optional. Most lumberyards allow you to select your own wood. Pick through the construction grade pile and choose the best pieces. You can build the set with a select grade of lumber but the costs will rise. The material choice isn’t important. The quality of your final project depends largely on the hardware, adhesives, and finish that you use.
You will be able to build additional pieces using this design. The leg loop style of the chairs and table supports follows the same principal of construction that you can use for other projects, such as benches or side tables, by extending the seat and back boards.
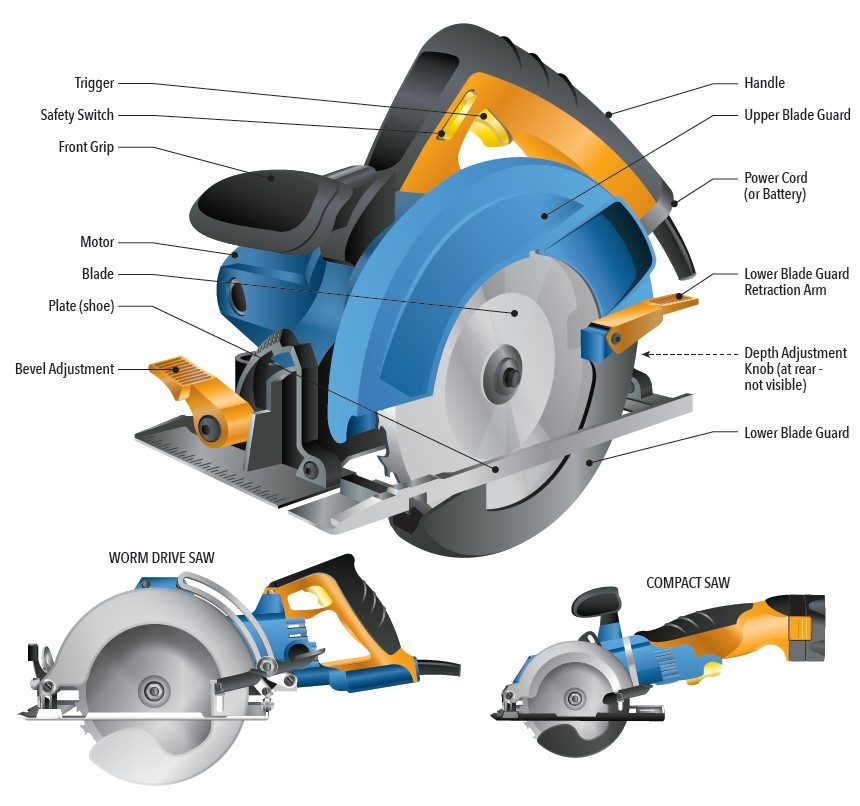
If your budget limits you to a circular saw and a few hand tools, this is the project for you. Bring a few tools up to the cottage and build this outdoor dining set. But, be careful not to show it off too much or you may start getting orders from your neighbours.
Outdoor dining set
BUILDING THE CHAIR
STEP 1
Cut the four vertical legs (A) and horizontal legs (B) to length. Each leg requires a ¾” deep by 3” long rabbet on both ends. You can make the cuts with hand tools or with a table saw, router table, radial arm saw or circular saw. Set the blade depth on your circular saw to ¾”. Make a series of cuts across the face in the joint field. Use a hammer to break away the waste and clean the joints with a sharp chisel.
TIP: If you plan to make a number of sets for friends and family, a tenoning jig is a great accessory for your table saw. It easily and accurately cuts rabbets and tenons. It’s one of my favourite tools because of the accuracy and safety features. Best of all, it isn’t that expensive.
STEP 2
Join two vertical and two horizontal legs to make one side assembly. Use waterproof adhesive and two 1 ¼” exterior rated screws at each joint. You can also use wood dowels for the joinery. Each leg loop assembly should be 26” high and 24” wide. Install the screws 1” apart and 1 ½” in from the outside corner of each joint.
TIP: If you plan on building a few chairs, or extra small tables or benches, remember that the leg loop assemblies are all the same. Construct an assembly frame jig with a scrap piece of any sheet goods and attach four boards to form an outside perimeter of 24” x 26”. This jig will ensure that all your leg loop assemblies are accurately constructed.
STEP 3
Sand the frames and cut each corner at 45 degrees. The mitres should be 1” back from the corner intersection of each leg. Use a handsaw or power miter to cut the corners.
STEP 4
Use a ⅜” round over bit in a router to soften the inner and outer faces on both assemblies. Sand the sharp mitred corners with a belt sander to soften the cuts. Then install the two seat supports (D) with their top surface 15” above the bottom of each assembly. Use glue and two 2 ½” screws per joint.
TIP: Be sure to pre-drill holes in the seat and back supports. You will be installing screws very close to the ends of these boards and they will split without a pilot hole.
STEP 5
The bottom of the two back supports must be cut at 18 degrees. This cut will create the back slant needed for comfortable seating. Attach the boards with the longest dimension of the angle 7” from the rear of the seat supports. Use glue and 2 ½” screws to secure the back supports. Driving the screw through the seat support makes the lower connection. Be careful at this point because you are now creating a right and left assembly.
STEP 6
Each chair requires six boards (C) to form the seat and back. Start by installing the bottom back board, resting it on the seat supports. Attach all the boards with glue and 2 ½” screws from the rear and underside. The boards are flush with the outside face of the supports. Space them all ⅛” apart. Let the adhesive set up and perform the final sanding on your chairs.
BUILDING THE TABLE
STEP 7
Prepare the vertical members (F) and the horizontal members (G) by cutting a ¾” deep by 3” long rabbet on both ends of all the boards. Then cut a 1 ½” deep by 1 ½” wide dado centered on each of the horizontal members. Assemble the frames by joining two vertical to two horizontal members. One frame must have the notches open to the inside and the other frame has the notches facing out. Use glue and 1 ¼” screws to assemble the frames. However, one horizontal member on one of the frames should be attached with screws only. This will allow removal when the frames are joined.
STEP 8
Sand the frames and miter only the bottom corners at 45-degrees. Round over the inner and outer face of each frame with a ⅜” round over router bit. Remove the horizontal member that was only screwed from one of the frames. Then join them by fitting the dadoes inside each other. Re-install the top member using glue and screws making sure the dadoes fit properly. Use glue and 2 ½” screws to lock the frames together at the dado joints.
STEP 9
Align the support stringers (H) flush with the tops of the frames. Secure them to the frame with glue and 2 ½” screws.
TIP: The easiest way to attach the table-top boards is by laying them on a flat surface with ⅛” spacers between each board. Centre the frame on the boards so the stringers run parallel with each side and install the screws.
STEP 10
Centre the frame on the seven table-top boards (J), spacing them at ⅛”. Use glue and 2 ½” screws from the underside to secure the boards. Sand the table and soften the sharp edges to prevent cuts and scrapes should anyone bump the corners. Apply a good exterior finish making sure all the surfaces are coated. I used Sikkens Cetol 1 #077 Cedar to finish my set.
CONSTRUCTION NOTES
Changing the length of all horizontal frame members easily alters the table size. Or, you can create a round table if you prefer that look.
The table can be fitted with an umbrella by drilling a hole next to the intersection of the two horizontal frame members. If you drill the hole accurately, the frame can be used to anchor the umbrella to the table.
There are quite a few design options available. Chair seats can be slanted, the backrest angle can be easily changed, and the chair width is variable.
You can build an oval table by altering the frame dimensions. One long and the other short, with the appropriate stringers, will allow you to build a large table to seat six or eight. However, you will need extra chairs.
And finally, you can further reduce the construction costs by using pressure treated lumber. Avoid direct contact with pressure treated wood by wearing gloves when handling it and using a dust mask when cutting. This material is only suitable if you plan to paint the set with a solid coloured exterior finish.
Photos by Lead Photo by Michael Bowie, Lux Photography, Ottawa, Ontario
Illustration by Len Churchill