PROJECT
Make a whiskey cabinet

James Dobson

Find more Cabinetry projects projects
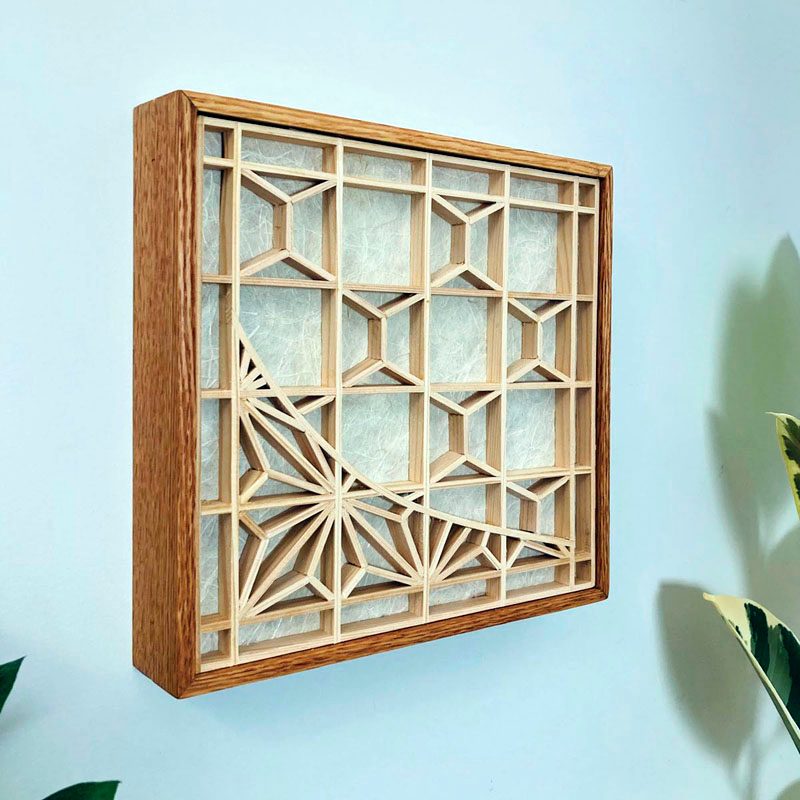
This whiskey cabinet can store your prized spirits and a few special glasses, and also features extra storage and display areas.
Several years ago, I stumbled upon a retiring woodworker on the Canadian Woodworking & Home Improvement online forum who was selling part of his lumber collection. He was local to me and so I headed over and spent an hour with him as he showed off his tool collection and spectacular lumber before I picked up two beautiful 10′ long cherry boards he’d had for over 40 years. Obviously, this wood needed to be used for something special so I kept it on my rack until the right project came along, a hanging liquor cabinet. Once I settled on my design, which went through many iterations in my sketchbook, I planed the boards to their thickness and cut them to length, and the joinery began.
Kumiko, the thin pieces of wood that make up the door panel, are a strong design feature of this whiskey cabinet. I’ll cover how to make them and install them in the door frame.
Assembling this cabinet with all its different dovetail joints is an exercise in following the order of operations. The through dovetails need to come together in a side-to-side manner, and the sliding dovetails need to be assembled in a front-to-back manner. If this order gets messed up it’s impossible to assemble the project. Follow my approach and you’ll end up with a fully assembled case.
Make a whiskey cabinet
The case – Part 1
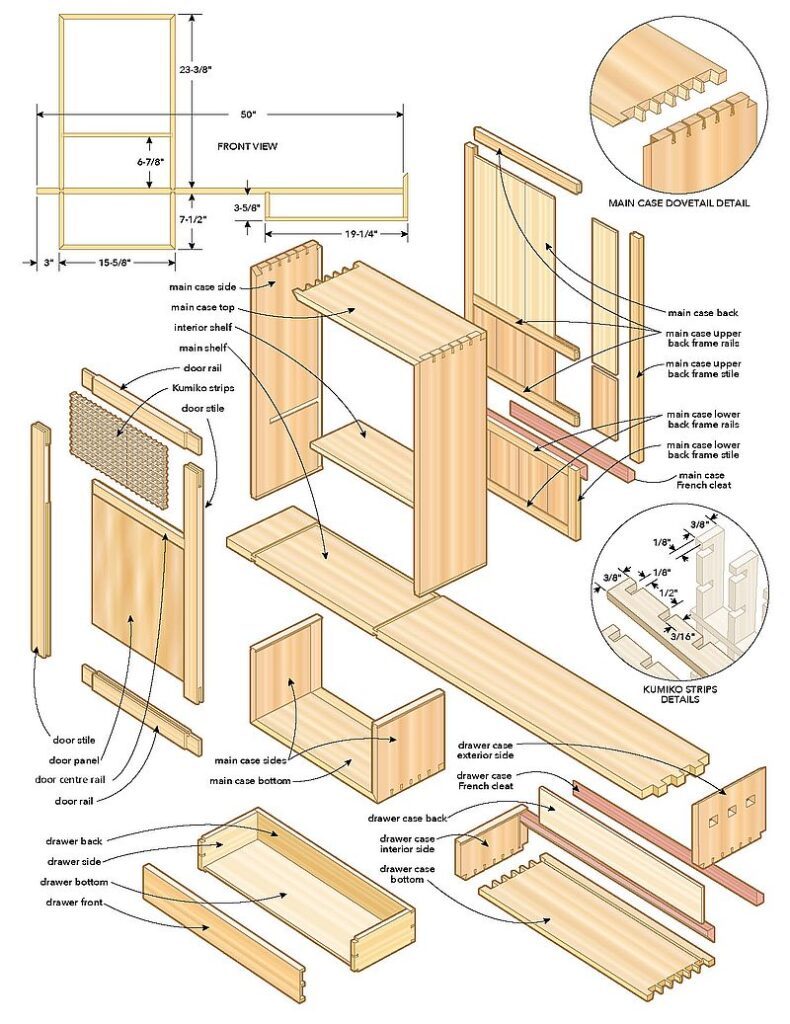
The cabinet case with the door and the compartment below are made as a single unit. Dimensions are fairly important here. The case needs to be the length of the door plus 1/8″ (for a 1/16″ reveal at top and bottom) plus 1/4″ for the top sliding dovetail, plus 1/8″ (or the width of your table saw blade for the kerf when you cut the case in half), plus 1/4″ for the bottom sliding dovetail, plus the depth of the bottom case. The width of the case is the width of the door plus 1/8″ for a 1/16″ reveal. Also remember that you need the width of the sides (5/8″ plus 5/8″) added to each of these lengths as the case is dovetailed.
That sounds complicated, but as long as you’re comfortable fitting your door to your opening, rather than hitting an arbitrary measurement, you should be able to manage it without too much difficulty. Save some cutoffs for setting up your router table later.
Dovetail the corners using hand tools or with a router and jig, whatever you feel most comfortable with. I mitred the front corners of my dovetails, which is something you can’t do with a dovetail jig, but with some hand tools you should be able to make it work. The hardest part about mitring dovetails is wrapping your head around what is waste and what needs to be kept. I like to keep a picture of the disassembled joint nearby that I can refer to. Mark the waste with your pencil and cut to the line. A guide block cut at 45° is very helpful when paring the waste down to the line.
Dry assemble the case and make sure everything fits well. Next, glue it together, making sure it’s square. While the glue is drying, set the case aside and begin milling the main shelf, which is slightly thicker than the case sides. I started by leaving it about 1/16″ wider than the case sides. This will be planed flush after assembly.
Once the glue on the case was dry, I added two 1/2″ thick plywood spacers on the backside of the case using pocket screws. Secure one on each side of the cut line but do not use glue, only screws. These will be removed later and the holes will be covered by the back panel. Perhaps these spacers are unnecessary, but I felt better about crosscutting the case on the table saw with the spacers to ensure that the case didn’t spring closed when cut. Set your table saw to make that crosscut. Using a sled for this operation is recommended.
The shelf
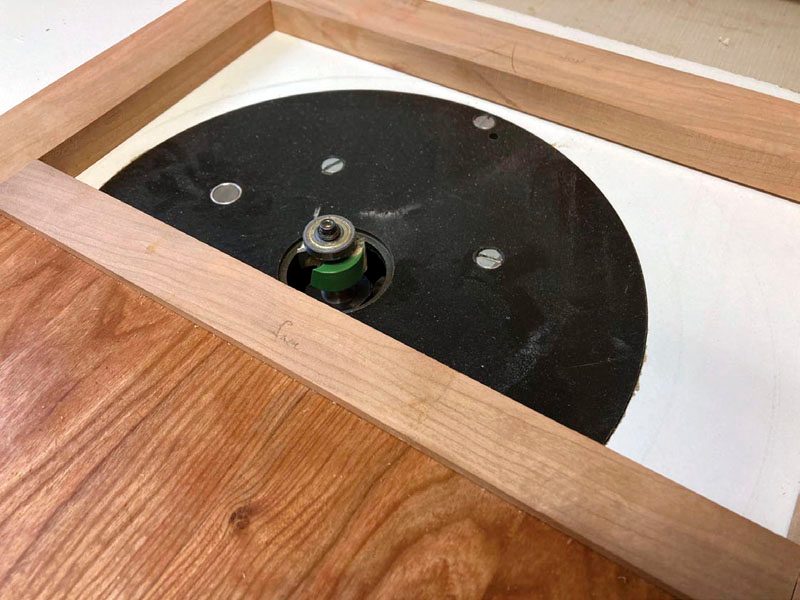
Before removing the plywood spacer, set one of the freshly cut case pieces on top of the shelf board and mark both the inside and outside of the case sides with a pencil. Remove the case and you should have four lines across the face of the shelf. Use a square to continue these lines around to the other face. Use a jig to cut the sliding dovetail socket. I used scrap lumber to make a T-jig, which is just two pieces of wood with jointed faces, screwed together at a 90° angle. When the lower face is clamped to the edge of a board, a router can ride along the upper fence and make a perpendicular cut across the face.
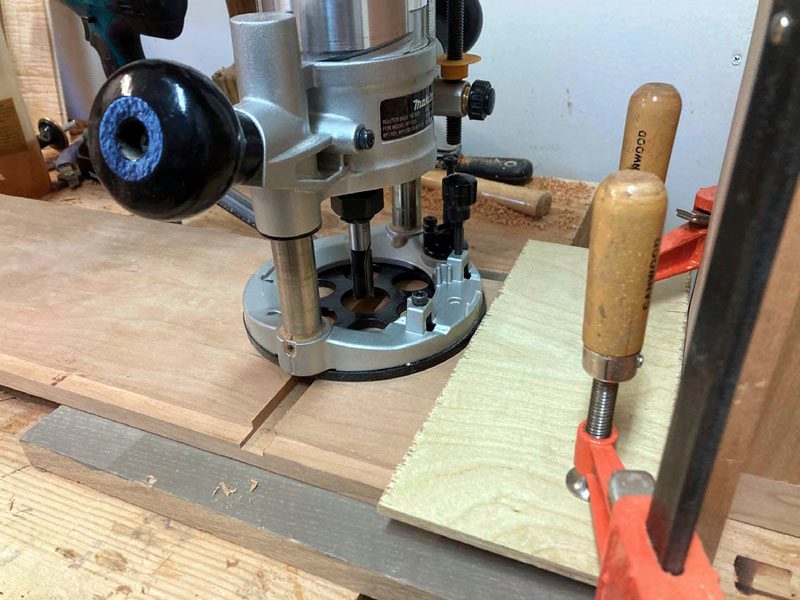
Plowing the dovetail groove in one pass is possible, but depending on the density of wood you’re using and how sharp your bit is, it often leaves a better cut if you remove some of the material in the dovetail groove before making the final pass with the dovetail bit. This initial operation to remove some of the waste can be done on a table saw, but I prefer using a second router equipped with a straight bit.
Clamp the jig to some scrap and then use a straight bit that’s smaller in diameter than the narrowest part of your dovetail bit and rout a groove just shy of 1/4″ deep through the lower fence. Follow this up with your dovetail bit set at 1/4″ deep. Having two routers with bases of the same diameter makes this operation much easier, though it’s certainly not mandatory. Your jig should now have a dovetail-shaped groove in the lower fence that will assist you with aligning the jig with the location of the dovetail groove on the workpiece.
Clamp the jig to your shelf board. The dovetailed groove on the lower fence should be centred between the two pencil lines that show the width of one of the case boards. It doesn’t matter which one you start with. Before routing, extend the pencil lines from the shelf directly onto the jig. Mark the jig to show which line corresponds to the inside of the case and which side corresponds to the outside. Now you’re ready to rout.
Start with the straight bit. Set it for just a hair under 1/4″ and rout a groove across the workpiece. This removes most of the material and makes the next pass with the dovetail bit much smoother and cleaner. Move your jig to each of the five spots on the shelf that will need a sliding dovetail; four for the case and one for the small drawer. You will have to clamp your jig to alternating sides of the board to keep the interior side of the jig pointed to the inside of the case, so make sure your board sides are parallel to each other. Once all five grooves are cut, switch bits to the dovetail bit and repeat the operation.
The case sides need the sliding dovetail tenons cut on their ends. Take the same dovetail router bit you used for the sockets to the router table to make this cut. Sink the bit into a sacrificial fence and then make some test cuts on one of your saved cutoffs. You’re looking for a close fit, but not one that you need to hammer closed. Using hand pressure is best. Once you have the fit dialled in on scraps, bring the case sides to the router table and cut the dovetails on all four ends of the side pieces. When in doubt, cut the joints all slightly tight and refine the joint as needed by adjusting the fence inward slightly. Just remember that moving the fence in by 1/64″ will remove 1/32″ from the dovetail tenon as you will make a pass on both sides of the tenon. It’s very easy to end up with a tenon that’s too small if you’re not careful.
The drawer case
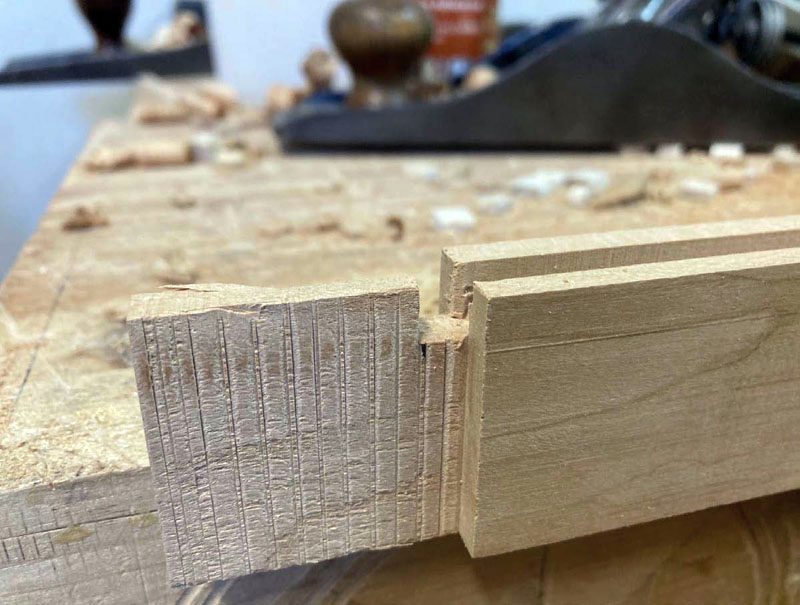
Before changing any settings on the router table, cut the dovetail for the drawer inner case side, but leave it long for now. The drawer outer case side is attached to the shelf with three through tenons. Mark out square tenons, equal to the width of the shelf board with one in the centre of the shelf, and then another two spaced evenly towards either side.
Once they’re cut, add a kerf across the grain for wedges. To transfer the tenon location to the drawer case side, scribe a line where the top of the shelf will meet the side. With the drawer case side flat on your bench, clamp a fence across that line. Butt a second fence against the edge of the drawer case side. Set your shelf board on top of the drawer case side and use a marking knife to mark lines where the mortises will need to be cut in the case side to accept the tenons.
Remove the shelf board and the fences and use your square and marking knife to connect the bottom edges so you have the lower limits of the mortises. Wrap these lines around the drawer case side with a square and marking knife so you know where the limits are on the other side of the board as well. This process needs to be done as accurately as possible. Use a marking gauge to set the vertical edges. Align it with the mark you made and then mark the line on both sides of the board.
To remove the waste, drill a small hole in each corner of the through mortises. Thread a coping saw blade through the hole and connect the dots. Get as close to the lines as you are comfortable with. Clean everything up with a chisel. Cut across the grain first to avoid splitting the board. Work in from both faces to further avoid any tearout.
The drawer case bottom is attached with through dovetails. This board is thinner than the sides, but using the same dovetail angle helps keep a consistent look across the piece. The pins need to be cut on the bottom board and the tails on the sides or the piece can’t be assembled down the road. This approach also leaves you with the traditional dovetail look you’ll want.
The drawer case has a 1/4″ back panel that sits in a groove 3/4″ from the back. The 3/4″ space is for the French cleat that will be used to hang the cabinet. At the router table, mill a 1/4″ slot in the drawer case bottom and sides. A stopped groove is needed in the main shelf between the sliding dovetail and the end of the board.
The sliding dovetail for the inner case side is what makes this assembly a little more complicated than normal. To begin, I glue the drawer case bottom and drawer case interior side dovetails together. Use a 90° clamping guide to ensure this assembly stays square. When that has dried, apply glue to the sliding dovetail that will join the inner drawer case side to the shelf and slide that joint together. Clamp in place and then insert the back. The drawer exterior case side can now be glued into the dovetail and through tenons. Be sure to support the inner case side so it remains at 90° while closing the exterior side joints. Too much force could break the sliding dovetail. Before the glue has dried, wedge the through tenons to close any gaps and tighten the joint.
The Case – Part 2
Returning to the main case, glue the upper and lower sections into the sliding dovetails on the shelf. This is fairly straightforward. Apply glue and slide the case pieces into position, ensuring they’re flush across the front.
Using a rabbeting bit, cut a 1/2″ deep and 3/16″ wide rabbet around the rear edge of the upper case for the back frame and panel.
The lower case needs a deeper rabbet. Taking progressively deeper passes, cut the 3/16″ wide rabbet down to 1-1/4″ deep. This allows room for the 1/2″ back frame and panel plus a 3/4″ plywood French cleat that will be used for hanging the cabinet.
The upper case also has a secondary shelf inside it. I rout a 1/2″ groove that’s 6-7/8″ up from the bottom of the case. To do this, cut a plywood spacer for your router to run against. It should be sized so the groove is at the correct distance from the corner of the cabinet. Clamp the spacer to the case side, butting it up tight to the main shelf board. Rout the groove, being sure to stop short of the front of the case. Remember, the door is inset so stop at least 7/8″ from the edge, or either the stopped rabbet will be visible in the finished piece or the shelf will stop the door from fully closing. Flip the case over, clamp the spacer to the other side and repeat. Mill the shelf board down to 1/2″ and size it to fit in the grooves. The back edge should be flush with the bottom of the rabbet for the back panel.
The back
The back is constructed with frame and panel construction. Floating shiplapped planks act as the panel. This makes an attractive back, while accommodating wood movement.
The frame is light 1/2″ thick and 1″ wide cherry. You’ll need enough frame material to make two panels. Rout a 1/4″ wide by 3/16″ deep groove down one side. There are two stiles and three rails for the upper case, and two stiles and two rails for the lower case.
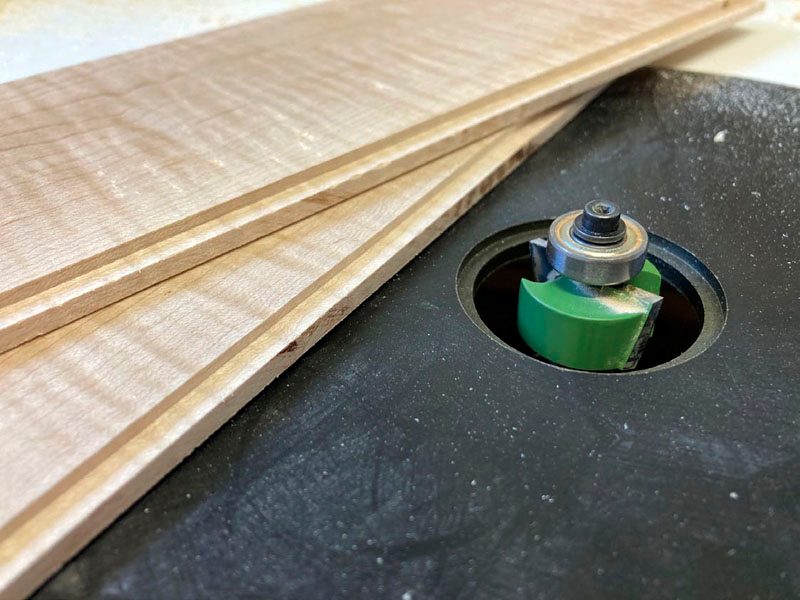
The panels are resawn from an 8/4 curly maple board. The panels are milled down to 1/4″ thick so they fit in the frame grooves. Using the rabbeting bit, I cut a 3/16″ wide rabbet 1/8″ deep on the opposite long edges of each panel. I prefinished these before installing them.
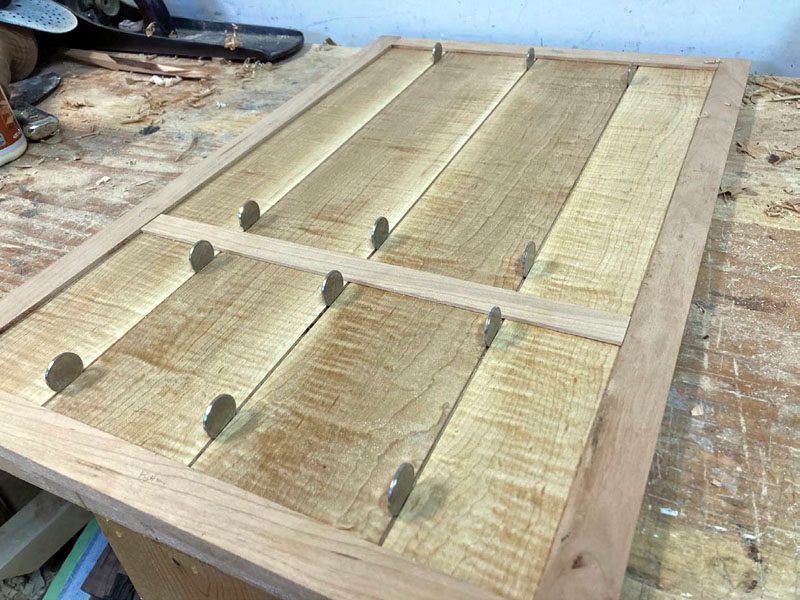
To assemble the back, cut stub tenons on the ends of the rails to fit into the grooves on the stiles. We don’t need a huge amount of strength here. For the upper case, mark where the three stiles will be glued on the rails. The middle stile is spaced to fall centred on the secondary shelf, inside the top cabinet. Crosscut the panel boards to fit in the groove. Assemble by gluing the three stiles to one rail, inserting the panel and then locking everything in place by gluing the top rail in. I used nickels to evenly space the shiplapped boards. If any of the back boards are too loose, a little drop of CA glue into the groove from the backside will keep them in place.
To install these panels, insert them into the case and use a wedge to ensure they remain tight. Forgoing the clamps means the frame will exactly match the case and you don’t have to worry about fitting it later. Once dry, both frame and panels can then be glued into the back rabbet. Clamps should be used to hold the frames in the case rabbet.
The door
It’s generally easier to fit a door to an opening than an opening to a door, so once you have your case glued together you can start working on the door.
This door features a simple kumiko-style grid pattern. You can easily substitute another pattern here, depending on your taste. The kumiko jig will set the dimensions of your kumiko panel so start with it, keeping the width of the door rails in mind, and then build the door around the panel.
The kumiko jig
The jig to aid with making the kumiko is essentially a simple crosscut sled. Attach runners sized to fit snugly in your table saw mitre slots to the bottom of a 3/4″ piece of Baltic birch plywood. Attach a front fence and then make a partial cut through the board. Attach a rear fence ensuring it is square to the kerf. Accuracy here will pay off on the finished project. A secondary fence is made with a piece of 1/4″ MDF. Dimension it to be just slightly smaller than your rear fence and then set the table saw blade to project 1/8″ above the sled. Cut a 1/8″ × 1/8″ kerf in the secondary fence and then glue a 1/8″ × 1/8″ × 1/2″ stick into the kerf. This will act as a registration pin.
Drill pilot holes in the secondary fence and attach it to the rear fence with screws. The registration pin is set 1/2″ away from the kerf on my fence. You can change the spacing if you prefer a tighter or wider pattern. It’s a good idea to keep the overall width of the kumiko pattern in mind now, as this assembly will eventually get fixed between the door rails and stiles. It’s important the overall dimensions of the door fit the opening. The rails and stiles can be trimmed a bit to size the door correctly, but you won’t want to be forced to remove much from the rails and stiles or the proportions will be off.
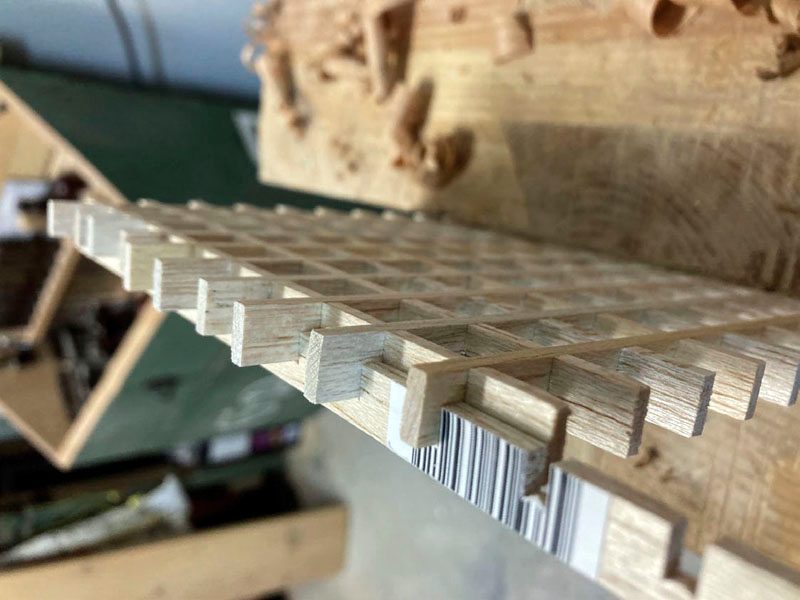
The kumiko
You can dimension your own lumber for kumiko but I find this tedious so I buy presized 1/8″ × 3/8″ strips of wood from my local hobby shop. They come in spruce or balsa and are consistently sized. You will pay more for them, but the time saved was worth it to me. I use balsa when I don’t have to cut angles other than 90° and spruce when making a pattern.
This panel is just squares, so I’ve used balsa. Set your blade height to 3/16″, or half of the height of the strips. Next, butt a strip against the registration pin. Make your first cut and then engage the fresh kerf on the pin. Make another cut and continue until you’ve made all 19 kerfs on the horizontal piece and 10 on the vertical pieces. Being off by even 1/16″ when you’re attaching the secondary fence to the main fence of your sled means that difference will be multiplied by however many notches are cut. This usually isn’t critical, though it will mean you’ll likely have more or fewer squares than I ended up with. Starting with a few extra pieces at the start of this process may be helpful. When I get to the last kerf I lay the strip down flat, engage the last kerf on the pin and then cut the strip free. Cut one extra piece.
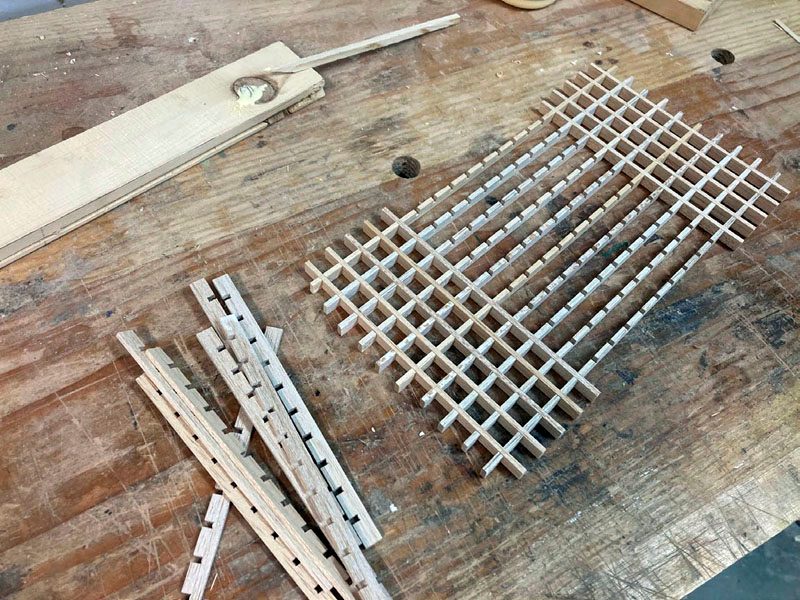
Assembly is straightforward. I add a tiny drop of glue in each half lap and use a small hammer and a block of wood to help seat each piece. Once the glue has dried, slide the extra kumiko strip against the outside edge and, using a flush cut saw, trim each of the overhanging pieces. Using the strip will ensure that the remaining protrusions are all 1/8″ around the entire piece. We will use those for mounting later.
Rails and stiles
After surfacing your lumber for rails and stiles, cut them to length by marking them directly against the cabinet opening. Their width is determined by the opening of the cabinet and the dimensions of the kumiko panel. We want the opening to be identical to the width of the panel from the outside edges of the vertical strips; the 1/8″ protrusions will sit in a rabbet and should not be counted in this measurement. Mark this width on one of the rails and then divide the remaining dimension of the rail by half. This will be the width of your stiles. This ensures the opening for your panel is exactly the width of your panel. I’ve used the same width for the top and bottom rails and a slightly narrower width for the centre rail.
Use a marking knife to set the shoulders of the bridle joint that will be used to assemble the door. Lay out the joint on the stiles with the slot centred. I cut the slots on the bandsaw. I used a stop clamped to the fence to set the length of cut. Flip the piece over to cut the other side. This ensures that the slot is centred on the stile. A chisel makes quick work of the waste.
The tenons are cut on the rails using the table saw. I use a sled to cut the shoulders and then move the piece, making multiple cuts, until the entire cheek is cut. I leave it about 1/16″ too thick. Returning to the bench I use a router plane to smooth out the cheeks and bring them down to the perfect size. The middle rail is cut in a very similar fashion, but those tenons are only 1/4″ long.
Next, I rout out grooves in the stiles, and lower and middle rails for the solid panel that fills in the rest of the door. Set a 1/4″ straight bit in your plunge router or router table and make these cuts. Remember, this is a stopped cut on the stiles and should not continue past the top of the middle rail or all the way through the tenons on the rails.
The centre panel is 1/4″ thick. Cut slightly oversized strips on the bandsaw and joint and plane them to size. Joint the edges and glue the panel together. I use tape across the joints for panels like this. Once the glue has dried, plane or sand to your finished smoothness and apply your finish of choice (linseed oil in my case).
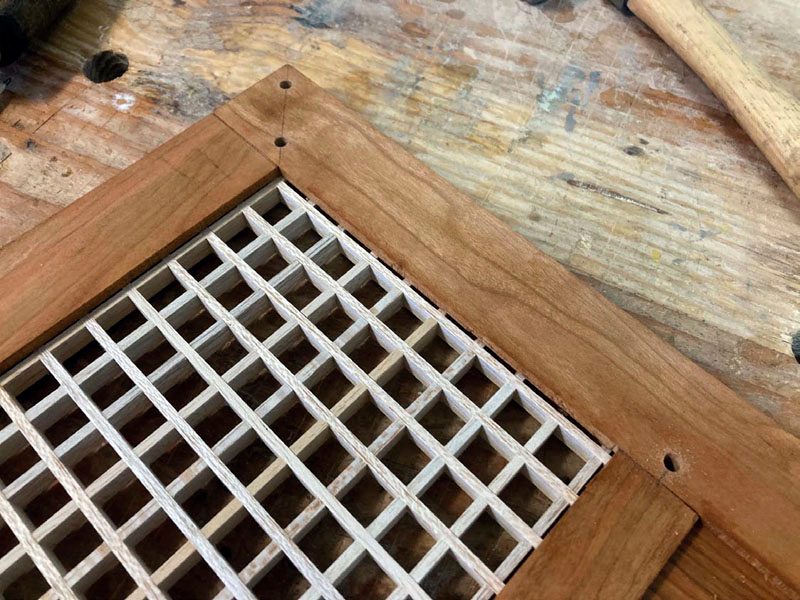
Assemble the door. Do a dry assembly to make sure it fits nicely. Make any adjustments now. A square door will make fitting it much simpler. Once you’re happy, glue it together. While perhaps unnecessary, I like to add 1/4″ dowels to the corners and where the centre rail meets the stiles. This is mainly for visual appeal. Fit the door into your case opening by planing away the outside edges of the door until you have a consistent reveal all the way around.
To fit the kumiko panel, use a rabbeting bit at the router table and cut a 1/8″ rabbet around the opening for the kumiko panel. Do this on the backside of the door. Your kumiko panel should fit snugly into this opening.
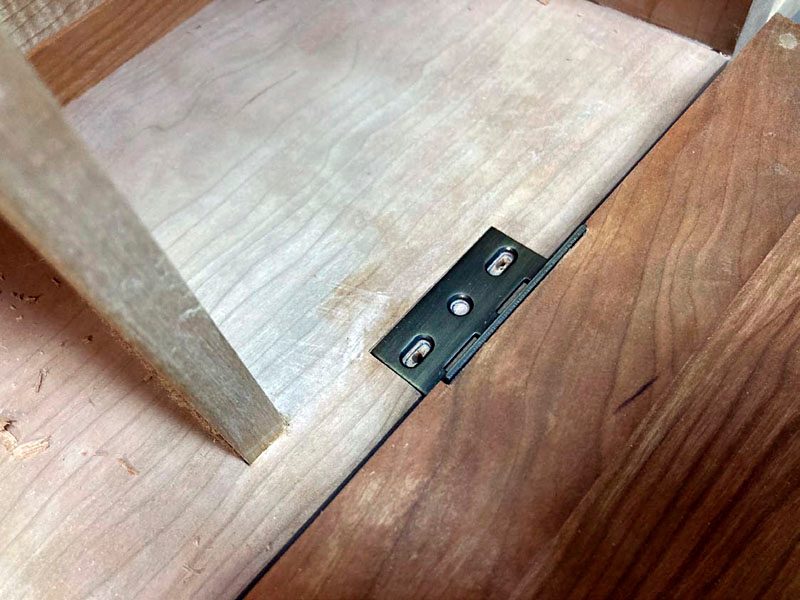
Hardware
With the door done, it’s time to add hardware. I’ve gone for mortised butt hinges and a very simple ring pull. Lay out the mortises for the hinges and use a router plane to cut away the waste. Transfer the hinge locations to the case and repeat in the case sides.
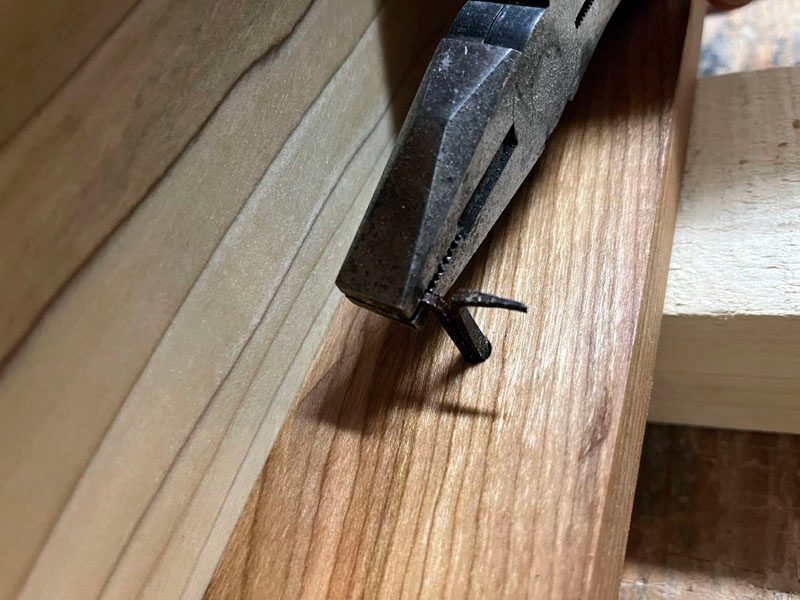
If you opt for the same pull I used, you’ll find it very simple. Drill a hole for the shank and push it through. Your hole should be big enough so that the shank doesn’t catch on the edges. Use a pair of pliers to bend over the shank and then hammer it into the backside of the stile as if it were a pair of nails.
The drawer
To finish the cabinet, we just need the small drawer. The drawer front is made from cherry while the back, sides and bottom are poplar. This is a simple box so it’s back to cutting dovetails. I’ve used through dovetails on the back and half blind on the front.
After laying out the pins on the front board I find it useful to go to the drill press to remove material from the half blind socket. This makes removing the waste much simpler. Everyone’s got their preferred method, though. The drawer uses the same ring pull as the cabinet door and installation is the same. Just note that the grain direction of the drawer front is different than the stile, so when you hammer in the shank ensure you don’t split the drawer front. Drill a pilot hole if necessary.
Finish
Sand everything to 320 and then finish with the product of your choice. I’ve used an oil/varnish blend from Detwiller Linseed Products, a local producer of linseed oil finishes. The cherry absolutely pops under an oil finish so I would recommend it over a water-based finish. Once cured, buff out with some wax.
Hanging the cabinet
The cabinet hangs on a French cleat. Cut a strip of plywood with a 45° bevel on the long edge. Cut two pieces to length to fit behind the lower section of the main case and behind the drawer. I’ve left a 3/4″ gap here for this. Glue the piece on all three sides and add a few pocket screws to hold it in place. Two smaller pieces are cut and screwed to the studs in the wall. The cabinet will rest securely on these cleats.
Kumiko Design Options
Kumiko are thin strips of wood that cross each other and form the structural portion of a door or other panel. They’re a common feature in traditional Asian furniture and interior house design. They’re often backed with handmade Japanese paper or another translucent material. Kumiko often join each other with half lap joints, though other pieces can be added and glued into place.
They have recently exploded in popularity and it’s easy to see why. The “asanoha” pattern has become the most popular design. It’s not too difficult to make a very eye-catching piece that includes kumiko, but as more and more woodworkers incorporate kumiko into their work, it can become a little stale seeing the same asanoha pattern over and over again. Here are some tips for shaking things up a bit.
Try a new pattern
There are many books on the market for you to learn from. There are also many designs on the internet that will encourage you to spice up a design you’re considering. New jigs and techniques for cutting birds-mouth joints and interlocking sections will bring your work up to a new level.
Build the kumiko into a larger project
Instead of just making a panel, put that panel to work in another way. The strict geometric pattern can be played against the organic flowing lines of the grain in a larger piece. Scale the patterns up or down to fit into furniture or into boxes.
Incorporate other woodworking techniques
Take advantage of the regularity of kumiko patterns by adding some variety. Use steam to bend a strip to add curves and flowing lines to your pieces. Vary the patterns on each side of the curve to add some real interest. To cut the half laps, first bend the strip and then lay it in position on top of your grid. Mark either side of each intersection on the grid pieces with a sharp pencil. When they have all been marked, pop the grid pieces out one at a time and cut the angled half laps on the inside of the marked line. Reassemble and install the curved strip into the slots. Flip it over and mark all the intersections on the curved piece. Pop it out again and cut the slots. It should now sit flush with the grid and be ready to be filled with your pattern.
Photos by James Dobson
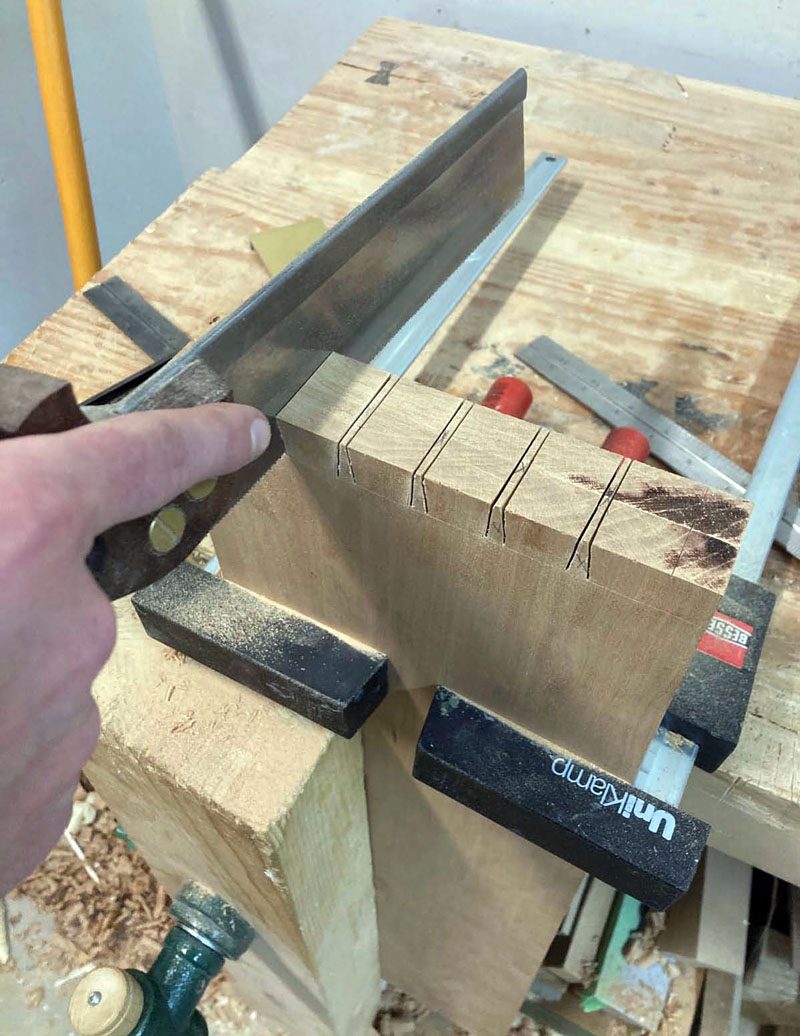
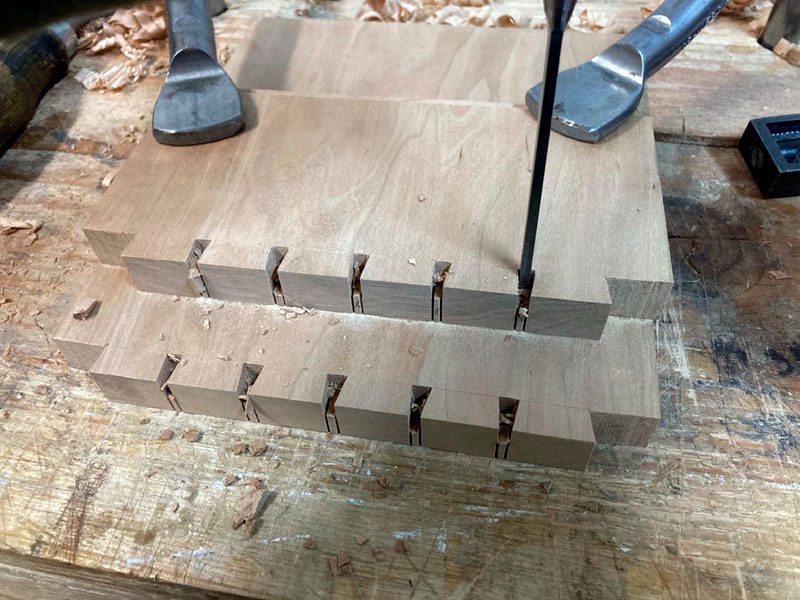
Gang Them Together
Dobson clamps two similar parts together before cutting the tails to speed up the process of creating the dovetail joints for the case.
Helping Hand
A mitred piece of scrap, clamped inline with the location of the mitred end of the joint, gives Dobson a guide for his chisel while he’s paring the joint.
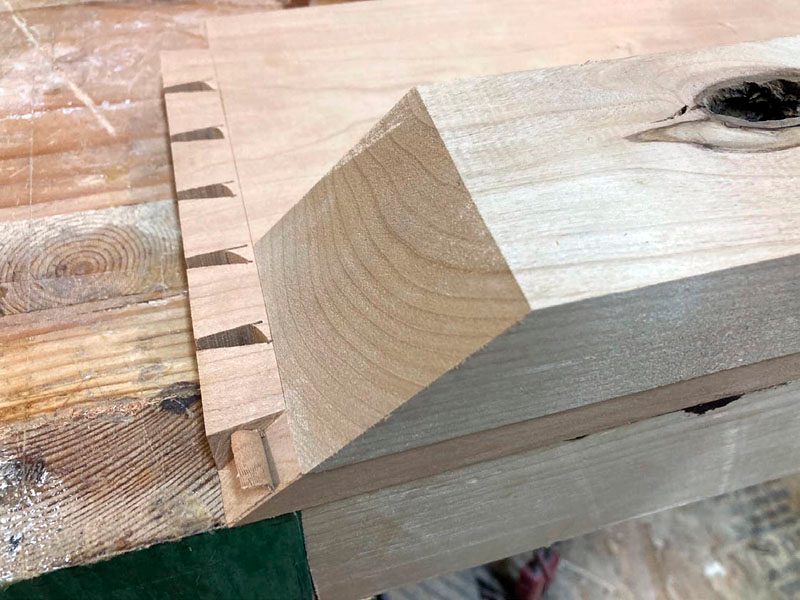
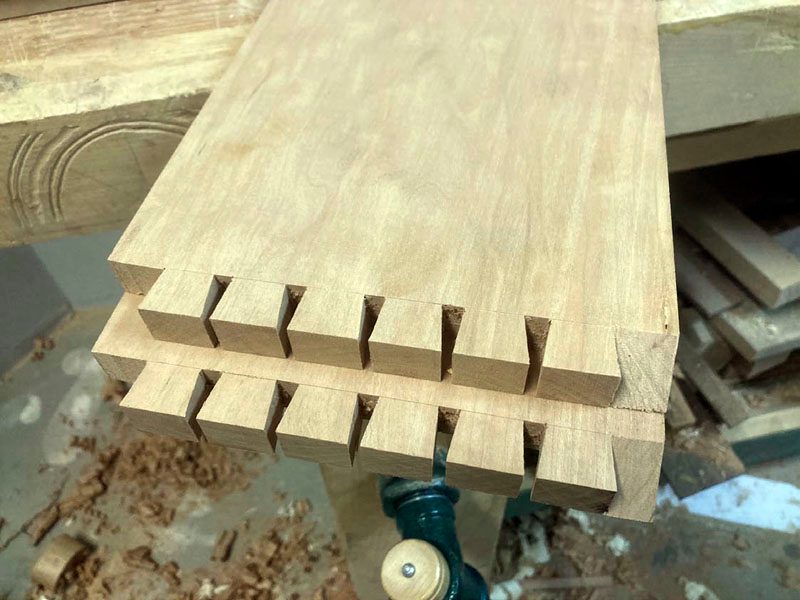
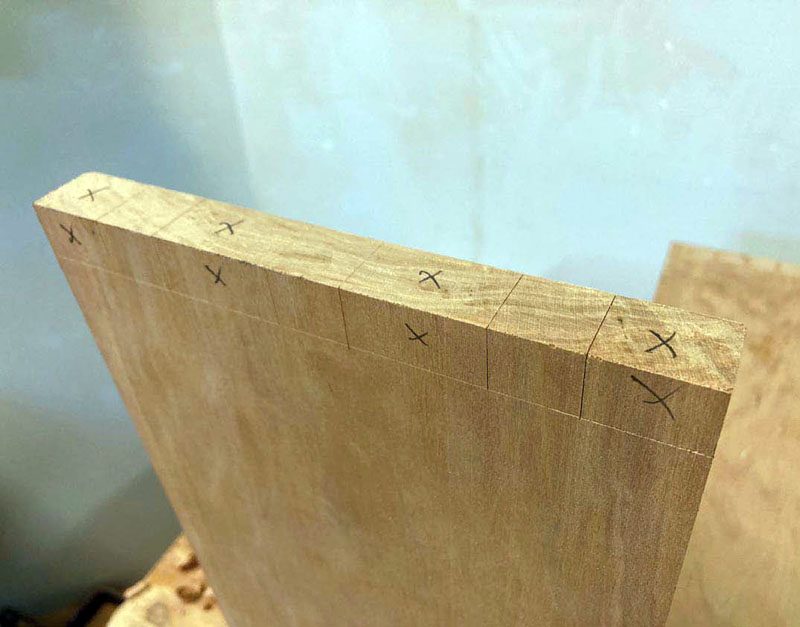
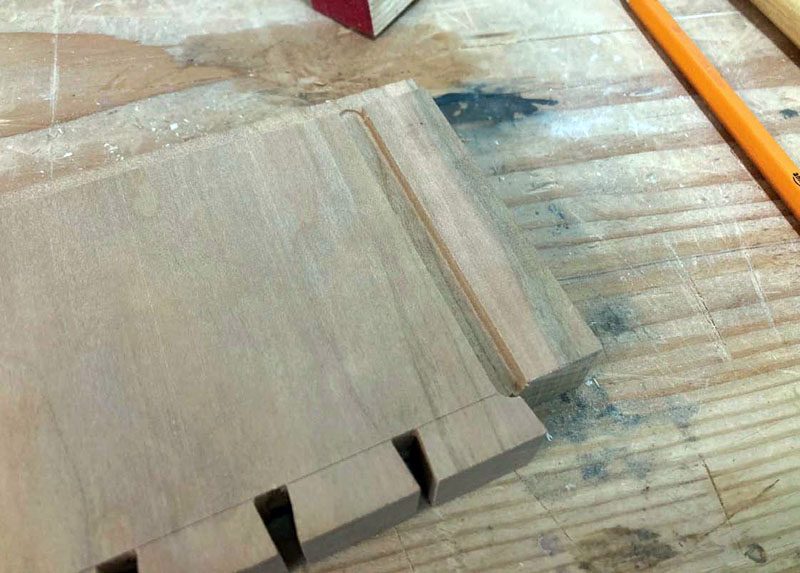
Ready for Assembly
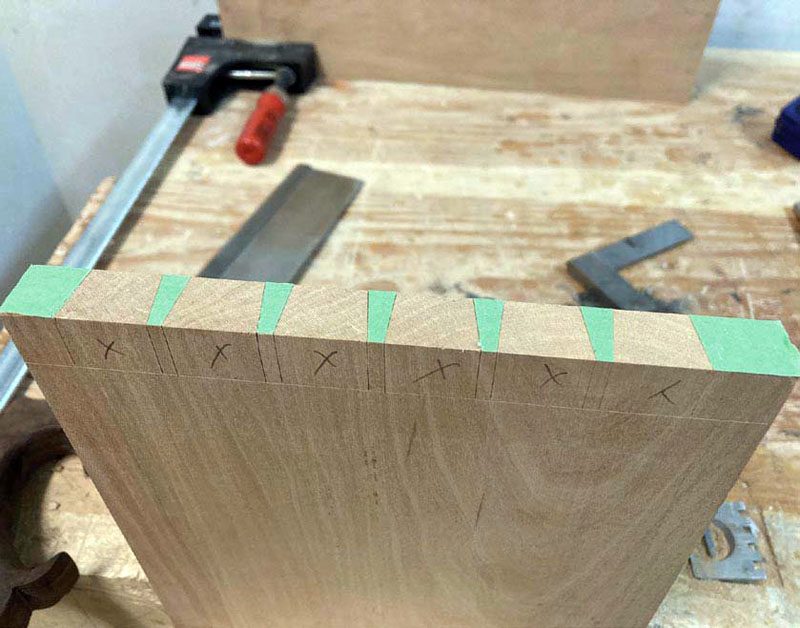
These case parts can now be used to lay out the mating portion of the dovetail joints.
Keep Things Clear
Dobson likes to mark the portion of the joint that will remain with masking tape so the process of removing waste is clear.
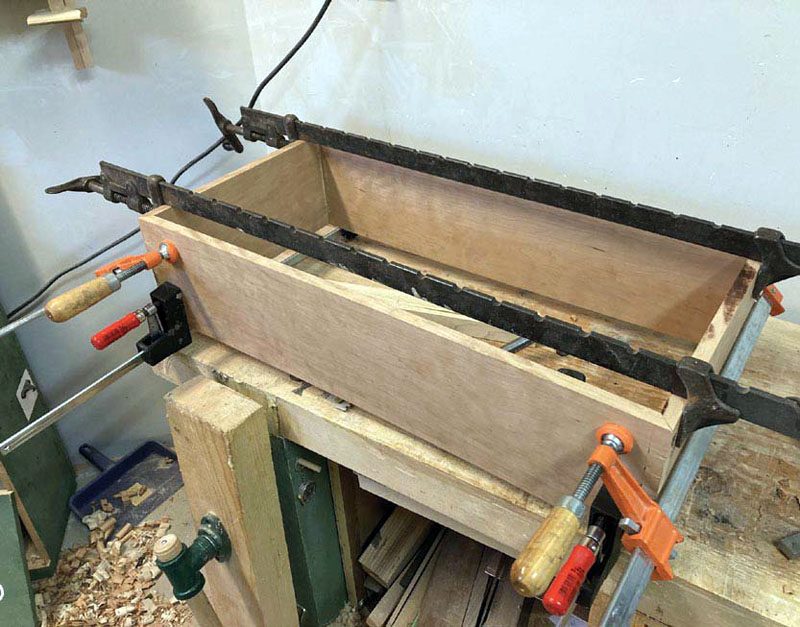
Bring Them Together
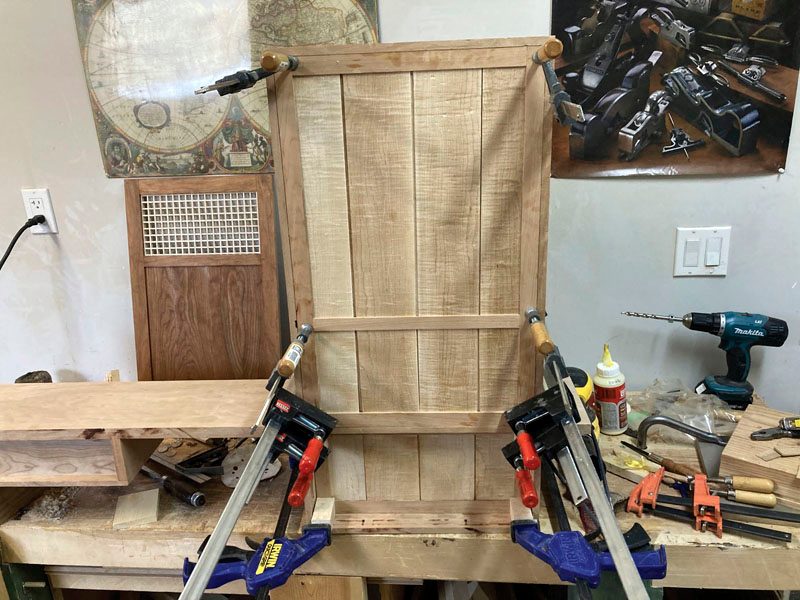
After a dry fit, Dobson applies glue to the joints and brings the parts together snugly with clamps.
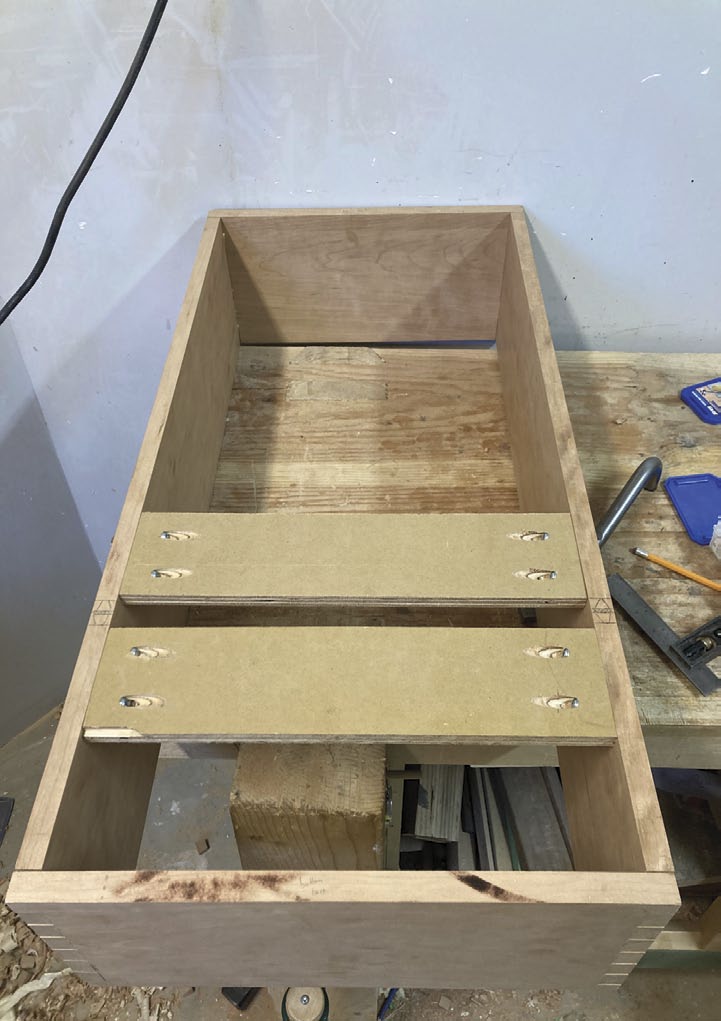
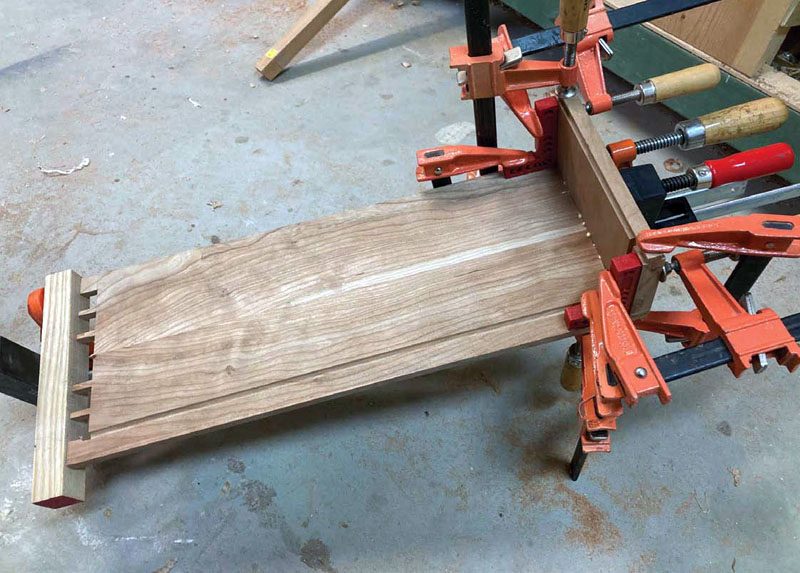
Add Spacers
Temporary spacers help keep the cabinet from shifting while it’s being cut in two. These spacers also make it easier to machine further joints on the gables to allow them to mate with the main shelf.
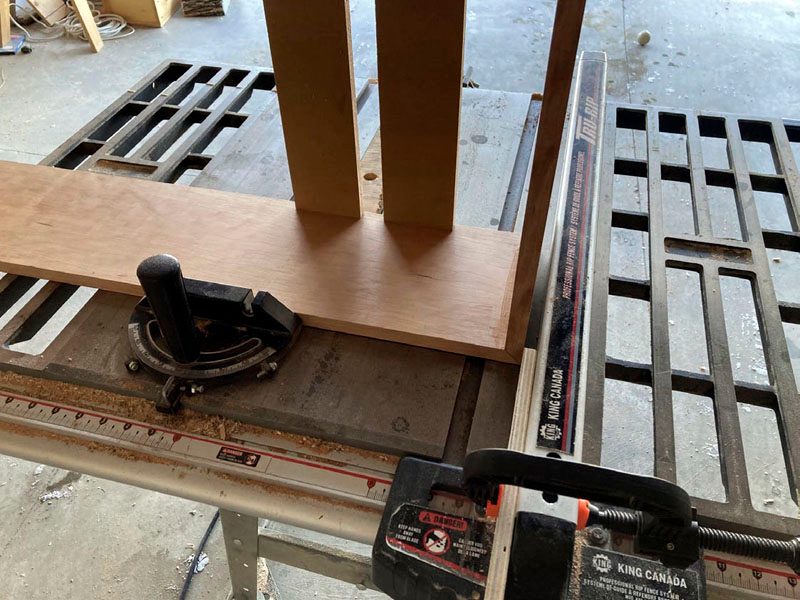
Stay Safe
Dobson is about to cut the cabinet into two parts. Notice the spacer clamped to the rip fence. This keeps the portion of the workpiece that’s between the fence and the blade away from the fence once the cut is made.
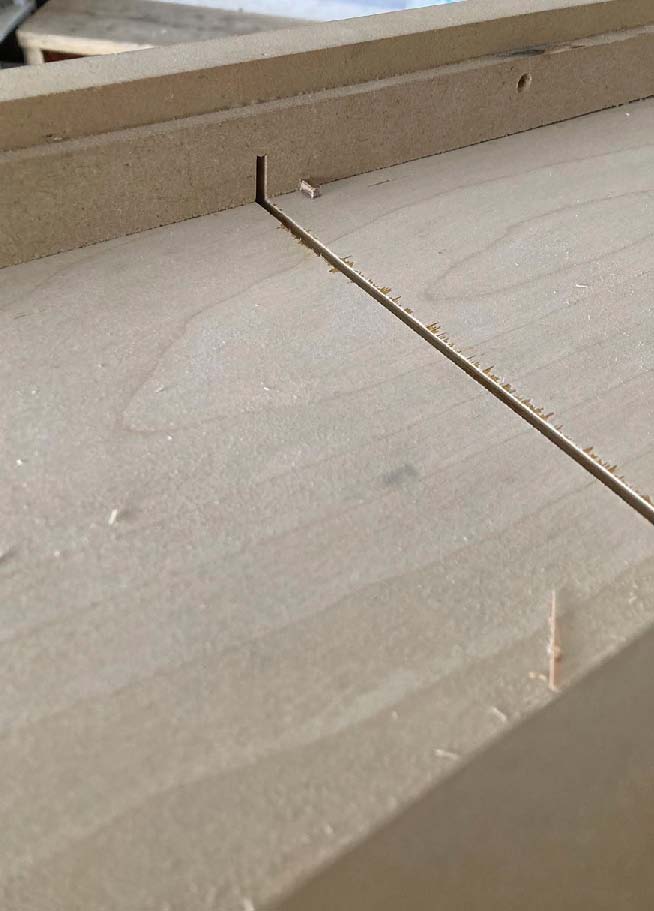
Sliding Dovetails
The main shelf needs some sliding dovetail grooves to accept the dovetail tenons that will be machined in the freshly cut ends of the case. A simple jig will go a long way in helping you create straight dovetail grooves across a workpiece. Dobson routed a smaller, straight groove first to remove much of the waste before he routed the dovetail groove.

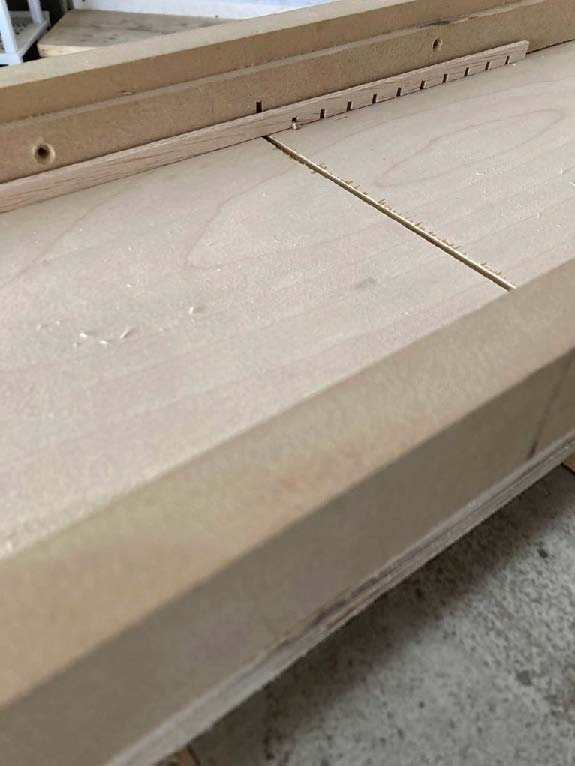
Keep Things Straight
Shown is the completed pair of dovetail grooves in the main shelf. Pencil lines, even if they aren’t perfectly accurate, will help keep the parts and the necessary joinery straight in your mind while you work.
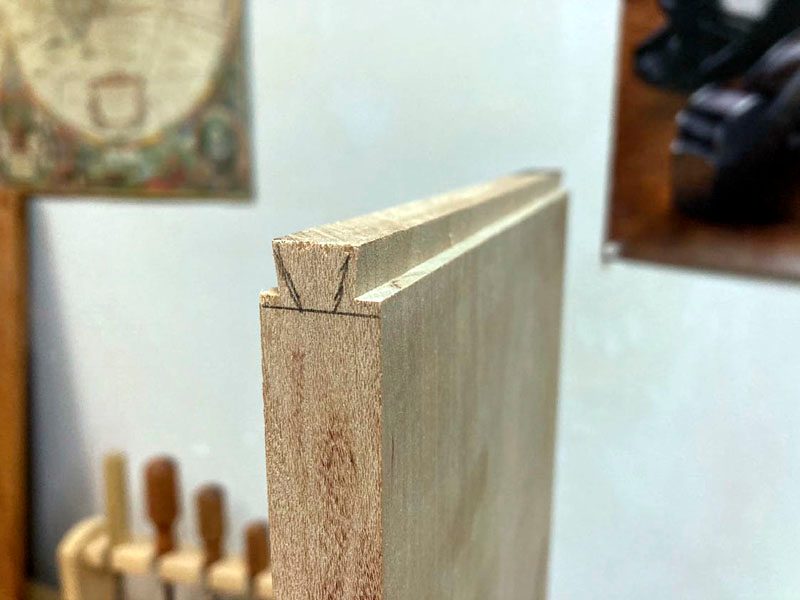
Dovetail Tenon
Be patient when cutting the dovetail tenons to size. Sneak up on the final dimension for the best results.
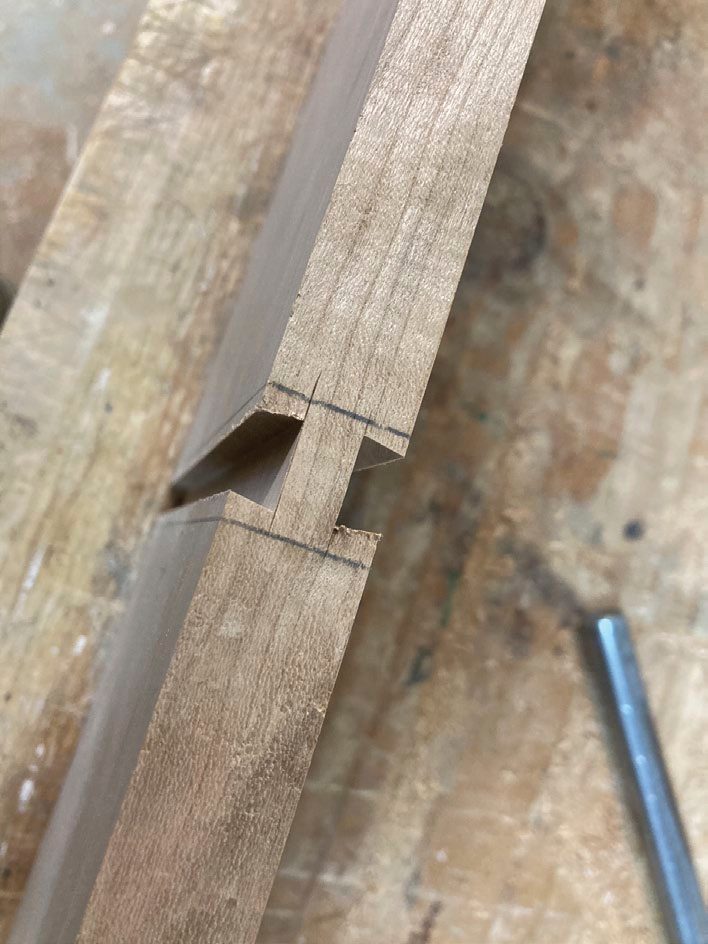
Mark the Tenons
Mark the locations for the tenons in the end of the main shelf, then remove the waste.
Transfer the Tenon Locations
Dobson uses the tenons on the end of the main shelf to lay out the locations for the mortises in the mating workpiece.
Remove the Waste
Once the locations are marked, use a saw to remove the waste so the tenons fit nicely.

Chop Them Out
Dobson works from one side, partway through the workpiece, then flips it over to work in from the other face. This will eliminate chipping on the underside of the workpiece.
Stopped Grooves
The 1/4" grooves that accept the back panel are stopped so they don’t protrude into the dovetail joints.
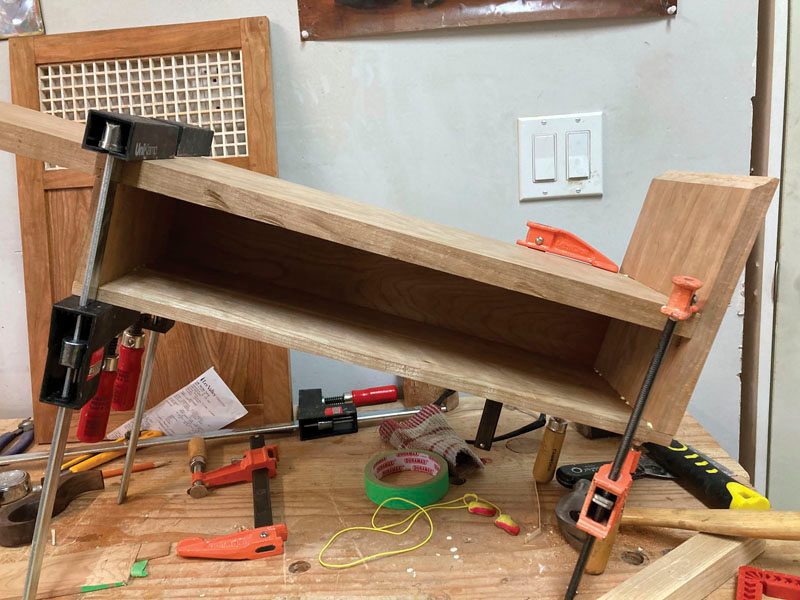
More Assembly
Here, the drawer case bottom and drawer case interior side get glued together. Ensure the parts mate at 90° while they dry.
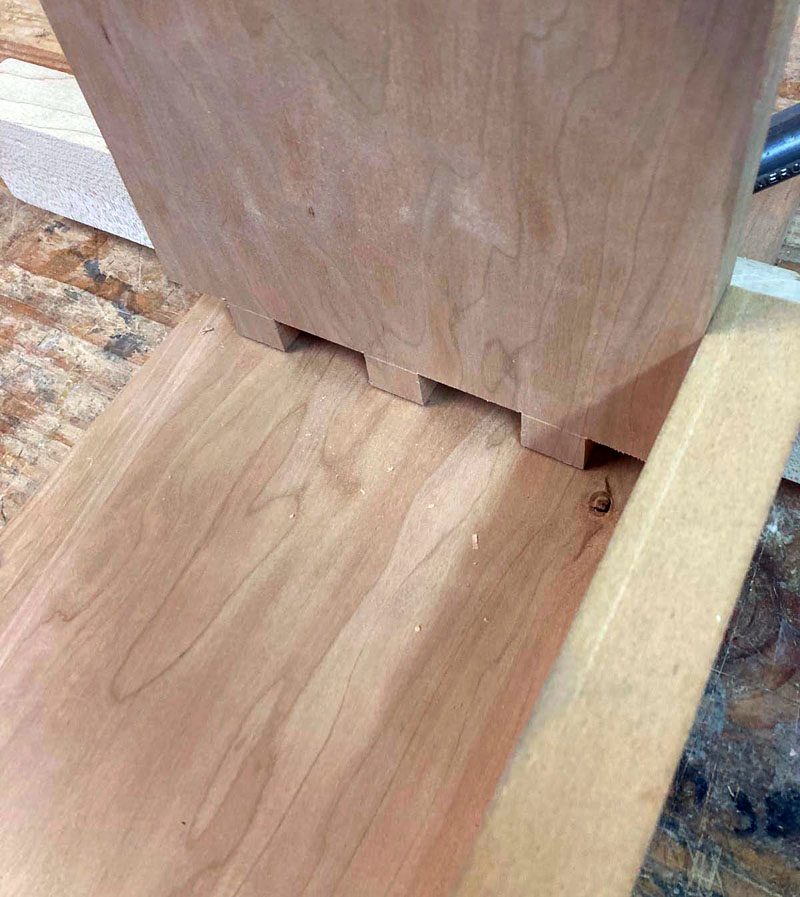
Drawer Case Is Assembled
Now all four parts that make up the drawer case are assembled. The drawer case exterior side, pictured at the right of this assembly, is the final part of the assembly to be brought together.
Shelf Groove
A router, guided by a straightedge, creates a dado for the shelf to fit into. Sizing the straightedge so it butts up against the mating workpiece will eliminate any positioning mistakes.
Back Parts
The rails that make up the outer frame for the back are grooved to accept the back panel.
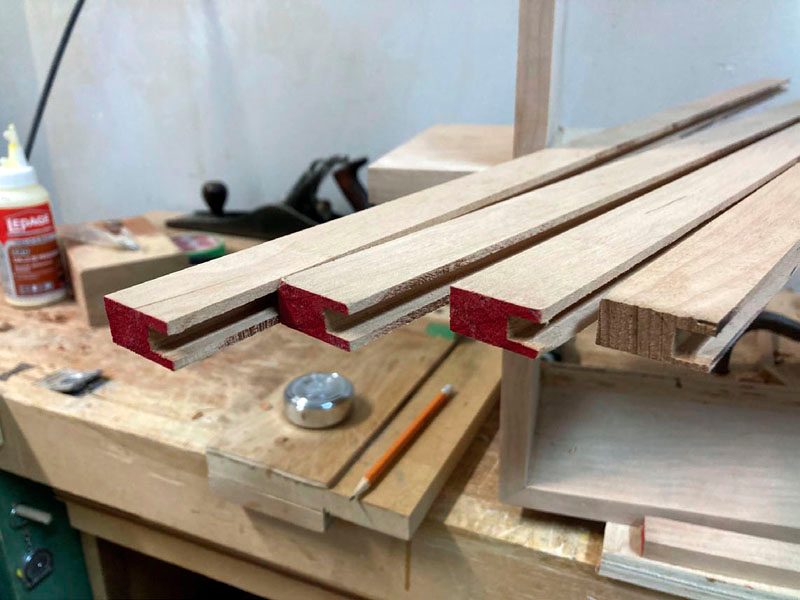
Small Joinery
Small shiplap joints will fill the visual gaps between the slats that make up the back panel.
Cheap Spacers
Once the back parts are cut to size and the joints machined, Dobson uses nickels to space the back slats evenly.
Glue It Up
The back panel is now glued up. Ensure the cabinet is still square before putting it aside to dry.
Backer Plate
Dobson added a piece the same width as the kerf of his blade to the edge of a backer plate, then screwed that plate to his crosscut sled. The distance between the edge of the small piece and the blade will give him the distance needed to make the kumiko pattern.
Cut Some Notches
Once the blade height is set, all the half-lap cuts will mate nicely and produce an even kumiko grid pattern.
Add Some Glue
A small dab of glue on the inner face of each half-lap joint will keep the strips together for good.
Trim to Length
Dobson temporarily installs another kumiko, then uses a flush cut saw to trim the glued-up kumiko to length. The extra 1/8" extensions will be used when installing the gridwork in the door frame.
Start with the Slots
Dobson cuts the slots for the door joinery on the bandsaw.

Notched Tenons
Once the tenons are machined on the table saw, a notch to accept the door panel needs to be cut into some of the tenons.
Rout a Rebate
Rout a rebate into the rear face of the door so the kumiko panel can be installed.
Drill for Pegs
Holes in the corner joints will accept pegs. The pegs will increase the strength of the frame, yet also play a role in aesthetics.
Mortise for Hinges
Once the door is complete, hang it to see how it fits. It might need to be trimmed slightly to fit into the opening evenly.
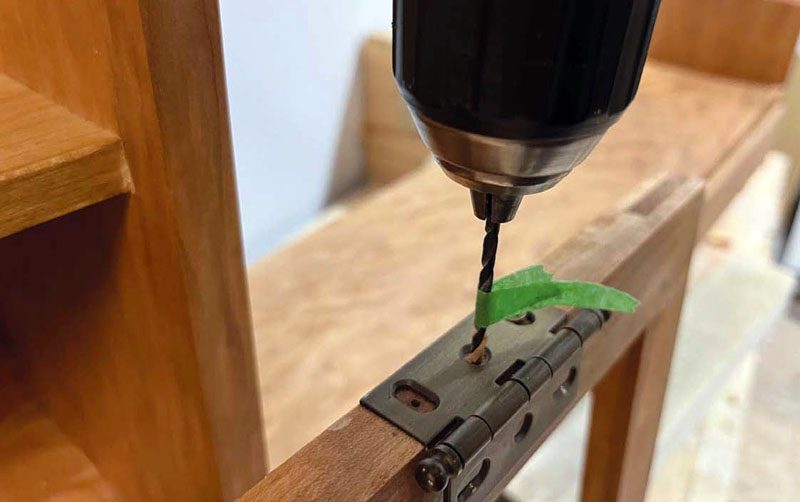
Careful Drilling
A pilot hole will help keep these small frame members from splitting. A piece of tape applied to the drill bit will stop you from boring through the frame.
Fold It Over
Dobson chose a pull that can be inserted through a hole in the door frame. The tips of the hardware can then be bent over to secure the pull in place. These are very traditional pulls.
Dovetailed Drawer Front
Half-blind dovetails secure the drawer front to the drawer sides. Once again, Dobson uses tape to keep the waste clear in his mind.
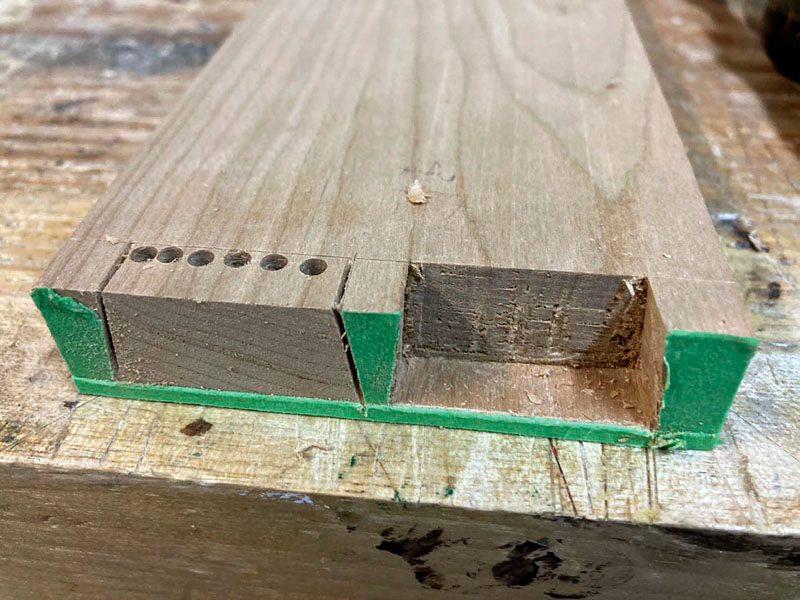
Illustration by Len Churchill


Thanks Klaus. Whisky vs Whiskey was front of mind while writing this one. I usually have an Irish whiskey (Bushmills) in the cabinet so went with that spelling. Of course, when it came time to photograph it there was a Scotch whisky and an American bourbon in it.
Nice work!
What a great looking cabinet, But, please be advised that up here in Canada, we spell “whisky” without the “e” 😄.