PROJECT
Make a simple textured box

Rob Brown

Find more Boxes projects
These boxes are so easy and fun to make, you won’t know when to stop. Grab a few small pieces of wood and see where this basic starting point takes you.
Make a simple textured box
Design considerations
Once I got the general approach of how I was going to build these boxes down, I could knock them off pretty quickly. An assortment of different coloured wood species, heights and widths makes for a pretty interesting collection of boxes. Even as simple art items, these boxes would look great on a shelf, with a spotlight to highlight their texture.
The overall dimensions and details of these boxes are very flexible. I made boxes between 2-1/2″ and 5″ high, and between 1″ and 2″ square, but you can really go as big, or as small, as you’d like. Generally speaking, drill a hole about 3/8″ narrower than the width of your box, so the walls will still be strong enough to withstand handling. It’s also unlikely the holes you drill will be perfectly centered – I know mine weren’t.
I used a thin vein line to conceal the joint between the lid and box. I only added texture above the top vein line, and below the lower vein line, but there’s no rule against adding texture to the entire box. There’s also nothing wrong with skipping the texture altogether. Chip carving or inlay would also be a great way to adorn the faces of these boxes.
Chop its head off
I applied masking tape to the underside and back faces of the box when cutting on my mitre saw, so when I cut the box lid off there was less splintering. I made my lids about 1/2″ long, but this is more art than science. Just don’t cut the lid too short to make it weak. While at the mitre saw, cut the bottom end of the box to determine how long the finished box will be. Mark an “X” centered on the top end of the main body of the box so you’ll know which end to bore the hole in. Also, mark a “G”, for “glue”, on the underside of the top, as you’ll eventually glue the lid lip to the underside of the main lid. You’ll want to ensure the grain in the body and lid line up when it’s assembled.
Break out a blank
Rip some stock square, and to the final width of your box. It’s best to start with a piece of wood that’s longer than the final length of the box you want. You can make multiple boxes out of one long length of wood. Trim one end of the stock square; this will be the finished top surface of the box. Finish sand the four faces and top of the work piece and make sure the four edges are eased so they’re comfortable on the hands. It’s strange to finish-sand this early in the project, but if you’re adding texture to your box, sanding will only remove any crisp edges left by the texturing tools.
Add texture
If adding texture to wood is new to you I would strongly suggest practising on some scrap beforehand. Layout the vein lines near the top of the box, then use a sharp gouge to add rounded grooves from just above the vein line towards the top end of the box on all four sides. Use a V-gouge to add the vein line on all four sides of the box, making sure not to cause any chipping near the edges. Neither the texture, nor the vein line, have to be perfect. Slight imperfections are what give texture a lot of its character.
Drill the hole
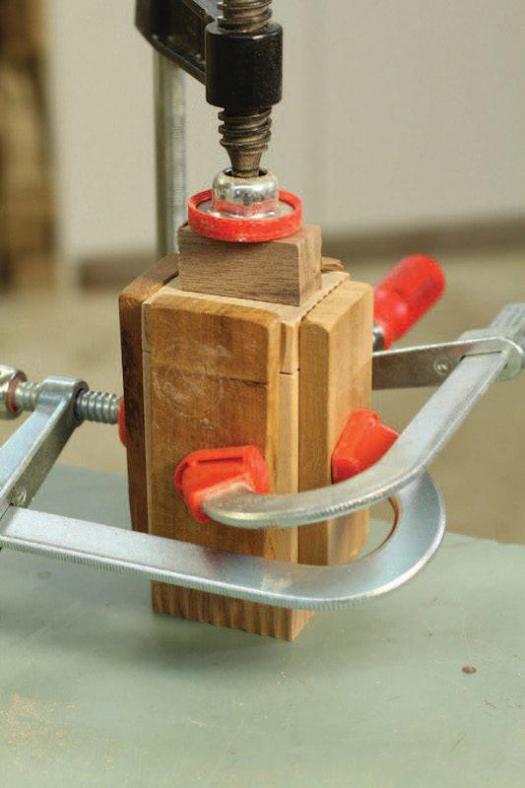
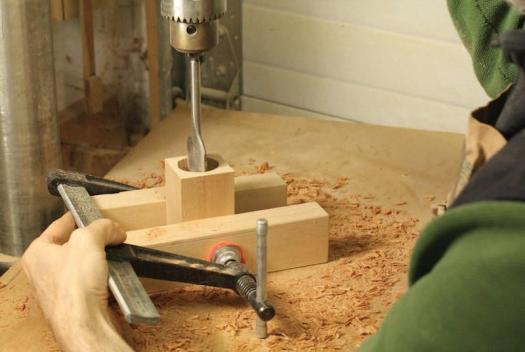
It’s crucial to clamp something to the body of the box while drilling the cavity, as otherwise the drill press will grab the box and injure your hand. I placed the main body of the box on a flat surface, lined up two flat cauls on either side of it, then clamped the cauls to either side of the box. I was then able to hold the clamp and cauls to give me a better grasp of the work piece. The added benefit was the cauls, being perfectly flush with the underside of the box, helped keep the box flat on my drill press’s table while the cavity was being bored.
I set up my drill press table’s height so the bit barely cleared the top of the body of the box. I also made sure the bit wouldn’t drill clear through the bottom of the box at the lower end of the stroke. With the drill press on make repeated bores into the center of the box, until the hole is at the correct depth. I had to stop my drill press many times to allow the drill bit to cool – a small container of water sped the process up. Don’t overheat the drill bit or you will ruin it. I used spade and Forstner bits in different boxes, and both work fine.
Add more texture
Clamp the box in a vise and add more texture, as well as a vein line, to the bottom area of the box sides. I positioned the upper and lower vein lines the same distance from the ends of the finished box, but another option is to position the lower vein line slightly further from the bottom of the box, as giving added visual weight to the base of the box gives a sense of grounding.
Domestic or Exotic Wood?
There are a few different directions you can take when selecting material for these boxes. Selecting simple, straight-grained material will allow any texture you add to the boxes to be the focal point. On the other hand, if exotic or highly figured wood is what you want to work with, you may find reducing the texture the best approach. And with these small boxes the amount of wood you need is minimal, so the total cost of purchasing exotic wood will not be too high. A few of the many options for sourcing woods of all types are Exotic Woods, in Burlington, ON, Century Mill, in Stouffville ON, B.C.W. in Brantford, ON, Woodchuckers, in Toronto, ON, The Wood Shed, in Smithville, ON and A&M Wood Specialty, in Cambridge, ON.
Lid lip
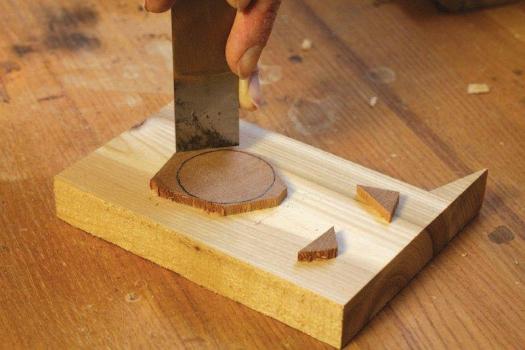
This is possibly the trickiest detail in making this box, so doing it right ensures the box looks and functions nicely. The lid lip gets glued to the underside of the lid, and not only centers the lid, but keeps it in place. Your cavity may, or may not, be perfectly round or centered, so keep that in mind. Cut an end grain slice of wood about 1/8″ long, and wider than your cavity. Draw the shape of the cavity on this slice then remove much of the waste with a sharp chisel and mallet. A belt sander, tilted on edge, will quickly (sometimes too quickly) remove waste to the line. At this point it’s a series of tests and sandings until the lid lip fits in the cavity nicely. Try not to lose the lid lip into the cavity, as it’s not easy to extract. You don’t want it too loose or it won’t hold the lid in place accurately. When doing this process ensure the grain direction of the lid lip is aligned with the grain direction of the lid and main body, so they will move with the seasons and cause no problems down the road. Mark the face that will be glued, so there are no mistakes during glue-up.
Glue the lid lip
Gluing the lid lip to the lid is easy, as long as you have the process right. Cut a piece of scrap to fit into the cavity, so its upper end is slightly further than 1/8″ (or the thickness of the lid lip) below the upper end of the main body of the box. Fold up a piece of paper towel so it’s a good 1/16″ thick and will fit into the cavity, on top of the piece of scrap. When the lid lip is placed in the cavity, and the lid of the box is positioned on top of the lid lip, light clamp pressure will compress the parts until the glue dries.
To ensure the main lid is aligned perfectly over the main body of the box during assembly, use a flat caul on each side of the box. Lightly clamp these cauls to the sides of the main body of the box and the lid will slide down between the cauls during assembly.
The last detail to consider is glue sizing. Because the end grain of the lid will allow glue to soak up inside it, there’s a chance that glue could squeeze out the top surface, causing ugly stains. It’s also going to produce a stronger joint if the top of the lid lip and the center area of the underside of the lid have been very lightly coated with glue a few minutes before final assembly. During assembly the parts can be re-glued and brought together for good. When dry, ease the edges between the lid and the box.
Add a finish to your textured box
Spraying a finish onto a textured surface works great. A spray bomb may be your best friend when it comes to finishing these boxes, unless you have spray equipment. You can also wipe or brush it on; with small projects like this it’s not going to be too much more difficult. I applied three coats of spray-on polyurethane to the sides of the box, but between the coats I added an extra couple of light coats to the end grain on the top and bottom of the box, as it soaks in finish material quickly.
It’s important these boxes feel nice in the hand, as they will be touched a lot. Texture has a way of tricking people into reaching for it. Once the finish is fully dry, I used #0000 steel wool and wax to buff the surfaces smooth. I stayed away from the textured surfaces, as those can’t be improved. I applied a few light coats of shellac to the inside of the box. I didn’t use an oil-based finish, as it needs air circulation to function properly.
Photos by Rob Brown
Add Texture
Once the blank has been cut to finished width in both directions, and the top surface has been squared off, Brown adds texture to the sides. For now texture is only added to the top of the box.
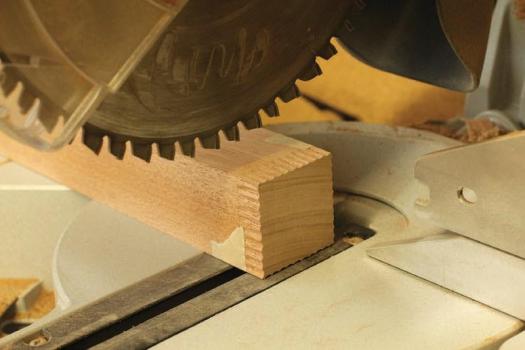
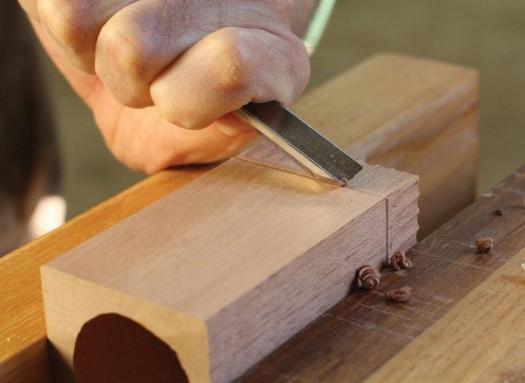
Cut the Lid Off
Because the four sides are finish sanded, Brown adds masking tape where the cut will exit the workpiece. This helps prevent splinters from forming.
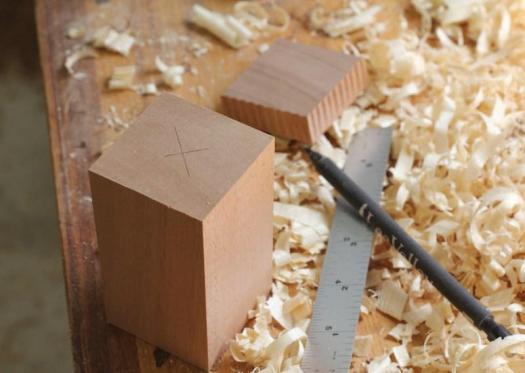
Mark the Center Point
With a steel rule you can line it up with opposing corners and mark an X in the center of the box blank.
Drill it Out
A clamp and cauls make holding the main section of the box in place much easier and safer.
Second Vein Line
Around the bottom of the box another vein line needs to be added, after adding matching texture to the area.
Slide of Endgrain
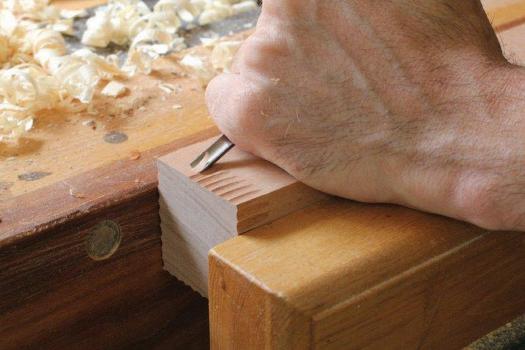
After cutting a thin slice of endgrain wood, mark a circle on it and use a chisel to remove most of the waste.
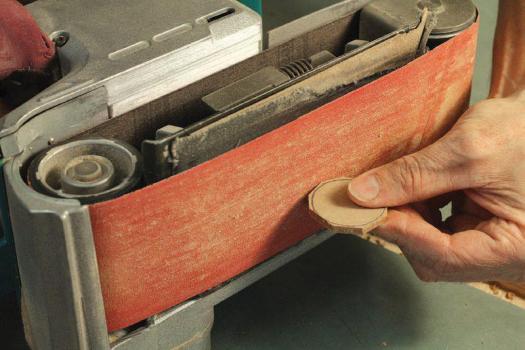
Careful Shaping
Fine tune the shape of the disk so it fits the opening of the box perfectly. A belt sander, turned on edge, works quickly, but a sanding block is less likely to remove too much material.
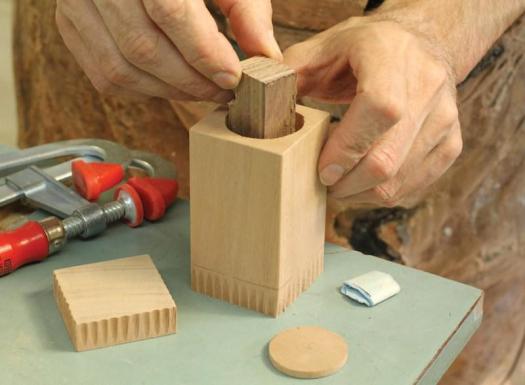
Applying Pressure
Brown inserts a piece of carefully measured scrap inside the box, then adds a piece of folded paper towel and the circular lid lip, followed by the top of the box. The folded paper towel applies pressure to force the lid lip against the top of the box during assembly.
Glue Sizing
In order for the glue to not stain the underside of the lid lip Brown adds an even layer of glue to the lid lip, then lets it dry for a few minutes, before adding a bit more glue and bringing the parts together.

Lots of Cauls
Cauls on all four sides of the box during assembly ensure the lid is aligned with the body of the box perfectly. Just make sure the cauls are perfectly smooth, or impressions will be transferred to the box.