PROJECT
Make a charcuterie board with drawers

Robert Zakarian

Find more Gifts / Crafts projects
Sitting down to enjoy delicious food and quality time with guests is great. Even better is being able to deliver a charcuterie board everyone can eat from.
I was in the market for a cheese serving board, however all the boards I found in stores were quite small and not what I was looking for. It was a great opportunity to design and make a custom board. This board measures 45″ in length by 11-1/4″ in width and is 4″ in height.
So the drawer cavity isn’t left open on the back side, I added a simple back rail between the two supports at either end of the board. From simple to complex, there are lots of joinery options.
I chose simple, and used a butt joint strengthened by a pair of 1/4″ dowels to hold each joint secure. These back rails are 2-3/4″ high and are cut to length during assembly so they fit perfectly between the supports.
Make a charcuterie board with drawers
Wood selection
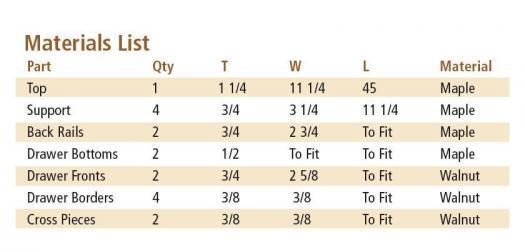
I used solid maple for this project. The drawer fronts are solid walnut for accent. Pretty much any wood will do. You could choose a bold wood like padauk or zebrawood, but I thought that approach was a bit too over-the-top for my taste. To each their own. Using a closed-grain wood is likely best, as there’s less chance food will get left in the grain to grow bacteria. Although wood is naturally resistant to that sort of thing, I prefer to be on the safe side.
Make the top
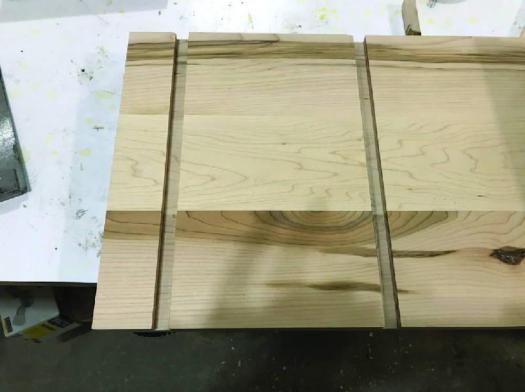
The top is 45″ long and 11-1/4″ wide. The final thickness is 1-1/4″. I dressed four boards to about 2-1/2″ wide, then glued them up to exceed the final width. When dry, I sent the plank through my thickness planer and cut it to final size. Rout a pleasing edge around the upper perimeter of the top. I opted for a 1/4″ chamfer.
Four supports
Another custom thought I had while making this board was including storage. I added two drawers to keep assorted serving utensils organized and nearby. The drawers could be made to whatever size you like. I made these drawers with the size of my utensils in mind. I decided to attach four supports to the underside of the top. Their function was two-fold. First, they would support the top. Second, they would have grooves in their sides that would guide and support the two simple drawers.
Though there are a number of options, I decided to use sliding dovetails to fasten the supports to the underside of the top. I cut the four supports to size, keeping in mind the extra material needed for the sliding dovetail tenon. The overall height of the top was 4″. Subtract the 1-1/4″ thick top and you get 2-3/4″ for the supports. Then add in the height of the sliding dovetail tenons (1/2″) and you have a final width of 3-1/4″ for the supports. Cut those four parts to size now.
I used my Porter Cable jig to cut the sliding dovetails on the underside of the top and all four drawer support pieces. There are many ways to cut sliding dovetails. If you don’t have a jig, rout the four sliding dovetail grooves in the underside of the top first, then install the same router bit in your router table and carefully adjust the height to allow you to router the sliding dovetail tenons.
As for the spacing between the sliding dovetails, I located the outermost supports 1-1/4″ from either end. The two innermost supports can be positioned according to how wide you want the drawers.
With the dovetails compete and dry fit, I machined a drawer groove on the inner face of each of the supports. These 1/2″ wide grooves are cut using the table saw and a dado set. I positioned these grooves 1/4″ away from the bottom edge of the support. The drawer bottom will fit into these grooves and allow the drawer bottom and face to slide in and out.
Two-piece drawer
The drawer bottom was glued up so it would fit between the two supports. I then planed it down to just under 1/2″. This will allow the drawer to slide freely in the 1/2″ wide groove in the sides of the supports. The two drawer fronts are also machined to size now, and a 1/2″ groove is cut in the rear of the drawer front to accept the bottom. This joint will only be glued at the center 5″ or so to allow the drawer bottom to shrink and swell with seasonal movement.
Dry fit and assembly
Once all the parts are complete, I double check everything with a dry fit before final glue-up and finishing. All the parts were sanded prior to the final glue-up. The assembly was quite simple. You can assemble two supports with a back rail, then install that assembly in the sliding dovetail grooves on the underside of the top first. Another slightly different variation is to install each support, then add the back rail between them. The choice is yours. I chose to assemble two supports and one back rail, then added that assembly to the underside of the top.
Glue two supports with the mating back rail and fasten them. Next, partially install the support assembly into the front of the top, so only half of the length of each support is inside the sliding dovetail in the top. Apply glue to only the portion of sliding dovetail that’s visible. This allows the top to move with the seasons, but keeps it in place. Repeat for the other side.
At this stage the drawer faces can be glued to the drawer bottom and ensure the fit is perfect.
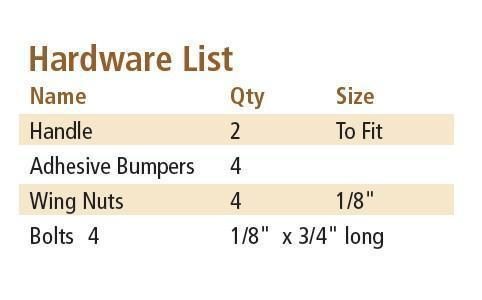
The 3/8″ × 3/8″ drawer borders were made and attached to the sliding tray with glue. They help contain the drawer’s contents. By adding another cross strip to the borders, you can lock the utensils in place. If that’s the approach you’d like to take, countersink a small bolt into the underside of the borders, and install it with its head pointing downward. A mating hole can be drilled in the crosspiece, and a small wing nut can be added to hold the crosspiece in place.
A handle is next. I shaped and attached a wooden handle, but a store-bought handle is also an option.
Finishing
I used a food grade oil from Ligna for a finish, but there are many other good options out there. Once a few coats are applied, and a rubber bumper is added under each corner of the project, the charcuterie board is ready to be delivered to its new home and enjoyed.
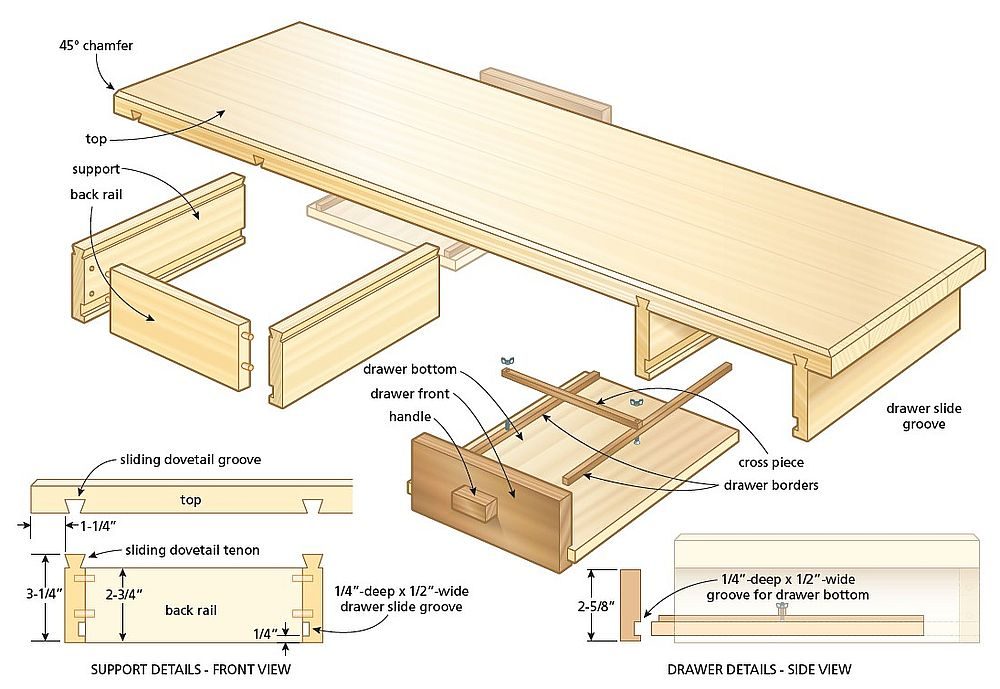
Sliding Dovetail Grooves
Zakarian routed four sliding dovetail grooves on the underside of the top. These grooves received the sliding dovetail tenons on the side of the four supports. Placement of these grooves isn’t critical, but will determine how wide the storage drawer is.
Drawer Sub-Assemblies
Though you can install the supports and then add the back rail, Zakarian opted to bring the three parts together first. The length of the back rail has to be cut exactly to length if you go this route.
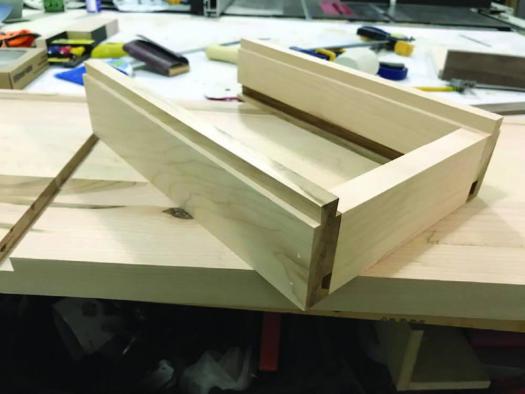
Simple Drawer
This may be the simplest drawer in the world. A flat bottom inserts into a groove in the rear of the front. The sides of the bottom run in grooves in the side of the supports.
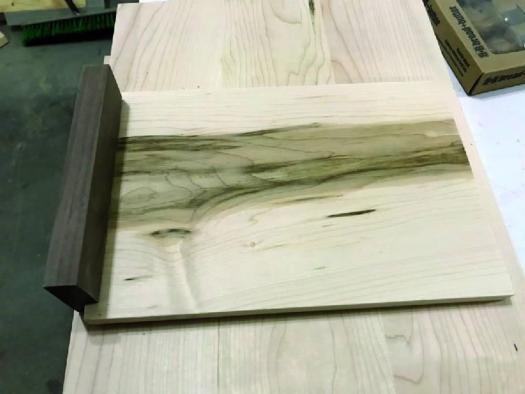
Customize It
In order to keep his utensils from moving around, and to add a sleek finished look, Zakarian added a pair of walnut side rails, and a third cross rail to the interior of his drawers. A pair of small wing nuts are removed to access the utensils.