PROJECT
Inlaid Jewellery Box

Glen Friesen

Find more Boxes projects
A finely handmade gift is itself a statement, saying as much about the maker as it does about the receiver.
And like the act of gift giving, the making of a gift is an intimate activity, requiring time, patience, and thoughtfulness.
My wife’s family has a Christmas tradition that I really enjoy. At the conclusion of the season’s festivities we put our names on small cards, which we toss into a hat. Everyone then draws a card from the hat, for whom they will make a handcrafted gift the following Christmas. Deciding on the ‘perfect gift’ for some special person and then making the gift can sometimes cause a bit of anxiety, but it is eminently more satisfying than struggling to find that elusive mass-produced gift in the pre-Christmas shopping rush.
Inlaid Jewellery Box
Last year I pulled my teenaged niece’s name from the hat. After careful consideration I decided to make her a small inlayed jewellery box. I especially enjoy constructing small boxes as they provide the perfect canvass on which to inlay custom designs. As well, it provides me with an opportunity to incorporate species of wood that I have not used before and to experiment with different forms.
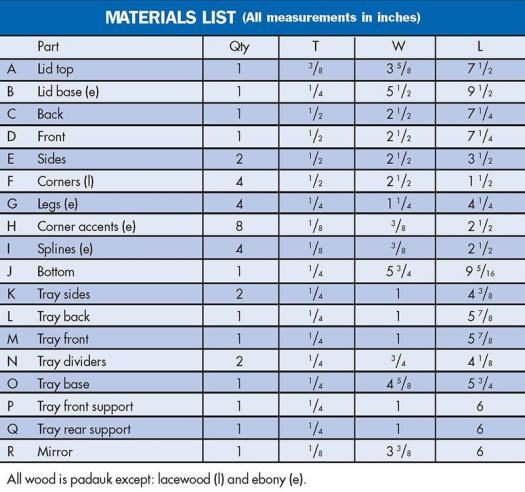
I selected lacewood for the corners (because of its lovely intricate flecks), padauk for the top, sides and base (because of its fiery red-orange colour), and jet black ebony for the legs and trim. You could of course, make this box using a single wood species or mixing two or more complementary species as I did. The overall dimensions of the box are 2 ½” x 6″ x 9 ⅞”.
Prepare the Material
• Mill stock for the lid top (A), lid base (B), and bottom (J), and cut to finished dimensions.
• Mill a piece of 1″ x 2 ½” x 26″ stock.
• From this piece cut the back (C) and front (D) pieces with 22 ½º angles at each end, 7 ¼” from long-point to long-point, and the side (E) pieces with 22 ½º angles at each end, 3 ½” from long-point to long-point.
• Mill a piece of 1″ x 1 ½” x 12″ stock.
• Rout a ¼” x ¼” groove along the center of one face.
• Cut 22 ½º angles along each side of the piece.
• Trim the stock into four 2 ½” corner (F) pieces.
• Mill a piece of ⅛” x ⅜” x 24″ stock.
• Slightly round over the edges of one side of the piece. You can do this with a hand plane, or with a ⅛” radius router bit on a router table.
• Cut the piece into eight 2 ½” lengths for the corner accents (H).
• Mill a piece of ¼” x 1 ¼” x 18″ stock.
• Cut this piece into four 4 ¼” lengths for the legs (G).
• Mill a piece of ⅛” x ⅜” x 12″ stock.
• Cut the stock into four 2 ½” lengths for the splines (I).
• Mill a piece of ¼” x 6 ½” x 10” stock for the bottom (J).
Shape the Sides
• Draw an arch on both sides of the top edge of front piece (D); you’ll want to ensure that ½” of stock remains.
• Cut the curved shape on a bandsaw.
• Using piece (D) as a template, transfer the curve to the side pieces (E), and cut them out on the bandsaw.
• The back remains straight; re-saw it to ½” thick, removing waste from the ‘short’ side.
• Sand all the surfaces smooth.
• Using piece (D) as a template, transfer the curve to the corner pieces (F). I used a shop-built jig to speed the sanding process for these pieces (see Sanding Corner Pieces sidebar). The corners are held together with a spline that is visible at the top and bottom of the box sides. It is helpful to have a fullsize drawing of the assembled sides to guide your progress.
• Slightly round over the outside corners of the front (D), back (C) and sides (E).
• Using yellow glue and spring clamps, attach the corner accents (H) to both sides of each corner piece (F). I set the corner accents flush with the back of the corner pieces.
• Once these are dry, use a table saw to cut a ⅛” groove on each side of the corner (F), back (C), front (D) and side pieces (E). Cut the groove about ¼” deep in the corner pieces and ⅛” deep in the other pieces.
• Apply glue to all the mating surfaces, insert the splines (I) and glue the corners, sides, front and back together. A band clamp or surgical tubing (available from Lee Valley) works well. Make sure the box stays square during this procedure.
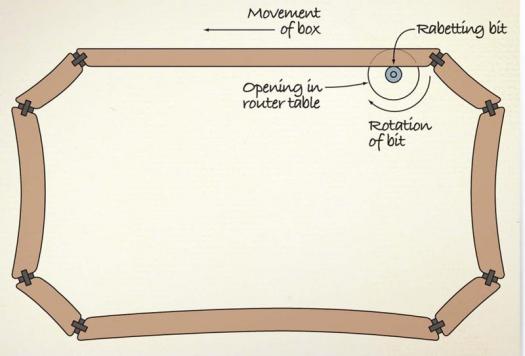
• Once the glue has dried, remove the clamps and using a piloted rabbeting bit and a router table, rout a ¼” x ¼” rabbet in the bottom of the box to accept the box bottom (see ‘Routing groove for bottom piece’ illustration).
• Place the bottom of the glued-up box on a sheet of paper or piece of cardboard, and trace out the profile of the bottom (J) along the inside edge of the rabbet.
• Cut out the bottom on a bandsaw and sand the padauk bottom to fit.
• Glue the box bottom into place.
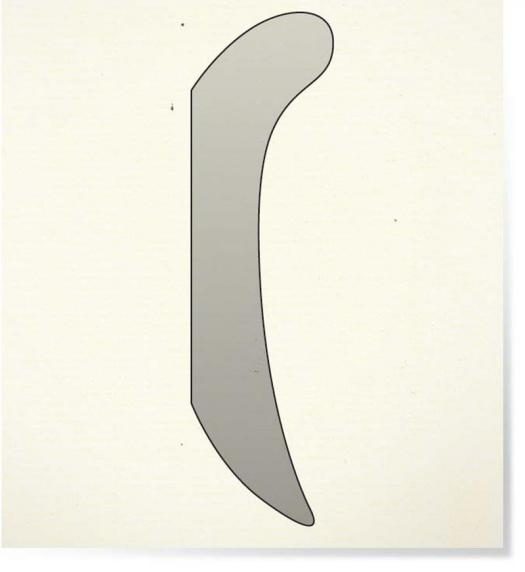
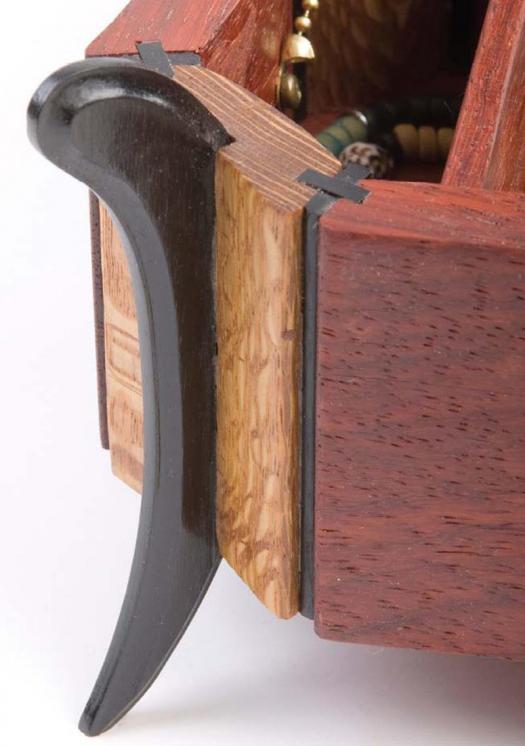
Cut the Legs to Shape
The legs are curved to complement the scalloped sides of the box.
• Transfer the leg template onto a sheet of cardboard or stiff paper and cut it out.
• Use the template to draw cut lines on each of the legs (G). The back edge will remain straight.
• Bandsaw the legs to shape and sand them smooth.
• Using a ⅛” radius cove bit, rout a cove on both sides of each leg piece, leaving about ⅛” flat along the front edge. Don’t rout the straight edge.
• Glue the legs into the ¼” groves in the corner pieces (F), being careful to avoid squeeze-out.
Build the Tray
The tray is a simple box divided into three compartments with the center having a ring storage area.
• Mill stock for the tray sides (K), back (L), dividers (N), and bottom (O) and cut to finished dimensions.
• Select a piece of ½” x 1 ½” x 7″ stock for the front piece (M).
• Transfer the curve from the front piece (D) onto the tray front piece.
• Bandsaw the tray front piece to shape and sand it smooth.
• Rout a ¼” x ⅛” rabbet in the bottom edges of the sides, back, and front tray pieces.
• Glue and clamp the tray together. I simply butt jointed the pieces. Optionally you could reinforce the butt joints with mini dowels or splines.
• After the glue has dried, glue and clamp the tray bottom into the rabbet.
• Sand everything thoroughly.
• The ring holder was constructed of light cardboard covered with soft leather and folded into the cavity. It was fastened in place with hot glue after the finish was applied.
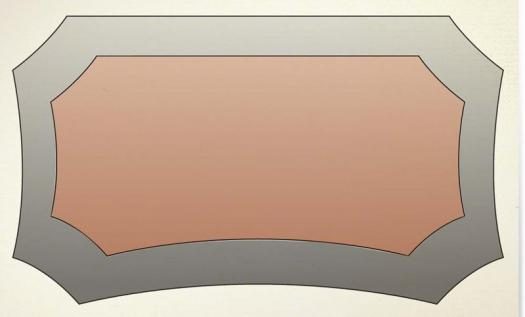
A Two Part Lid
• The lid is comprised of a top (A) and base (B), which follow the shape of the box. The base only covers half of the top edge of the sides. To save some ebony I cut a void in the base. The void is covered by the mirror (R). Make sure to retain at least 1 ½” of stock around the outside edge of the void.
• Make a template for the top and another for the base.
• Tape the templates to the top and base, cut them out on a bandsaw and then sand the edges smooth.
• Glue the top to the base.
• Optionally inlay a design onto the lid (see Personalize Your Project With Inlay sidebar).
• Install two small hinges and a brass chain to prevent the lid from opening too far. I located the hinges approximately 34″ from the edges of the back. Be careful that the screws do not penetrate the top of the lid. To attach the hinges to the box, I cut a slot with a small burr used for routing an inlay cavity, and then inserted the leaf of the hinge in the groove. Put a dab of polyurethane glue on the leaf before inserting it into the slot. Use a #4, ½” screw, installed from the outside of the back piece, to hold the hinge in each slot.
• Drill holes to accept small screws to attach the ends of the chain to the lid and the side of the box.
• Cut an appropriate length of chain, install chain ends and attach to the box (remove before finishing).
• Mark the center of the front edge of the lid. With a 1″ sanding drum, carefully sand a semicircular recess on the bottom of the lid to allow room for a finger to open the box.
Finishing
I applied three coats of wipe-on polyurethane, allowing for sufficient drying time between each application. If you use dense woods like I did you may need to allow for longer drying times. Once the finish has thoroughly dried you can add a mirror to the back of the lid (securing it with a bead of silicone), and a ring holder to the removable tray.
I enjoyed constructing this jewellery box. It is an elegant piece and adding the inlay personalizes it for the recipient. When I construct a project like this, it is my hope that the user enjoys it for many years, and that it becomes a treasured heirloom passed to future generations.
Personalize Your Project With Inlay
Inlaying is a great way to personalize any woodworking project, and it isn’t as difficult as you might think. If you haven’t done it before, the key is to begin with a simple inlay. Inlays with straight lines and angles are much easier to do than inlays with curves. Begin with a few simple geometric shapes, and as your skill builds, move on to more complicated images.
The butterfly on the lid consists of several colours of mother of pearl and abalone, with the lettering for Kirsten’s name in white mother of pearl. The inlay materials are approximately .05″ thick. The text chosen for the name is a Japanese stylized font gleaned from the Internet. Photocopy the inlay pattern (and any text) onto paper. Then glue the inlay material onto the paper with cyanoacrylate (CA) glue. Cut out the inlay using a jeweller’s saw with a 2-0 blade. Once the cutting is done, file the edges smooth to ensure a good fit between the pieces. Glue the pieces into place on the lid using balsa model glue. Once the glue is dry, use a razor sharp X-acto knife to incise around the inlay pieces. This outlines the cavity that needs to be removed. Using a razor blade, carefully remove the inlay pieces, and then rout the cavities. A Dremel rotary tool is ideal for this task. The depth of the cavity should allow the shell to fit in slightly proud of the surface. When the inlay fits in the cavity, install it with cyanoacrylate glue and allow it to dry. Sand the inlay flush with the surface.
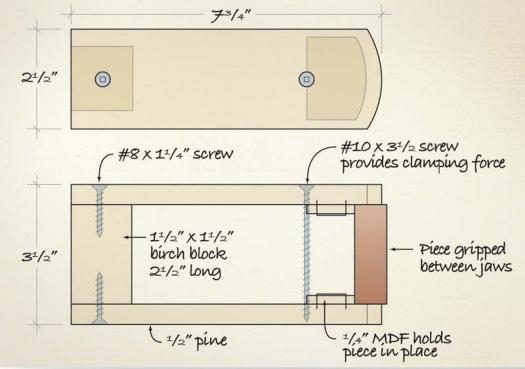
Sanding Corner Pieces
I made a jig to help me quickly and safely sand the small corner pieces (F). The corner pieces are clamped vertically between the two ‘jaws’ by tightening a #10, 3 ½” wood screw. The ¼” MDF pieces glued to the ½” pine jaw sides keep the corner pieces properly aligned. Scribe the outside and inside radius profile on the top edge of each corner piece. Tighten the #10 screw to securely hold a corner piece between the jaws, set the jig on the drill press table, and using a sanding drum that matches the curve of the outside of the corners, gently sand to the scribed pencil line. Once you’ve finished sanding the outside profiles, sand the back (convex) profiles.
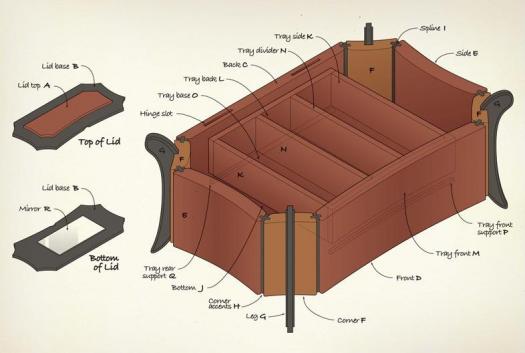
Sculpted leg and corner assembly
Routing groove for bottom piece
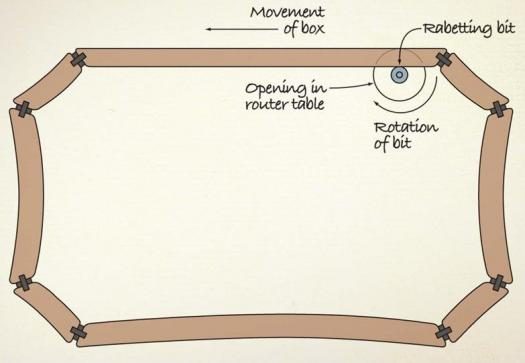
Illustration by James Provost