PROJECT
Floating top console

Chico Sakman

Find more Furniture projects
For this ‘floating top’ console, Chico strove for strength and grace: delicate, but not too frail.
For this ‘floating top’ console, I strove for strength and grace: delicate, but not too frail. I also wanted some unique details that would entice the viewer to scan the whole table.
Essentially, I wanted an interesting and exciting look. For me, that was captured with the table’s most unique design point: twisted legs. Such interest could also be achieved with double (or quadruple) tapered legs, or flared legs.
Floating top console
Since this design contains a minimal number of stretchers and other structural parts, its integrity of construction relies on the strength of the wood, and its large (though not oversized) mortise & tenon joinery. (For additional info on M&T joinery, see “Wood Joinery” Oct/Nov 04).
I used contrasting wood to emphasize and define certain lines of this design, but you could make it out of one species. I wanted to use purpleheart, and I chose a light coloured curly maple as an accent. I felt that the purpleheart by itself would have been too dark, obscuring the curved ends of the top. The maple feet provide contrast and draw your attention downward, emphasizing the diagonal twisted legs.
Having said that, it is very easy to over use multiple contrasting woods in a design. The amount and placement of contrasting wood is a delicate balance to maintain. The goal is to compliment, not to overwhelm. This aspect of the design process can be somewhat difficult to visualize and establish on paper. If that’s the case for you, you can always experiment with different woods during the construction process to reach a final decision.
I love purpleheart, but its look isn’t for everyone. If you decide to build this table (or a version of it), cherry, figured maple, or walnut would also look great. You could also consider some reddish-brown exotics like jatoba, padouk or makore.
Construction and Joinery
The key construction element of this table is its front and back aprons (A). Everything is joined to these two pieces of wood.
Cut the tenons first. Then, using the shoulders, clamp a block of wood to guide your router to cut the through mortises. I use a ½” spiral router bit in my router, with the edge of the bit set 1 ⅞” from the edge of the router base plate. If your router’s base changes this dimension, even up to an inch, it should still be fine. If it’s any closer than that, it would weaken the tenon that goes into the leg’s mortise. This is especially critical if you’re using a less dense domestic wood, like cherry or western maple. Mark the curved lines and bandsaw the waste. Use a router (with flush trimming bit) and a curved template (with 44″ radius) to smooth the edges. You could also use a spokeshave and/or drum sander to smooth the edges.
Although I did not curve the bottom of the side aprons, I think now that it would have better complimented the curved edges of the top. If you decide to curve them, try a 36″ radius.
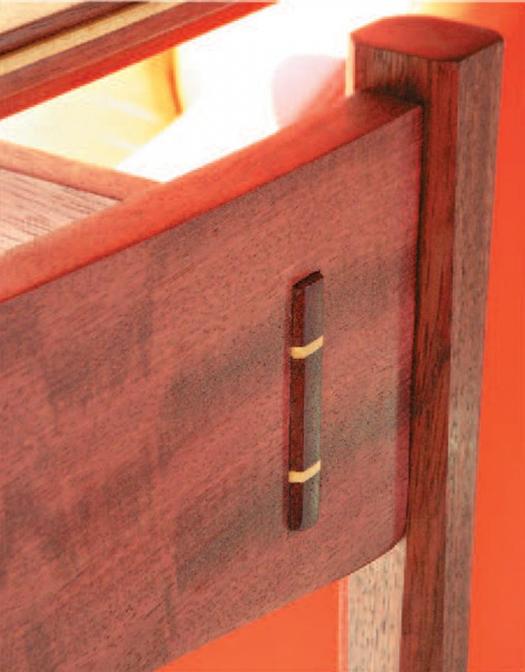
The tenons of the side aprons go through the front and back aprons. You can use a table saw, bandsaw or handsaw to cut the tenons. Table saw cuts provide the most consistent results. You’ll need to chisel out the mortises, so pre-drill out most of the waste on a drill press. Bevel the ends of the tenons before assembly, then cut the kerfs which receive the maple wedges. Before you cut the kerfs, drill ⅛” holes at the end of the kerf line; this will help prevent splitting when the wedges are driven in.
Cut a ⅜” x 1 5/32″ x 5″ mortise on the top of each leg. Pre-drill the waste, then chop the mortises with a chisel. You could also use a dedicated jig, like the Leigh Mortise and Tenon Jig (see review of Leigh M&T jig – Canadian Woodworking Aug/Sept ‘03). The leg mortises are the same size as the tenons, except their length from shoulder to the end is 1 ⅛”. That leaves a 1/32″ gap at the bottom of the mortise for glue spill out.
The curly maple feet are simply glued to the purpleheart legs. I know purists will say “You can’t glue end grain!”, but I’ve never had a problem, even with chair legs. Technically, the reason end grain glue-ups fail is because porous end grain absorbs the glue and starves the joint. However, since PVA glue works on a cellular level, it literally fuses cells and fibers, to create a bond between the two pieces of wood.
Cell structure and fibers are dramatically differently on end grain and face grain, which is another reason why end grain does not glue well to face grain. However, it’s a different story when end grain meets end grain. In this case, I apply glue to both end grain pieces, wait a few minutes until the glue gets tacky (not dry), then apply a little more glue and clamp the two pieces together.
Pay attention to grain orientation when you’re machining. Doing so will avoid unwanted tear-out due to the opposing grain direction. If you decide to attach the feet to the legs in this way, it’s very important that you crosscut the legs and feet pieces carefully. For successful gluing you don’t want any score lines or burn marks. If you prefer, you could always dowel the feet to the legs.
The legs are faceted on the jointer, with the fence set at 45º. It is a tricky operation, so use caution, especially at the beginning when the corners are sharp and have no flat reference faces for good contact with your jointer bed. Count every pass so you can keep the legs looking the same.
If you’re nervous about performing this operation on the jointer, you can flare the legs using a #7 or #8 jointer hand plane. Use the jointer hand plane at the beginning to establish the flat facets, then switch to the jointer for the rest of the planing. If you prefer, you could even do the whole thing with a hand plane.
This table would also look good with a different leg design. You could try a simple flared leg to match the curve of the top.
The braces that connect the top to the base are maple, inlayed with ½” x ½” purpleheart buttons. These braces are lap joined and doweled to the aprons. They are also counterbored to receive 4 screws for attaching the top.
I bevelled the edges of the top with a 45º chamfering bit, to emphasize the floating top. The beveled edge also makes the ⅛” beading more proportional. The slot for the maple beading is done with a Lee Valley ⅛” box slotting bit. I like this bit because with its ½” diameter, it’s very easy to climb-cut, minimizing the possibility of tear-out. (Editor’s Note: Climb-cutting is feeding the router right to left, the opposite of the normal feeding direction. This operation can be very dangerous with larger diameter bits or even small bits that are fully engaged into the work piece). Exercise caution, taking a series of small passes to remove material.
I glued ⅛” x 3/16″ curly maple strips into the slot I had routed. These strips are mitered at the corners. Since there is no router bit that cuts ⅛” beading, I used the ⅛” bead cutter from my old Stanley #45. I took the cutter out of the plane and used it as a scraper to shape the bead on the curved ends to a 36″ radius.
All in all, this was a fun piece to build. It also put good use to some of that mottled purpleheart I picked at the Victoria Woodworking show from Westwind Hardwoods. I finished it with linseed oil and 4 coats of hand-rubbed varnish.
Maple wedge detail
Brace detail
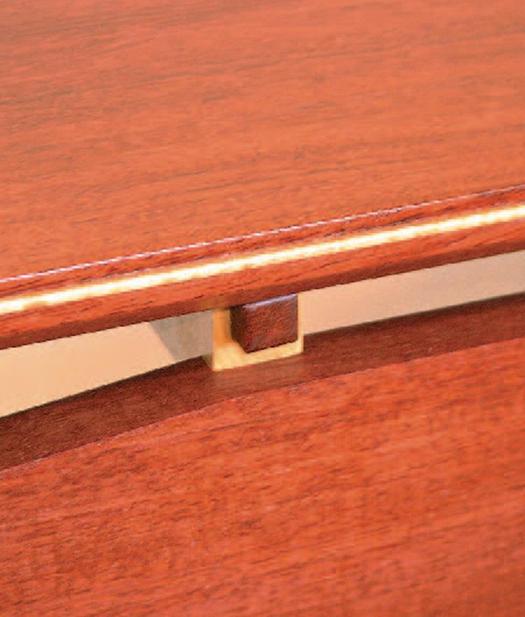
Illustration by Mike Del Rizzo