PROJECT
Flags Puzzle

Murray Mackinnon

Find more Toys / Puzzles projects
It’s rewarding to be able to share your woodworking interests with family, friends, and colleagues during festive seasons. Make a few of these puzzles so you can have one around, and also give a few away.
This wooden implementation of an ages old card puzzle is fun and can be enjoyed by young and old alike, since it is really five puzzles in one. It was originally played with the court cards (Ace, Jack, Queen and King) of the four suits and the objective was to arrange the 16 cards in a 4×4 grid so that no card type or suit repeated in any row or column or in each of the diagonals of the grid. This implementation substitutes the suits with four distinct woods and the card types with four inlaid stripe patterns (horizontal, vertical, forwards diagonal, backwards diagonal), yielding 16 unique squares. While the original objective is more suited to puzzle aficionados, there are several simpler variations described below that provide increasing levels of challenge, making it suitable as a stocking stuffer for youngsters or a welcome addition to a games room.
Flags Puzzle
Puzzle 1 (3x3 grid)
a) Using three squares of each of three woods (nine in total), arrange the squares (inlaid side down) in a 3×3 grid so that no wood is repeated in any row or column.
b) Using three squares of each of three woods with three different inlaid stripe patterns (horizontal, vertical, forwards diagonal) per wood (nine in total), arrange the squares (stripe side up) so that no wood or stripe pattern is repeated in any row or column.
Puzzle 2 (4x4 grid)
a) As for puzzle 1a, but select four of each of four woods and arrange the squares (inlaid side down) in a 4×4 grid so that no wood repeats in any row or column.
b) As for puzzle 1b, but arrange the squares (inlaid side up) so that no wood or stripe pattern repeats in any row or column.
c) As for puzzle 2b, but additionally ensure that neither diagonal has any repeats of wood or stripe type.
Getting started
The puzzle squares are 1-1/2” square in size and 1/4” or more in thickness. The 1/4” wide inlay needs to be reasonably bold and stand out from the rest of the woods.
To allow for safe machining and planer snipe, it is easiest to make a minimum of two puzzles, and work with long strips of wood, before slicing them to size near the end of the process. Hence, four 30” lengths of stock for the flag squares are needed, plus one the same width by the thickness of the dado cutter (e.g. 1/4”) for the inlay. As well, to assess the inlay width and depth, an additional inlay test strip is required.
The bulk of this machining, as described below, was done using a table saw, but other tools such as a laminate router could also be used. The first step is to reduce the stock to the dimensions above and then cut each of the four strips for the squares into two 15” pieces. For the moment, leave the inlay strips and the inlay test strip slightly thicker than the dado cutter to allow for precise fitting.
Longitudinal dado
Using one set of the half lengths, a longitudinal 3/32” deep dado is then machined using a rip fence and two featherboards.
Making a sled
In cutting the diagonal dados, it’s easiest to fabricate a simple sled for the table saw. Versions of the basic table saw sled, with different fences and stops, can be used more generally for a variety of purposes (specifically here for cutting squares to length, and mitering corners accurately).
The base was made from 5/8” Customwood (a man-made board similar to MDF) due to its flatness, and hardwood offcuts were used for the fences. The sled runner which fits in the table saw mitre fence slot is a strip of UHMW plastic, or it can be a strip of hardwood. After this is installed underneath the sled base with countersunk screws, place the sled on the saw table and rip a slot through the front half of the sled. Using this slot as a datum, mark a perpendicular line for the bridging bar (approximately 2” high by 1-1/2” wide) that strengthens the partially cut base and secure the bar in place from underneath with countersunk screws. Remount the sled and raise the dado blade so that it’s approximately 1/4” above the sled base and cut through the stiffening bar. Now position the 45o fence so a strip to be dadoed clears the bridging bar, and screw the fence to the base from the top.
Cutting the diagonal dados
In marking out the positions of the diagonal dados on the edges of the strips, allow at least 2” between centres, as this gives enough space for a saw cut and some room for positioning errors. Adjust the dado blade so it cuts at the same depth as the longitudinal dado and cut the diagonal dados in the remaining set of ‘square’ half lengths. In order to avoid chip out, place a waste strip of uniform thickness behind the strip being dadoed.
Machining and fitting the inlay
Do a test fit with the 1/4” cutter using the inlay test strip. Use the planer to gradually reduce the thickness of the inlay test strip from slightly over 1/4” until it is a snug fit in the dado. Finally, thickness the inlay strips with this planer setting.
The actual thin inlay strips are cut from these dado-fitted strips. Again, it is useful to rip a test inlay from the test strip to fit the actual dado depth. With this setting, I then ripped inlays off each side of the machined inlay strip stock, then re-edged the strip in the planer and cut another two strips, and so on, thus giving inlays with a finished face and a ripped surface suitable for gluing into the dados.
Next, cut the thin inlay strips to length for the diagonal dados, allowing 1/16” on each end overhang for trimming (the dado sled with a fine cross cut blade can be used for this). If necessary, lightly sand the inlay strips to get them as flush as possible with the surface. Secure these with glue in the diagonal dados, making sure they are firmly pressed in. Similarly, glue inlay strips into the longitudinal dados in the other set of half lengths.
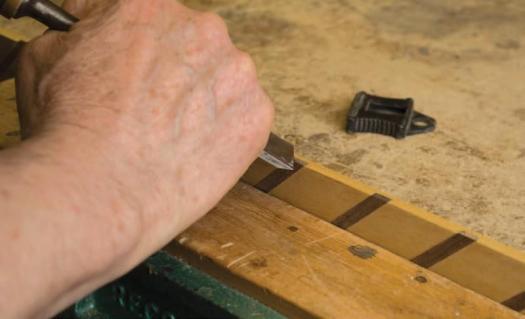
Finally, trim off the excess diagonal inlay using a chisel shearing cut with the inlays sloping forwards, and then sand the faces.
Cutting the squares to size
While a chop saw could be used, I chose to use a table saw cross cut sled, similar to the diagonal dado jig in the preceding section.
First, the nearest end is trimmed (possibly with several micro cuts) until equal amounts of the end of the inlay appear on both sides of the square – in other words the ends of the inlay are symmetrically arrow like. The second pass uses the spacer to position the strip, with the spacer being withdrawn before cutting the square off to length. The squares with the longitudinal dados can be cut in one pass, using the spacer.
Details of the cross cut sled
The basic jig (base, runner and bridging bar) is the same as the diagonal dado sled, except the cut in the base is made with a fine cross cut blade. This jig has two fences out of 1/2” plywood, secured from the top. The left hand one acts as a stop and the right hand supports the strip during the cut. Since it is dangerous to have the square to be cut off positioned (and potentially jammed) between the blade and the fence, I used a removable spacer, slightly thicker than the stop fence.
The sizes of the components in the plan of the slide are saw dependent. The key point is that the spacer, initially oversize and packed out with a strip of inlaid squares, is ripped to exact size, before being attached to its handle.
Another approach to cutting these pieces to length is to clamp a stop block to your rip fence, well back of the blade, then adjust your rip fence to the dimension required.
Making the base
While the base is optional, it makes for an elegant presentation. It’s made from a 6-1/4” square of 3/8” birch plywood and trimmed with a contrasting wood such as walnut.
While the trim strips can be cut with a chop saw, it is also possible to adapt the above cross cut jig by making a so-called picture framer’s fence for it. This is just a triangle of scrap ply with an exact right angle at the tip, secured parallel to the saw groove on the sled base.
Having cut the trim pieces precisely to length, lightly apply glue to the backs of them and the edges of the plywood. Then slide/slip the trim against the ply until it sticks, securing the trim tightly against the ply with masking tape and wiping off any excess glue.
Finishing the puzzle
Lightly sand all the pieces and soften the edges. I chose to use Osmo Polyx-Oil High Solid Satin finish because this product is vegetable based, pops the grain, and it is easily touched up. It also feels very nice to the touch once done.
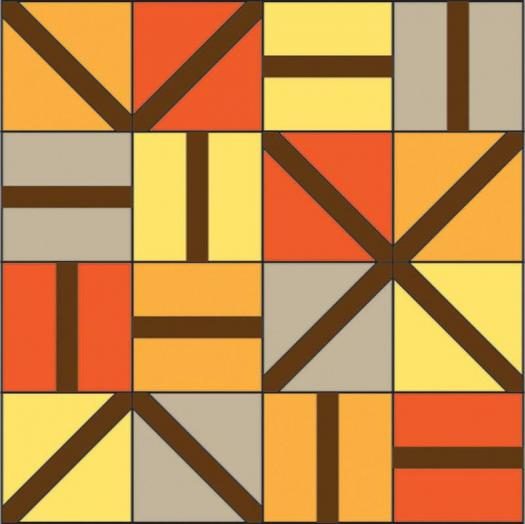
Solution
There are actually 1152 solutions in total for puzzle 2c. For a variation with twice as many solutions, try the puzzle on the right, where the diagonal restrictions of puzzle 2c are substituted by requiring that the inner four squares have one of each wood/stripe.
Photos by Murray Mackinnon
Longitudinal Dado
Featherboards assist in keeping the strip firmly against the rip fence and table surface, ensuring a uniform depth and position.
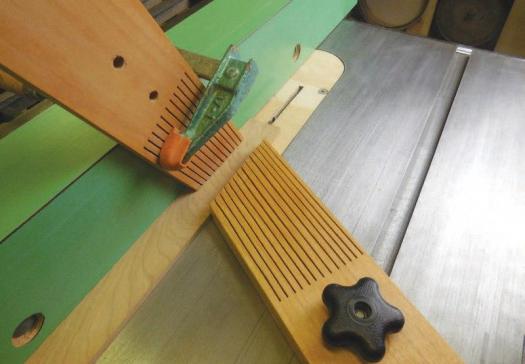
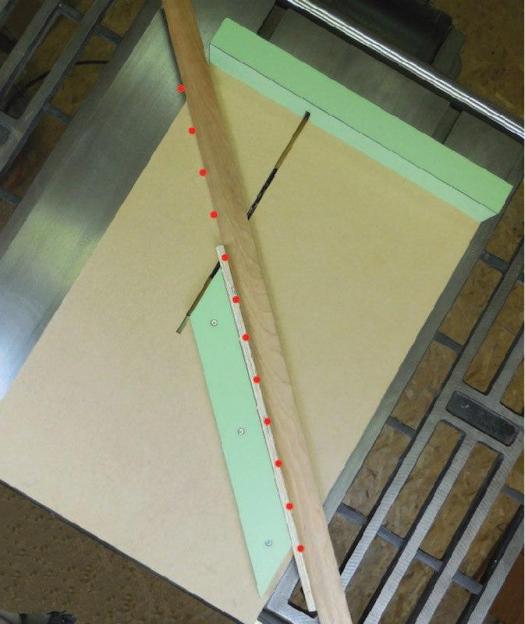
Diagonal Dado Sled
This jig allows accurate angle dado cuts to be easily repeated. The dados are positioned using pencil marks on the side of the strip as indicated by the red dots. Note the waste wood behind the strip.
Trimming the Inlay
Light shearing cuts with a sharp chisel from the inlay side provide support for the inlay fibres.
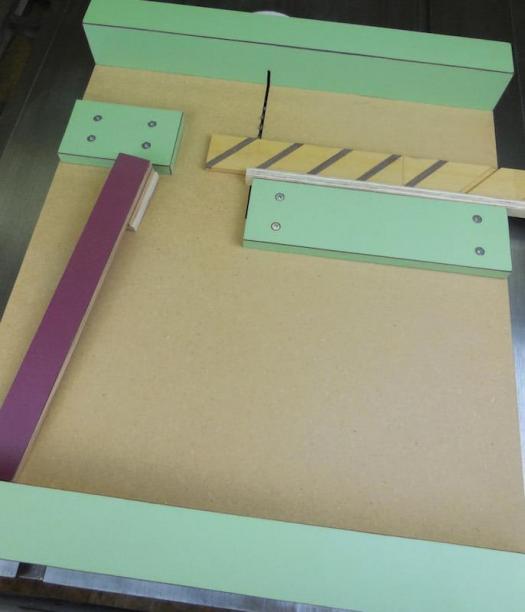
Cross Cut Sled
The lateral fence on the right, is used to trim the left end of the square, and the stop on the left plus the removable ‘purple’ spacer positions the strip accurately for cutting the square to length.
Solutions
Here's one example of a solution for puzzle 2c (i.e. no repeated woods or stripes in any row or column or on the two diagonals).