PROJECT
Create a set of textured ornaments

Rob Brown

Find more Gifts / Crafts projects
Bright, eye-catching ornaments make great gifts. This two-piece maple ornament is finished with glitter and then textured to reveal the bare wood under the bold finish.
Dealing with small workpieces has its pros and cons. On the pro side, small parts aren’t heavy or expensive. You also don’t need a large space to work them. On the con side, I see only one: they’re harder to hold while machining them. When you make these ornaments, you have to commit to making a grooving jig for your table saw to keep the operation safe. Although the jig takes a bit of time to make, it’s not overly complex. It provides you with repeatable and accurate results and, best of all, keeps you safe. Once made, the jig allows you to easily cut grooves in dozens or even hundreds of parts so you have lots of ornaments to give away to friends and family.
On the other hand, if you want to use hand tools to cut the grooves, that’s an option, too, however somewhat exacting cuts need to be made to create grooves the same width as the mating workpieces are thick. Not impossible, but if you want to make even a dozen of these ornaments, this approach isn’t my idea of a fun time. Hopefully, you’re more accurate with your hand saw than I am.
Create a set of textured ornaments
Dress some blanks
To ensure the workpieces you mill will fit nicely into the grooves, set up a 1/4″ wide dado stack in your table saw and cut a groove into some scrap wood. You can use this groove to check for proper workpiece thickness down the road.
The ornaments are made from two 2-3/4″ diameter wood disks, so starting with blanks around 3″ wide works well.
I used 6/4 stock to obtain three blanks from that thickness of material, though you can also resaw 4/4 stock in half. I jointed one face of the blank, then planed the upper face before heading to the table saw. I raised the blade to a little below 1-1/2″ high so it wouldn’t cut through the stock while it was being ripped on edge. Once I made two cuts, I went to the bandsaw to cut the workpiece free. I find this approach is more accurate than resawing 3″ wide material directly on the bandsaw unless your bandsaw is properly tuned, your blade sharp and you are familiar with the process. I also find it much safer than ripping through the entire width of the stock in two passes on the table saw, as then you have a thin piece of wood sitting between the blade and fence you have to control.
Now the lengths can be dressed to final thickness while checking your progress with the 1/4″ wide groove you machined in the piece of scrap. A friction fit is what you’re aiming for.
Draw and cut some circles
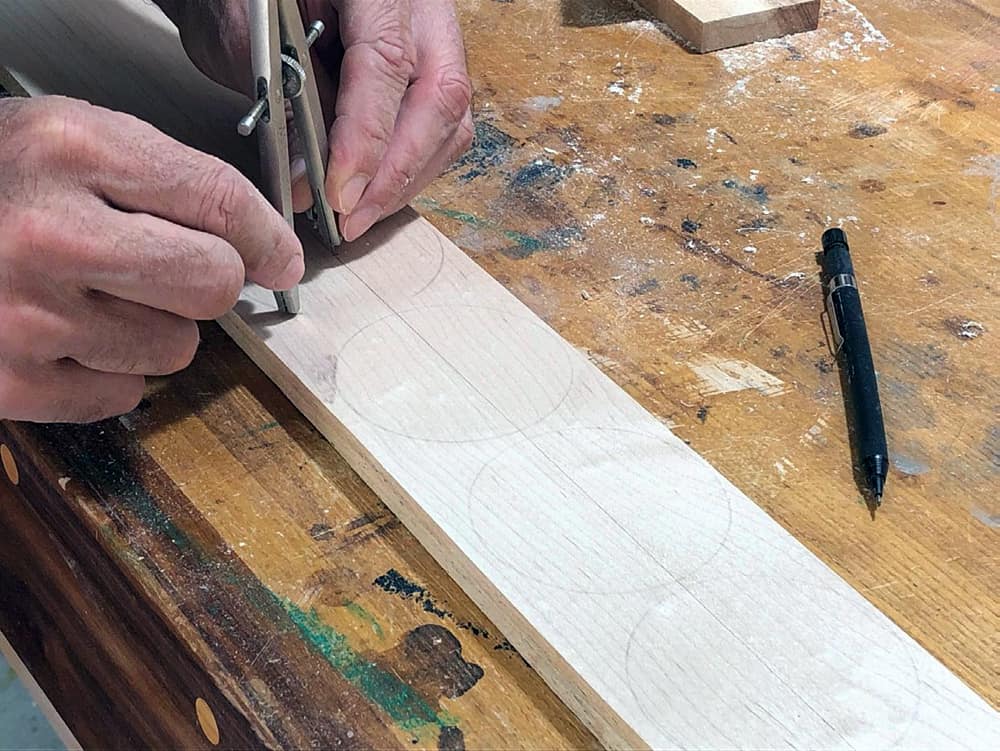
Mark a line down the center of the lengths. This will give you a location for the pin in your compass so you can draw the circles and it will also give you a locator while machining the grooves later. Next, mark 2-3/4″ diameter circles along the length of the blank, leaving about 1/4″ between them.
I used a scroll saw to accurately cut these disks from the blank, though a bandsaw would also work. I found it was important to be as accurate as possible, as the more uniform the disks, the better the grooving jig works. Barely leave the lines on so you can sand to the line if need be. I had to touch up a few later, as my concentration wanes and waxes, especially after cutting a few dozen disks.
The grooving jig
Attached to your miter gauge, the grooving jig and hold-down device will make cutting grooves in the disks easy and accurate while allowing you to keep your fingers a safe distance from the blade. I have a piece of solid hardwood screwed to my miter jig at all times to help keep the workpiece positioned properly during use. The grooving jig gets attached to it. If you don’t have a piece of wood on your miter gauge I’d recommend adding one now so the union between the grooving jig and miter gauge is solid.
There are two fairly simple assemblies that make up this jig. The first assembly is made of two wooden parts and a piece of sandpaper and gets fastened directly to your miter gauge fence. It positions each disk. The second assembly is made up of six parts and applies pressure to the disk while cutting. We’ll focus on the first assembly now — the grooving jig.
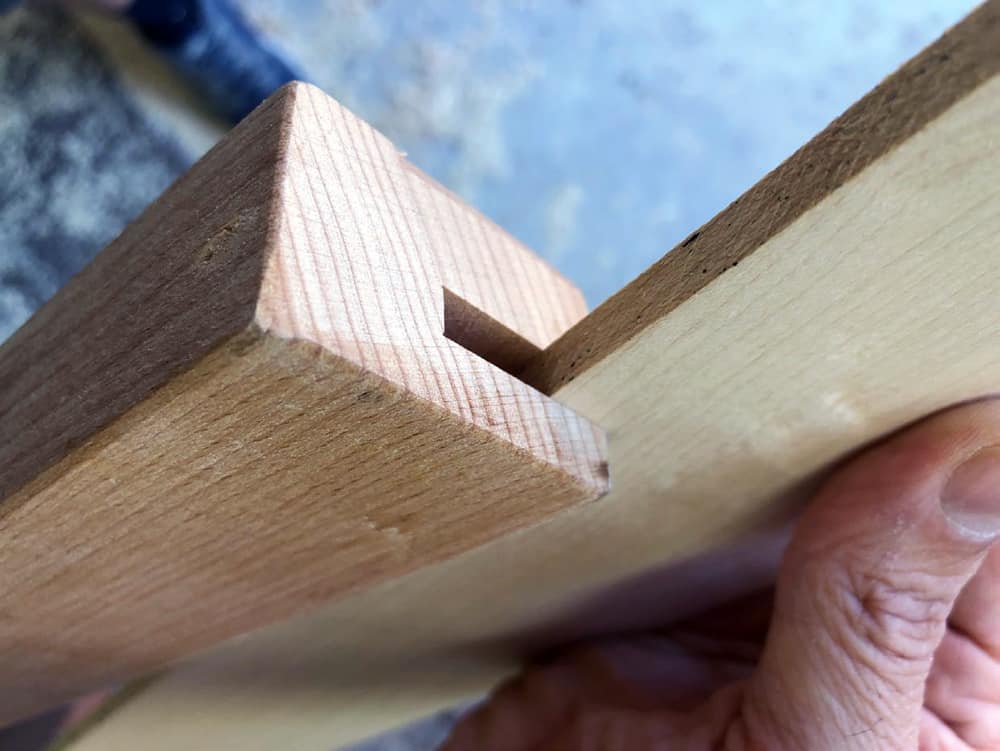
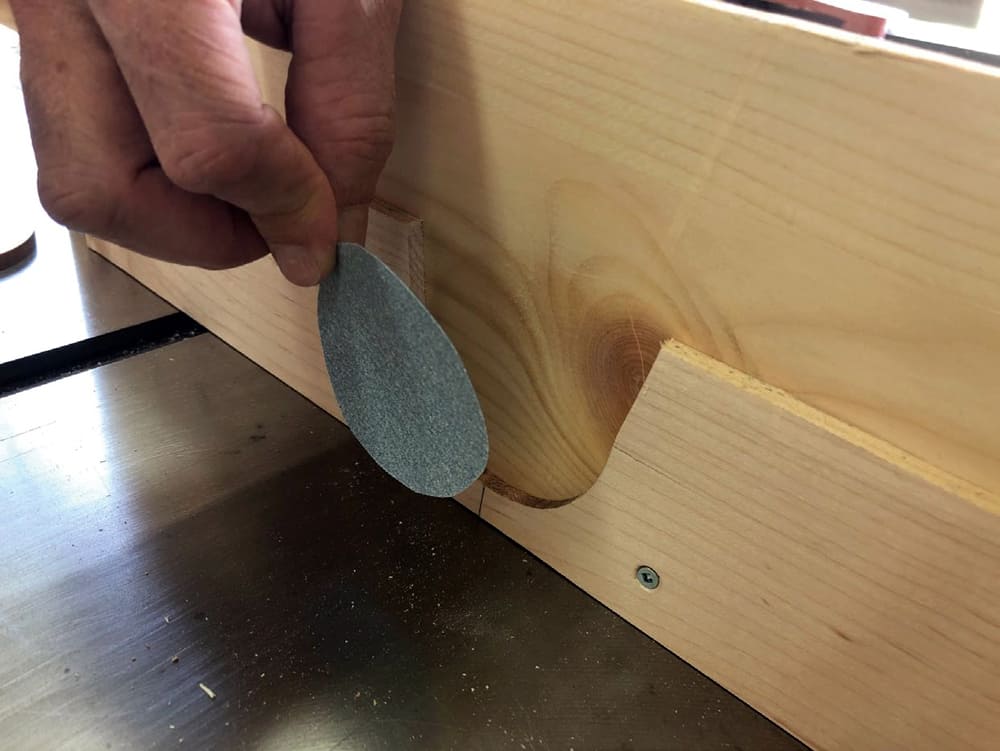
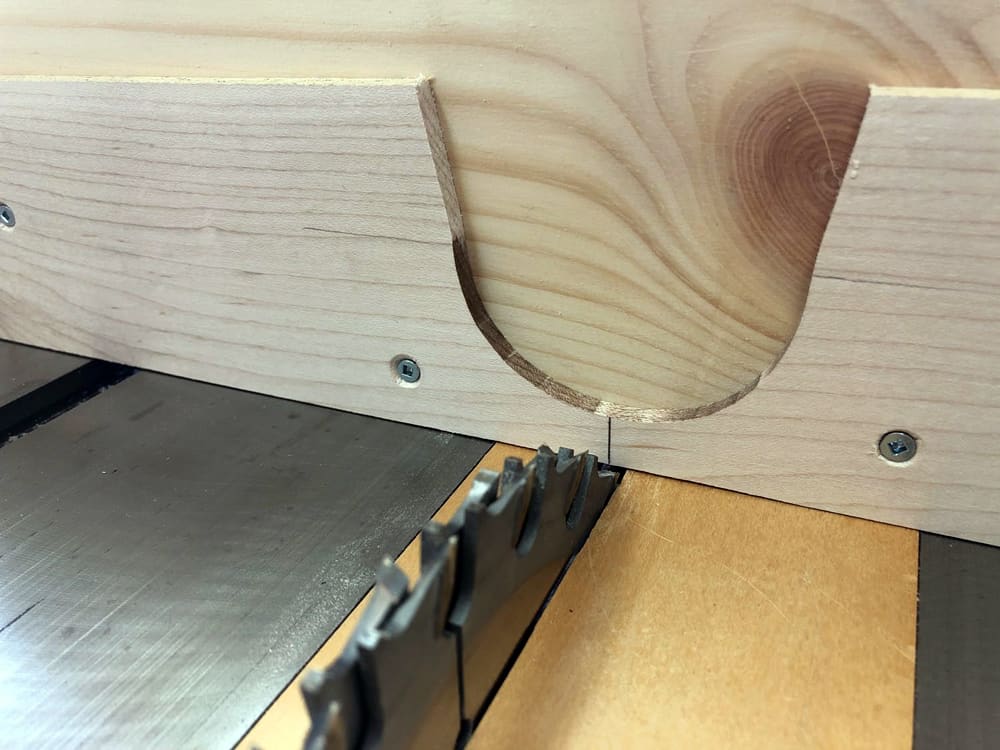
I used a piece of 1/2″ thick particleboard trimmed to around 15″ long and 6″ high, though the exact size isn’t critical. Next, I cut a piece of solid maple slightly thinner than the disks, around the same length as the 1/2″ particleboard piece, and about 3″ wide. A half circle was then drawn on this piece. The lower quadrant of that circle should be about 3/8″ above the lower edge of the maple. Cut the half circle out, then make two trim cuts from the side quadrants of the circle upward on a slight angle, allowing you to be able to insert the maple disks into the half-round cavity to cut each groove. This piece of solid wood gets glued and screwed to the face of the 1/2″ particleboard, so their lower edges are both flush. Cut and adhere a sandpaper disk to the 1/2″ particleboard face in the circular opening to help keep the disk in place while grooving them.
Hold-down device
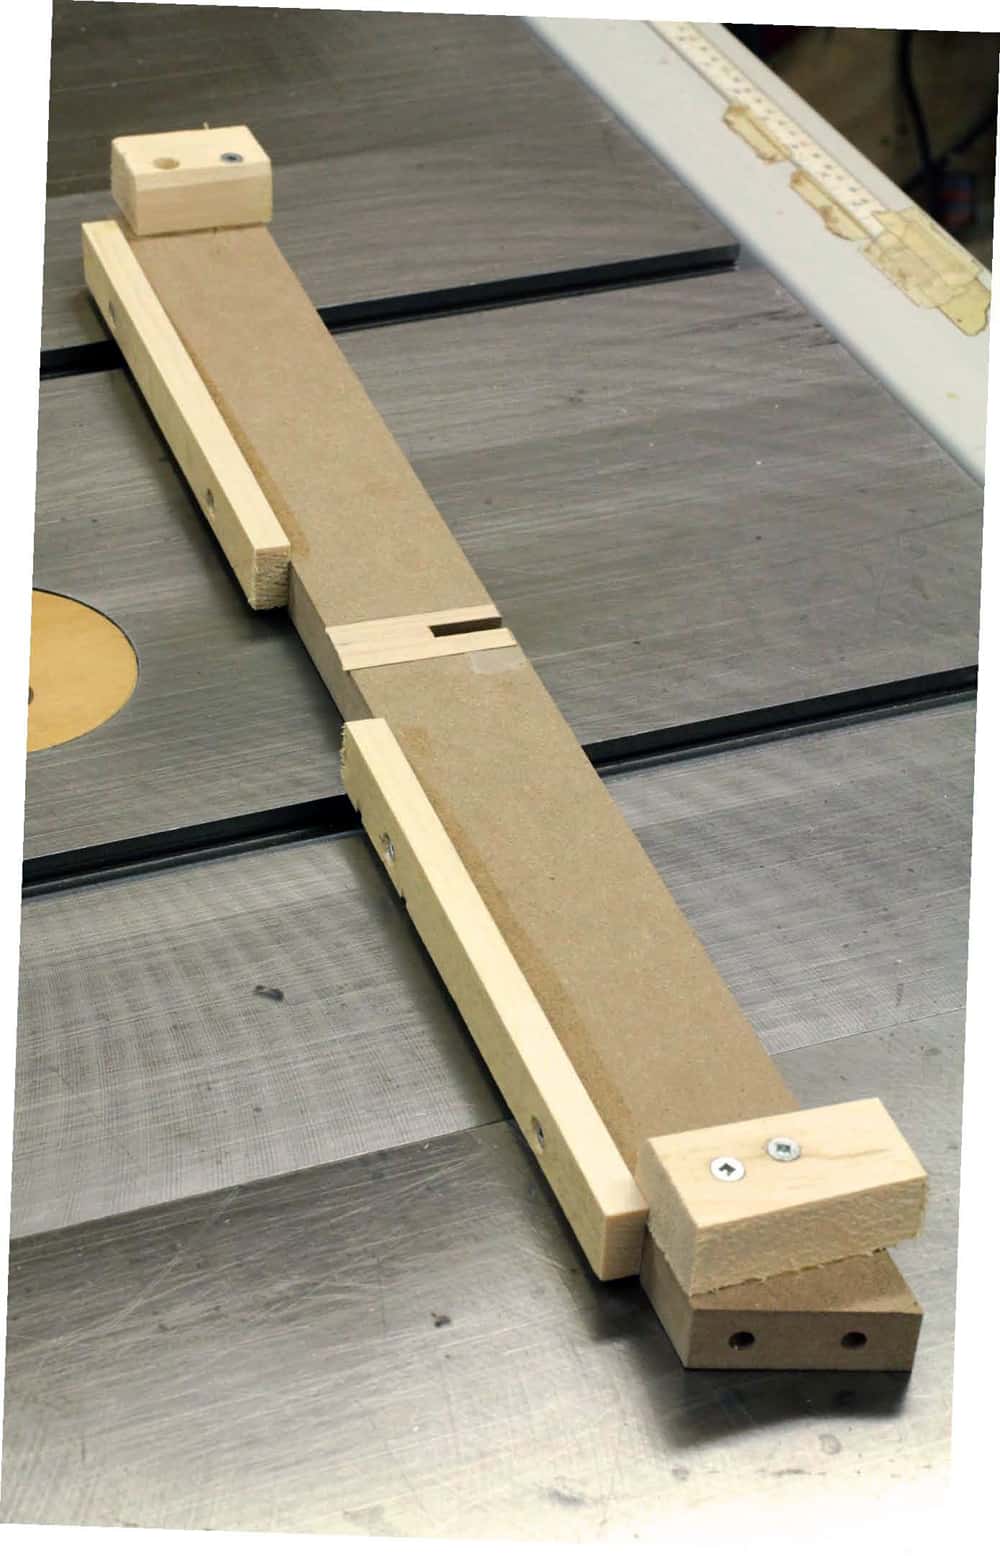
To keep the disks from moving while the grooves are being cut, a second assembly needs to be made. This hold-down assembly consists of a main face about 2″ wide and a few inches longer than the 1/2″ thick particleboard face of the first assembly, a pair of upper cleats, a pair of side cleats and a strip of iron-on edge banding.
The upper cleats should overhang the edge of the piece of maple that is attached to the first assembly, while the side cleats get glued and screwed to the face so they prevent the face from moving side-to-side while the disks are being grooved. A short piece of iron-on edging (or a 1/16″ thick piece of solid wood) is fixed to the inner face of the second assembly, and applies pressure on the workpieces while machining the grooves. These two assemblies keep the disks stationary while in use.
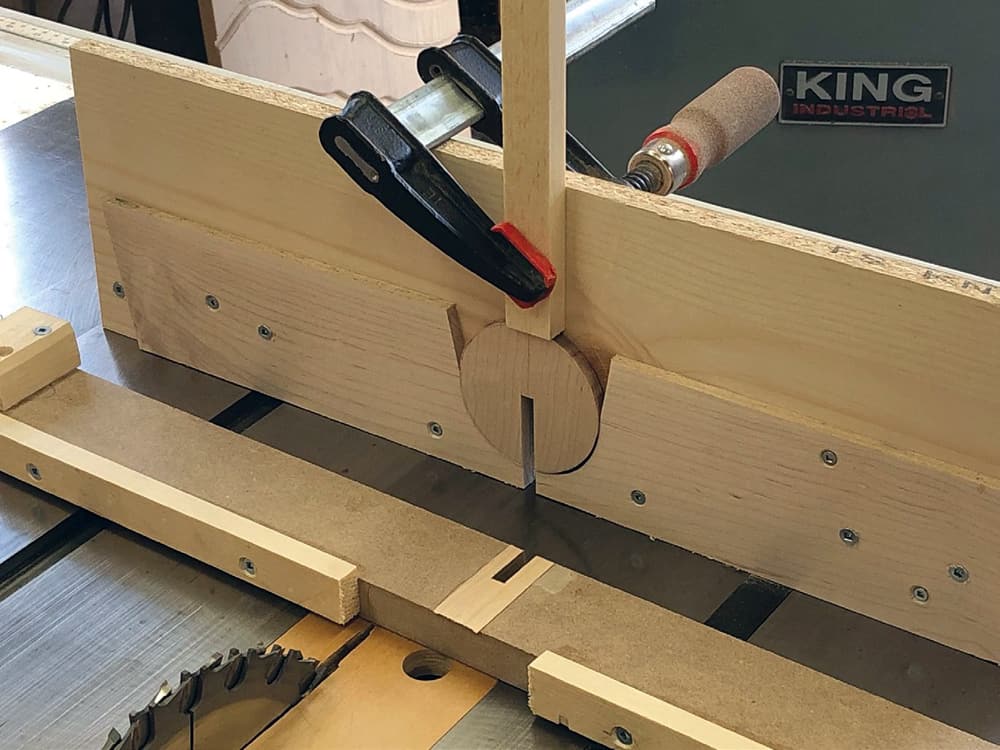
Machine the grooves
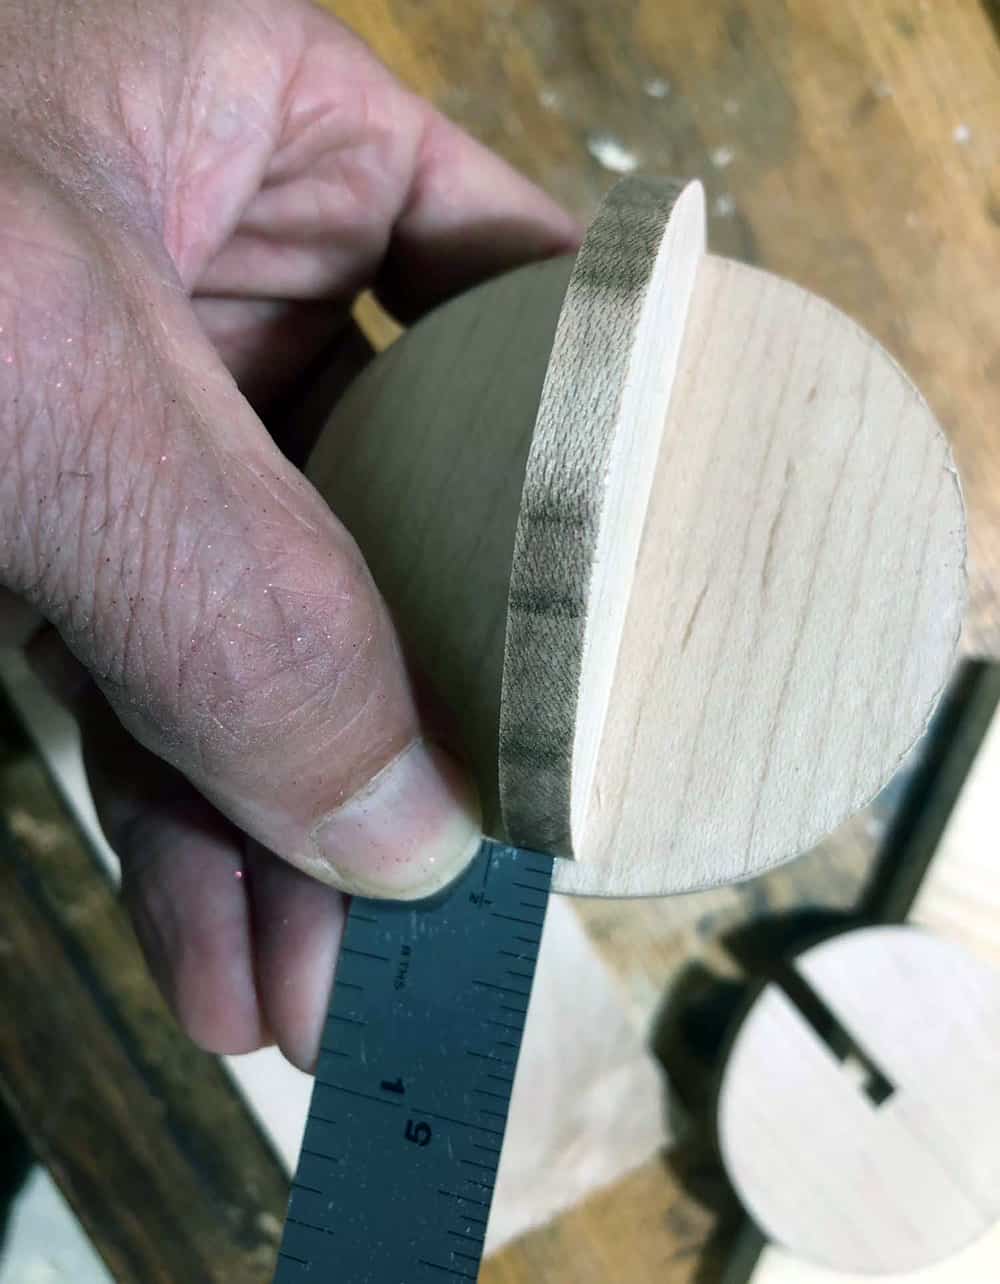
Now that your grooving jig and hold-down device are complete, and the disk is in the grooving jig, take a measurement from the upper surface of the table saw to the center of the disk and set your 1/4″ wide dado blade to slightly under that height. If the grooves are too deep the fit won’t align the two mating halves of the ornament when they’re assembled. But if the grooves are cut slightly less than halfway across the disks it’s not too hard to use a hand or bandsaw to cut the groove a bit deeper to get a perfect fit. Since these disks aren’t all uniform in diameter the grooves will all be cut at a slightly different depth.
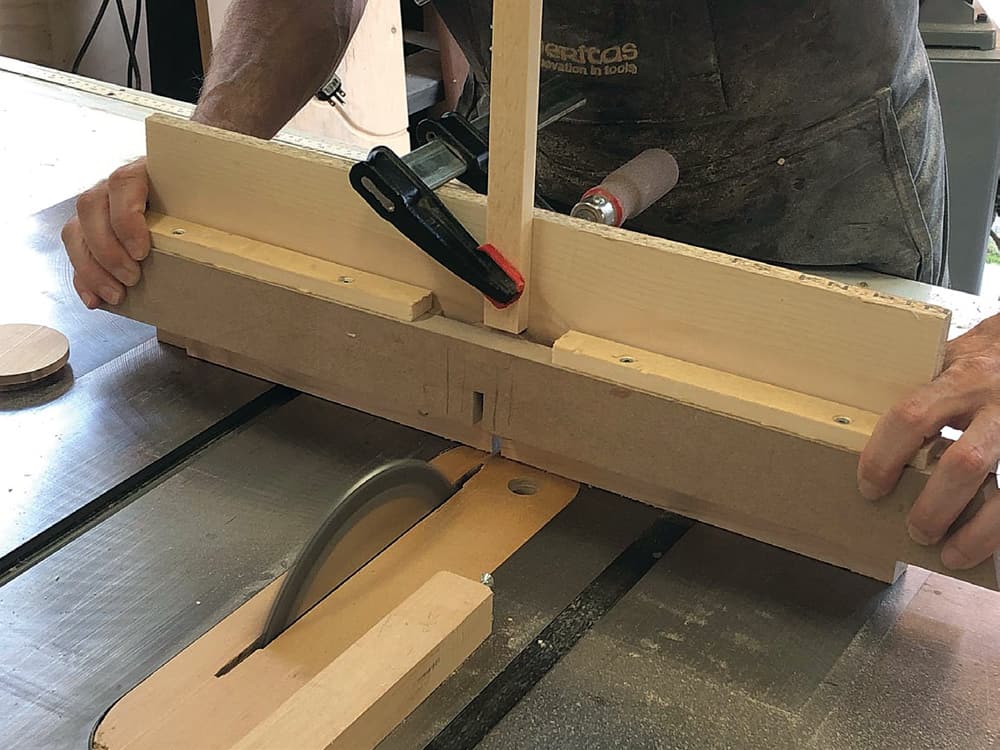
With the blade height set, insert a disk and install the hold-down device. The hold-down device is kept in place by hand pressure. To ensure the disks don’t ride up while being cut clamp a piece of solid wood above the disk so it can’t go anywhere. If the top of the disk isn’t visible above the hold-down device, machine the strip of solid wood slightly thinner than the disks so it can protrude down to come in contact with the disks.
Slowly move the disk across the blade to cut the groove. Be aware that the blade will likely protrude out the user side of the miter gauge assembly, so keep your hands away from this area. I used a stop block clamped to my table saw to limit the travel of my miter gauge.
If for some reason the grooves aren’t the perfect depth, you can use a hand saw or bandsaw to lengthen one of the grooves. Dry assemble an ornament and measure how far away the halves are from lining up, then mark that distance on one of the parts, right at the end of the groove. I had to do this with a few of the disks, as the first few I made rode up while being grooved and weren’t deep enough.
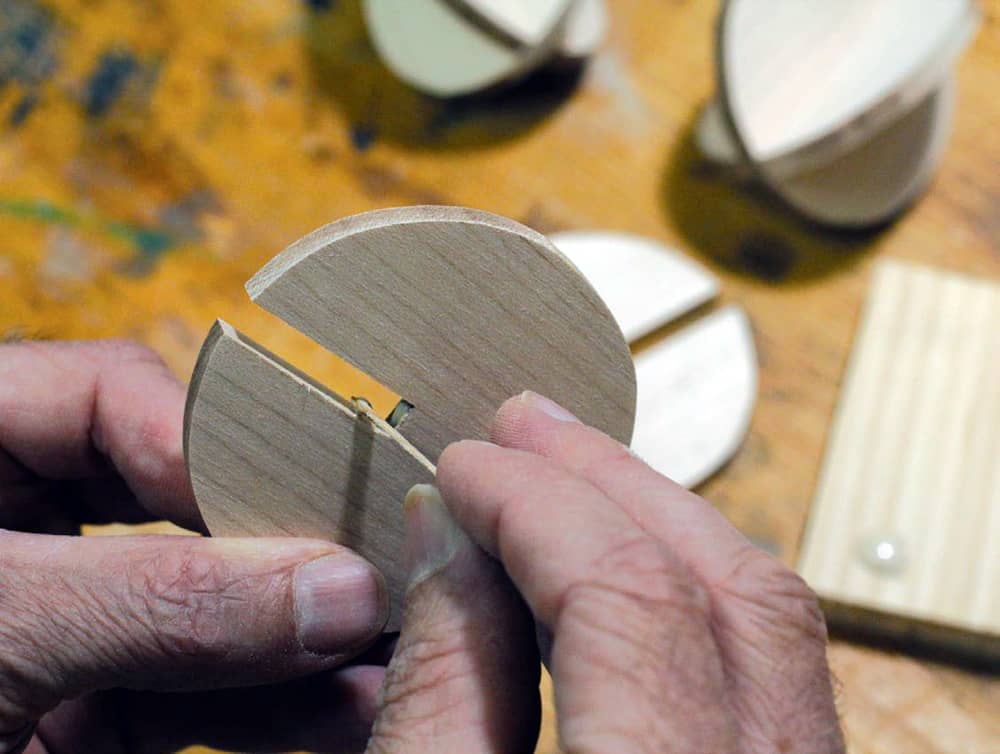
Assembly
Even a small project like this needs to be assembled, though it’s a lot easier when there are only two pieces per finished item and they both fit nicely in your hands. Apply a small amount of glue at the base of the groove and on the sides of the groove, very close to the base. As long as you have a decent friction fit the glue will just be added insurance to keep the two halves together. Remove any squeeze-out when dry.
Sanding
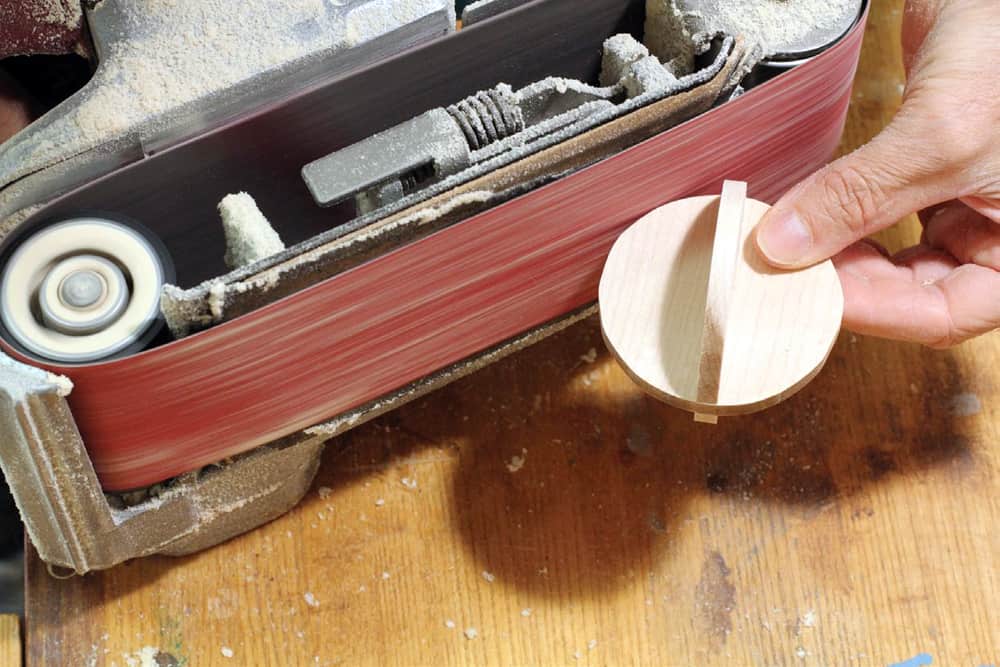
I sanded the edges of the disks and ensured they were even with their mating partner. I did this freehand on a belt sander while it was turned on its side. I was aiming for a smooth transition where the bottoms and tops of the two parts met and to have the edges of each disk show a nice, even curve. It doesn’t have to be perfect, though. A bit of hand sanding eased all the sharp edges.
Apply the finish
There are dozens of approaches to take at this point, though I narrowed my focus to applying a finish to the parts, then adding texture to create a two-tone effect on each ornament. By applying the colour first, any wood I uncovered while adding texture would provide a solid hit of contrast.
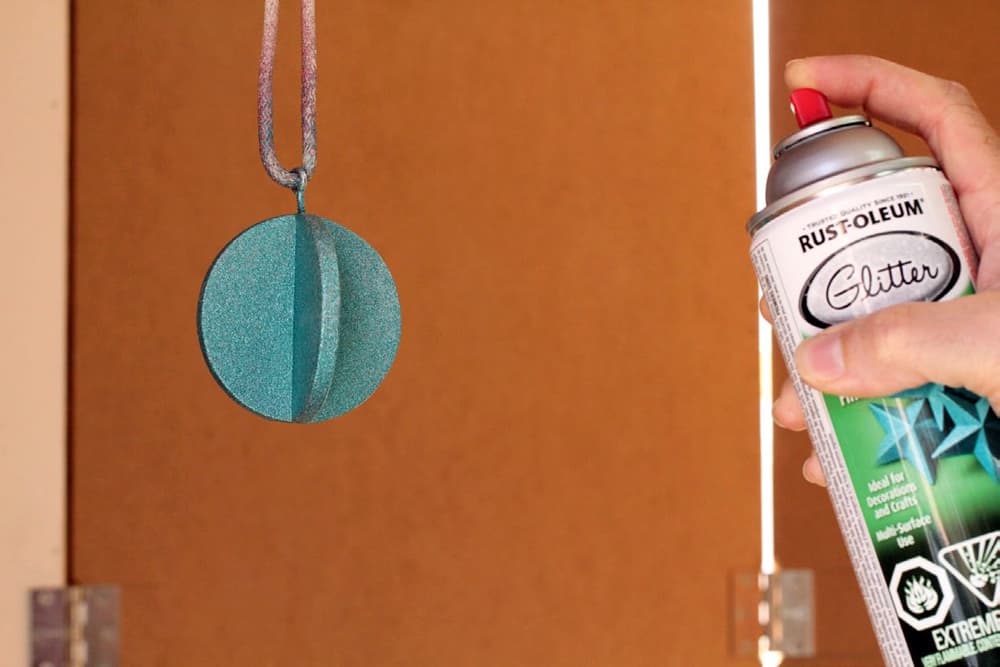
I wanted to add colour to these ornaments, and when I went to the local hardware store I found a product that was available in many colours and also had glitter in it. I can’t imagine applying a glitter finish to furniture or woodwork, but for ornaments Rustoleum Glitter was perfect. You could apply a different finish by hand or brush, but an aerosol product applies a quick, even coat and makes finishing this type of small project a breeze.
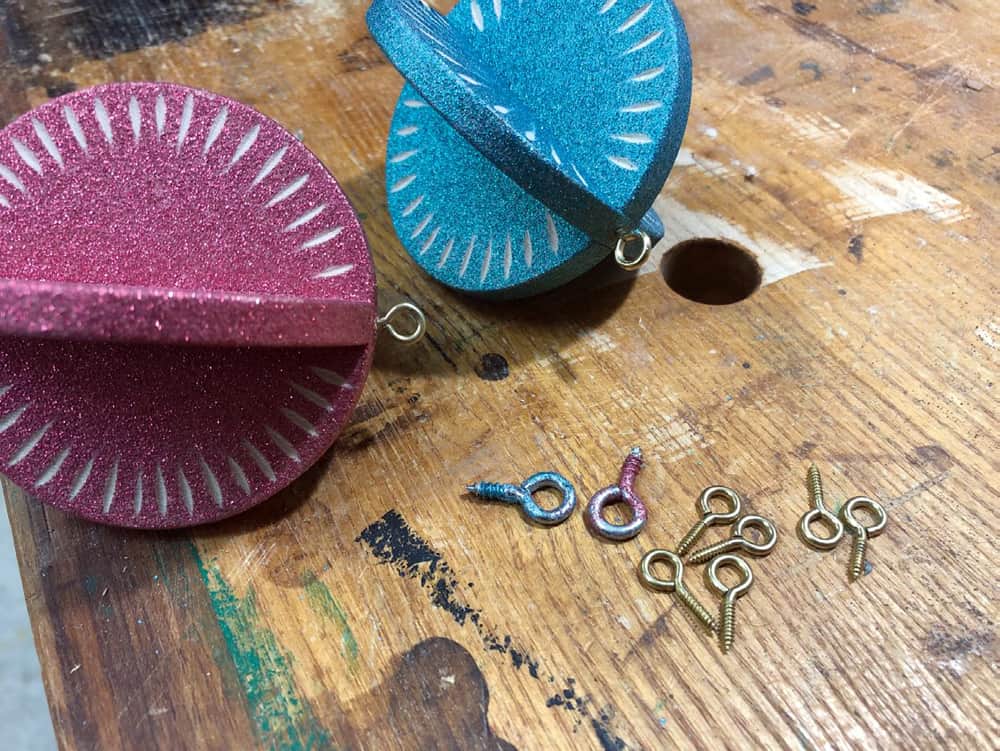
As you need to spray all the surfaces of these ornaments at once, you’ll need to suspend them. I bored a small pilot hole in the upper end of one of the disks and installed a small screw eye into the ornament. I used a small rope to suspend each ornament while I finished it. Large- and medium-sized screw eyes are everywhere, but I found it hard to find small screw eyes. Workshop Supply had some that were 4mm diameter, so I ordered a bunch, and they worked great. Because the screw eyes were going to get coated with glitter, I used a few of them for the finishing process, and replaced them with clean ones when I was done. Thankfully, I wasn’t in a rush, so spraying only a few at a time was fine. Otherwise, you will either have glitter screw eyes (which isn’t awful) or you can clean them when each ornament is complete.
Although Rustoleum has a primer you can apply first, I applied the glitter spray finish over top of bare wood. Adhesion may be better and fewer coats of the glitter product needed if you use the primer, but I didn’t have any trouble without it. It could be a case of me not knowing what I was missing out on.
For the glitter finish, three light to medium coats will go on better than one or two heavy coats. I hung an ornament then sprayed it at 90° angles to cover all the sides, then sprayed some finish on the upper and lower ends of the ornament. Once an even coat was applied, I let it dry before applying another even coat. When the glitter and colour coverage was complete I applied a sealer coat to the ornaments. This helps lock the glitter in for texturing and Christmas usage for years to come.
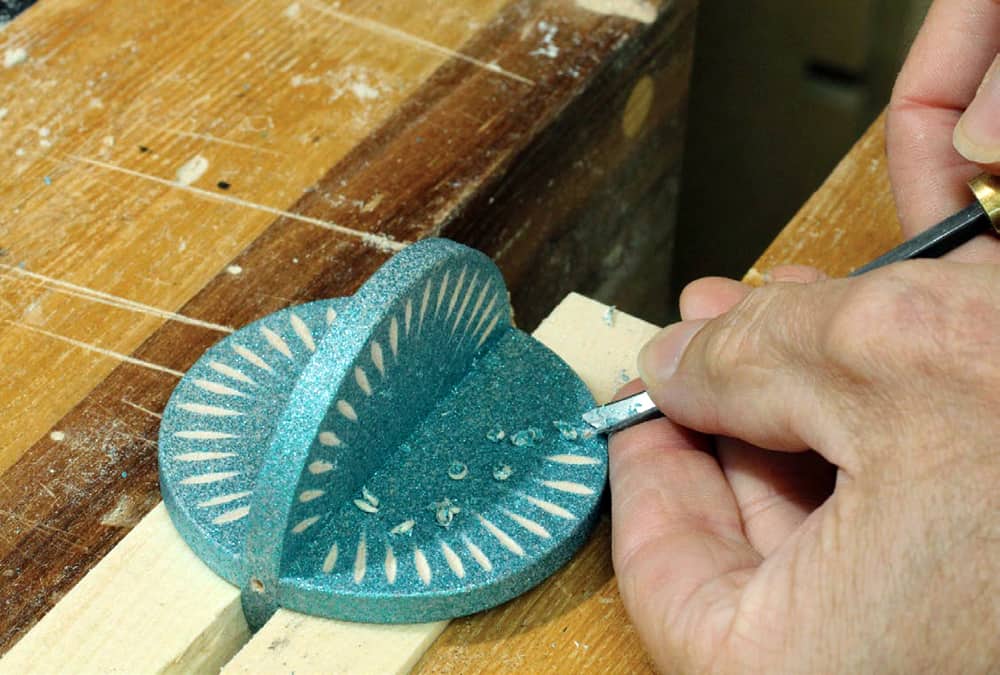
Adding texture
I found the texture brought each ornament alive even more. I used a sharp V-gouge to create a series of small grooves toward the outer edge of each disk. There’s no need to worry too much about being even, as a bit of variation shows the ornaments were textured by hand.
If you don’t have a sharp V-gouge you could try a small burr in a rotary tool to leave a series of small divots.
With clean screw eyes in the ornaments, it was time to hang a few on the tree. I recommend giving a few away, too. A small box for each gift ornament would make a very nice presentation. Nothing overly fancy is needed, but it would really showcase your craftsmanship. But if it’s already late December I’d understand if you just wrapped each gift ornament in paper and rushed out the door right away.
Photos by Rob Brown
Not Quite Through
Unless your bandsaw is tuned up nicely, it might be easier to rip about 40% of the way through your blank from both sides on your table saw, then head to the bandsaw to separate the halves.
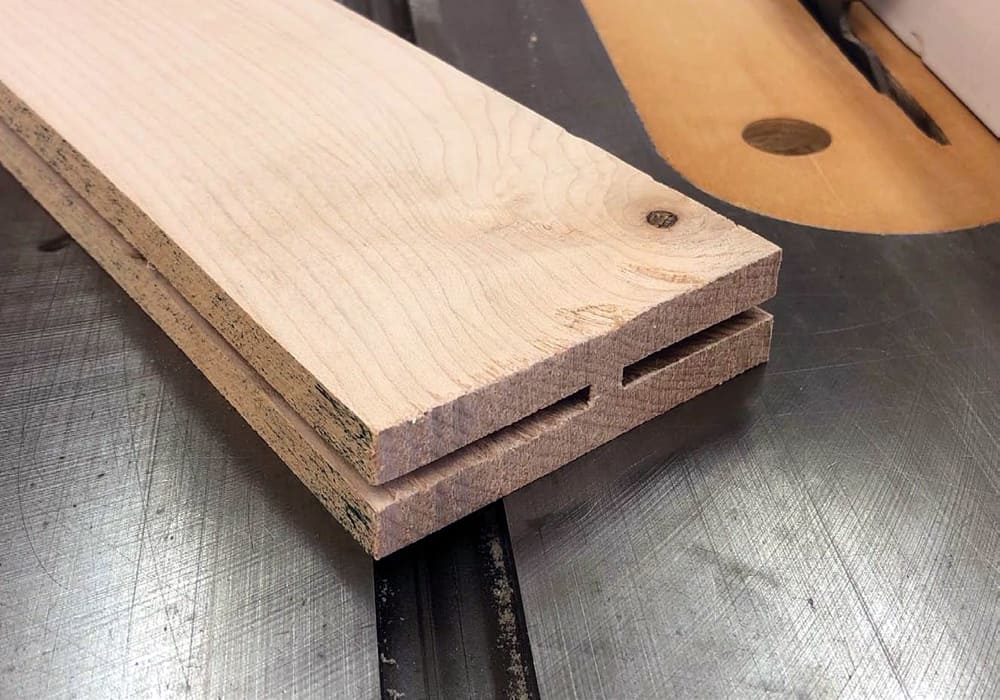
A Nice Fit
Make a groove in a piece of scrap with the 1/4" dado blade you’re going to use for the groove in the workpiece. This will allow you to dial in the thickness of the blank to fit the groove nicely.
Centerline and Circles
Mark a centerline down the middle of the part. This will assist with positioning the disks for grooving and for marking the circles with a compass.
Make the Grooving Jig
A piece of solid wood slightly thinner than the disks with a half circle cut out in it gets attached to a thicker backer board. This assembly gets attached to your miter gauge to complete the grooving jig.
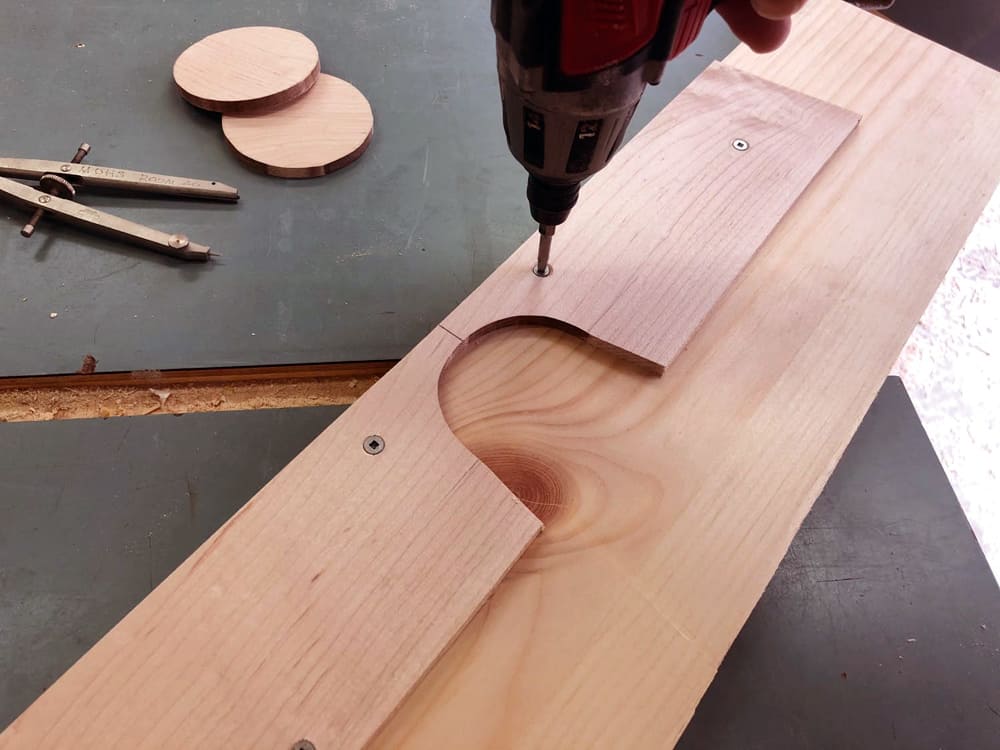
Create Some Friction
Cut a disk of sandpaper and use spray adhesive to fix it to the opening on the backer board. This will help keep the disks in place while cutting the grooves in them.
Center the Grooving Jig
Center the grooving jig on the blade when attaching it to your miter gauge.
Hold-Down Device
This assembly allows the user to quickly and easily add a bit of pressure to the disk being grooved with hand pressure. The cleats on the top and sides of the main piece of material are strictly to position the device before each cut, while the thin piece of iron-on tape at the center of the device applies pressure directly to the area of the disk being grooved.
Downward and Inward Pressure While Cutting
With the disk in place and the hold-down device applying pressure to the face of the disk, the only thing left is to clamp a piece of wood directly above the disk to keep it from moving upwards during the cut.
A Fresh Groove
With the first groove machined you can repeat the same operation with the rest of the disks.
How Far Off?
If you happen to end up with grooves at imperfect depths, you can trim one of the grooves a bit deeper at your workbench. Dry assemble the parts and measure how far off the ends are, then transfer that distance to the end of one of the grooves. At this stage the pairs can be marked so they go back together with their mating halves.
Lengthen the Groove
Use a hand saw with minimal set to cut the walls of the groove deeper. Brown used a Japanese hand saw to make the outer kerfs, then his bandsaw to remove the waste in the center to the marked line.

Sand the Circumference
A belt sander turned on its side with medium grit belt will allow you to fair the outer edges of the both disks, and ensure they meet evenly at the top and bottom of the ornament. You could also use a coarse grit and a hand sanding block, though this takes longer.
Just a Few Drops
If the grooves are sized appropriately the two disks should fit together with a friction fit. A few small drops of glue are all that’s needed to keep the ornaments together forever.
Spray on a Finish
Aerosol spray products, like Rustoleum’s Glitter product, make spraying small, irregularly shaped objects like these ornaments a breeze. Several light coats are better than fewer heavy coats.
Add Texture
Although you could skip this step, texture adds so much to these small ornaments. Both physical and visual texture are nice to touch and look at, and by uncovering the solid wood under the finish another colour is added to each ornament.
Ready to Hang
Small screw eyes allow you to pass a piece of fabric, string or fishing line through so the ornament can be hung. The smaller the better, as you don’t want a large screw eye taking away from the ornament. Brown sourced these small screw eyes from Workshop Supply.


Hi, great looking ornament. Maybe, you could try doing all the work on the discs while they are in the board shape. Still prep the boards to thickness, sand smooth, draw the center line, mark the circles, cut the dados for each piece using the miter gauge, paint then texture them, cut them into circles, glue them together, sand edges and finally attach the hangers.
Doing it this way alleviates the need for any jigs.