PROJECT
Corner table

Marty Schlosser

Find more Tables projects
Learning to build a table with sultry curves not only looks beautiful but adds another skill to your woodworking repertoire.
When I first saw the piece of art my client wanted to showcase, I knew that a corner table was warranted. I was excited about my initial design ideas, even with the words of my mentor echoing in my mind, “When the curves begin, the profit ends.” Ah, the challenges of making studio furniture.
My design also called for Sheraton-inspired legs and a delicate drawer with cockbeaded edges. These features would give the piece the punch it needed to stand out, without shouting “look at me!” Once these defining features were settled on, finalizing plans and selecting materials proceeded quickly.
The plan called for mahogany – true African mahogany that would blend in nicely with the other pieces of furniture in my client’s space. Because of its relatively small size there was no need to go with a secondary wood for the framing and such non-showing areas of the piece. Yellow birch was selected for the drawer sides to provide contrast and the design also called for a drawer handle to match the Sheraton era being emulated. Metal drawer slides would have been out of place in such a piece, so a wood-on-wood slide arrangement was chosen.
Corner table
Serpentine Front
The most challenging part of this piece is the serpentine front. Of the three methods for making curved parts – steam bending, band sawing a core from a solid piece of wood then applying veneer to the two faces, or gluing laminated strips together on a mould – the latter is preferred. It is a relatively straightforward method that produces very strong parts (see Curved Panel Veneering, Dec/Jan 09, Issue #57.) Using the scale drawing as your guide, make full-sized plans, as these will guide you through the process of determining exact lengths and angles of joinery pieces. Focus now on making the serpentine front, and arrange the laminations so the front of the stack faces downwards on the mould. This orientation allows the mould to be used for holding the front (A) in proper orientation for cutting the left and right edges of the piece and making the rabbets that will support the drawer supports (F, G).
With the lamination process completed, mark reference lines on both the lamination (A) and the mould before separating them. These will help you correctly register the lamination on the mould and facilitate the machining operations that are to come. Remove the lamination and then, using first a hand plane and then a jointer, clean up one of the edges. With the one edge straight and square to the face, rip the opposite edge so that the front (A) ends up being ¼” wider than its final size. Next, rip the upper (A-4) and lower (A-5) front stretchers from the lamination, then clean up and square those edges on the jointer.
Multipurpose Mould
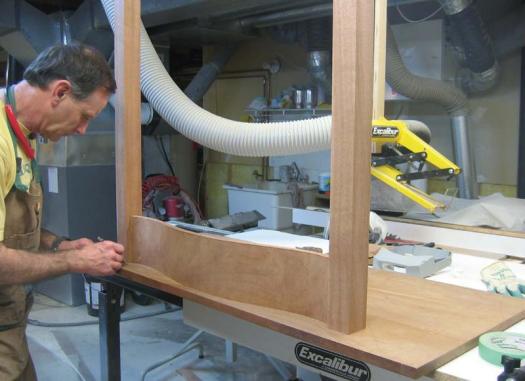
Attach pieces of scrap to the front edge of the mould so that it now becomes a jig to hold the lamination in proper alignment for other machining operations. Lay the lamination onto the jig and use your alignment marks to line everything up correctly, then clamp everything firmly together. Carefully mark where you need to cut the front (A-1) from the two sides (A-2, A-3). Using a thin-kerf blade in your radial or mitre saw, carefully cut the drawer front (A-1) free.
Glue the four pieces of the laminated front together, allowing it to set in the clamps overnight. If you have the drawer front (A-1) in place during this process, it helps line everything up properly. Whatever you do, don’t get any glue onto the edges of the drawer front (A-1) while this is going on or you will have wasted a lot of time and may even have to start the lamination over again. Once the front (A) is dry, carefully scrape or sand its face and back. The front should look like one seamless piece when you’re done. Clamp the front to the jig and with a thin-kerf blade in your saw, cut the left and right-hand sides of the piece. With that same setup, cut the rabbets that will receive the drawer side supports (F, G).
Legs
The legs (D, E) are relatively straightforward to make. Look carefully at your rough stock and select pieces that will provide you the nicest figure and grain pattern, especially for the front legs. Once the three blanks have been jointed straight, planed square and cut to correct length, go ahead and mark each piece so that there will be no mix-up when it comes time for further machining. Cut the mortises where the side stretchers (B, C) and front piece (A) will connect, then mount a 3/16″ beading bit in your router and rout the three beads on the outside top of each of the three legs. Machine matching mortises in the table front (A), so that you can use floating tenons to join everything together. Now turn your attention to the remaining machining operations, which will give the piece its Sheraton signature: the legs’ tapered shape and elegant bulbs near their lower section. Using a ¾” Forstner bit, go ahead and drill the curved concave corners of the bulbs; this process is so much easier than sawing, rasping and sanding them to shape.
You have a few choices to select from when tapering the legs: band sawing, followed by smoothing operations, or simply jointing them with one or two quick and easy passes on the jointer. If following the latter procedure, set your in-feed table for a ½” cut and fasten limiting blocks at each extreme end of the cut. These will ensure that your starting and stopping cuts are positioned correctly and that the operation is undertaken as safely as possible. After making the required number of passes to achieve the desired taper, move along to tapering the bulbs and cutting the foot sections of each leg. Use your band saw for these steps then clean up with rasps and a scraper or sandpaper. While you’ve got these tools in your hands, proceed with cleaning up the transition areas where the jointer machining started and stopped.
Apron
Turn your attention to making the side skirting sections, also known as stretchers. Make highly accurate measurements by taking your cue directly from the full-sized plans. Dry-fit the front (A) and front corner legs (D) together with floating tenons then place the assembly directly onto the plans. Place the rear leg (E) on the plans, in the appropriate location, then make lines with a pencil directly on the edges of the actual pieces. This gives you the exact lengths and angles for the side stretchers (B, C). Make these pieces, again orienting the grain patterns to best effect. Cut the matching mortises in the skirts, then insert floating tenons and do a dry fit of the nearly-completed assembly. Make any adjustments that may be necessary to achieve tight-fitting joints all around.
Drawer Support Assembly
The drawer side supports (F, G) should be made next, followed by the drawer rear supporting stretcher (H). As you did with the side stretchers (B, C), take your measurements directly from the piece laying upside down on the plans, then go cut these three pieces. Note that the drawer side supports (F, G) are held in place with floating tenons. Machine these mortises now. Once you have cut the under-drawer supports (I, J) to size, drill the required screw holes.
Assembly
Scrape or sand all parts carefully, conduct a dry-fitting of all the parts, then permanently assemble everything you’ve made thus far. Be judicious with the amount of glue you use and ensure you immediately clean up any glue that may squeeze out. With everything in the clamps and the under-drawer supports (I, J) screwed into position, you’re now ready to move on to making the drawer.
The Drawer
The drawer is the next most difficult piece to make, after the front. Because the drawer front (A-1) is curved, you’ll need to make a flat on both sides on the inside face of the drawer, to provide a square area for the drawer sides’ dovetail joinery to mate into. Make the drawer sides (K, L) and back (M) pieces, and then cut the tails into the front of the drawer sides. Trace these onto the drawer front (A-1) so you can proceed with making the drawer front’s matching pins. If you make a cradle to support the drawer front, it will greatly simplify cutting the pins. Now do the drawer back’s dovetail joinery. Machine the slot for the drawer bottom (N) using a slot-cutting router bit. This is the ideal tool to use because of the drawer front being curved. Dry fit the drawer together, trace the required outline for the drawer bottom (N), then cut it out. Dry assemble the drawer, this time with the bottom in place, and make any required adjustments before machining the cockbeading surrounding the drawer front. The tool of choice for the beading operation is a beading scraper. Be especially careful when scraping the profile along the two sides, as, from personal experience, it is very easy to tear the wood during this crossgrain operation. One way around this challenge is to rabbet a slot in the drawer’s ends to accept a pre-beaded piece of wood. Regardless of which way you choose to go, ensure that any cuts made in the corner areas are crisp and clean. The drawer is now ready to be glued together.
The Top
The solid wood table top (O) may be made of a single piece of lumber, or glued up from several narrower boards. Either way, ensure you make it larger than required and then trace its final perimeter profile using the now-dry table assembly turned upside-down on the top as the guide. Machine slots in the inside of the serpentine front (A) and two side stretchers (B, C) to accept the buttons that you will be making to hold the table top into position. Do a trial fit of the top and when you’re satisfied with how it fits, do the final fitting of the drawer.
Finishing
My client had mentioned to me that, in addition to the carving, she may be placing a flower vase on the table from time to time. Because of this, I wanted to provide protection against the possibility of water rings. The finish started off with a sanding down to P320, vacuuming off all the dust, then a light misting with water to raise the grain prior to a final, very light sanding with P320. I then sprayed on two coats of waterborne garnet shellac to bring out the warm tone of the wood, followed by three more coats of a waterborne hybrid (linseed oil and polyurethane). I rubbed down each coat with P320, with the exception of the very last coat, which by that time was silky smooth. Apply the drawer handle and, voila, you have just completed a unique piece of furniture to pass along to following generations.
Photos by Marty Schlosser; Lead photo by Vic Tessolin
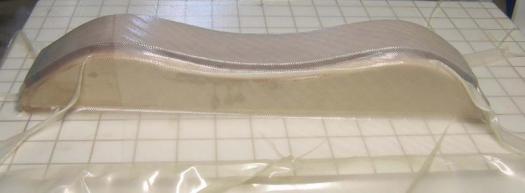
Bent Laminations
The vacuum press is an easy way to bend the curves into the serpentine front apron. You can achieve the same results with a good number of clamps and a flexible clamping caul.
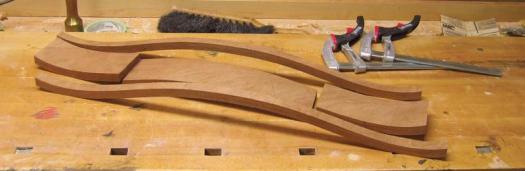
Great match
Cutting all the pieces from the same lamination creates the look of undisturbed grain lines, despite having a drawer front in the middle of the apron.
Mould of many uses
Attach guide blocks on the mould to register the curved apron. This will ensure maximum support and safety as you crosscut the parts to length.

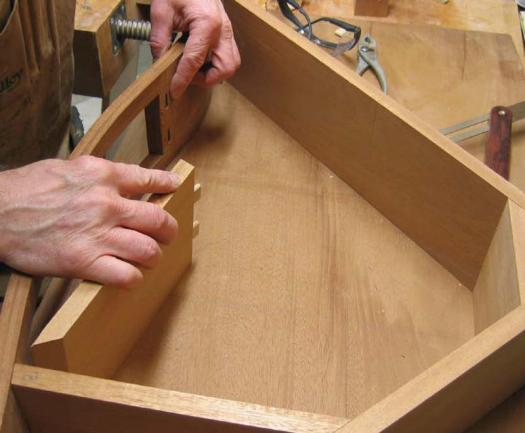
Support the drawer
A mortise and tenon joint create a solid connection point for the drawer supports to attach to the curved apron.
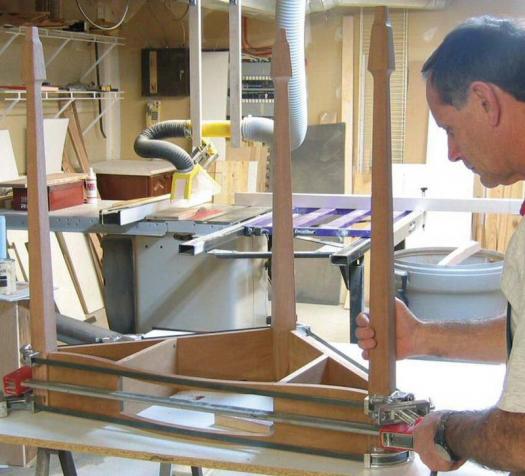
Dry then wet
Always conduct a dry run of a glue-up to find out how many clamps you need and if there are any hang-ups that will prevent the table from coming together.
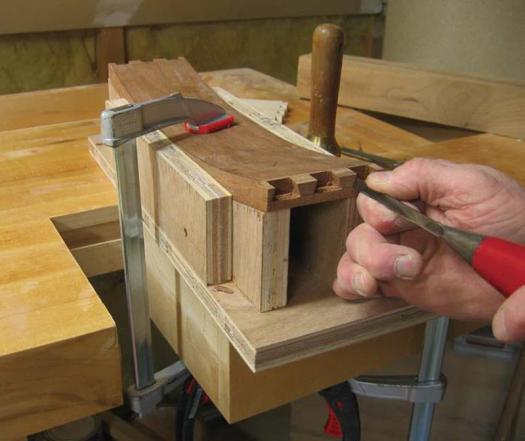
Cradle your work
Making a custom cradle to hold the curved drawer front is essential. This will allow you to keep the drawer front level and supported while you chop the pins.
Lay out the top
Use the assembled base parts to lay out the shape of the top. Always start with an oversized top to allow adequate overhang.