PROJECT
Build a custom wood fence

Carl Duguay

Find more Outdoor projects
Fencing can have a dramatic impact on the curb appeal of your home, and can also provide a safer area for young children or pets to play in.
Wood fencing remains very popular, with prefabricated treated panels and 4″ by 4″ pressure-treated posts the most common choice of materials. This is because they are relatively quick to install and cost less than other types of fencing, though they do require more maintenance. Even though there is some choice in the style of prefab fencing, it still has a bland, uniform look that really doesn’t enhance the appearance of a house.
Build a custom wood fence
If you are willing to invest marginally more money and time, then consider building a custom wooden fence. A custom fence will look significantly better than a prefab fence, it will enhance your property value, and last for decades. While it will require somewhat more maintenance than a prefab fence, it will age much more gracefully.
Most DIYers will likely have all the tools they need to do the job. Those tools you don’t have, such as a post-hole digger, cement mixer, or air compressor, are reasonably economical to rent. Like most woodworking projects, you’ll want to divide your fencing job into a few basic steps: design, materials, foundation, finishing and installation.
The fence shown in this article was built by Robert Turner (gardentamers@shaw.ca), who specializes in building custom patios, fences, and gazebos.
Design Options
When selecting a design, bear in mind that your fence serves both a functional and an aesthetic purpose. As with any woodworking project, balancing the two will take some thoughtful consideration. You’ll find a lot of fencing ideas looking around your neighbourhood, scanning the internet, and consulting fence design books. Robert recommends “Ultimate Guide to Fences, Arbors and Trellises” (ISBN: 1580113907), which provides a range of design ideas plus a wealth of information on construction techniques.
For this project, Robert based his design on a 1930s-era fence he saw in a nearby community. Most homeowners will be happy to give you permission to take photos and measurements directly off their fence, as Robert did.
In order to reduce costs, Robert and his client decided to build the new fence along the front and side of the property that faced the street, and retain the old fence that extended along the back, secluded portion of the property.
Don’t neglect to consult with any neighbours with whom you share property lines. Good fences don’t necessarily make good neighbours, unless they know what you intend to do. And remember to find out if you require a municipal building permit, and whether there are height and setback restrictions you may need to follow.
Once you’ve settled on a design, it’s time to mark out where the posts will go (typically 8 to 10 feet apart), and any gates. Sketch the fence layout and calculate the linear feet of rails and stiles that you’ll need, and the number of posts. Because of the fence length, Robert opted to use 6″ x 6″ posts for a sturdier look, and selected 4″ wide rails and 2″ wide stiles for the panels. Now is a good time to call the necessary utilities companies to make sure the location of your holes don’t interfere with anything.
Finish First
By far the most common wood fencing material is PT (pressure-treated) lumber, primarily because of its resistance to decay and moderate cost compared to the two other popular materials, cedar and redwood. As you know, all lumber will begin to check due to moisture build-up and freeze/thaw cycles in winter, and turn a grayish colour due to the effects of ultraviolet light. So, you’ll likely want to apply some kind of water repellant with a UV inhibitor on the lumber.
There are quite a few products to choose from, including paint, stains, varnishes and non-film forming finishes. The finish you use will depend on the material you choose. If you plan to paint the fence, as Robert did, then cedar and pine are good choices (cedar for the posts and pine for all the other components). Both of these woods also stain well. Robert chose to apply two coats of Dulux Weatherguard Maximum, a 100 percent acrylic paint with a high solids content and a fungicide additive that helps retard the growth of mildew. You can also paint PT lumber, but the results are likely to be less satisfactory. You’ll need to clean the PT lumber with an appropriate cleaner (one that contains sodium hypochlorite, metasilicate or carbonate) and then use an acrylic latex primer followed by a topcoat.
Companies like Sikkens and Penofin make reliable penetrating finishes. If you want to leave the wood natural, then consider a product like Lifetime Wood Treatment (valhalco.com), an organic, environmentally friendly preservative.
When applying a finish, it’s important to ensure adequate coverage on all exposed surfaces. Robert chose to apply the paint before assembling the fence, finding it easier to cover all four sides and both ends without having to deal with bugs and leaves sticking to the paint or waiting for a cloudy day. Begin by cutting all your stock to finished length and make any decorative or bevel cuts on the stiles. Don’t forget to cut the pieces for your post caps as well. Depending on how accurately you planted the posts, you may have to trim some of the rails shorter, so you’ll want to have some paint and a brush on hand during assembly.
As an alternative to using real wood, you might want to consider the use of a synthetic lumber, such as Altwood (syntalproducts.com) which does not require finishing, is maintenance-free, and lasts a lifetime. It can be worked just like real wood, but is, however, significantly more expensive.
A Solid Foundation Makes a Level Fence
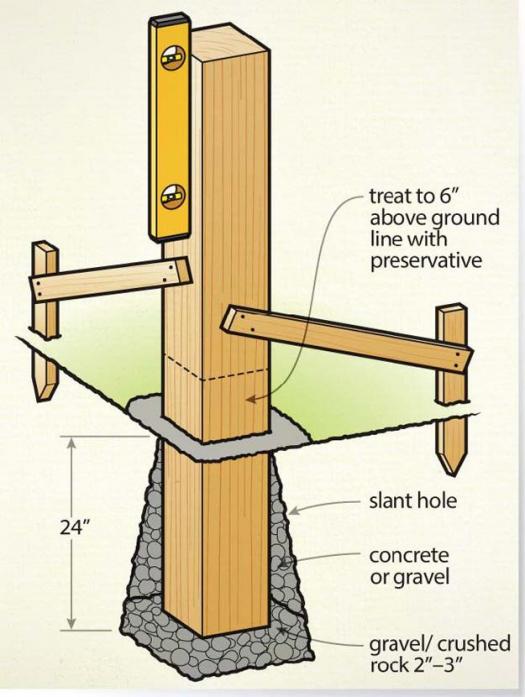
Probably the most critical part of your fencing project is installing the posts. These need to be plumb and consistently spaced, so take time to measure and position the posts accurately.
Digging post-holes is hard work. For a 4- to 6-foot high fence, they need to be 24″ deep. You can dig the holes a little wider at the bottom than at the top to help lock in the concrete or gravel. If your soil is sandy and relatively rock-free and you have a strong back, you can dig them with a pick and shovel. Otherwise, rent a post-hole digger or hire a landscaping company to dig the holes for you.
It will be a lot easier if you have someone help you install the posts. Set the end and corner posts, and any posts supporting a gate in concrete. Make sure you use a wood preservative to treat the section of the post that will be underground, particularly if it’s not pressure-treated lumber. All the other posts can be set in gravel. You’ll also want to lay about 3″ of gravel or crushed rock in the bottom of the holes for the posts to stand on, to help drain away water.
Use a simple bracing system to support the posts before you pour the concrete or gravel. You’ll need about one bag of premixed concrete per 2′ deep hole. Run the concrete a couple of inches above ground, sloping it away from the posts to facilitate water run-off. If you have a lot of posts to set, don’t try to do them all at the same time – spread it out over two or three days.
Once you have installed the first end post, install the other end post, or corner post if there is one in between the end posts. Then install the next corner post, or the end post. Now you can string a cord just above ground level between these posts to aid you in laying out the locations of the intermediate posts. Let all the posts settle for several days before you install the rest of the fence.
Now Comes the Easy Part
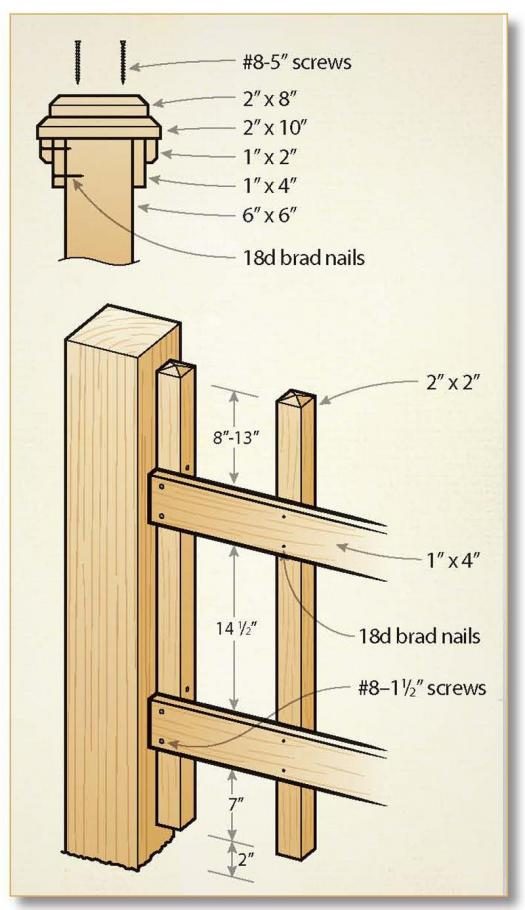
Installing the rails and stiles is the easy part. For this fence, Robert began by attaching a stile onto each of two facing posts with 3″ galvanized screws, keeping the ends of the stiles about 2″ above ground level. This keeps the ends of the stiles dry and makes it easier to trim grass around the base of the fence. These first two stiles serve as braces to hold the rails. Robert then attached the rails onto the stiles using 1 ½” galvanized screws. Finally, he nailed the remaining stiles onto the rails using an 18 gauge brad nailer. For even spacing, he used a spacer block between stiles. Rather than nail the stiles in place, you could screw them onto the rails. The first four stiles on either side of each post are cut 1 ½” shorter than each other to give a curved appearance towards the top of the fence. Rather than leaving the tops of the stiles flat, Robert beveled them on the mitre saw.
The trim for the post caps, which Robert cut on the table saw, is nailed in place. Then the top two plates for the caps are attached using four 5″ galvanized screws. The framing for the front gate is made up of 2 x 8 stock, and uses the same decorative trim as found on the post cap.
So there you go. Building a custom fence really isn’t that complicated. It does take more time than installing a prefab fence, and it will cost you marginally more, but the results will be much more impressive – and you’ll be the envy of the neighbourhood for both your DIY prowess and design acumen.
To Build a Fence
Here is what you need to build a fence. Much of the larger equipment (compressor, nailer and auger) can be rented from your local building supply center.
• Lumber
• Post-hole digger, power-driven auger, or shovel and pick
• 4′ box beam level or post level
• Circular saw, mitre-saw, or table-saw
• Drill or impact driver
• 18g nailer, compressor, and brad nails
• Gloves
• Hammer
• Twine
• Fast set concrete (1 bag per 2′ post hole)
• Portable cement mixer (if you have a lot of post-holes to fill)
• Galvanized screws
• Wood preservative
• Your choice of finish
Photos by Carl Duguay
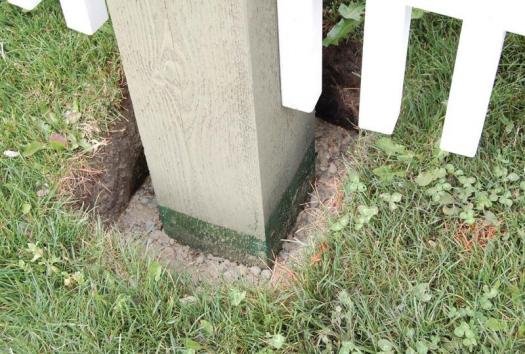
Preserve the Strength
Apply wood preservative to the wood that will be 6" above ground level to help keep the structural backbone of your fence good and strong for years.
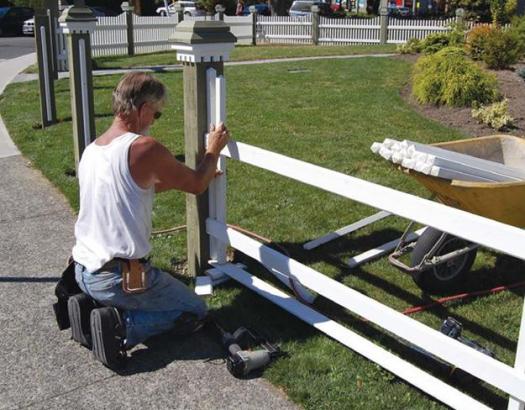
A Single Stile
With the posts installed, attach a vertical stile to the side of each post. The rails will then be installed to the stiles. All the stiles and rails are painted before installation to protect them against decay.
Lots of Cuts
Once the rails have been attached to the initial stiles, you can prepare the rest of the stiles for installation. Notice the mitre cuts on the top of each waiting stile. This adds an element of style, and sheds rain.
A Few Tricks
Use spacers to keep the stiles spaced evenly across the rails. Also notice the properly supported board on the ground, providing a helping hand during installation. The ground board will assist with keeping all the stiles at the same height.

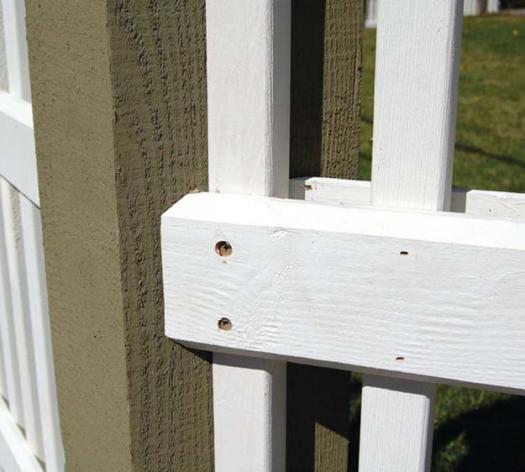
Choose Your Fastener
Brad nails can be used to install many parts of a fence, but screws are best for areas that require higher strength.
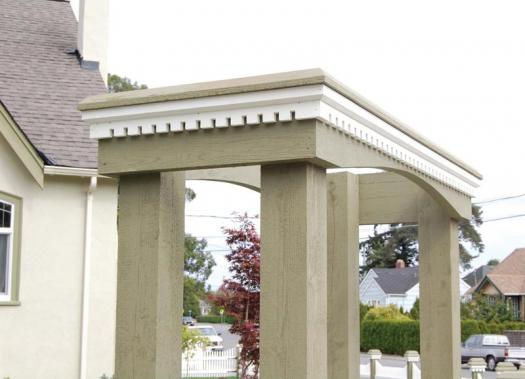
Focal Point
An arch gate is a great way to add a focal point to a fence, and direct visitors toward the entrance gate.
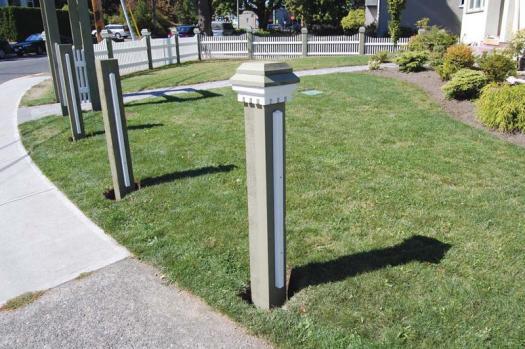
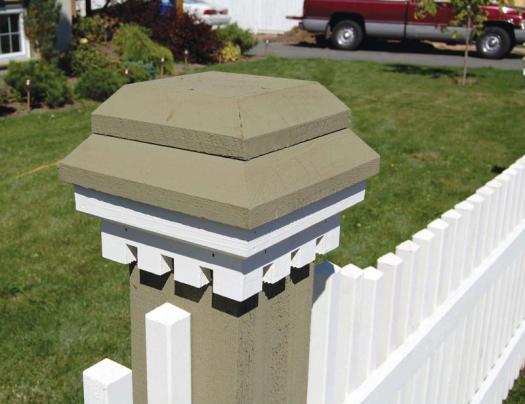
Outdoor Style
There are many options when it comes to post caps, and each adds a certain look. Do some research about what look you want, then create the exact look you’re after from a mixture of square stock, mouldings, etc.
Don’t Skimp Now
After all the work you’ve put into your fence project, you’ll surely want to use high-quality, smooth-acting hardware for gates and doors.
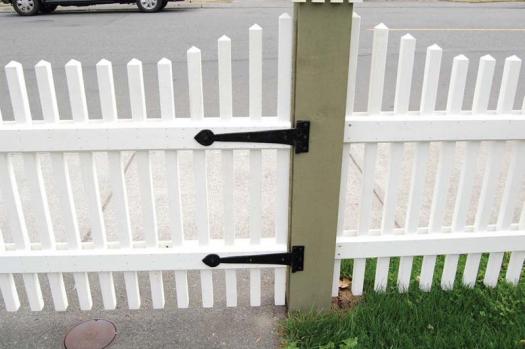
Illustration by James Provost