PROJECT
Build a removable outfeed table

Chris Wong

Find more Shop projects projects
Improve your band saw’s ability to machine long workpieces by adding this support table. When not in use it can easily be removed and stored out of the way.
Having a large enough band saw tabletop that can fully support your workpiece can improve accuracy, reduce user strain and improve the quality of your work. However, having large infeed and outfeed tables for every machine takes up a considerable amount of space that can, in many cases, be better utilized. In addition, a machine with larger tables is heavier, harder to move, occupies more space and usually costs more.
After struggling with ripping long lengths of material on my band saw, I decided to address the issue by building an extension table and mounting rail system to allow the table length to be increased when necessary but stored out of the way when not needed. With appropriately mounted rails, an extension table can be used on the infeed or outfeed side of a machine, as well as on the left or right. You could even mount multiple extension tables in a series for extra length.
Keep in mind that an extension table on a band saw, table saw or router is primarily to provide support and keep long material from tipping off the end of the table, whereas an extension table for a jointer or planer can actually serve as an extension of the precision ground machine bed and increase machining accuracy of long material if it is sufficiently flat and properly aligned. A shop-made extension table can be made of sufficient accuracy for either application if care is taken choosing appropriate materials and in construction.
Build a removable outfeed table
Table design
Looking at the different lengths of material I commonly cut on the band saw, I decided that a 12″ × 30″ table would suit my needs well, offering ample support without being unnecessarily long which would make it heavier, more prone to sagging and more difficult to store when not in use.
Most commercial extension tables are made of cast iron, anodized aluminum, sheet steel or particleboard covered with plastic laminate. These materials have excellent wear resistance and are also fairly slick, so your workpiece will glide over it. For a shop-made table, a plastic laminate-coated surface is a great choice and well within the capabilities of most woodworking shops. Although not as durable, a melamine-coated particleboard table is slick, flat, cheap and readily available. Plywood, MDF or solid wood is suitable for light-duty use, although none of these are as flat, stable, wear-resistant or slick. Material that’s 3/4″ thick is stronger and stiffer, but for small tables a 5/8″ thickness may be sufficient.
Building the table
Cut the extension table to your desired size and mill grooves in line with the mitre slots, if desired. The shape doesn’t matter as long as there is one straight edge to go against the machine table. With a table saw or router, plow a 3/4″ wide dado about a third of the way into the bottom of the table, 5/8″ from the edge, that will attach to the machine. The distance the dado should be machined away from the end of the support table will depend on the hardware you’re going to use to fix the rail to the band saw table. To help align the mounting rail during installation, make a setup block from a scrap of the extension table material with the same dado setup.
Although I machined the dado in the underside of the support table, then installed the solid wood rail on my band saw’s table, it could be completed in the opposite order. You’d then be able to fine-tune the depth of the dado according to the height of the rail. There are pros and cons to each approach. The deeper you mill your dado in the underside of the support table, the weaker the support table will be.
To secure the table to the rail, a simple rail clamp is employed. It consists of a 5″ × 2-1/2″ × 3/4″ wood batten with two 1″ long by 1/4″ wide slots in it starting 1-1/2”and 3-1/4″ from the front edge, and some 1/4-20 hardware. The clamping knob passes through the front slot of the batten and into a T-nut installed in the top of the extension table. For effective clamping, it’s important to ensure the batten is kept parallel to the bottom of the mounting rail. This is achieved with a second bolt through the rear slot in the batten and into an insert nut in the bottom of the extension table, and a few carefully adjusted 1/4-20 nuts.
Mounting rail design
After trying a number of ideas, I settled on a 1-1/8″ × 9/16″ rectangular mounting rail made from a piece of hardwood. The oversized dado in the tabletop slips over the rail and keeps it from sliding off.
I cut the mounting rail to about the width of the machine’s table. If the extension table will be used in only one position, such as right behind the blade, the rail could be made exactly as wide as the table. However, having a wider rail allows greater flexibility in positioning the table for optimum support. I would advise against having a rail protrude from the edge of the machine’s table as it would likely be in the way and catch on things.
Attaching the mounting rail
As I mentioned before, you could attach the mounting rail, then machine the dado on the underside of the support table to suit. I opted to do it the other way around, but there’s no true right or wrong. Whether you size the rail to the support table or vice versa, the end result should be the same. Either way, ensure the dado in the underside of the support table isn’t too shallow or the support table will be too weak.
The rail must be mounted to the machine securely at a height that allows the extension table to sit at exactly the height of the machine table. Using 1/4″ bolts through 3/8″ holes allows a reasonable amount of height adjustment if your holes aren’t located perfectly.
If your table doesn’t have any appropriately located holes, you’ll need to add some. The exact placement of the holes will depend on the table design you’re dealing with. Keeping the holes lower on the rail will prevent the bolts from interfering with the lateral positioning of the extension table, but don’t locate them too close to the bottom edge of the table. Also, make sure to locate your holes far enough from any reinforcing webbing underneath to allow a washer to sit flat.
Most machine tables are cast iron, which can be drilled with an electric drill, a few twist bits and patience. Mild steel is easier to drill and aluminum even easier. When drilling metal, I always use a slow speed and a liquid cutting lubricant on the bit to reduce heat buildup and make drilling more efficient. Listen for the sound of the bit cutting into the metal. Also, it’s easiest to drill a small hole first to set the location of the hole, then use a larger bit to enlarge the hole.
To attach the rail, I first put a 2-1/2″ long 1/4-20 bolt through the rail followed by a spacer about 5/8″-3/4″ long. (I used a steel bearing spacer from a pair of old roller blades, but any small tubing resistant to compression would work. The end of the bearing spacer was quite thin, so to increase the bearing surface, I added a washer. I had considered using old pen-turning bushings or making spacers from wooden dowel, but this seemed the easiest.) Then the bolt went through the machine table and was secured with a washer and nut.
Positioning the rail at the exact height can be achieved most easily by setting a straight edge on the machine’s table near a bolt and clamping the setup block you made earlier between the straight edge and rail. Tighten the bolts, confirm that nothing moved, then move the setup to the next bolt and repeat.
Building an adjustable leg
I built an adjustable leg to support the other end of the table. If the extension table will go over a work surface or other machine top, you could use a set of shims instead. You could also consider using a diagonal brace from the end of the table to the base of the machine. If using the table with multiple machines, alignment marks or stops on an adjustable leg could reduce setup time. Another option would be to just use a one-piece arm that extends all the way to the floor. It’s stronger and simpler to make, though it doesn’t tuck away as nicely, nor does it offer much help if you’re using this support table on machines of differing heights.
To make the adjustable leg, I measured the table heights of various machines I might use the table with and identified the tallest and lowest tables. I added a few inches to the tallest table to accommodate the loss from the slant of the leg. Since I wanted a compact leg that was also tall enough for use at my band saw, I built a three-tier leg, but you could make a simpler two-tier leg if you don’t need that range of adjustability — just omit one outside part and one set of hardware. The following instructions are for a three-tier leg.
Machine the outside posts to 1-1/2″ × 3/4″ and inside post to 3/4″ × 1/2”, cut them to the same length (which you have to determine based on the heights of your machines), and mill 7/32″ deep grooves down the centers of the two outside posts so the inner post slides freely. Rout a 5/16″ wide groove for a 1/4″ bolt along the center of each outside post, stopping 2″ from each end.
At 2″ from each end of the inside post, and on opposite faces, drill and counterbore for a T-nut. Install the T-nut, then assemble the leg with 1/4-20 jig knobs and washers. At the bottom of the leg, install a cross dowel and thread in a 1/4-20 adjustable foot for making fine adjustments to the height. Attach the leg to the extension table with a strap hinge.
Attaching the extension table
Adjust the leg to the approximate required height, then position the dado of the extension table over the rail. Slide the rail clamp forward and tighten the locking knob to secure the table to the mounting rail. Use a straight edge to see if the extension table is planar to the machine’s table and raise or lower the leg as required.
Benefits of an extension table
This was a quick and inexpensive build that works well and, best of all, has made my work easier and more accurate. Now, instead of trying to balance a big workpiece on a small table, I can just focus on accuracy.
Upon reviewing my article, CW&HI Editor Rob Brown, who is always concerned with the safety of his readers, questioned the strength of the table and, specifically, the adjustable leg. To illustrate the strength of the table design, I took one of the biggest pieces of wood in my shop — a 6′ long piece of 2-1/4″ thick black locust and straight-lined one edge. The extension table did its job wonderfully, allowing me to focus on following my line rather than balancing the heavy slab. I considered placing the dynamic loads of either my two- or four-year-old kids on the table, but strangely they declined to participate in my experiment.
Photos by Chris Wong
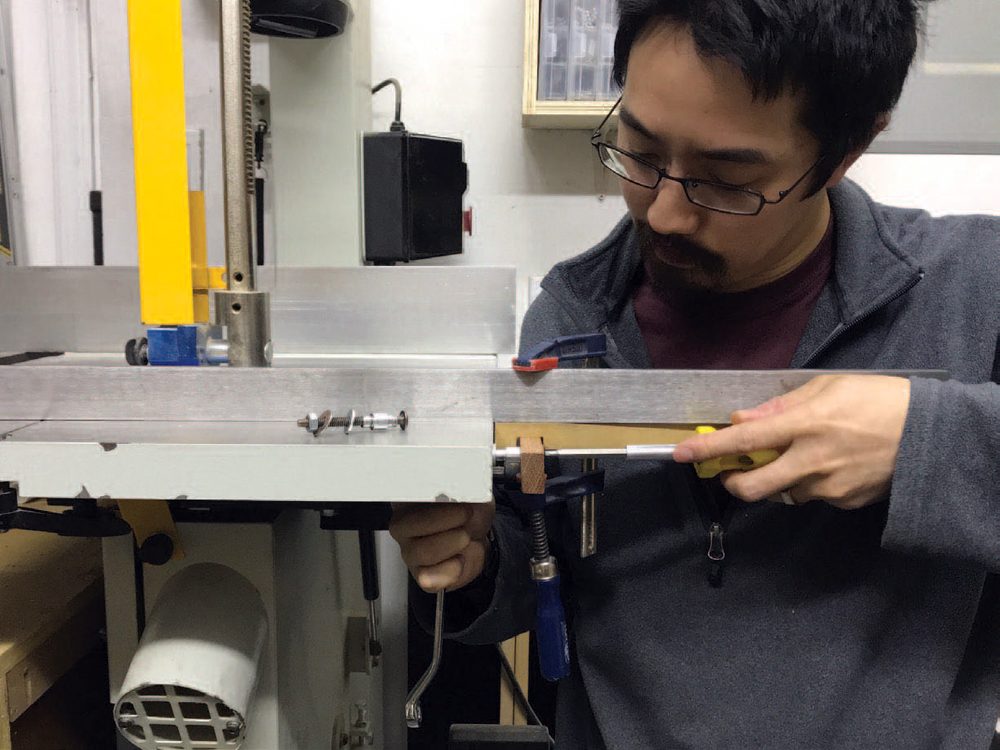
Attach a Rail
Wong machines and attaches a solid wood rail to the rear edge of his band saw table. With the necessary hardware to keep the rail away from the edge of the table and making sure to position the rail at the proper height below the band saw’s table, the support table will be strong and flush with the band saw table’s surface.
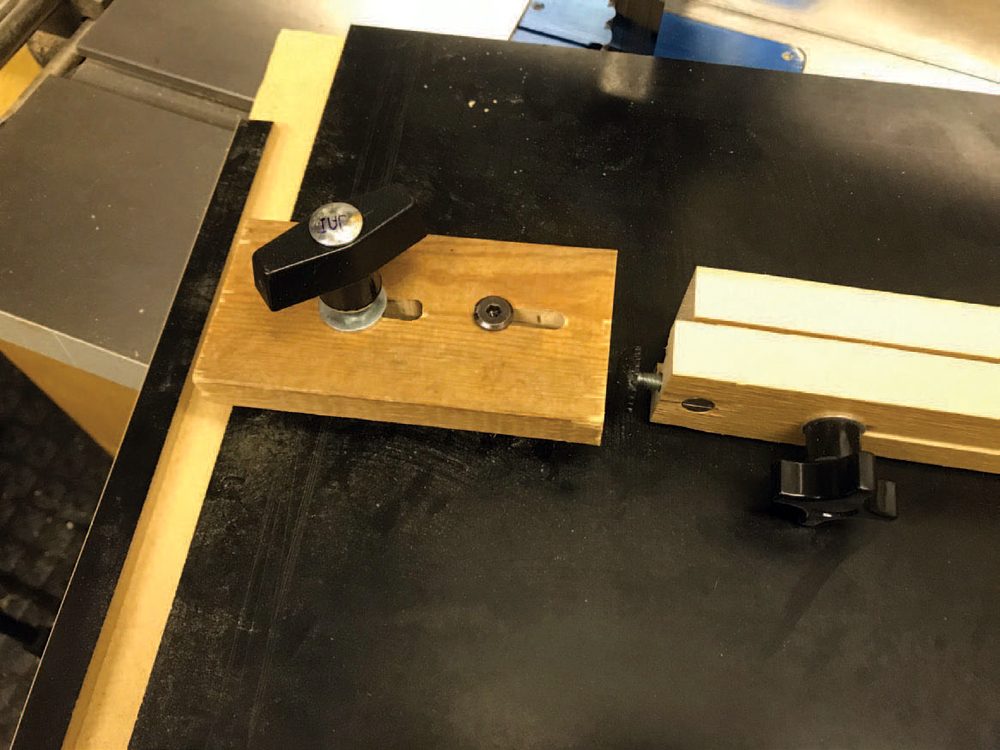
Under the Hood
A shop-made clamping device will secure the support table to the rail, while the adjustable support leg will work well not only for use on your band saw, but also on other machines you attach a similar support rail to.
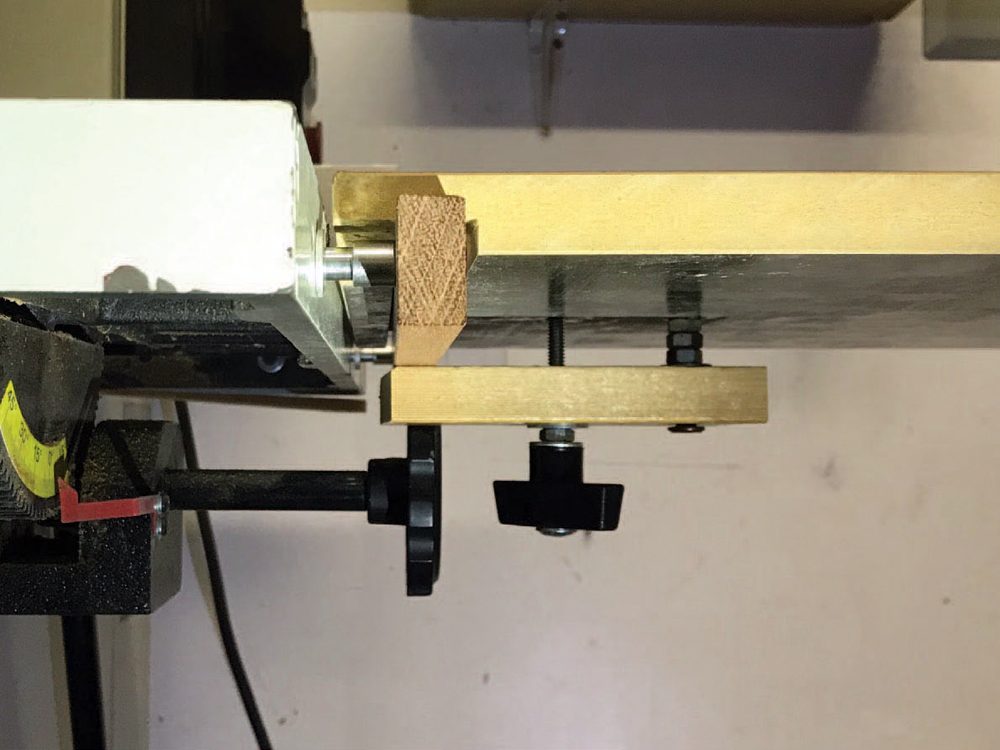
Small Adjustments, Big Benefits
Wong bored a slightly oversized hole in the rail so it could be adjusted up or down. This gave him the option to ensure the outfeed support table is co-planer with his band saw table.
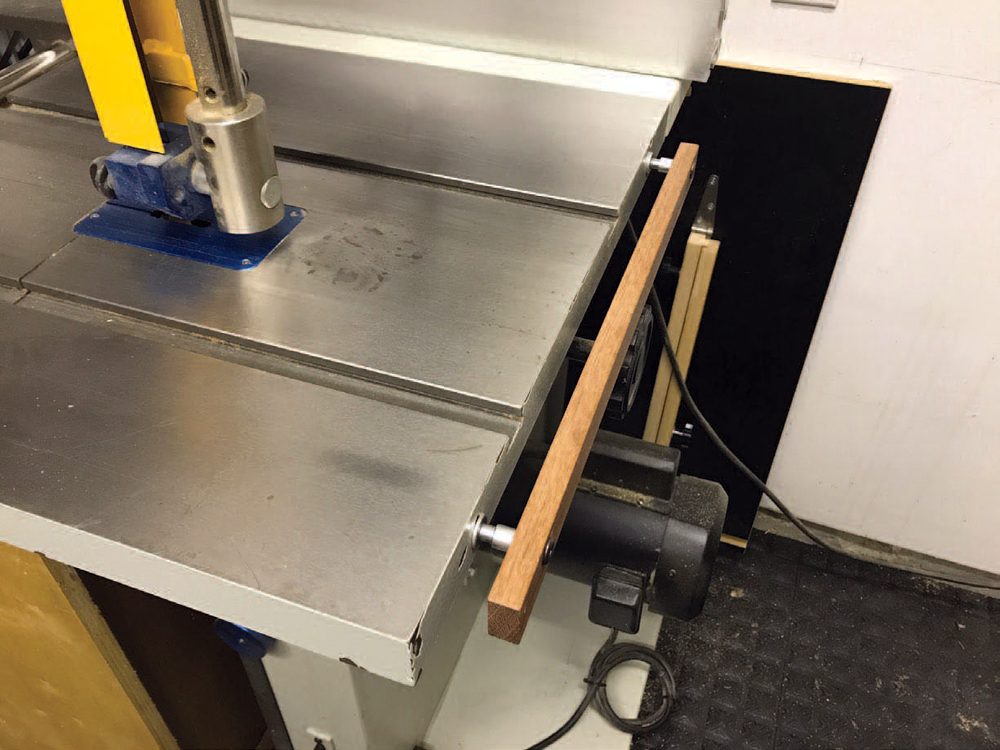
Locked and Loaded
With the support fence in place and the shop-made clamping device engaged, Wong can be sure his support table will stay in place while working.
Ready for Action
Wong’s setup will support a surprising amount of weight and is very easy to set up. This is exactly what working in a small shop is all about.

Illustration by Len Churchill


Excellent idea. Fully functional, stowable, a real testament to the KISS principle of design. Thank You!