PROJECT
Build a Box with Diamond Pegged and Bevelled Corners

Merv Krivoshein

Find more Boxes projects
Bevelled corners are visually very clean, but they can be on the weak side. Learn a new technique to add strength and style to a box with bevelled corners.
Lee Valley in Edmonton asked me to come up with a workshop for making small boxes using mainly hand tools. A new process for securing the bevelled corners of this box came from my desire to find an alternative method in place of the many established techniques. Though I used mainly hand tools and document that process here, machinery can be substituted for just about all of the steps in this project if you’d like.
Build a Box with Diamond Pegged and Bevelled Corners
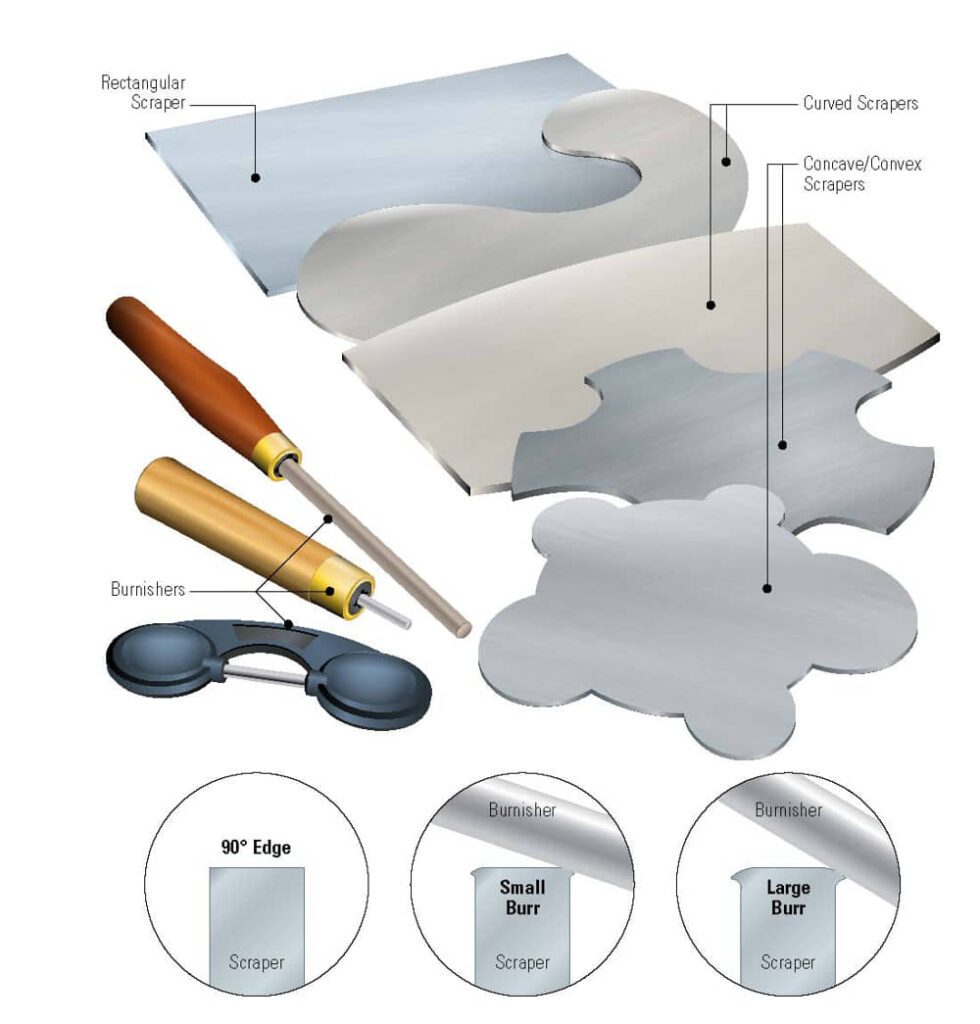
Get dressing
I dressed the rough board flat using hand planes and then dressed the opposite face parallel to the first. Next, I straightened one long edge, cut and planed the other long edge parallel with the first. A groove is added to the bottom inside face of the board where the box bottom will fit into place. You can use solid or sheet stock for the bottom, but if you use sheet stock, be sure to measure how thick it actually is, as sheet goods are rarely the exact thickness stated. The bottom I used was 1/4″ thick, so my groove was cut the same width, and 1/4″ deep. It was also cut about 1/4″ from the bottom edge of the board. According to the length of the board I determine the width and length using the golden rectangle concept. I multiply the width by 1.618 to determine the length of the box.
Bevel the corners
Using a 45-degree square mark the top edge so the bevels face the inside of the box. I leave about 3/16″ space between the outside marks on the face side of the board. This space allows me to cut the bevel on each board using a hand mitre saw. Using a donkey-eared shooting board, the bevels are hand planed, making sure opposite boards are exactly the same length. Before gluing up, masking tape is placed on the inside face of the board along the bevelled edge, so any squeezed-out glue will be on the tape and not on the board.
Assemble the box
Place the boards in sequence end-to-end, as they were cut from the main board. The bevels should be facing down and against a straight-edge fence. Place masking tape on the outside surface of the boards, across all joints except the last, then flip the taped assembly over, so the cut bevels are accessible. After placing glue on all the bevels, place the bottom in the groove of one of the longer boards, and fold up the other sides so the bottom fits into all of the grooves. Tape the last corner together. Check your diagonals to make sure they’re equal, and leave the box to dry overnight.
Diamond jig
The block-like jig I used for assisting with creating the diamond-shaped pegs is 2-5/8″ × 5-3/4″. If your jig is a different dimension you will have to adjust some of the following measurements. After drilling the holes you will have to make two 45-degree cuts on the table saw to create a V-groove on one side of the jig. This can be tricky, and sometimes even dangerous, with a small block of wood. Leaving the block longer for now, and cutting it to length after the two 45-degree cuts are made, is a good option.
The first time I made this jig I took a few extra steps in order to get it right. To more clearly locate the holes, in relation to the V-groove that will position this jig against the box, I first made the 45-degree cuts in the block to create the V-groove, then glued a piece of contrasting wood into the groove. This gave me a very clear visual where the corner of the box would be housed. Once I had located the holes in the jig, I then cut the contrasting block from the jig. Instead of going all the way and gluing a different species into the V-groove, you could simply lay it out with clear pencil lines.
The points that I marked on the block for drilling are 1-3/4″ from the back of the block and 1″ apart on opposite sides. The distance between the points can vary according to the height of the box you make and the dimensions of your jig. Measure these points of entry on both sides of the block, ensuring the location of the resulting peg will be housed completely inside the bevel corner joint and won’t come through the interior side of the joint. Don’t drill these holes all the way through. If you’re drilling round holes use, a Forstner or brad-point bit, as they leave clean holes. Drilling round holes will leave you with elliptical-shaped pegs when complete, not diamond-shaped pegs. Drill about 1″ down on each point. If you use a square mortising bit, you can drill the hole with its edges parallel to the block sides. This approach will leave you with diamond-shaped pegs on the corners of your box.
Remove a notch from the jig
After the holes are drilled, tilt the blade of the table saw to 45 degrees. Place the block so the holes on one side of the block face the fence on the table saw. Don’t raise the blade to take a full cut. The blade should eventually be raised to about 1-1/2″ height to make the final pass on both sides.
The size of your block may vary from mine, but when you make your 45-degree cut on the inside of your block, the distance between the apex and the peg or dowel coming through should be no less than 3/4″. This means that when you put your peg or dowel through the hole, the distance between your corner of the box and the edge of the peg/dowel should be 3/4″. This leaves enough material so the joint should not split. When you clamp this jig onto the corner of your box, you can adjust how high up from the base you want to have your first hole. You use the 45-degree waste block to be placed inside the box, so the two pieces can be clamped for the drilling process. Clamp the block in place against the box and create all of the cavities for the pegs.
The pegs
If you used a square bit and a hollow chisel mortiser you can mill up enough contrasting material to fill all the square cavities. If you drilled round corner holes, regular solid wood dowels can be used. The trick here is that very rarely are store-bought dowels the exact stated diameter. Either bring a scrap of wood drilled with the proper hole with you to the hardware store so you can test the dowel lengths before making a purchase, or make your own with a dowel former.
Add glue to the cavity and the pegs, and tap them home. When dry, use a handsaw to trim them close to flush, and hand plane them flush with the surface of the box.
Four feet
The rounded feet pictured on the box are not easy to make, but I like their finished look. You can easily add many other different types of feet or a larger base to a box like this. You could also leave the feet or base off the box entirely. Here’s a brief overview of how I create the rounded feet.
I start by cutting a 2″x2″x2″ block on the table. Using a large dowel cutter chucked in my drill press, the lower, circular part of the foot is cut to a depth of about 1/4″. I then move to the bandsaw to carefully rough out the foot further, being sure to keep one flat face on the bandsaw’s table at all times and my fingers out of the way. A coping saw could also remove much of the material at this stage.
The foot is then sanded on my oscillating spindle sander using an 80-grit sleeve. This gives a lot of the flow and shape to the overall look of the foot. To sand the feet smoother I usually use an electric drill equipped with a fine flap wheel.
The last main step in shaping the foot is to create a recess in the top, and leave a 1/4″ x 1/4″ lip around the two outer edges, at the very top of the foot. The lips will sit proud of the box when complete. Using a jig that holds the foot, I rout a recess into the surface opposite the rounded foot to a depth of 1/4″, leaving an edge so the corner of the box fits into this area.
A hole is drilled from this recessed area down to the base of the rounded foot. A screw is then used to hold the foot to the corner of the box. This whole process takes about one hour per foot, but I do each described process on all four feet at the same time.
Top it off
The lids for most of my boxes are made like a raised panel and are either hand planed or made on the table saw. I made a jig for the panel cuts, so I do not have to tilt the blade every time I make a lid. The jig is adjustable, so I can tilt it to the right angle and then clamp the panel in and make my cuts. Make a panel that will fit the box opening, with a slight gap around its perimeter.
On the inside of the box, I glue two small strips of wood, with one end cut at an angle (1/4″ down at the back and about 2″ long). When you press down on the back edge of the lid, the lid lifts up, so you can remove it to place items inside the box. Adding a standard handle to this box is an option, but I find it detracts from the overall look of the box. I also find people enjoy learning about, and using, my lid opening method.
Finish
Any finish that will enhance the look of the grain, add a desired colour and include a medium amount of protection will work nicely for a project like this. Unlike some project, where heavy daily use is demanded from the piece, this box won’t take a beating. I have used wiping oils with great success. When I use a white wood like holly I don’t want the finish to yellow much over time, so I use a water-based finish. Ease of application is also important for a small project like this. A small aerosol sometimes works wonderfully. Test the finish on some scraps to check for colour, then apply a few coats to the box.
Photos by Traci Munday
Getting Groovy
Krevoshein wanted to use mostly hand tools for this box, but you can just as easily create the grooves to accept the bottom with a table saw or router table.

Angle It
A mitre box equipped with a sharp saw is one option to cut the bevelled corners of the box.
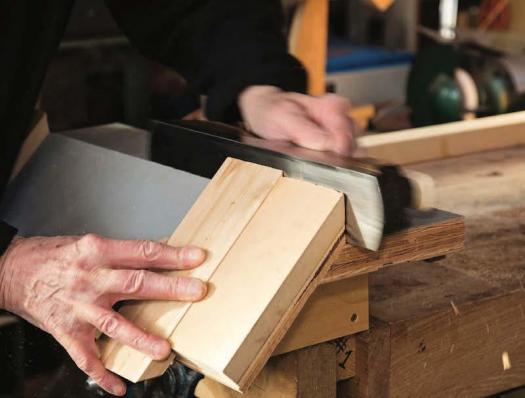
Perfect the Bevels
A shooting plane can perfect the face of the bevelled edge and ready it for assembly.

Gluing Bevelled Joints
Once masking tape has been applied to the inner edges of the box to protect against glue squeeze-out, apply glue to the bevelled joints, rub it in, then apply a bit more glue to the joints.

Wrap It Up
With masking tape across three of the four bevelled joints, and glue on those joints, wrap the pieces together, and around the bottom panel, before applying tape across the last joint.

Careful Jig Layout
Krevoshein marks a line where the holes should be located. The location of this line is crucial; too close to the outside corner of the box and the corner will split, too far away from the corner and the pegs will be visible near the inner corner of the box.

Pre-Drill the Holes
Before cutting away some waste to form the V-groove in the jig, use either a horizontal mortising machine or a drill press to bore the holes. Use a clamp to keep the small jig steady during the operation.

Keep the Scrap
The offcut while making the V-groove in the jig works perfectly as a caul on the inside of the box.

Bore the Holes
With the jig clamped to the box, and everything aligned and clamped in place, Krevoshein creates the square cavities in the corners of the box.

Perfect Fit
Once the square cavities are cut, you can machine the pegs to be glued into place. Contrasting wood looks great.

Trim 'Em Up
Once dry, use a saw to remove most of the waste, then flush the plugs with a plane or sander.