PROJECT
Bird feeder

Jim Sinclair

Find more Outdoor projects
Liven up your backyard with this hand-made cedar and acrylic bird feeder.
This project is made with dry western red cedar. The red cedar that you get from the building supply center will be wet, which means it takes nails well without splitting. This, along with cedar’s weather resistance makes it great for nailed-together outdoor construction projects such as fences, planters and sheds. However, like any wet wood, when cedar dries, it shrinks. Whenever I do a project with wet cedar I set aside a couple of nice looking, relatively knot-free pieces to dry in my shop for more refined projects. Once it is dry, cedar is a very soft easily dinted wood, but it works well, and smells wonderful in the shop. All of the cedar parts except the roof ridge can be cut from a nominal 6″ by 3/4″ cedar board, which my building supply company actually measures about 5-1/8″ by 5/8″. The roof ridge blank can be cut from a cedar 2 x 4 or 2 x 2, whatever you have available.
I keep some 1/4″ clear polycarbonate about the shop to construct custom router bases, jig parts and the like from time to time. This seemed like an ideal material from which to make the front and back of the bird feeder.
Bird feeder
Basic Preparation
Pick some nice looking cedar that is relatively knot-free. If you need to use more than one piece, try to select pieces with a good colour match. Use some chalk to lay out on the rough boards where each part will come from. The blank for the feed stops are a special case here, so lay out a single blank that is about 5″ wide. The feed stops will be cut from this blank during detailed cutting. All of the parts are small, so you should be able to work around any knots or blemishes in the cedar. Rough cut the part blanks from the boards so they are still long enough to process on your jointer and planer. For all the blanks, joint a face and edge, plane them to thickness, rip them to finished width and, finally, cross-cut them to finished length.
Cutting the Sides
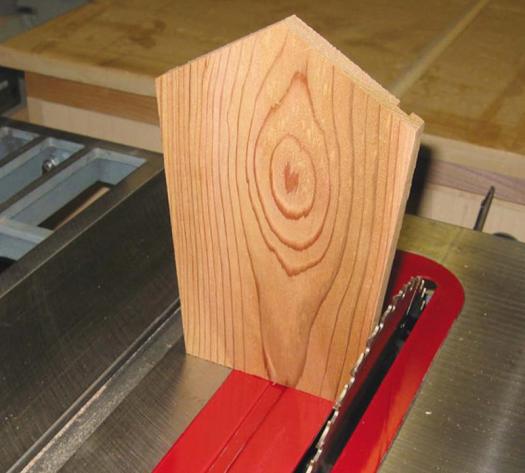
The angles here interact with each other as you make the cuts. You may want to make a test piece first out of some scrap material to make sure you know what is going on. Set the mitre gauge to five degrees. Set a stop so that you remove 1/2″ from the bottom of the piece. Flip the piece over and remove a similar wedge from the other side.
Rotate the mitre gauge to 35°, put the edge just cut against the mitre gauge fence and set the width of the cut to just graze the point on the side. Flip the piece over and do a similar wedge. This will give you a roof pitch of 30°. Repeat this for the second side piece.
Before making the slot cuts in the sides, purchase the clear sheeting that you will use for the front and back and measure it for thickness. You should be able to find clear sheeting from your local building supply store that is somewhere between 1/8″ and 3/8″ thick. Just about any size will do and the sheets will usually come with instructions for cutting them. Generally, the thinner it is, the easier it is to work with. Select a router bit that will cut a slot the right size to match the sheeting available. I used a 1/4″ spiral bit. To cut the slots in the sides, set the bit 1/4″ clear of the router table fence. Set the height of the bit to 1/4″. I make the slots in two passes without any adjustments by using a cleated 1/8″ piece of hardboard to raise the piece up for the first pass. Mark a pair of stop lines on the fence approximately 1″ from the center of the bit on either side of the bit. For the cut that feeds from the top toward the bottom, feed the piece into the bit and use the line to the right of the bit to show how far to move the bottom before lifting the piece clear of the bit. For the cut that feeds from the bottom to the top, use the stop line on the left to guide the position of the bottom as you lower the piece on to the bit, and then run the piece out through the top.
Cutting the Perch Supports
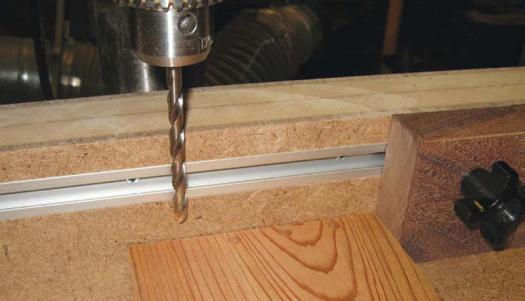
Lay out the location of the perch mounting holes on the inside faces of the perch supports. On your drill press, set up depth and width stops to obtain consistent locations for the perch mounting holes. Using a 1/4″ lipped brad point drill bit, drill two 1/4″ deep holes in each support. When drilling into soft wood like cedar it is important to go slowly at the beginning to allow the drill bit lips to score a clean shoulder. With the holes drilled, move on to the table saw. Set your mitre gauge to 45° and set the stop to leave about 1/2″ at the top. Trim off both ends of both base sides. Of course, this cut is purely cosmetic, so consistency is more important than accurately reproducing the design. Just make sure you don’t cut off the perch mounting holes.
Cutting the Feed Stops
The easiest and safest way to make these is to mill a larger piece to 1/2″ thick and cut it to length. Set the table saw blade to five degrees off of vertical and then put the five-degree bevel on both edges of the piece. Return the table saw blade to 90° and rip off 1/2″ strips from each side with the five-degree bevel already in place. When you make the second bevel and the first rip, make sure you place the wide portion of the bevelled edge up against the rip fence so that it doesn’t slip under the fence and mess up the cut. An easy way to set the table saw blade to five degrees off vertical is to use one of the sides you recently produced as a guide.
Cutting the Roof Pieces
Tip the table saw blade to 60° and rip one edge of each roof piece. Routing the slot in the removable roof piece requires building a minor jig. Take a piece of scrap roughly 8″ x 4″ x 1/2″. On a table saw or mitre saw, trim off both ends to make sure they are square with one side. Mark this side. Trim off a 30 degree triangle from each end, making sure to place the marked side against the mitre gauge or fence for both cuts. Attach the two triangles back to the remaining piece using a pair of rub glue joints to form a cradle that will support the removable roof piece. Wait 20 to 30 minutes for the glue to harden and you are ready to rout the slot.
When you are smoothing the roof pieces, smooth the removable piece down about 1/32″ smaller than the fixed one. This will allow the removable one to continue to slide in and out, even with some expansion due to wood movement.
Cutting the Roof Ridge
The roof ridge needs a slot cut into it that will hold the removable roof piece. This slot should be routed before the inside and outside slopes are cut. Set up the router table with a 1/4″ gap between the fence and a 1/4″ spiral bit. Set the bit height to 3/8″. I used a pair of 1/4″ cleated spacers to make this cut in three passes.
Once the slot has been cut, move on to the table saw. Tip the table saw blade to 60° and set the height of the blade to be just over half the height of the piece. Use a push block and rip the outside slopes. The newly created roof peak should run nicely against the rip fence for cutting the inside slopes. For the inside slopes, lower the height of the blade to just under where the cuts should meet. You don’t want to over-cut and end up with unsightly saw kerfs extending into the roof ridge. Using a push block, rip the inside slopes and clean up the leftovers with a shoulder plane.
Preparing the Perches
If you can create 1/4″ cedar dowels, go ahead and make the perches as 1/4″ dowels. If you don’t have this option, mill a couple of 1/4″ square pieces to the correct length. A simple V-groove jig with a stop at one end can be used to hand plane the perches from a square cross section to an octagon cross section. Drill a 1/4″ deep hole in a scrap of hardwood. With a little hand pressure you should be able to twist and jam the ends of the perches into the hardwood hole to compress them round.
Cutting the Front and Back
Dry fit the cedar parts of the bird feeder together and measure for the width and length of the acrylic pieces, just in case some sizing issues have crept in during construction of the cedar parts. Follow the instructions that come with the acrylic to cut the pieces to size. I like to use the table saw blade that came with my saw (rather than any of my good woodworking blades) to cut acrylic parts.
Joinery
Most of the joinery for this project is done with 1/4″ hard wood dowels. The two sides are attached to the base with dowels. A set of dowels 1″ apart should do fine for this joint. The two perch supports are attached to the base with dowels. Once again, a set of dowels 1″ apart are fine for this joint; just make sure you offset them to half way between the dowels attaching the sides. The fixed roof piece is attached to the top edges of the sides with dowels. Don’t skimp on the dowels here. This joint will end up holding all the weight of the bird feeder once it is mounted. The perches are inserted into 1/4″ holes drilled 1/4″ deep into the perch supports. The roof ridge is simply glued to the fixed roof piece. Long grain to long grain makes this a strong glue joint without any need for dowel reinforcement. The removable roof piece is attached to the roof ridge using a cleat. The cleat is a 1/4″ x 1/2″ strip of cedar that is glued into the slot cut into the removable roof piece and slides in the slot cut in the roof ridge.
Assembly and Glue Up
Start by gluing the sides to the base. I used a thin clamping caul between the base and the clamp to discourage the clamp from twisting the side out of square with the base. I used a shop-built 120° caul to provide even clamping pressure to the top edge of the side. I also clamped a 90° brace between the base and side to keep them square to each other.
Glue the roof cleat into the slot in the removable roof piece. With the sides in place, glue the feed stops to the base. Minor misalignment on the positioning of the sides relative to the base may cause the feed stops to not line up quite right with the base. If this is the case, clean it up with a bit of work with a block plane before moving on to the next glue step. Now glue the perches to the perch supports and the perch supports to the base as one step. Glue the roof ridge to the fixed roof piece. Slide the clear front and back pieces into place before attaching the roof. Slide the removable roof piece into place. Glue the fixed roof piece to the sides.
Finishing
I used a ‘one coat’ exterior grade cedar siding stain. For a small project like this bird feeder I took the time to apply two coats of stain, wiping off the excess stain after each coat. I didn’t do any sanding between coats or after the final coat. Once the finish was dry I put a thin coat of beeswax on the cleat and in the slot in the roof ridge to enable them to slide more easily.
Mounting the Bird Feeder
The roof ridge should be large enough to accommodate whatever mounting hardware you want to go with. I chose a pair of loop hooks, one into the center of the top of the roof ridge and the other into the underside of the pergola where I hung the bird feeder.
Photos by Vic Tesolin, all others by Jim SInclair
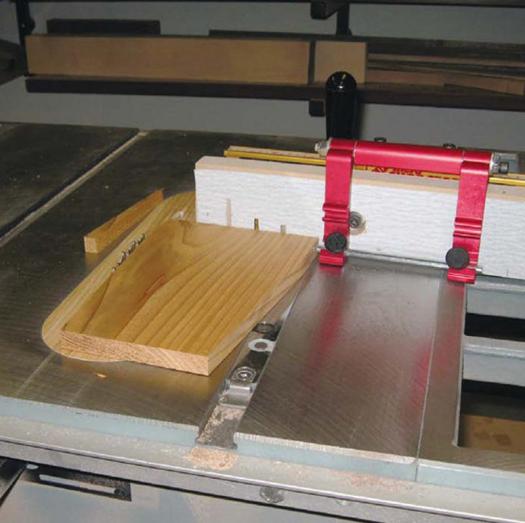
Side slopes
Use the mitre gauge for cutting the five-degree slope on the sides.
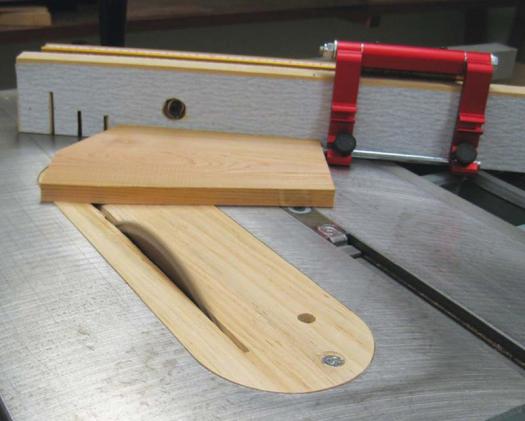
Roof pitch
Reset the mitre to cut the 30° roof pitch on the table saw.
Simple stops
A pencil mark 1" from the bit will tell you when to stop when routing the slots in the sides.
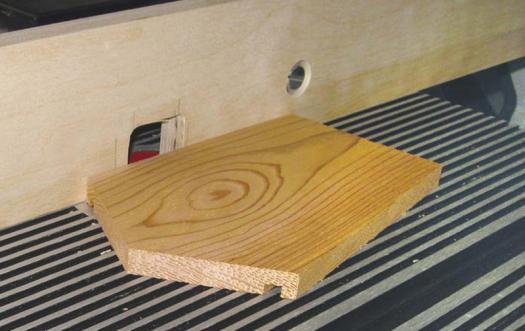
Easy set-up
Drop the numbers and use the side as a guide for setting up the saw.
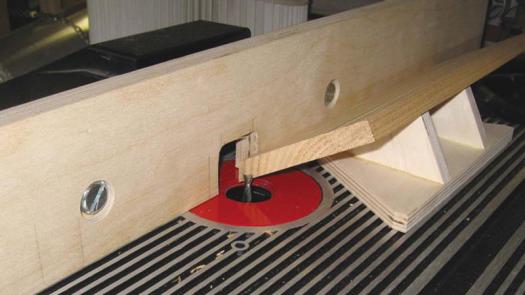
Jig it up
A simple shop-made jig will aid in routing the slot in the removable roof piece.
Stops will help
Using a series of stops as jigs will help the dowel hole drilling obtain consistent alignment.
Glue-up
Using a custom caul and a 90° bracket will make the glue-up easier.
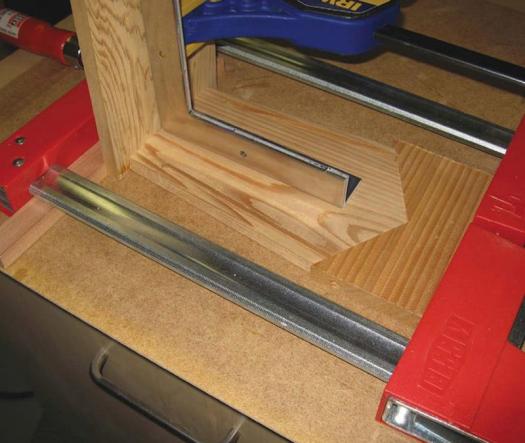
Illustration by James Provost