PROJECT
Bird feeder – kid’s project

Rick Campbell

Find more Toys / Puzzles projects
This is a fun project for kids of all ages - a a great way to help our feathered friends.
My woodworking skills have been put to the test many times by clients with unusual requests for custom projects, but my latest challenge came from a very unexpected source, my 10-year-old daughter’s Girl Guide troop. My assignment was to design a simple project that could be completed in an evening by 9 to 12 year old kids with absolutely no woodworking skills – not an easy task to say the least.
Bird feeder – kid’s project
After considering my options I decided it was best to keep it simple and go with a traditional style bird feeder. I got down to work designing a version that would be both easy and economical for the kids to build. I made sure that all the parts were no more than 5” wide so I could use standard cedar fence boards for the material. Cedar is a good lumber choice for outdoor projects and the fence boards are both easy to find and inexpensive. To avoid waste be selective when buying your lumber – pass on any boards that are split or have loose knots.
After completing the prototype I realized that there would not be enough time at the meeting for the kids to both cut out the parts and assemble the projects. My solution was to precut all the pieces, then bundle them together into kits that the kids could easily put together in an hour.
Mass Production
Making the required number of kits one at a time was not an option, so I used some common mass-production methods to save time. These techniques are useful to know when faced with any job that calls for a large number of identical pieces.
Begin at the table saw by ripping enough fence boards into 5” widths to complete all the feeder kits you will require. When you do this don’t rip all the excess material from one edge – trim a little off each side to remove the curved profile milled on the edges at the factory.
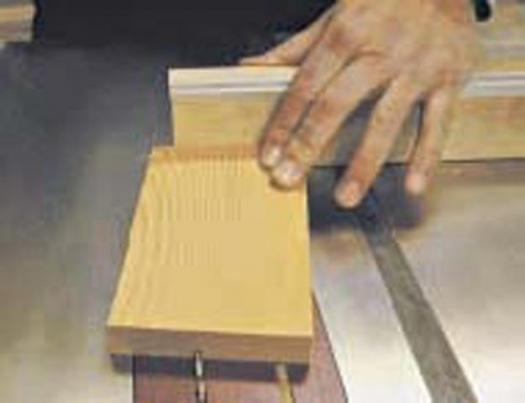
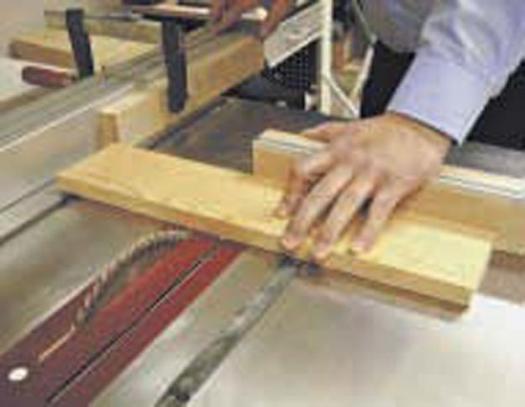
With this done you can begin cutting the sides, back, top and bottom parts to length. To avoid measuring for each piece clamp a stop block to the fence, then position the stop block and fence the appropriate distance from the blade to establish the length of cut.
Be sure the stop block is located far enough to the front of the saw so that the piece is free when it hits the blade. This will prevent the material from getting jammed between the blade and the fence, avoiding a potentially dangerous situation.
Next cut the angle on the top of the side pieces to form the roof slope. I did this at the table saw using my miter fence tilted 10 degrees. To be sure I had good support close to the blade I bolted an extension board to my mitre fence.
Now it’s time to cut a 1/4” deep slot on the inside face of each side piece to receive the Plexiglas insert. A standard saw kerf is plenty wide enough to accommodate the thin 1/16” thick plastic used for this project. Notice that the plans show that the slot is cut at an angle to provide an area in front of the Plexiglas window for the seed to accumulate. Achieve the required 10° angle by running the material over the blade with the sloped edge of the side pieces flush against the mitre fence.
Remember that there are lefts and rights so it will be necessary to make half the cuts to the left side of the blade and half to the right so the slots match. The extension board you added to your fence earlier is even more critical for safety now that you are cutting along the length of the very narrow side pieces.
With the saw blade tilted 10°, bevel the back edge of the roof panels to match the angle cut on the top of the side pieces. Next, apply a decorative round-over to the front edges of the roof parts at the router table using a 1/4” radius round-over bit. The back panels receive a 1/2” diameter hole used for mounting the feeder and a 1 1/2” diameter hole to provide access to fill the unit with birdseed. The plans show the correct position for each. Save time by making up a full size template to help you quickly locate and mark the centre point of the holes. To avoid tear out when drilling it’s a good idea to stop short of the bottom, then finish the hole by boring through from the other side. Complete the backs by slightly rounding the top corners at the bandsaw for a more finished look.
Next rip the bottom panels to the required width but don’t discard the narrow scrap you cut off. This piece will be the right size to serve as the perch on the front of the feeder – there’s no waste with this project.
I’ve learned from experience that young kids often have difficulty pounding nails. They often miss, which can be painful for the fingers holding the nail – particularly when those fingers are my own. They also have a problem preventing the nails from bending or going in crooked. To solve these problems I decided to drill pilot holes for the nails. The holes are drilled slightly smaller than the diameter of the nails and are only necessary on the outside face of the project parts. To speed up the drilling process I made a full-size hardboard template for each part to use as a pattern.
With all the wood parts complete we can now turn our attention to the Plexiglas inserts. I cut mine using the table saw with a standard 80-tooth combination blade installed. Proper eye protection is always essential in the workshop but is particularly important when working with Plexiglas because the material splinters easily. Begin by ripping the Plexiglas into 4 1/4” widths then cut the inserts to length using the stop block method described earlier. With this done mark the opening on the bottom, then cut it out using the scroll saw. The plans show the location and size of the opening. Once you have completed one you can use it as a pattern for the others.
To save time at the meeting we sorted the parts, then bundled them together into individual kits using shrink-wrap. In each project kit we included a brief instruction sheet complete with the Girl Guide logo at the top and the required number of galvanized nails bound with an elastic band.
Time for Assembly
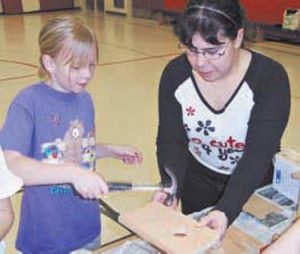
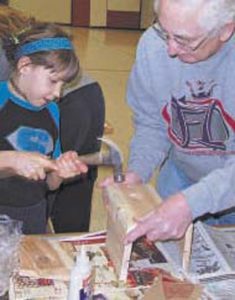
On the night of the meeting we made sure we had plenty of hammers, exterior grade wood glue, rags and willing helpers to lend a hand. The parents and grandparents that turned out did a great job holding parts together to keep them aligned while the kids pounded in the nails, but more importantly they made sure the kids had fun and worked safely.
When the kids weren’t working on their bird feeders they had the opportunity to visit a supervised area where they could try their hand at using some other common hand tools such as a square, tape measure and handsaw. Surprisingly, the kids seemed to get a great deal of satisfaction from cutting all the way through a board with a handsaw – most saved the scrap piece they cut off as a souvenir.
By the end of the evening the room was filled with smiling young faces reflecting well-deserved pride in their accomplishments. Most had never used a hammer or a saw before but, judging from the reaction, I’m certain many will be out in the workshop again.
Cutting the sides, back, top and bottom parts to length.
Cutting the angle on the top of the side pieces
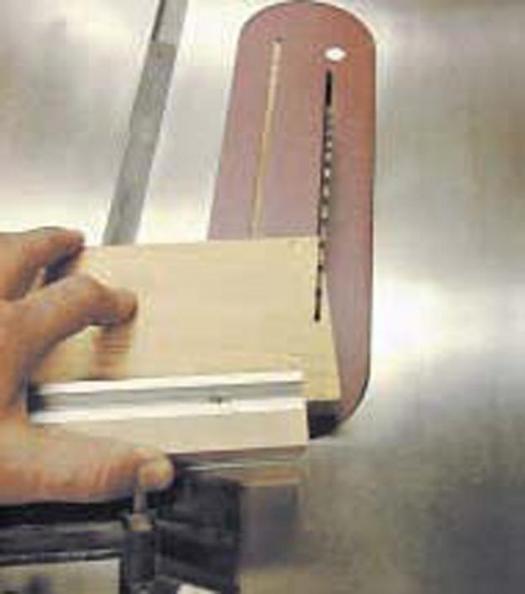
Cutting a 1/4” deep slot on the inside face of each side piece