No other plane performs as well as a shoulder plane when hand-fitting joints.
I think all woodworkers need a basic set of three planes: a smoothing plane, a low angle block plane and a shoulder plane. The shoulder plane is another in the series of bevel-up planes and we use it predominantly to clean up joinery to obtain that perfect fit.
As with the block plane, the shoulder plane does not incorporate a chip breaker. The bed angle is relatively low, at about 15 degrees. Together with a primary bevel of 25 degrees, we end up with an attack angle (the angle at which the blade enters the wood), of about 40 degrees. In reality, we will add a couple of degrees of bevel when we hone the iron creating the micro-bevel; for those who like numbers, we end up at 42 degrees.
The plane will see most of its use cutting across the grain for fitting joinery, but at 42 degrees, the attack angle is high enough that we don’t suffer excessively when cutting with the grain. The plane should have a small mouth opening to reduce tear-out. If you purchase a plane with a one-piece casting, make sure the effective mouth size is small, that is, with the iron extended just enough to begin cutting. Some two-piece planes feature an adjustable toe section, which makes mouth adjustment easy. Simply unlock the toe-locking screw on the top, and then adjust the toe adjustment screw at the front of the plane. Veritas goes one step further by adding guide screws as lateral stops for precise blade positioning and repeatability.
As with all planes, look for a plane that suits the scale of work that you will do most often. Choose a plane that fits well in your hand, and a tool that suits your eye. I enjoy tuning and just looking at the engineering of my tools, so looks are a factor for me, as well as feel and functionality. I have used large shoulder planes, but much prefer lighter tools for ease of handling while trimming joints. My preference is a plane with a sole width that does not exceed ¾”. The feel of the tool in my hand is of utmost importance.
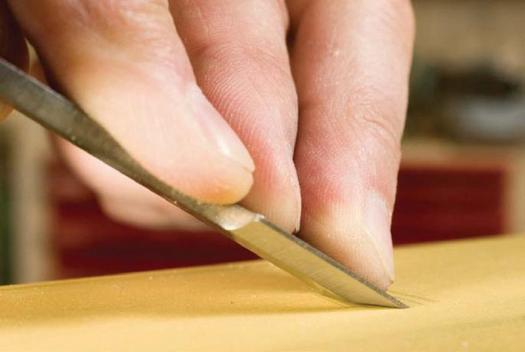
Blade preparation is rather easy on shoulder planes due to the small size of the paddle-shaped blade. We polish the entire backside of the blade using a 4000–8000 grit water stone, until it is mirror-smooth.
To apply a micro-bevel, flip the blade and place it with the primary 25-degree bevel sitting flat on the stone. Since the blade is tiny, and fine water stones are relatively soft, I prefer to use a pull stroke for shoulder plane blade honing.
With the blade placed at the far end of the stone, lift the rear of the blade slightly to add about two degrees of micro bevel. Maintain the angle to the stone as you draw the blade toward you over the length of the stone. Take about five passes and then inspect the edge. We want the smallest, mirror-smooth micro bevel possible, which is continuous across the entire width of the blade. Additional honing at this point will not improve your edge so stop as soon as you observe that brilliant line going completely across the leading edge of the blade. To test your edge for sharpness, attempt to cut fine shavings on end grain. If the cut results in dust, keep polishing the back and/or honing the micro bevel until ultra-thin shavings are possible.

The designers purposely make the blade of a shoulder plane wider than the sole. The blade protrudes laterally beyond the machined outer cheek of the plane casting, allowing for a clean cut into the corner of a tenon shoulder or into the corner of a rabbet. As with all planes, I look for a plane with a stout iron in order to reduce flexing of the blade during cutting, thus reducing chatter.
Advance the blade using the depth adjustment knob at the rear of the tool. A lever cap assembly holds the blade against the bed. The lever cap pressure point should be well forward on the blade so as to keep chatter in check. Reduce the pressure on the lever cap while advancing the blade. Remember to make a clockwise adjustment to advance the blade as your final adjustment. This eliminates the effect of backlash in the depth of cut adjustment, and ensures positive support for the blade so that it will not retract during use. Once the cut depth is set, apply a moderate amount of lever cap pressure.
The fine adjustments cannot be seen by sighting down the sole of the plane, so use a test cut on wood to determine if your cut depth is correct. If you are setting up to cut a shoulder, try a test cut on the end grain of a scrap of wood of the same or similar species. Look for a shaving that is of the same thickness across the cut. If skew is present in the blade setup, the shaving will vary in thickness from side-to-side, and the shaving will tend to curl toward one side. Reduce the lever cap pressure, and manually move the blade sideways to eliminate skew. A note here – when grinding these blades to re-establish the primary bevel, it is important to maintain a square leading edge on the blade.
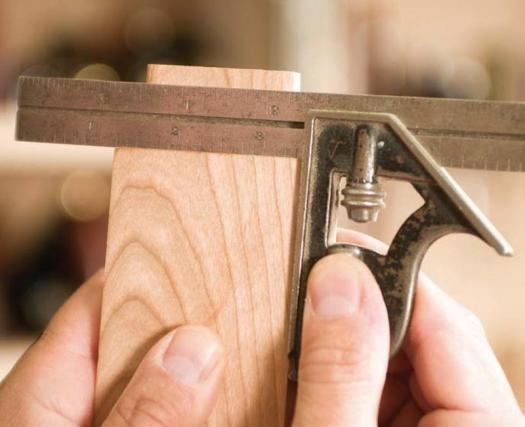
Trimming a shoulder is a delicate process, the goal of which is to achieve a square shoulder with a minimum amount of material removed. This is one of those jobs where you may find yourself chasing around the shoulder only to find that the shoulder is not at the same height on all four sides. Take the time to carefully inspect the four shoulders with a square, and then remove the high spots.
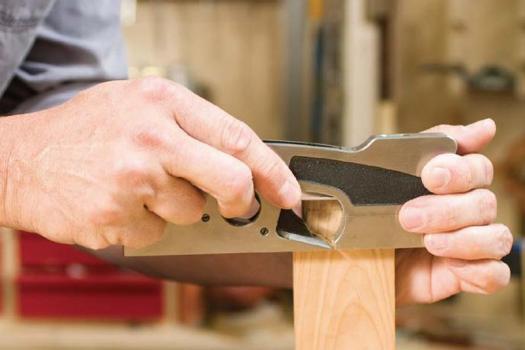
To make a clean shoulder cut, set the blade so that it is just proud of the machined cheek of the plane body, such that the blade cuts all the way into the intersection of the shoulder and tenon.
Set the depth of cut for a very tiny cut; remember that this is a finesse cut on end grain. What we want to do is to make several light passes avoiding chatter. Keep checking with your square until you have created a clean-cut shoulder on all four sides, with all surfaces at the same height.
On the long shoulder of a tenon, it is best to attack the cut from one end, and then the other, avoiding shooting right through and splintering the wood at the end of the cut. I prefer to get the long shoulders square, and at the same height, and then address the short shoulders. In most cases, it is more practical to make the cut on the short shoulder with a chisel, since there is not enough bearing surface to balance the plane. In practice, I actually leave the short shoulders very slightly higher than the long shoulders. When you draw the joint together later with a clamp, the proud short shoulder digs into the mating part, making a wonderfully tight joint.
Keep in mind that the strength of a mortise and tenon joint comes from the glue joint between the sides of the tenon to the inside of the mortise. Many woodworkers think that they have a good joint when the tenon is difficult to insert into the mortise. If the friction is created by a pinch on the width of the tenon, but not the thickness of the tenon, the joint must be repaired. The thickness fit of the tenon is most important. A good way to ensure that tenon thickness is correct is to push one corner of the tenon into the mortise at about 45 degrees.
Firstly, fit the thickness of the tenon, and then the width. You should be able to lift the tenon up and have the part with the mortise hold onto the tenon with moderate friction. To adjust your fit, plane the thickness of the tenon with your shoulder plane.
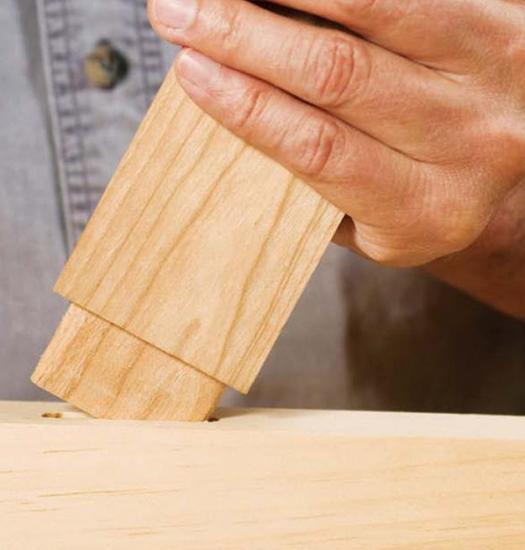
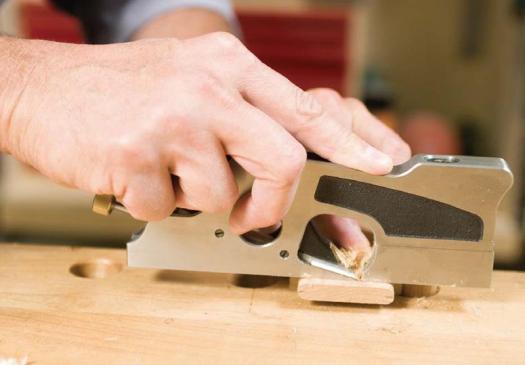
Again, set the depth of cut to a very fine cut. Use a sweeping motion across the face of the tenon while traversing along the length of the tenon. Flip the joint over, and repeat the process on the opposite face. Test for a fit that requires light pressure to insert the tenon at a 45 degree angle into the mortise. Once you have the correct tenon thickness, trim the tenon width with a chisel to allow the tenon to slide into the mortise. The length of the tenon should be 1/16″ shorter than the depth of the mortise so that the joint will pull in tight without bottoming out.
If you have hand-chopped the mortise, the bottom of the pocket will be rough. In this situation, I make the tenon a full ⅛” shorter than the mortise depth to ensure fully seated shoulders when the joint is drawn together with a clamp.
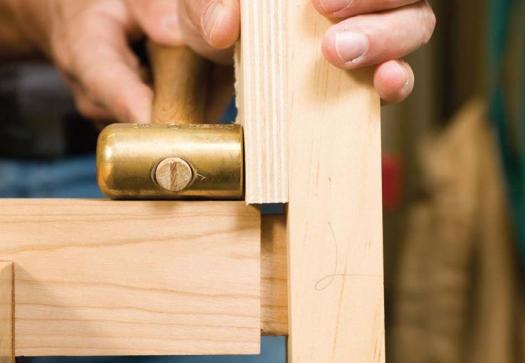
When testing your joint, you may get the tenon stuck in the mortise and have significant trouble extracting the apron from the leg. Many new woodworkers will try to wiggle the joint apart, leading to shoulder damage on the joint. The safest way to take the joint apart is to place the part with the tenon into your vise, and then gently tap on the part with the mortise, or vice versa. While tapping the wood, use a scrap block against the part to avoid denting the wood. It is important to extract the parts at 90 degrees to avoid joint damage.
What happens if the tenon ends up loose? One simple fix is to add thickness to the tenon. Use a piece of commercial veneer, cut it to match the size of the tenon, and then glue it to one face of the tenon. Use a flat block to distribute the pressure on the veneer while gluing to keep the clamping pressure even. It is a good idea to wrap your clamping block with painter’s tape so that it does not adhere to the joint. Once the glue is dried (overnight), proceed to fit the tenon once again by trimming the thickness with your shoulder plane.
As with any metal hand tool, remember to keep a light coating of non-silicon based oil, or wax on your tools to keep them from rusting. Happy planing!