For any woodworker who does a lot of sanding, especially with shop-sawn veneer, large panels, or figured lumber, the SuperMax 16-32 is a godsend.
Seasoned furniture and cabinet makers who frequently use shop-made veneer, large panels, or highly figured woods know that the secret for getting consistently flat, smooth surfaces in short order is a thickness sander. For small shops and hobbyist woodworkers, a cantilevered (or open-end) drum sander is the most practical and economical choice.
COMPANY: Laguna Tools
MODEL: 71632
PRICE: $1999.99
MADE IN: Taiwan
SOURCE: Find a Dealer
While one of the major benefits of a drum sander is it’s ability to considerably speed up the sanding process, it can also do things just about impossible for the thickness planer or jointer, and much quicker and easier than you can achieve with hand tools. And when using a drum sander you don’t have to worry at all about grain direction. Here are a few of the things that a drum sander can easily handle:
- remove milling marks and snipe left by the planer or jointer
- sand highly figured wood without causing any tear-out
- remove tear-out on figured wood caused by the planer or hand planing
- level stock wider than most planers can handle
- level glue joints on panels and face frames
- sand out the minor warping that often occurs after panels are glued up
- sand bandsawn veneer down to as thin as 1/32″
- sand stock as short as 2-1/4″ long
- flatten and sand end grain cutting boards
- sand glued up drawers, small boxes, and picture frames that are under 3″ high
- surface live edge slabs
The SuperMax 16-32 drum sander has a number of features that make sanding every easier. Changing belts is a breeze – you can remove a belt and install a different grit belt in about the same time it takes you to change the blade on a table saw (and a heck of a lot quicker than installing a blade on a bandsaw). Adjusting conveyor belt tracking and aligning the drum parallel to the conveyor belt table is straight forward and uncomplicated. Moving the drum head up and down now takes a couple of seconds – no more arduous hand cranking. You can make precise manual adjustments to the cutting depth down to an amazing 1/128″. And, my favorite enhancement, conveyor belt speed is automatically regulated.
Lets take a more detailed look at what the SuperMax 16-32 has to offer.
The 16-32 comes completely assembled except for the stand, which took me about 20 minutes to put together. The sander is heavy, and because of it’s size a bit awkward to manhandle alone – you’ll probably want a helper when it comes time to placing it onto the stand. Unlike most owner’s manuals that I’ve read over the years, the one that comes with the SuperMax is well written and easy to follow. If you’ve never used a drum sander before I suggest you take the time to read it through.
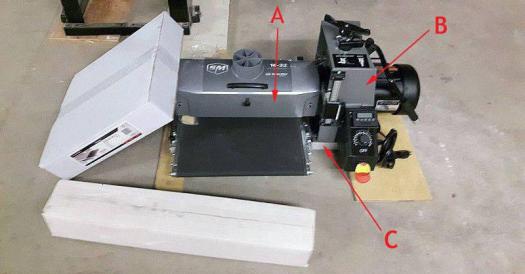
When you lift up the sander to install it onto a stand you’ll notice how rigid the frame is. The carriage (A) – the part that encases the sanding drum – is bolted to the shroud (B) which is bolted to the base (C) – on which the conveyor belt rests. It makes the unit rock solid, which goes a long way in helping to prevent any movement or alignment issues – when the sander is shipped to you, and while using it in the shop.
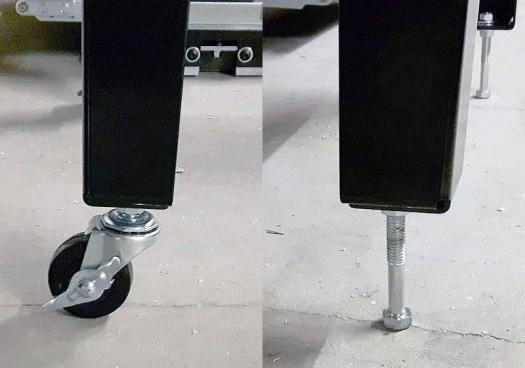
The stand comes with a set of leveling feet, but I chose to mount two swiveling wheels on one end so I could more easily move the sander about the shop. The wheels I had on hand were fairly small, so I also had to use two longer lag bolts in place of the leveling feet that SuperMax supplied. As far as I can tell this hasn’t introduced any additional vibration to the sander, though I’ll eventually replace these small wheels. It was only after installing them that I found out that SuperMax sells a set of wheels (#98-0130) for the 16-32.
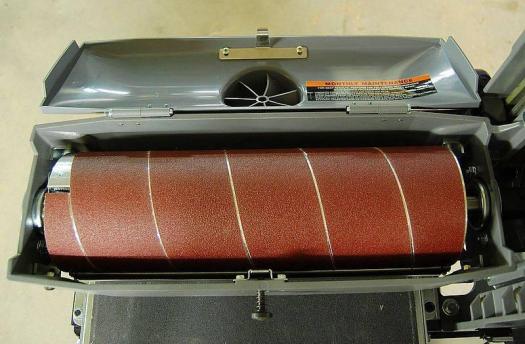
The 16-32 is primarily an all-metal machine, which further serves to reduce vibration and makes the machine super rigid, helping to keep the drum head in alignment with the conveyor belt. The only plastic parts are the dust cover (over the sanding drum) and the drum height adjustment handle.
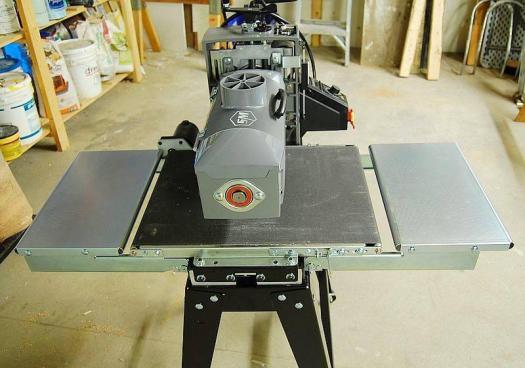
The conveyor belt measures 21-1/2″ front to back and SuperMax guarantees that the conveyor belt table is flat to within .010″. It’s fine for short stock, but for long stock you’ll do well to install the optional infeed and outfeed tables (#71632-7F) available from SuperMax. They provide an additional 21-1/2″ of support (for a total 43″ of stock support). With the extension tables installed I had no problem feeding stock up to 8′ long through the sander. For even longer stock you’d likely want to use roller stands as well. Likewise, if you’ll be sanding wide, heavy panels up to the maximum capacity of the SuperMax (32″ for this model), you might want to place a roller stand or two on the open side of the sander, or have a friend help you feed the panels.
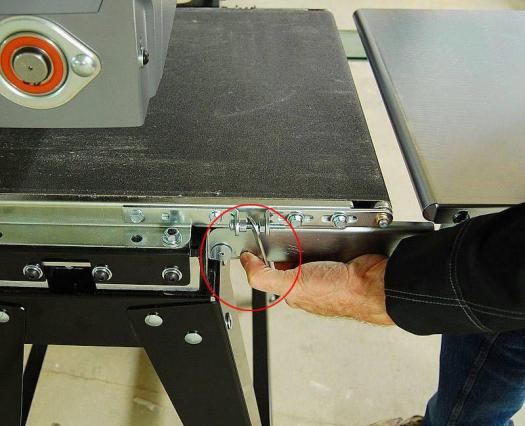
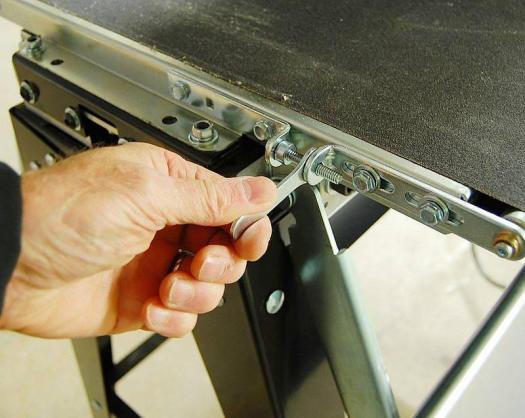
Mounting the infeed and outfeed tables is fairly straight forward – it took me about 30 minutes. It’s important to take the time to adjust both tables level with the conveyor bed. The process is a tad awkward, as you need to release the tension on the bolts (A) that attach the tables to the sander, tweak the set screws (B) that level the table as you eyeball a straight edge placed across the table and conveyor belt, and then re-tighten the locking bolts. I had to repeat the process three times to get that ‘just perfect’ alignment.
I like that the in- and out-feed tables can be lowered out of the way – it’s a great space saving feature in a small shop. All you need to do is press lock buttons on either side of the extension tables to lower them. However, you need to press both buttons simultaneously, and be careful to support the end of the table with your hip or knee – otherwise they’ll swing downward rather smartly. When you raise the tables upward there is no need to depress the lock buttons.

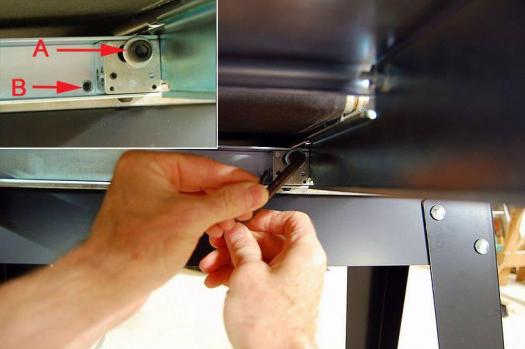
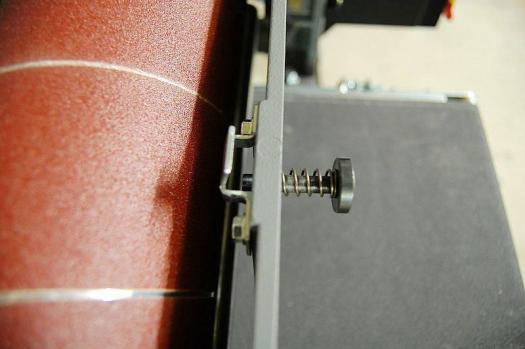
Straight from the factory the drum was absolutely parallel to the conveyor table – a testament to how solidly the sander is put together. To confirm this you’ll want to remove the abrasive belt from the drum, and then follow the directions outlined in the owner’s manual. It’s a straight forward process. If you ever do need to adjust the alignment it can be done by backing off a few screws (A) and then turning a single adjustment nut (B), which raises or lowers the outfeed side of the conveyor table.
The conveyor belt also tracked perfectly, without requiring any adjustment. Don’t you love it when you purchase a machine that you can quickly assemble and put straight to work, without any tinkering!
Unless you do a heck of a lot of sanding, or cause some inadvertent damage and need to replace the conveyor belt, it should last for years. What is more likely to occur over time is that, with wear, the belt may begin to track a tad to one side or the other. Fortunately, adjusting the belt tracking is a breeze on the 16-32. It’s done by adjusting the take-up screw nuts on either side of the conveyor belt using the handy captive wrenches (photo above). The process is clearly outlined in the owner’s manual. Here again, SuperMax has made the adjustment process straightforward and uncomplicated.
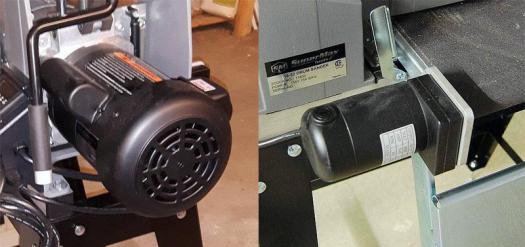
There are two motors on the 16-32, a 1-1/2 HP, 14 amp motor that drives the drum (left, photo above), and a 1/20 HP, .45 amp motor that drives the conveyor belt. These motor sizes seem to be fairly common among drum sanders of this size. The owner’s manual recommends that you connect the sander to a 20 amp circuit. I’ve had it running on a dedicated 15 amp circuit without any problems. However, I’m careful to limit the sander to removing just 1/64″ or so on each pass (by lowering the drum height adjustment wheel by 1/4 of a turn). If you choose to sand more aggressively then you’d want to use a 20 amp circuit.
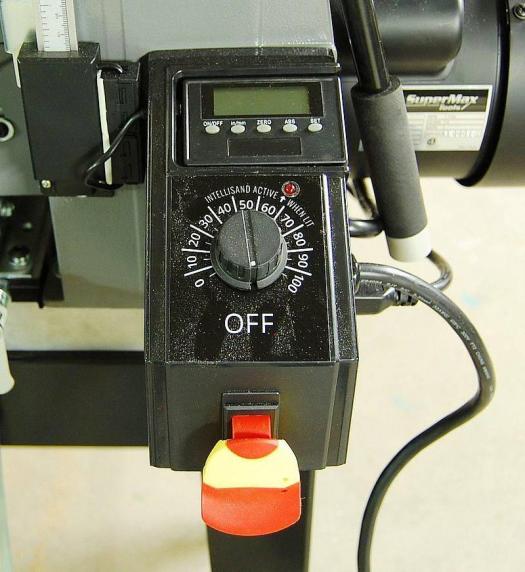
The control panel for both motors is located at the front of the sander. The red and yellow switch turns the drum motor on and off, which runs at a constant speed of 1740 RPM. The dial knob controls the conveyor belt speed, and is equipped with an “Intellisand” feature. Normally you would manually adjust the conveyor belt speed as the load on the sanding drum varies. Otherwise you risk burning the stock, or creating a scallop in the stock if the conveyor belt stalls. The Intellisand feature takes care of this for you, by monitoring current draw from the main motor that drives the sanding drum, and adjusting the speed of the conveyor motor as the drum load varies.
Intellisand is a great feature that helps to take the stress out of drum sanding. In general, set the conveyor speed at a lower setting when using coarse abrasive, and higher as the you use finer abrasive. I set the speed dial at the half mark when using 80-grit abrasive, and around 75 percent when I switch to a 100-grit. Anything over 100-grit I turn the speed dial to 100. You’ll see a red light next to the speed dial illuminate when Intellisand kicks in. If you sense the motor straining (or the drum slowing down) you can adjust the feed rate on the fly by turning the dial up or down.
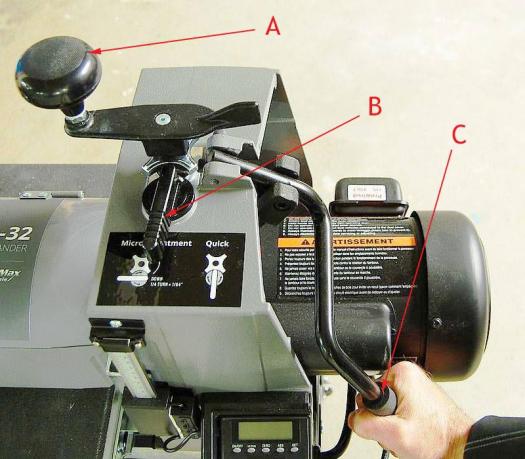
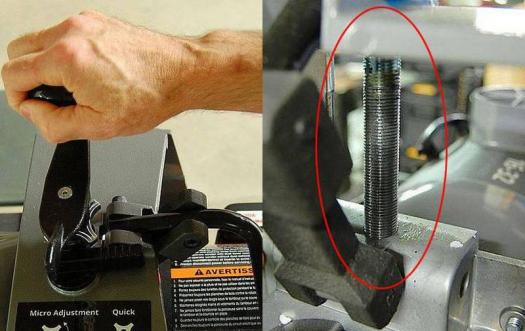
On virtually all drum sanders you turn a height adjustment handle (A) to raise and lower the drum (on some models the table moves up and down rather than the drum head). If you’re sanding a fair amount of stock of varying thicknesses it’s a hassle to be constantly cranking the handle up and down. There is a clever feature on the 16-32 that takes care of this predicament. With the flick of a lever (B) you can easily disengage the threaded height adjustment screw, enabling you to quickly lower or raise the drum head by means of a quick lever handle (C). Once you’ve re-positioned the drum you re-engage the height adjustment screw by moving the lever back to the ‘micro-adjustment’ position. The process works smoothly and I’ve found it to be a huge time saver.
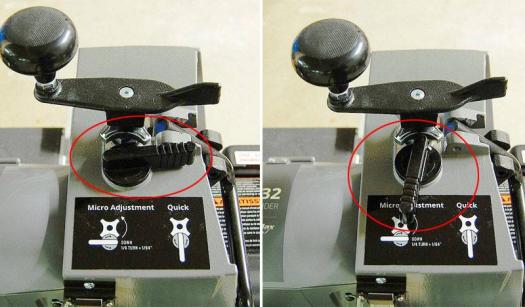
In the top left photo the quick lever is in the disengaged (Micro Adjustment) position – in this position you turn the height adjustment handle to fine tune the height of the drum. In the top left photo the lever is in the ‘Quick’ mode – just grab the quick lever handle to raise or lower the drum in one fell swoop. Very cool.
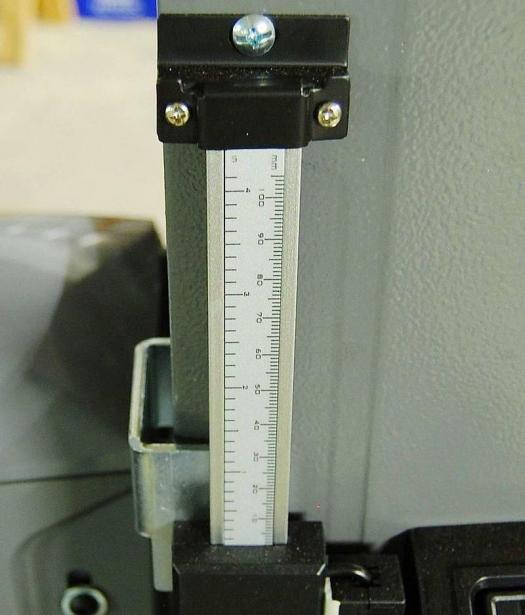
There are two ways to set and keep track of the depth of cut. The most common, which you’ll find on all drum sanders, is an imperial/metric depth scale. It works the same way the depth-of-cut scale works on a thickness planer. I find the imperial scale, which shows registration marks at 1/8″, too coarse to use. But, the metric scale, which is in millimeters, is too small to see. Besides, you can’t ‘zero out’ to set a baseline position.
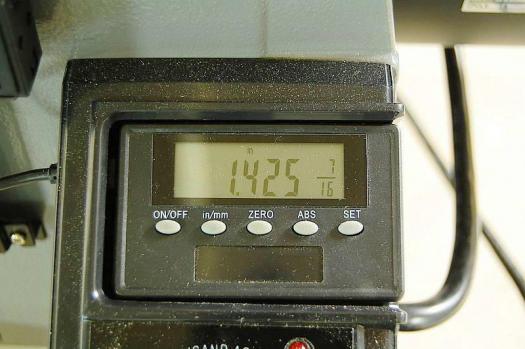
A better method to set the depth of cut is the digital read out (DRO), which I find far more precise. You can set the readout to show fractions from 1/32″ to 1/128″ as well as millimeters. Once you position the drum head on the stock you can zero out the position (essentially you’re setting the distance between the abrasive and your stock at 0″). You can then choose between absolute (ABS) mode, which gives the actual thickness of your stock as it’s being sander, or incremental (INC) mode, which gives a measure of the amount of material removed from your stock. I have the 16-32 set to display measurements in ABS mode at 1/64″. It takes a bit of practice to get comfortable using the DRO, but once you do, it’s an effective way to sand to an exact thickness. My only complaint is that the LED screen is not backlit, which makes it hard to read unless you have very good shop lighting.
Of course you don’t always have to use the digital read out. When sanding shop made veneer I simply insert a piece of veneer under the drum head, then lower the head as I manually turn the drum. As soon as the drum makes contact with the veneer I stop, and pull the sheet out. I then turn the sander on and begin to feed the veneer. As the first piece goes through the sander I keep my hand on the height adjustment handle so that I can tweak the setting depending on how much contact the head is making with the veneer. This works really well for me, as I’m careful to resaw my veneer to the same relative thickness.
One thing that is really noticeable on the 16-32 is how smoothly the manual height adjustment handle moves the drum head up and down. One full turn of the handle lowers or raises the drum by 1/16″; a quarter turn moves it 1/64″. With a bit of practice you can get pretty close to 1/128″ by turning the handle just 1/8th of a turn.
What’s even more important is that there is absolutely no wobble and no backlash when you turn the handle, which means that you don’t have to fiddle around moving the handle back and forth to set the right depth of cut. I find this especially helpful when using the digital read out. You get this high level of adjustment precision in part, because of the fine threads on the height adjustment screw rod (right in photo above) combined with the nylon lock nut above and thrust bearing below the rod.
Small things make all the difference, and here is more evidence of the attention that goes into a SuperMax. For the dust cover latch they use a spring loaded metal release button, rather than a simple plastic catch. The latch plate on the lid is also metal. Once the latch is engaged, the dust cover won’t open during operation.
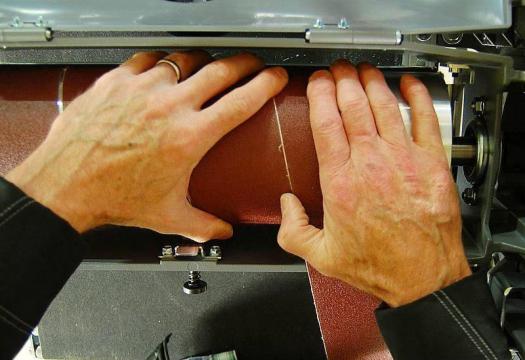
One of the most common complaints with drum sanders is the difficulty of changing the abrasive belts. However, on the 16-32 it’s surprisingly quick and easy. One reason is the size of the drum carriage – there is ample space for your fingers to hold the abrasive belt securely as you wrap it around the drum.
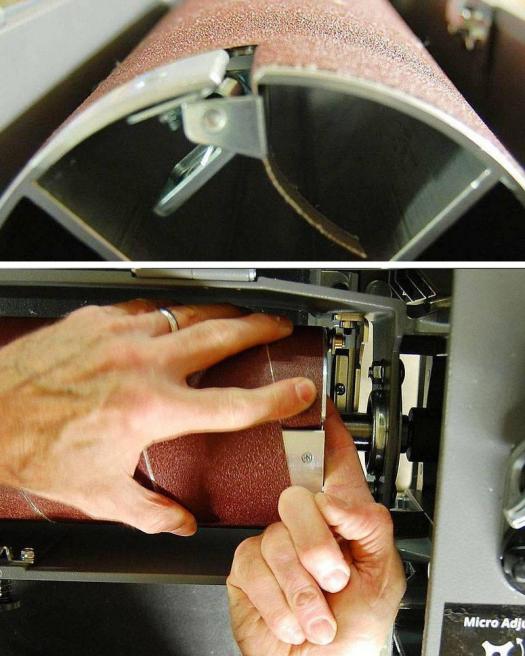
The second reason installing an abrasive belt is so easy are the two belt spring clamps, located on either end of the drum. The first spring clamp, on the left side of the drum holds the the belt in place. The second spring (bottom photo above) tensions the belt, taking up any slack. I found it reasonably easy to reach in with a forefinger to release the spring – once the tail end of the abrasive belt is slipped into position, you simply release the spring. You’ll likely need to practice this a few times before you get it right, but once you do, it takes no more than a couple of minutes to remove and install a new belt.
The 16-32 comes with one 80-grit belt installed. It’s a good choice to practice with, and useful for light dimensioning of stock. You’ll want to purchase a couple more grits, and a good time to do it is when you order your machine, either from SuperMax for an abrasive manufacturer.
I use X-weight cloth backed aluminum oxide abrasive that I purchase in 70 foot rolls from Fintech. That gives me 9 wraps per roll, at a cost of about $12 per wrap (which includes import duties and shipping to Canada). When going from the thickness planer to the SuperMax I typically use 150- or 180-grit abrasive – depending on how prominent the milling marks are. For veneer that I rip on the bandsaw I use 100-, 150- and then do a final pass with 180-grit. For wood that is in rough condition I start with 80-grit and work upwards. The drum sander does leave a linear scratch pattern on the wood surface that you’ll need to subsequently remove. If you finish off with 180-grit on the sander you can use a card scraper or with 180-grit sandpaper by hand or with a random orbital sander.
Don’t be intimidated with changing the belts on the 16-32. It really is easy to do, and you’ll save a lot of time by sanding right up to 180-grit.
The dust that a drum sander produces is very fine, and it’s crucial that you efficiently remove the dust from the sander – it will help to keep the drum cooler and prolong the life of the abrasive belt. SuperMax recommends a dust collector that delivers at least 600 CFM of air movement. Remember that most manufacturers list the CFM at the inlet, not at the hose end. I have the 16-32 connected to a Laguna B|Flux, which is rated at 650 CFM at the inlet and 550 CFM at the end of a 12 foot dust hose. Because I’m use a 4 foot hose I figure I’m getting around 600 CFM. In any event, my set-up does a good job in removing that fine dust.
The dust port on the 16-32 has a series of internal fins that, according to SuperMax, increases air flow by 15 percent. Perhaps these fins help to create a vortex effect as air is drawn out of the drum carriage. Whatever the reason, I’m all in for anything that increases air flow.

When sanding material under 16″ the ‘fast lever’ at the back of the machine is positioned vertical. However, when sanding wide stock you move the lever about 45-degrees from the vertical position. This raises the inboard side of the conveyor bed by .003″, enough to remove the sanding ridge that often occurs when sanding panels wider than 16″. I don’t often use panels wider than 16″, but when I do, it’s great to have this feature.
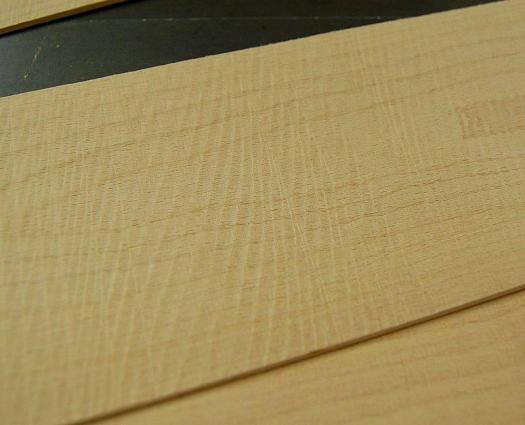
While you can use the 16-32 to sand just about anything, I find it particularly useful for sanding shop-made veneer and highly figured wood that is prone to chip out when run through the planer or jointer. Generally I resaw to around 3/16″, using a 3/4″ Woodslicer Swift blade with a 3-4 variable tooth pitch, which give a tolerably clean finish, though there are noticeable tooth marks (photo above) that have to be removed.
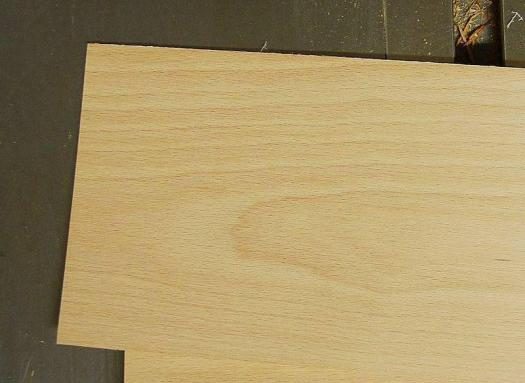
Two passes through the 16-32 using an 100-grit belt produced the finish above. At this stage, if I only have a few pieces of wood to deal with I might finish with a random orbital sander. Usually though I’ll switch to a 150-grit and make a couple of additional passes. Depending on what the finish looks like I might make a final pass with 180-grit. With a bit of experimentation you’ll come up with your own sequence of grits to use.
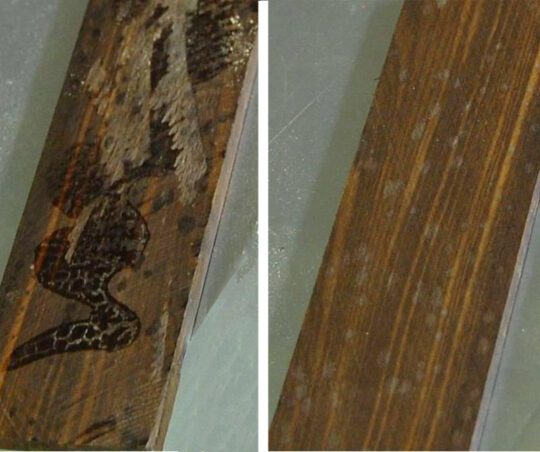
Similar to most drum sanders, the minimum sanding thickness is 1/32″, while the maximum thickness of stock you can sand is 3″. What’s nice about the 16-32 is that you can safely sand stock as short as 2-1/4″. In the left photo is a cutoff of 2″ x 6″ Rosewood with tear out and glue residue. On the right is the same piece after passing though the drum sander twice (using 80-grit abrasive).
The SuperMax 16-32 is surprisingly quiet – with both motors running I measured noise output standing right next to the machine at 59.8 decibels. Of course, once you turn on the dust collector the noise level will shoot up.
If you take the time to learn how to use the 16-32 efficiently, then I think you’ll find it one of the most productive machines in your shop.
At just under the $1700 mark it’s likely to be one of the more expensive acquisitions in any workshop. But, considering how much sanding time you save, and how good a finish it produces, it becomes a much more reasonable investment. Prorated over 10 years you’re looking at a cost of about $175 a year – which makes it excellent value in my book.
Here are some tips that I think you’ll find useful when sanding:
- Dust extraction is critical. Keep the drum sander as close to the dust collector as possible.
- Because the dust is very fine remove dust build-up from the inside of the filter (or bag) of your dust collector more frequently than usual. I rotate the flapper handle on top of the canister on my dust collector at the end of each sanding session, or a couple of times during the session.
- Dried glue will load up the abrasive very quickly, so I use a cabinet or card scraper to remove any dried glue before sanding. Otherwise, start sanding with a 40 or 60-grit belt for your first pass, then move on to an 80- or 100-grit belt.
- Resist the urge to speed things up by hogging off a lot of material, which will increase heat build-up, and, depending on how much material you try to remove, may overtax the motor. Take several light passes of around 1/64″ (roughly 1/4 turn of the height adjustment handle) rather than a single heavy pass of 1/16″ or greater.
- Whenever possible feed your stock at an angle – this creates a shearing effect that also helps to reduce heat build-up. For your final pass feed the stock straight.
- Use a crepe block to remove built-up crud on the sanding belt. I’m in the habit of using the crepe block at the end of each sanding session, or during the session if I’m sanding a lot of stock.
- Check the tightness of the abrasive every so often, and take up any slack if it seems too loose.
- The common rule is ‘finer girt faster speed’. With coarser grits start with a slow feed rate and work up. Keep an eye on woods like cherry and maple that have a tendency to burn easily, and increase the speed if you notice any burning.
- The drum sander leaves linear sanding scratches on the wood surface, so you’ll still need to do a final manual or power sanding of the surface.