Marking gauges are a basic yet essential shop tool for quickly and accurately marking layout lines on your stock. This marking gauge allows you to mark with a pencil or a pin and, as you will see, is quite simple to make.
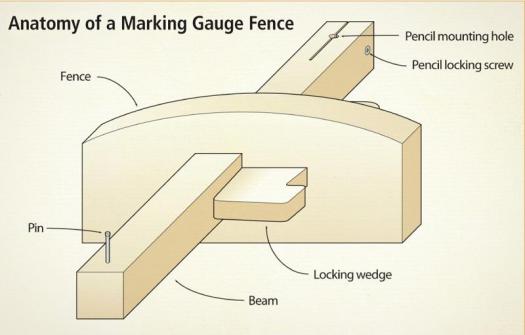
This marking gauge has three main parts: a beam that holds the pin, as well as a pencil, a fence and a beam locking wedge. Although any stable wood could be used, it is important that it is free of checking or knots that could weaken the gauge. I used ash for the beam and padauk for the rest of the gauge because of the beautiful colours and textures of these woods. Besides, these wood scraps had been languishing around the shop collecting dust for ages and I couldn’t think of any better use for them than to make myself a functional tool.
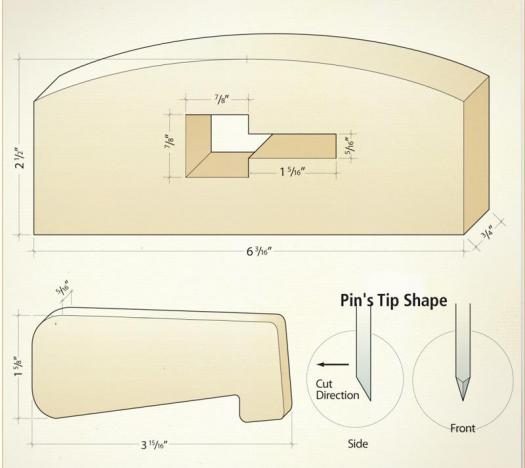
Start by making the fence (A), as it’s easier to make the beam (B) to fit the fence’s mortise than the other way around. After ripping and planing the fence to its final thickness, leave it oversized until you have finished making the mortises for the beam and wedge (C). Using your mortising method of choice, chop the beam mortise and then the majority of the locking wedge, stopping 3/16″ short of the far end. Now, using a chisel, carefully cut out the 10° ramp that complements the locking wedge’s angled side. As you may have surmised, this ramp enables the locking wedge to seat firmly against both the far side of its mortise and the side of the beam. Clean off any roughness with rasps and files.
It is worth mentioning that my original design called for a narrower locking wedge than my final design. This came about because, when machining the fence, I failed to respect the African padauk’s brittleness and splintered the underside quite deeply. Rather than discard the piece and start all over again, I decided to simply widen the mortise. This mistake resulted in my gauge having an unusually wide locking wedge, which I subsequently found to be much more comfortable for holding than other gauges that have narrower wedges. Mistakes can sometimes lead to successes.
Give the top of your fence a nice round arc as shown in the sketch and smooth out the edges sides using rasps and a scraper. Some prefer to leave these areas just as they come off the rasp, so as to make gripping them easier in use.
Taking your measurements directly from the mortise in your fence, rip the beam, leaving it about 1/32″ wider and higher. This gives you enough material to make a perfect fit, allowing the beam to slide freely without any hint of sloppiness.
Once you are happy with how things fit, turn your attention to the pin and pencil mounting holes. For the pin, simply insert the nail you’ll be using as your pin into your drill and slowly drill through the beam, being careful not to split the underside as the nail exits. This produces a perfect-fitting pin that is neither too tight nor too loose.
Sharpen the point of the pin with a fine file, as shown in the drawing, and your pin will cut rather than scrape a clean line. Now that the pin is out of the way, turn your attention to making the pencil mounting hole. Most pencils seat firmly in a quarter-inch hole, but measure yours before going ahead and drilling the hole. Then saw the slot and drill the hole for the pencil locking screw. Check to ensure the pencil mounts firmly into place when you tighten the locking screw and make any adjustments necessary.
With your beam in place, measure the wedge mortise opening to make sure your measurements are the same as mine. Before cutting the angled face of the wedge, double-check the angle of the ramp area of the mortise, and if it is anything other than the 10° my design calls for, adjust the shape of the locking wedge accordingly. As you had done with the beam, start by making the wedge thicker than its final dimensions calls for, and then finish up with hand tools. All sides of the locking wedge should be quite smooth in order for it to operate easily.
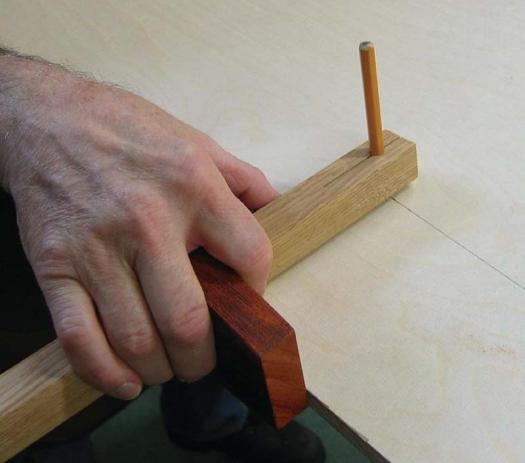
Do a final trial fitting and smooth out any rough edges that you find unpleasant to the touch. Apply the finish of your choice, be it oil and wax or a top-coat such as polyurethane or varnish. To allow everything to operate smoothly, lightly wax and buff all surfaces. Your new tool is now ready to serve you.
The great thing about making your own marking gauge is that you can customize it to best fit your needs. Here are a few ideas:
Rounded beam. Some prefer the underside of their beams to be slightly round. If that is your choice, simply round the underside of the fence beam mortise and the corresponding face of the beam to fit.
Mechanical pencil. You may wish to mount a mechanical pencil in lieu of a wooden pencil as I have done.
More delicately-sized pieces. If you find the fence, beam or locking wedge to be thicker than desired, simply adjust the sizes as you go along. The only caution is regarding the thickness of the fence; ensure it is adequate so there is enough thickness to allow the beam to be held firmly into position and not wiggle during use.