Create adjustable shelves with ease.
When it comes to storage, adjustable shelves offer lots of flexibility. Whether they’re in kitchen cabinets, bookcases, built-in wall units or smaller wall cabinets, the ability to adjust the height of a shelf will allow the cabinet to change as your storage needs change. The trick is drilling all those holes evenly and accurately so they look good and don’t cause shelves to rock or shift in use.
Kreg Shelf Pin Jig
MSRP: 1/4″ or 5mm Jig US$39
Website: KregTool.com
Kreg, which has produced some wonderfully simple and functional jigs over the years, has recently updated their shelf pin drilling jig. I tested out both their 5mm and 1/4″ jig. I prefer the 5mm jig, as it’s easier for me to find mating shelf pins. They both work the same, but ensure you can purchase the proper-sized shelf pins for the jig you’re using. This jig bores holes 32 mm apart, which is the industry standard.
There are a few options when it comes to locating the jig on the workpiece. The included fence ensures holes are drilled parallel to the edge of a workpiece. In terms of locating holes a certain distance away from the top of bottom of the gable, you could align it with the top or bottom of your workpiece, drill a single hole, then use the locating pin to re-locate the jig with the hole you just drilled. Sounds complex, but it’s very easy in practice. Another option is to mark a line on your workpiece and align the jig with it. Both methods work well. The bottom line is you need to locate the jig using the same method while making each of the four rows that will hold the shelf pins to ensure they’re all even. Once the jig is aligned you can clamp it in place and grab your drill.
Hardened-steel sleeves, long enough to guide the bit perpendicular to the surface of the workpiece, are one of this jig’s main strengths. They’re durable for long-term use. They’re also long enough to guide the bit perpendicular to the workpiece as you drill. Speaking of the bit, the supplied brad point bit is much better at boring clean holes than a standard twist bit, but to boost its performance ensure your drill is rotating at a high speed before boring your holes and don’t press the drill in too quickly. The stop collar on the bit will go a long way to ensuring you don’t bore through the other face of the workpiece and ruin it.
Once at least one hole has been bored, the locator pin can be used to reposition the jig so you can drill more holes. Each time you drill holes, the jig should be clamped in place, but only light pressure is needed, as the grippy surface on the rear face of the jig does a good job at keeping the jig from moving during use. I even used the jig a few times without clamps and it worked fine. If you’re drilling shelf pin holes in an assembled cabinet it’s not always going to be possible to clamp the jig in place. If you regularly need to drill more than six holes, a second jig can connect to the first, giving you a full run of 12 holes to drill.
Once the first row of holes is bored you can swap the fence from one side to the other to bore holes parallel to, and a certain distance from, the other edge of the workpiece. You do have to be careful you don’t just rotate the jig 90° so the fence can reference against the opposite edge, as the hole heights won’t be aligned, causing a shelf that rocks. I did have trouble swapping the fence from side-to-side at first, but once I got the hang of how it worked it was fine.
I used this jig on frameless-style cabinets, but the fence can be removed entirely for use on face frame cabinetry. All the accessories, including the Allen key for setting the depth collar location, are stored on the underside of the jig, keeping everything close at hand.
If you build storage cabinets with adjustable shelves this jig is your answer to drilling adjustable shelf pin holes. It’s a well thought out design with lots of features, making it invaluable for these sorts of projects. It also seems to be a high-quality product that should stand the test of time.
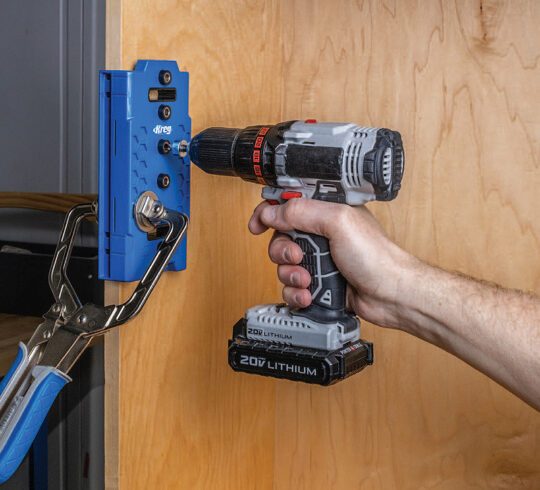
Easy Drilling – With the fence installed on the jig you can easily position the jig, clamp it in place and drill the shelf pin holes. To bore the holes for the rear shelf support, simply remove the fence.