TOOLS
The cabinet scraper: low tech tool – high performance results

Bill Perry

Scrapers are among the lowest-tech tools in the woodshop – right down there with mallets and two-by-fours. But low-tech or not, these little pieces of steel can leave a lustrous, tear-free finish on figured hardwood.
Scrapers are among the lowest-tech tools in the woodshop – right down there with mallets and two-by-fours. But low-tech or not, these little pieces of steel can leave a lustrous, tear-free finish on figured hardwood.
A card scraper is a small piece of hardened steel with either a very sharp edge or a small hook on the edge. A scraper is a cutting tool, just like any other, and needs to be sharp. A sharp scraper produces fine shavings; a dull scraper makes sawdust. Now here’s the good news: your scraper responds to sharpening and honing just like any other blade in your shop. Scraper preparation is a task that can drive woodworkers to distraction. Fortunately, there are just three basics steps and none of them are hard.
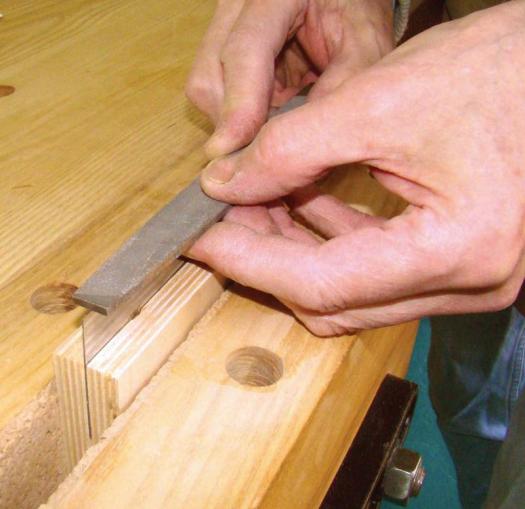
Card scrapers are rectangles of spring steel or sometimes they have curved edges for smoothing profiles. Jointing is done with a fine single-cut file and the scraper held vertically in a vise. This needs to be done carefully to achieve an even, continuous edge filed at 90° to the sides. A guide such as the Veritas Jointer/Edger can be helpful to keep the file at 90° or a piece of squared hardwood can be used as a guide. This will produce an edge that is even but it will have serrations left by the file.
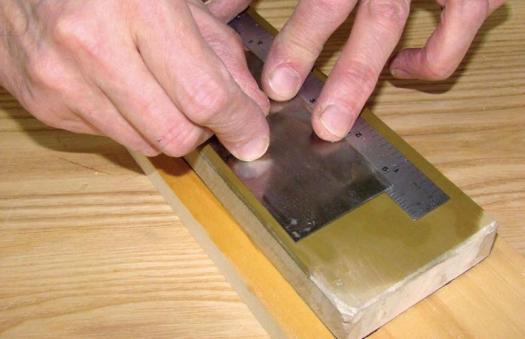
Serrations left by the file must be removed by honing the jointed edge. A simple way to do this is to lay the stone on top of the workbench, overhanging the edge of the bench. Then hold the scraper against the edge of the bench, using the bench as a guide and slide the scraper back and forth against the bottom of the stone. This technique works well if the thickness of your benchtop is less than the width of the scraper. Otherwise the scraper is difficult to grasp.
Note that a scraper will quickly wear a groove in a waterstone. This gives you a couple of options. The first is to hone scrapers only on the edge of the stone. The edge can be re-flattened quickly, while the faces remain flat and smooth.
A better option is to use a square block of hardwood to support the scraper vertically as the edge is honed against the face of the stone. The wooden guide keeps the edge square while making it much easier to use the entire face of the stone without wearing grooves into it. Better yet is to use a diamond bench stone, which wears very slowly due to its hardness.
Now, remember that your best cutting edge will be the intersection between two finely honed surfaces. Therefore, just as you must hone both the face and the bevel of blades such as chisels, you must also hone the two faces of the scraper. This ensures a square, sharp and polished junction between the scraper’s edge and face.
You can hone the face simply by placing the scraper flat against the stone but this means you’re flattening a bunch of metal that doesn’t need it. Again, like a chisel, the cutting edge is what matters, so all you really need to hone is the quarter-inch or so adjacent to the edge. Holding the scraper while you do this can be difficult. A rare-earth magnet or a piece of wood stuck to the scraper with double-sided tape makes it easier.
A slick alternative is to use the “ruler trick” made popular by the British craftsman, David Charlesworth. When he hones the back of his plane blades, he lays a thin ruler down one edge of his waterstone, then hones the blade with it supported by the ruler.
This raises the honing angle by perhaps a degree so that only the cutting edge contacts the stone, thus minimizing the amount of metal to be honed. The small back-bevel that this creates doesn’t seem to affect how a blade cuts but it greatly reduces honing time. The same technique works for scrapers.
Once honed, the scraper is ready for fine work such as finishing, marquetry or final levelling of wood bandings and inlays. For heavier work such as glue removal or smoothing grain prior to finishing, you will want to burnish a hook onto the scraper’s edge. The amount of hook depends on the job at hand.
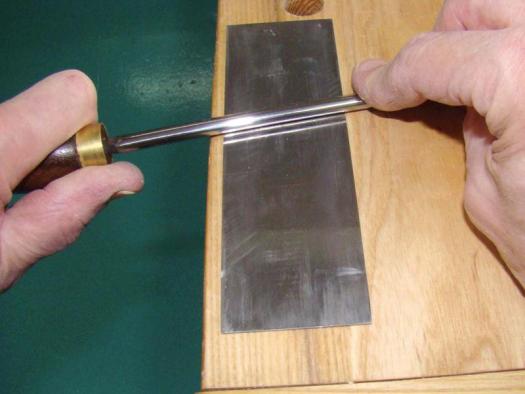
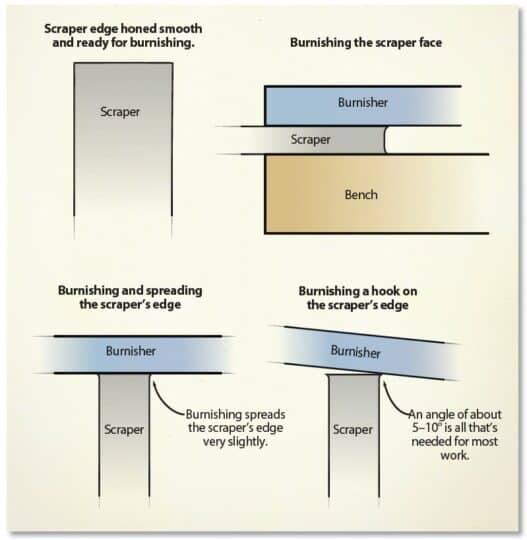
The hook that you burnish on a scraper forms the tool’s cutting edge. To create the hook you need a burnishing tool, which is a rod of steel or carbide harder than the steel used to make the scraper. It spreads the edge of the scraper slightly then rolls that edge over into a hook, creating the edge.
Burnishers are quite inexpensive. A small carbide burnisher costs less than $10; the Veritas Tri-Burnisher – a high quality tool suitable for use on rectangular as well as curved scrapers – costs about $30.
Burnishing the face is simplicity itself. Lay the scraper flat on your bench near the edge. Make a half dozen passes down the face with your burnisher (this is where a longer burnisher excels) with medium pressure. Turn the scraper end for end and burnish the face along the other edge, then flip it over and do the same on the other side. Now you can burnish a hook. First, secure the scraper vertically in a vise. Holding it between two pieces of flat wood close to the edge may help to prevent it from flexing. Next, lightly lubricate the scraper’s edge with a tiny wipe of oil or a bit of hard wax such as carnauba. Very little is needed – just enough to reduce friction.
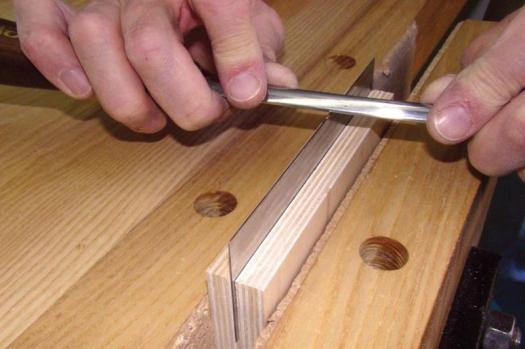
Using light to moderate pressure, draw the burnisher horizontally along the scraper’s edge. Two or three strokes should be enough. This will slightly spread or mushroom the edge. How much pressure? Well, if you’re holding the burnisher between your thumbs and index fingers, that’s probably not enough. If you’re leaning over it with the full weight of your body … you get the picture. Now repeat the burnishing strokes with the burnisher tilted five or 10°, first along one side of the edge, then along the other. This will spread the metal further, forming a hook.
Except for heavy scraping work such as paint removal, very little hook is needed. With your fingernail, pick at the edge of the scraper. If you can feel the hook, it’s probably large enough. Lightly drag the hook across your fingernail. If it catches the nail and takes a tiny shaving, it’s sharp and ready to go.
Since you have two long edges on a scraper blade, you can prepare both the same way so you don’t have to sharpen as often. Or, if you wish, burnish a heavier hook on one edge for initial scraping and a very fine hook on the other for finishing. Turn the scraper over and you have four working edges. After a bit of trial and error you will get a feel for how much hook you want for the job at hand.
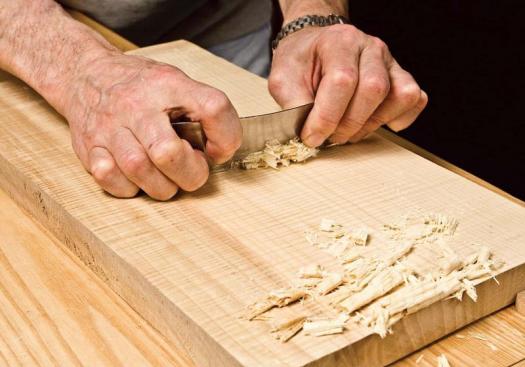
For most work the scraper is held with both hands, with your thumbs pushing against the back of the blade and your fingers holding the front. This grip allows you to bend the scraper slightly, permitting a lighter or heavier cut depending on how much the blade is bent.
Tilt the scraper forward very slightly – just enough for the hook to slice into the wood fibres. Bending the blade will increase the depth of cut. You will feel this difference, and can adjust it from a very fine cut for finishing work to a much heavier cut, such as when scraping glue squeeze-out from a joint. Super-thin scrapers (as thin as 0.25mm) are also available for the finest finishing work. Often effective with just a honed edge and no hook, these are light enough to be used one-handed, either pushed or pulled across a surface to remove the last tiny surface imperfections.
One caveat about scrapers is that they are an effective tool for finishing many hardwoods but are not suitable for softwoods such as pine, fir, spruce and cedar, or even softer hardwoods such as basswood, butternut or poplar. A scraper will simply compress and tear the fibres of these softer woods, instead of shearing them off.
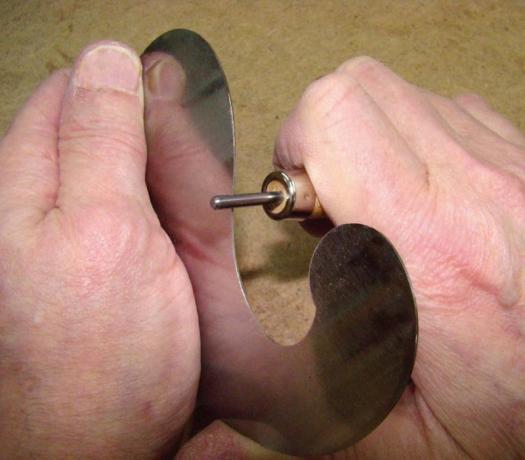
Some scrapers come with curved edges so they can be used to smooth concave or convex profiles. Woodworkers making reproduction furniture will often cut old saw blades into pieces to make scrapers that are then ground to match the profile being reproduced.
Preparing a curved scraper is slightly different from one with straight edges. First, you cannot use a flat file to joint the edge. Use a fine-cut round file instead, and then hone the edge using a dowel with a piece of abrasive wrapped around it. This is freehand work, so you’ll have to be a bit careful to keep your edges square.
Turning a burr on a curved scraper is most easily accomplished with a small carbide-rod burnisher. Use a stroke as if you were holding a paring knife and peeling a potato, but instead of cutting, you apply pressure with the burnisher to form the hook.
If you haven’t yet experienced the joys and efficiency of a card scraper you are really missing out. This simple piece of steel will make easy work out of preparing woods with heavy figure or reversing grain. Besides, how often do you get away with a $6 woodworking tool that actually does what it’s supposed to?